LVS+Keepalived实现高可用负载均衡
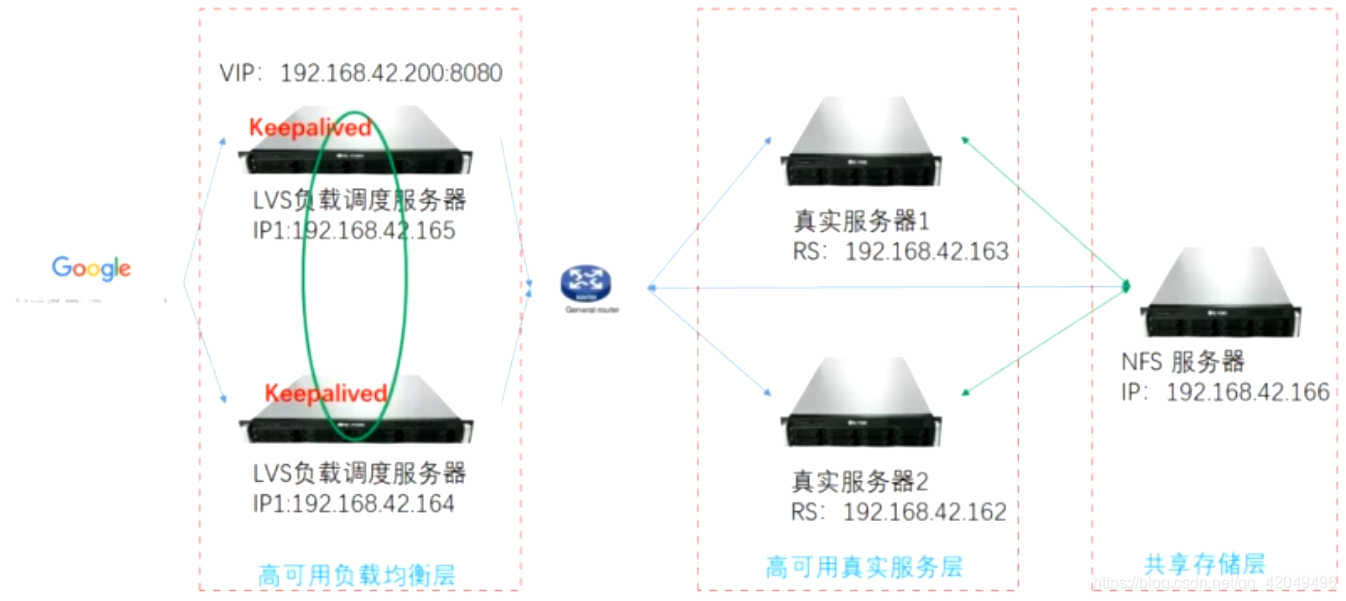
负载均衡方案系统架构拓扑图
安装LVS和keepalived软件包
节点规划
| 主机名 | IP | 角色 | 备注 |
|---|---|---|---|
| DS1 | IP1:192.168.213.136 VIP:192.168.213.200 | LVS负载调度器1 | VIP为LVS的浮动IP |
| DS2 | IP1:192.168.213.161 VIP:192.168.213.200 | LVS负载调度器2 | VIP为LVS的浮动IP |
| RS1 | 192.168.213.129 | 真实服务器1 | 提供WEB服务 |
| RS2 | 192.168.213.135 | 真实服务器2 | 提供WEB服务 |
| NFS | 192.1 68.213.233 | 数据共享服务器 | 提供网页共享数据SER |
初始环境配置
(1)配置主机名(略)
(2)处理防火墙(略)
(3)同步时钟源(略)
搭建LVS-DR集群
注意:测试好集群之后,将绑定的浮动IP摘掉。
建议:两个节点依次配置测试,配置后,不用保存。
安装keepalived
在两个负载均衡器上配置keepalived
配置keepalived实现LVS负载均衡
LVS MASTER keepalived.conf
[root@ds1 ~]# cd /etc/keepalived/
[root@ds1 keepalived]# cp -p keepalived.conf{,.bak}
[root@ds1 keepalived]# vim keepalived.conf
! Configuration File for keepalived

global_defs {
   notification_email {
     [email protected]
   }
   notification_email_from [email protected]
   smtp_server 127.0.0.1
   smtp_connect_timeout 30
   router_id LVS_1
}

vrrp_instance VI_1 {
    state MASTER
    interface ens33
    lvs_sync_daemon_interface ens33
    virtual_router_id 51
    priority 150
    advert_int 1
    authentication {
        auth_type PASS
        auth_pass 1111
    }
    virtual_ipaddress {
        192.168.213.200/24 dev ens33 label ens33:1
    }
}
virtual_server 192.168.213.200 80 {
    delay_loop 6
    lb_algo wrr
    lb_kind DR
    nat_mask 255.255.255.0
    persistence_timeout 0	#此值为0,方便测试,每次刷新页面结果会不一样
    protocol TCP
    real_server 192.168.213.129 80 {
        weight 1
        TCP_CHECK {
        connect_timeout 8
        nb_get_retry 3
        delay_before_retry 3
        connect_port 80
        }
    }
    real_server 192.168.213.135 80 {
        weight 1
        TCP_CHECK {
        connect_timeout 8
        nb_get_retry 3
        delay_before_retry 3
        connect_port 80
        }
    }
}
LVS BACKUP keepalived.conf
! Configuration File for keepalived

global_defs {
   notification_email {
     [email protected]
   }
   notification_email_from [email protected]
   smtp_server 127.0.0.1
   smtp_connect_timeout 30
   router_id LVS_2
}

vrrp_instance VI_1 {
    state BACKUP
    interface ens33
    lvs_sync_daemon_interface ens33
    virtual_router_id 51
    priority 100
    advert_int 1
    authentication {
        auth_type PASS
        auth_pass 1111
    }
    virtual_ipaddress {
        192.168.213.200/24 dev ens33 label ens33:1
    }
}
virtual_server 192.168.213.200 80 {
    delay_loop 6
    lb_algo wrr
    lb_kind DR
    nat_mask 255.255.255.0
    persistence_timeout 0
    protocol TCP
    real_server 192.168.213.129 80 {
        weight 1
        TCP_CHECK {
        connect_timeout 8
        nb_get_retry 3
        delay_before_retry 3
        connect_port 80
        }
    }
    real_server 192.168.213.135 80 {
        weight 1
        TCP_CHECK {
        connect_timeout 8
        nb_get_retry 3
        delay_before_retry 3
        connect_port 80
        }
    }
}
重启keepalived systemctl restart keepalived
结果测试
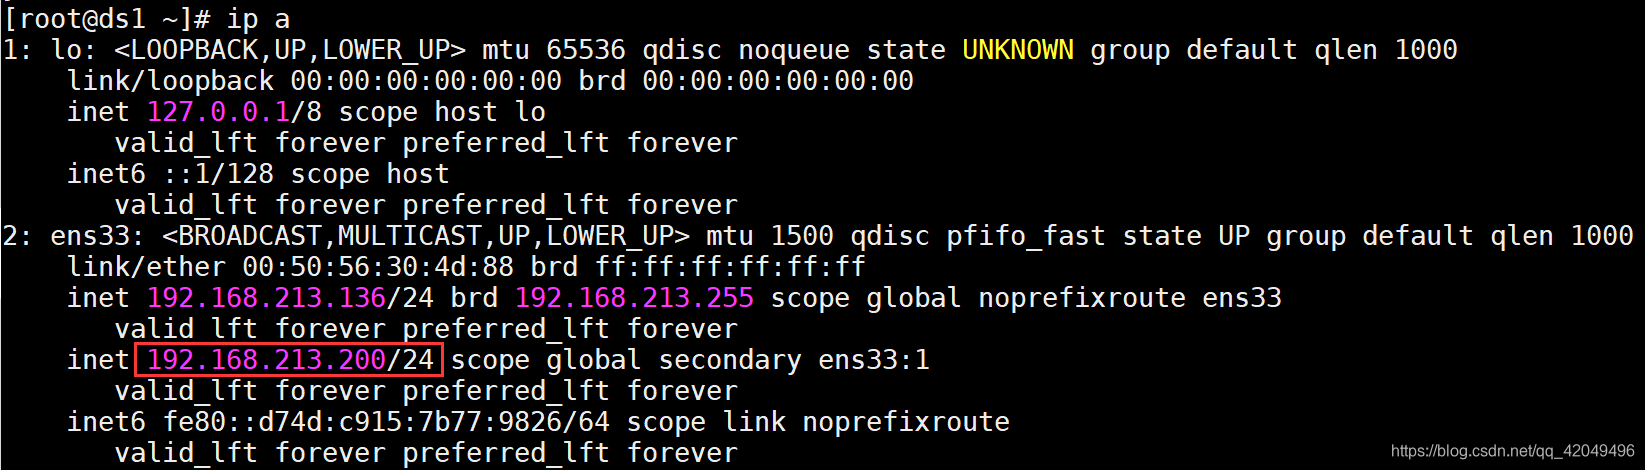
查看浮动ip
在DR1 (主) 上查看IP信息
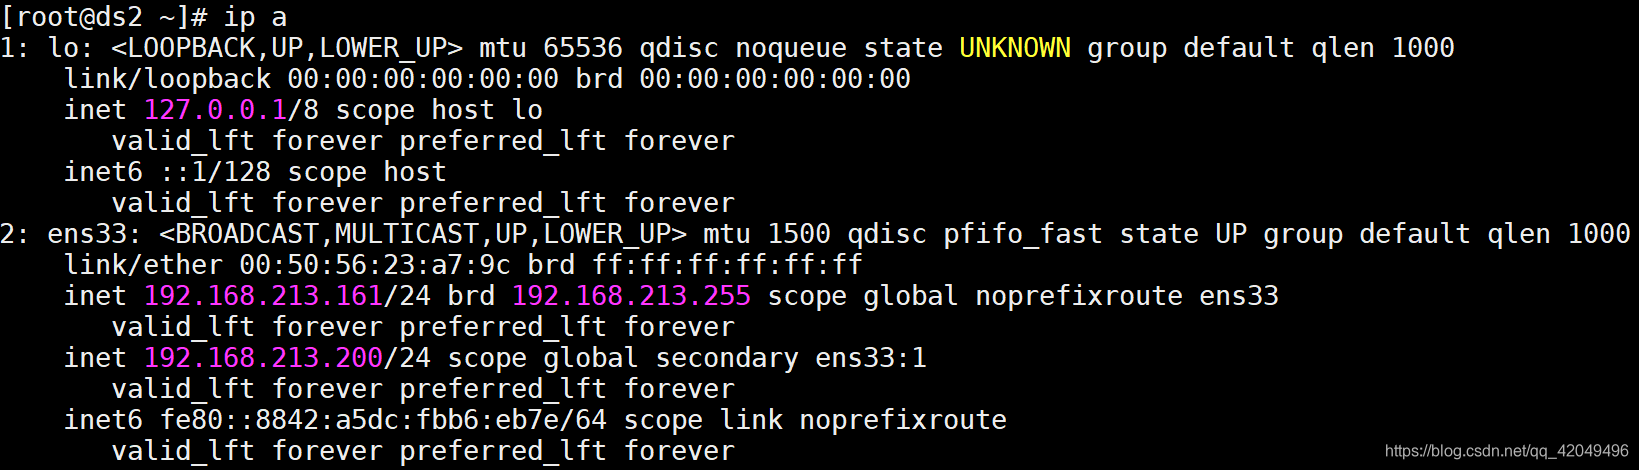
 在DR2 (备) 上查看IP信息
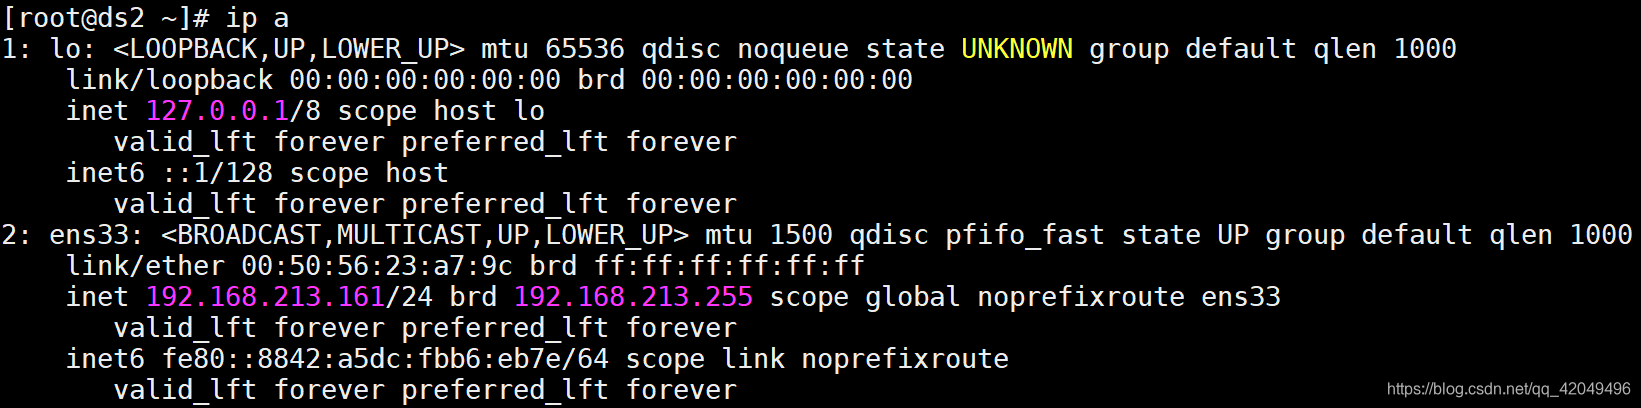 由此可见浮动IP在负载均衡主节点上
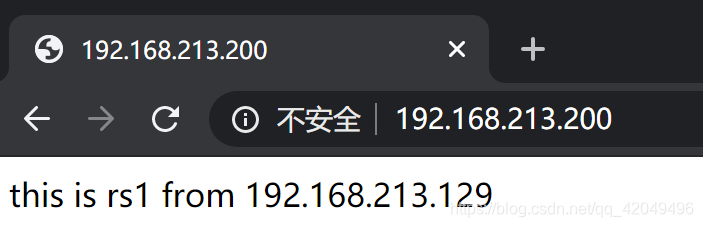
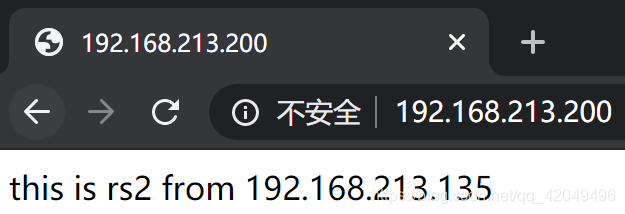
在网页上访问测试

测试故障切换
(1)在linux终端上写测试脚本
# vim keepalived.sh
#!/bin/bash
URL="http://192.168.213.200"
while true
do
    curl -I $URL >/dev/null 2>&1
    if [ $? -eq 0 ]
    then
        echo "$URL is 0K ..."
    else
        echo "$URL is ERR..."
    fi
    sleep 2
done
注意:该测试节点是任意的一个linux节点,只要和192.168.213.200网段通信正常即可
运行脚本,持续监控 sh keepalived.sh
模拟故障 systemctl stop keepalived
查看ds2网卡,浮动IP已经漂移过来了
 查看脚本监控结果,业务没有中断
sh keepalived.sh
http://192.168.213.200 is 0K ...
……
http://192.168.213.200 is 0K ...
http://192.168.213.200 is 0K ...
模拟故障恢复 systemctl start keepalived
查看IP,浮动IP再次漂移到主节点上;查看脚本监控结果,业务正常
