四、 CoarseGrainedExecutorBackend 分析
概念简介
Hadoop Yarn组件介绍:
我们都知道yarn重构根本的思想,是将原有的JobTracker的两个主要功能资源管理器 和 任务调度监控 分离成单独的组件。新的架构使用全局管理所有应用程序的计算资源分配。 主要包含三个组件ResourceManager 、NodeManager和ApplicationMaster以及一个核心概念Container。(别人的)
-
ResourceManager(RM)
就是所谓的资源管理器,每个集群一个,实现全局的资源管理和任务调度。它可以处理客户端提交计算作业的请求,启动并监听ApplicationMaster,监控NodeManager,进行资源分配与调度。每一个应用程序需要不同类型的资源,因此就需要不同的容器。这里的资源包括内存、CPU、磁盘、网络等。(比如使用spark-submit 执行程序jar包,就需要向 ResourceManager注册,申请相应的容器,资源),其中该ResourceManager提供一个调度策略的插件,负责将集群资源分配给多个队列和应用程序.(可以基于现有的能力调度和公平调度模型)
-
NodeManager(NM)
节点管理器,每个节点一个,实现节点的监控与报告。处理来自ResourceManager的命令,也处理来自ApplicationMaster的命令,同时监控资源可用性,报告错误,管理资源的生命周期。NodeManager是每一台机器框架的代理,是执行应用程序的容器,监控应用程序的资源使用情况(CPU、内存、硬盘、网络)并向调度器汇报。
-
ApplicationMaster(AM)
应用控制器,每个作业或应用一个,实现应用的调度和资源协调。具体来说呢,它进行数据的切分,为应用申请资源并分配给任务,完成任务监控与容错。实际上,每个应用的ApplicationMaster是一个详细的框架库。它结合从ResourceManager获得的资源和NodeManager协同工作来运行和监听任务。ApplicationMaster负责向ResourceManager索要适当的资源容器(containter)来运行任务,跟踪应用程序的状态和监控她们的进程,处理任务的失败原因。
-
Container
容器,封装了及其资源,包括内存、CPU、磁盘、网络等。每个任务会被分配一个容器,该任务只能在该容器中执行,并使用该容器封装的资源。当应用程序发出资源请求时,ResourceManager并不会立刻返回满足要求的资源,需要ApplicationMaster与ResourceManager不断地通信,检测分配到的资源足够,才会进行分配。一旦分配完毕,ApplicationMaster便可从ResourceManager处获取以Container表示的资源。(Container可以看做一个可序列化的Java对象,包含字段信息)一般来说,每个Container可用于执行一个任务。ApplicationMaster在收到一个或多个Container后,再将该Container进一步分配给内部的某个任务,确定该任务后,ApplicationMaster将该任务运行环境(包含运行命令、环境变量、依赖的外部文件等)连同Container中的资源信息封装到ContainerLaunchContext对象中,进而与对应的NodeManager通信,启动该任务。
压缩版
YARN相关概念
- ResourceManager:负责整个集群的资源管理和分配。
- ApplicationMaster:YARN中 每个 Application 对应一个 AM 进程,负责与 RM协商获取资源,获取资源后告诉NodeManager为其分配并启动Container。
- NodeManager:每个节点的资源和任务管理器,负责启动/停止Container,并监视资源使用情况。
- Container:YARN中资源抽象封装。
Yarn-Cluster模式

yarn -cluster 任务执行流程
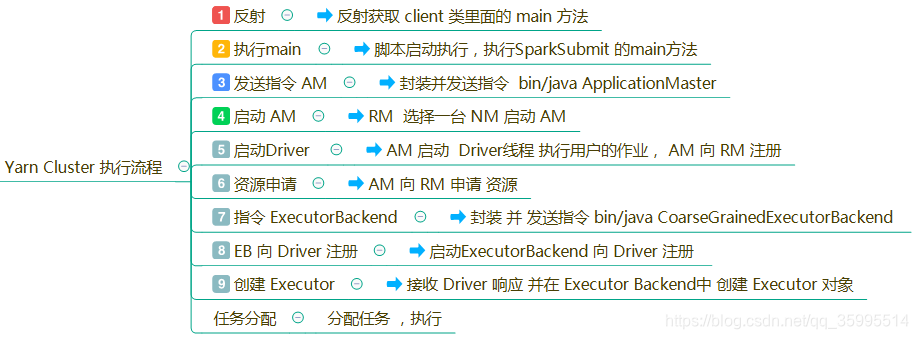
YARN-Cluster模式下,Driver运行在AM(Application Master)中,它负责向YARN申请资源,并监督作业的运行状况。当用户提交了作业之后,就可以关掉Client,作业会继续在YARN上运行,因而YARN-Cluster模式不适合运行交互类型的作业;YARN-Client模式下,Application Master仅仅向YARN请求Executor,Client会和请求的Container通信来调度他们工作,也就是说Client不能离开;
源码分析 ,设计的 主要的 类有 SparkSubmit , Client , ApplicationMaster , CoarseGrainedExecutorBackend, Executor
一、 SparkSubmit 分析
(1 ) 启动进程
Spark-submit 进程
// 对于Spark-submit --master yarn 任务提交的类
object SparkSubmit extends CommandLineUtils {
// Cluster managers
private val YARN = 1
private val STANDALONE = 2
private val MESOS = 4
private val LOCAL = 8
private val ALL_CLUSTER_MGRS = YARN | STANDALONE | MESOS | LOCAL
// Deploy modes
private val CLIENT = 1
private val CLUSTER = 2
private val ALL_DEPLOY_MODES = CLIENT | CLUSTER
// Special primary resource names that represent shells rather than application jars.
private val SPARK_SHELL = "spark-shell"
private val PYSPARK_SHELL = "pyspark-shell"
private val SPARKR_SHELL = "sparkr-shell"
private val SPARKR_PACKAGE_ARCHIVE = "sparkr.zip"
private val R_PACKAGE_ARCHIVE = "rpkg.zip"
private val CLASS_NOT_FOUND_EXIT_STATUS = 101
// scalastyle:off println
private[spark] def printVersionAndExit(): Unit = {
printStream.println("""Welcome to
____ __
/ __/__ ___ _____/ /__
_\ \/ _ \/ _ `/ __/ '_/
/___/ .__/\_,_/_/ /_/\_\ version %s
/_/
""".format(SPARK_VERSION))
printStream.println("Using Scala %s, %s, %s".format(
Properties.versionString, Properties.javaVmName, Properties.javaVersion))
printStream.println("Branch %s".format(SPARK_BRANCH))
printStream.println("Compiled by user %s on %s".format(SPARK_BUILD_USER, SPARK_BUILD_DATE))
printStream.println("Revision %s".format(SPARK_REVISION))
printStream.println("Url %s".format(SPARK_REPO_URL))
printStream.println("Type --help for more information.")
exitFn(0)
}
// scalastyle:on println
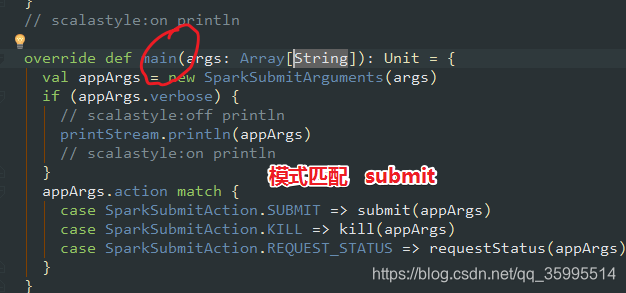
override def main(args: Array[String]): Unit = {
// 封装的参数
val appArgs = new SparkSubmitArguments(args)
if (appArgs.verbose) {
// scalastyle:off println
printStream.println(appArgs)
// scalastyle:on println
}
appArgs.action match {
case SparkSubmitAction.SUBMIT => submit(appArgs)
case SparkSubmitAction.KILL => kill(appArgs)
case SparkSubmitAction.REQUEST_STATUS => requestStatus(appArgs)
}
}
}(2)封装的参数 SparkSubmitArguments(args) 点进去
Spark-sumit
val appArgs = new SparkSubmitArguments(args) (111)
封装的参数
/**
 * Parses and encapsulates arguments from the spark-submit script.
 * The env argument is used for testing.
 * ======》解析并且封装 spark-submit 脚本为参数
 */
private[deploy] class SparkSubmitArguments(args: Seq[String], env: Map[String, String] = sys.env)
  extends SparkSubmitArgumentsParser {
  var master: String = null
  var deployMode: String = null
  var executorMemory: String = null
  var executorCores: String = null
  var totalExecutorCores: String = null
  var propertiesFile: String = null
  var driverMemory: String = null
  var driverExtraClassPath: String = null
  var driverExtraLibraryPath: String = null
  var driverExtraJavaOptions: String = null
  var queue: String = null
  var numExecutors: String = null
  var files: String = null
  var archives: String = null
  var mainClass: String = null
  var primaryResource: String = null
  var name: String = null
  var childArgs: ArrayBuffer[String] = new ArrayBuffer[String]()
  var jars: String = null
  var packages: String = null
  var repositories: String = null
  var ivyRepoPath: String = null
  var packagesExclusions: String = null
  var verbose: Boolean = false
  var isPython: Boolean = false
  var pyFiles: String = null
  var isR: Boolean = false
  var action: SparkSubmitAction = null
  val sparkProperties: HashMap[String, String] = new HashMap[String, String]()
  var proxyUser: String = null
  var principal: String = null
  var keytab: String = null

  // Standalone cluster mode only
  var supervise: Boolean = false
  var driverCores: String = null
  var submissionToKill: String = null
  var submissionToRequestStatusFor: String = null
  var useRest: Boolean = true // used internally

  /** Default properties present in the currently defined defaults file. */
  lazy val defaultSparkProperties: HashMap[String, String] = {
    val defaultProperties = new HashMap[String, String]()
    // scalastyle:off println
    if (verbose) SparkSubmit.printStream.println(s"Using properties file: $propertiesFile")
    Option(propertiesFile).foreach { filename =>
      val properties = Utils.getPropertiesFromFile(filename)
      properties.foreach { case (k, v) =>
        defaultProperties(k) = v
      }
      // Property files may contain sensitive information, so redact before printing
      if (verbose) {
        Utils.redact(properties).foreach { case (k, v) =>
          SparkSubmit.printStream.println(s"Adding default property: $k=$v")
        }
      }
    }
    // scalastyle:on println
    defaultProperties
  }

  // Set parameters from command line arguments =====》设置来自于命令行的参数
  try {
    // =======》解析参数
    parse(args.asJava)
  } catch {
    case e: IllegalArgumentException =>
      SparkSubmit.printErrorAndExit(e.getMessage())
  }
Spark-submit 的 main方法
进入parse 方法
 /**
   * Parse a list of spark-submit command line options.
   * =======》 解析 spark-submit 命令行的 list
   */
  protected final void parse(List<String> args) {
    Pattern eqSeparatedOpt = Pattern.compile("(--[^=]+)=(.+)");

    int idx = 0;
    for (idx = 0; idx < args.size(); idx++) {
      String arg = args.get(idx);
      String value = null;
      // =====》 模式匹配 检查传入的参数是否合法
      Matcher m = eqSeparatedOpt.matcher(arg);
      if (m.matches()) {
        arg = m.group(1);
        value = m.group(2);
      }

      // Look for options with a value.
      String name = findCliOption(arg, opts);
      if (name != null) {
        if (value == null) {
          if (idx == args.size() - 1) {
            throw new IllegalArgumentException(
                String.format("Missing argument for option '%s'.", arg));
          }
          idx++;
          value = args.get(idx);
        }
        if (!handle(name, value)) {
          break;
        }
        continue;
      }

      // Look for a switch.
      name = findCliOption(arg, switches);
      if (name != null) {
        if (!handle(name, null)) {
          break;
        }
        continue;
      }

      if (!handleUnknown(arg)) {
        break;
      }
    }

    if (idx < args.size()) {
      idx++;
    }
    handleExtraArgs(args.subList(idx, args.size()));
  }
(3)提交Submit 动作
点击进入 action

  /**
   * Load arguments from environment variables, Spark properties etc.
   */
  private def loadEnvironmentArguments(): Unit = {
    // 给 action 赋值
    action = Option(action).getOrElse(SUBMIT)
  }
(4)解析提交环境
spark-submit----prepareSubmitEnvironment()
  /**
   * Submit the application using the provided parameters.
   *
   * This runs in two steps. First, we prepare the launch environment by setting up
   * the appropriate classpath, system properties, and application arguments for
   * running the child main class based on the cluster manager and the deploy mode.
   * Second, we use this launch environment to invoke the main method of the child
   * main class.
   * 谷歌翻译也有点烂,====》 用提供的参数 提交应用
   *     这个运行有两个步骤,  第一步,我们在集群管理和部署模式的基础上,通过设置适当的路径、系统
   * 属性和应用参数来准备启动环境
   */
  @tailrec
  private def submit(args: SparkSubmitArguments): Unit = {
    val (childArgs, childClasspath, sysProps, childMainClass) = prepareSubmitEnvironment(args)

    def doRunMain(): Unit = {
      if (args.proxyUser != null) {
        val proxyUser = UserGroupInformation.createProxyUser(args.proxyUser,
          UserGroupInformation.getCurrentUser())
        try {
          proxyUser.doAs(new PrivilegedExceptionAction[Unit]() {
            override def run(): Unit = {
              runMain(childArgs, childClasspath, sysProps, childMainClass, args.verbose)
            }
          })
        } catch {
          case e: Exception =>
            if (e.getStackTrace().length == 0) {
              // scalastyle:off println
              printStream.println(s"ERROR: ${e.getClass().getName()}: ${e.getMessage()}")
              // scalastyle:on println
              exitFn(1)
            } else {
              throw e
            }
        }
      } else {
       // 执行 此方法,, 什么用户代理,在此不予理会
        runMain(childArgs, childClasspath, sysProps, childMainClass, args.verbose)
      }
    }

    if (args.isStandaloneCluster && args.useRest) {
      try {
        // scalastyle:off println
        printStream.println("Running Spark using the REST application submission protocol.")
        // scalastyle:on println
        doRunMain()
      } catch {
        // Fail over to use the legacy submission gateway
        case e: SubmitRestConnectionException =>
          printWarning(s"Master endpoint ${args.master} was not a REST server. " +
            "Falling back to legacy submission gateway instead.")
          args.useRest = false
          submit(args)
      }
    // In all other modes, just run the main class as prepared
    } else {
     // 执行 此方法,, 什么用户代理,在此不予理会
      doRunMain()
    }
  }
我们看看 runMain方法
object SparkSubmit extends CommandLineUtils {
  // ======>  方法返回值其实就是模式匹配  ,使用提供的运行环境 运行子类的 main 方法
  private def runMain(
      childArgs: Seq[String],
      childClasspath: Seq[String],
      sysProps: Map[String, String],
      childMainClass: String,
      verbose: Boolean): Unit = {
    // scalastyle:off println
    if (verbose) {
      printStream.println(s"Main class:\n$childMainClass")
      printStream.println(s"Arguments:\n${childArgs.mkString("\n")}")
      // sysProps may contain sensitive information, so redact before printing
      printStream.println(s"System properties:\n${Utils.redact(sysProps).mkString("\n")}")
      printStream.println(s"Classpath elements:\n${childClasspath.mkString("\n")}")
      printStream.println("\n")
    }
    // scalastyle:on println

    val loader =
      if (sysProps.getOrElse("spark.driver.userClassPathFirst", "false").toBoolean) {
        new ChildFirstURLClassLoader(new Array[URL](0),
          Thread.currentThread.getContextClassLoader)
      } else {
        new MutableURLClassLoader(new Array[URL](0),
          Thread.currentThread.getContextClassLoader)
      }
	 // ====》 当前类加载器
    Thread.currentThread.setContextClassLoader(loader)

    for (jar <- childClasspath) {
      addJarToClasspath(jar, loader)
    }
    // =====> 从当前类加载器中读取 jar
    for ((key, value) <- sysProps) {
      System.setProperty(key, value)
    }

    var mainClass: Class[_] = null

    try {
	  // =====》反射 加载类
      mainClass = Utils.classForName(childMainClass)
    } catch {
      case e: ClassNotFoundException =>
        System.exit(CLASS_NOT_FOUND_EXIT_STATUS)
    }

    // SPARK-4170
    if (classOf[scala.App].isAssignableFrom(mainClass)) {
      printWarning("Subclasses of scala.App may not work correctly. Use a main() method instead.")
    }
    // =======》从 mainClass  查看类中是否有 main 方法, 找主方法
    val mainMethod = mainClass.getMethod("main", new Array[String](0).getClass)
    if (!Modifier.isStatic(mainMethod.getModifiers)) {
      throw new IllegalStateException("The main method in the given main class must be static")
    }

    try {
	  // 反射 加载类,检查类中 是否有 此方法 , 然后 再执行
      mainMethod.invoke(null, childArgs.toArray)
    } catch {
      case t: Throwable =>
        findCause(t) match {
          case SparkUserAppException(exitCode) =>
            System.exit(exitCode)

          case t: Throwable =>
            throw t
        }
    }
  }
}
返回来在看环境的准备
/**
* Prepare the environment for submitting an application.
* This returns a 4-tuple:
* (1) 子进程的参数
* (2) 子类路径的条目列表
* (3) 系统属性的 map
* (4) childMainClass
* Exposed for testing.
*/
private[deploy] def prepareSubmitEnvironment(args: SparkSubmitArguments)
: (Seq[String], Seq[String], Map[String, String], String) = {
// Return values
val childArgs = new ArrayBuffer[String]()
val childClasspath = new ArrayBuffer[String]()
val sysProps = new HashMap[String, String]()
var childMainClass = ""
// 设置集群管理器 模式匹配
val clusterManager: Int = args.master match {
case "yarn" => YARN
case "yarn-client" | "yarn-cluster" =>
printWarning(s"Master ${args.master} is deprecated since 2.0." +
" Please use master \"yarn\" with specified deploy mode instead.")
YARN
case m if m.startsWith("spark") => STANDALONE
case m if m.startsWith("mesos") => MESOS
case m if m.startsWith("local") => LOCAL
case _ =>
printErrorAndExit("Master must either be yarn or start with spark, mesos, local")
-1
}
// 设置部署模式 默认的是 client
var deployMode: Int = args.deployMode match {
case "client" | null => CLIENT
case "cluster" => CLUSTER
case _ => printErrorAndExit("Deploy mode must be either client or cluster"); -1
}
// Make sure YARN is included in our build if we're trying to use it
if (!Utils.classIsLoadable("org.apache.spark.deploy.yarn.Client") && !Utils.isTesting) {
printErrorAndExit(
"Could not load YARN classes. " +
"This copy of Spark may not have been compiled with YARN support.")
}
}
val isYarnCluster = clusterManager == YARN && deployMode == CLUSTER
val isMesosCluster = clusterManager == MESOS && deployMode == CLUSTER
if (clusterManager != YARN) {
// The YARN backend handles python files differently, so don't merge the lists.
args.files = mergeFileLists(args.files, args.pyFiles)
}
if (args.pyFiles != null) {
sysProps("spark.submit.pyFiles") = args.pyFiles
}
}
// TODO: Support distributing R packages with standalone cluster
if (args.isR && clusterManager == STANDALONE && !RUtils.rPackages.isEmpty) {
printErrorAndExit("Distributing R packages with standalone cluster is not supported.")
}
// =======》 yarn 的 client 和 Cluster 都会判断
if (deployMode == CLIENT || isYarnCluster) {
childMainClass = args.mainClass
if (isUserJar(args.primaryResource)) {
childClasspath += args.primaryResource
}
if (args.jars != null) { childClasspath ++= args.jars.split(",") }
}
if (deployMode == CLIENT) {
if (args.childArgs != null) { childArgs ++= args.childArgs }
}
// Map all arguments to command-line options or system properties for our chosen mode
for (opt <- options) {
if (opt.value != null &&
(deployMode & opt.deployMode) != 0 &&
(clusterManager & opt.clusterManager) != 0) {
if (opt.clOption != null) { childArgs += (opt.clOption, opt.value) }
if (opt.sysProp != null) { sysProps.put(opt.sysProp, opt.value) }
}
}
// 在yarn-cluster模式下,将yarn.Client用作用户类的包装
if (isYarnCluster) {
childMainClass = "org.apache.spark.deploy.yarn.Client"
if (args.isPython) {
childArgs += ("--primary-py-file", args.primaryResource)
childArgs += ("--class", "org.apache.spark.deploy.PythonRunner")
} else if (args.isR) {
val mainFile = new Path(args.primaryResource).getName
childArgs += ("--primary-r-file", mainFile)
childArgs += ("--class", "org.apache.spark.deploy.RRunner")
} else {
if (args.primaryResource != SparkLauncher.NO_RESOURCE) {
childArgs += ("--jar", args.primaryResource)
}
childArgs += ("--class", args.mainClass)
}
if (args.childArgs != null) {
args.childArgs.foreach { arg => childArgs += ("--arg", arg) }
}
}
}
接下来我们就要看看集群模式到底在干嘛?
二、转到 Client

private object Client extends Logging {

  def main(argStrings: Array[String]) {
     // 封装参数
    val args = new ClientArguments(argStrings)
    // 创建 Client  构造 传参,
    new Client(args, sparkConf).run()
  }
}
我们继续 点进入Client 看看做了什么?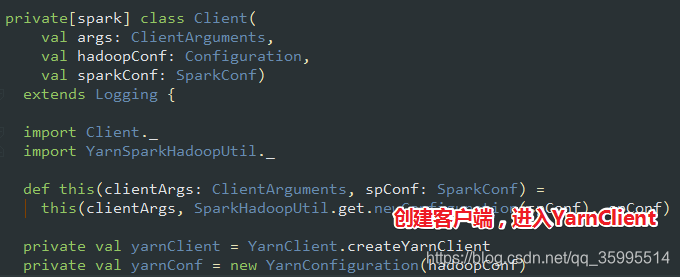
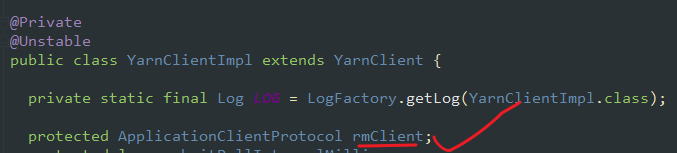
连接服务器 首选要创建客户端
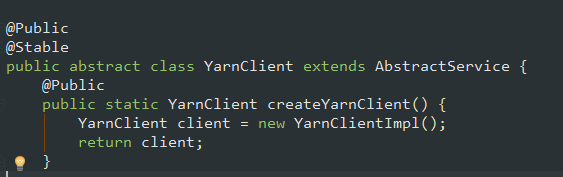
在 YarnClientImpl 实现类中 创建了 rmClient
客户端对象准备好了之后(Client 类的 run方法 ), 那么就要运行了,将 应用程序提交到 RM。
/**
* 将应用程序提交到 ResourceManager。 如果将spark.yarn.submit.waitAppCompletion设置为
* true,它将保持活动状态,报告应用程序的状态,直到由于任何原因退出应用程序为止;否则,客户端进
* 程将在提交后退出
*/
def run(): Unit = {
// 全局应用的 ID,yarn 中唯一
this.appId = submitApplication()
if (!launcherBackend.isConnected() && fireAndForget) {
val report = getApplicationReport(appId)
val state = report.getYarnApplicationState
logInfo(s"Application report for $appId (state: $state)")
logInfo(formatReportDetails(report))
if (state == YarnApplicationState.FAILED || state == YarnApplicationState.KILLED) {
throw new SparkException(s"Application $appId finished with status: $state")
}
} else {
val (yarnApplicationState, finalApplicationStatus) = monitorApplication(appId)
if (yarnApplicationState == YarnApplicationState.FAILED ||
finalApplicationStatus == FinalApplicationStatus.FAILED) {
throw new SparkException(s"Application $appId finished with failed status")
}
if (yarnApplicationState == YarnApplicationState.KILLED ||
finalApplicationStatus == FinalApplicationStatus.KILLED) {
throw new SparkException(s"Application $appId is killed")
}
if (finalApplicationStatus == FinalApplicationStatus.UNDEFINED) {
throw new SparkException(s"The final status of application $appId is undefined")
}
}
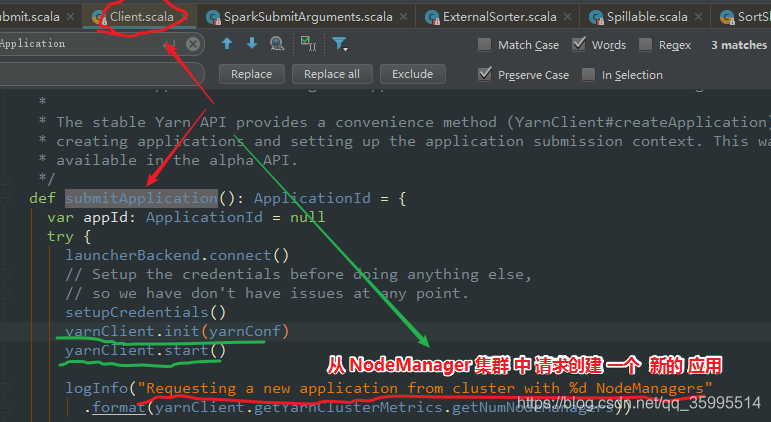
}Client 类中的 submitApplication(), 将 运行 我们 应用程序的 ApplicationMaster 提交到 RM
/**
* 将运行我们应用程序的AppMaster提交到ResourceManager
* 稳定的Yarn API 提供了一种方便的方法(YarnClient#createApplication),用于创建应用程序和设
* 置应用程序上下文
*/
def submitApplication(): ApplicationId = {
var appId: ApplicationId = null
try {
// 后台的连接
launcherBackend.connect()
setupCredentials()
// 初始化
yarnClient.init(yarnConf)
// 启动 与服务器 之间的连接
yarnClient.start()
logInfo("Requesting a new application from cluster with %d NodeManagers"
.format(yarnClient.getYarnClusterMetrics.getNumNodeManagers))
// ======》 yarnClient 创建一个应用
val newApp = yarnClient.createApplication()
// =======》 获取响应
val newAppResponse = newApp.getNewApplicationResponse()
// 在 yarn 中创建一个应用 获取到Id
appId = newAppResponse.getApplicationId()
new CallerContext("CLIENT", sparkConf.get(APP_CALLER_CONTEXT),
Option(appId.toString)).setCurrentContext()
// Verify whether the cluster has enough resources for our AM
verifyClusterResources(newAppResponse)
// 提交了 什么 尼 进入 createContainerLaunchContext
val containerContext = createContainerLaunchContext(newAppResponse)
val appContext = createApplicationSubmissionContext(newApp, containerContext)
// Finally, submit and monitor the application
logInfo(s"Submitting application $appId to ResourceManager")
// yarnClient 向 yarn 提交应用
yarnClient.submitApplication(appContext)
launcherBackend.setAppId(appId.toString)
reportLauncherState(SparkAppHandle.State.SUBMITTED)
appId
} catch {
case e: Throwable =>
if (appId != null) {
cleanupStagingDir(appId)
}
throw e
}
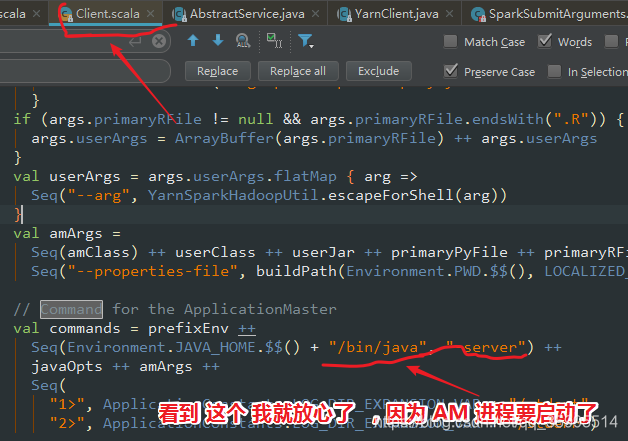
}yarnClient 创建 一个 应用,并且获取 新应用的 响应 , 创建 容器启动的上下文, 为 ApplicationMaster 进程的启动做准备
/**
   * 设置一个 ContainerLaunchContext 来启动我们的 AM 容器,  设置启动环境,Java选项,以及用于启动
   *
   */
  private def createContainerLaunchContext(newAppResponse: GetNewApplicationResponse)
    : ContainerLaunchContext = {
    logInfo("Setting up container launch context for our AM")
    val appId = newAppResponse.getApplicationId
    val appStagingDirPath = new Path(appStagingBaseDir, getAppStagingDir(appId))
    val pySparkArchives =
      if (sparkConf.get(IS_PYTHON_APP)) {
        findPySparkArchives()
      } else {
        Nil
      }
    val launchEnv = setupLaunchEnv(appStagingDirPath, pySparkArchives)
    val localResources = prepareLocalResources(appStagingDirPath, pySparkArchives)

    val amContainer = Records.newRecord(classOf[ContainerLaunchContext])
    amContainer.setLocalResources(localResources.asJava)
    amContainer.setEnvironment(launchEnv.asJava)

    val javaOpts = ListBuffer[String]()

    // Set the environment variable through a command prefix
    // to append to the existing value of the variable
    var prefixEnv: Option[String] = None

    // Add Xmx for AM memory
    javaOpts += "-Xmx" + amMemory + "m"

    val tmpDir = new Path(Environment.PWD.$$(), YarnConfiguration.DEFAULT_CONTAINER_TEMP_DIR)
    javaOpts += "-Djava.io.tmpdir=" + tmpDir

    // =====>  GC 设置
    val useConcurrentAndIncrementalGC = launchEnv.get("SPARK_USE_CONC_INCR_GC").exists(_.toBoolean)
    if (useConcurrentAndIncrementalGC) {

      // 命令行参数, 启动 JVM  多租户 机器  CMS  从存活率
      javaOpts += "-XX:+UseConcMarkSweepGC"
      javaOpts += "-XX:MaxTenuringThreshold=31"
      javaOpts += "-XX:SurvivorRatio=8"
      javaOpts += "-XX:+CMSIncrementalMode"
      javaOpts += "-XX:+CMSIncrementalPacing"
      javaOpts += "-XX:CMSIncrementalDutyCycleMin=0"
      javaOpts += "-XX:CMSIncrementalDutyCycle=10"
    }
    // ....
     val amClass =
      if (isClusterMode) {
       // =====>拿到类名 commond = bin/java org.apache.spark.deploy.yarn.ApplicationMaster
        Utils.classForName("org.apache.spark.deploy.yarn.ApplicationMaster").getName
      } else {
        Utils.classForName("org.apache.spark.deploy.yarn.ExecutorLauncher").getName
      }
    // ======》 AM  指令
    val commands = prefixEnv ++
      Seq(Environment.JAVA_HOME.$$() + "/bin/java", "-server") ++
      javaOpts ++ amArgs ++
      Seq(
        "1>", ApplicationConstants.LOG_DIR_EXPANSION_VAR + "/stdout",
        "2>", ApplicationConstants.LOG_DIR_EXPANSION_VAR + "/stderr")

    // TODO: it would be nicer to just make sure there are no null commands here
    val printableCommands = commands.map(s => if (s == null) "null" else s).toList
    amContainer.setCommands(printableCommands.asJava)


    /**
      * 将  command 封装为对象  就是将 指令 传给 yarn   ,yarn 就执行
      * commond = bin/java org.apache.spark.deploy.yarn.ApplicationMaster
      */
    val securityManager = new SecurityManager(sparkConf)
    amContainer.setApplicationACLs(
      YarnSparkHadoopUtil.getApplicationAclsForYarn(securityManager).asJava)
    setupSecurityToken(amContainer)
    amContainer
  }
三、ApplicationMaster
spark-shell 默认启动的是 client 模式
现在我们进入 ApplicationMaster , 去执行这个进程,ApplicationMaster 是在yarn 模式下 的 NodeManager 中启动的 ,Resource 也是 一个进程 两个进程要通信, 在 AppcationMaster 中传入yarnRMClient对象,通过RPC建立 两者间的通信。选择一个NodeManager, 在一个 Container中启动 ApplicationMaster , 反过来 ApplicationMaster 也会向 ResourcecManager 注册。
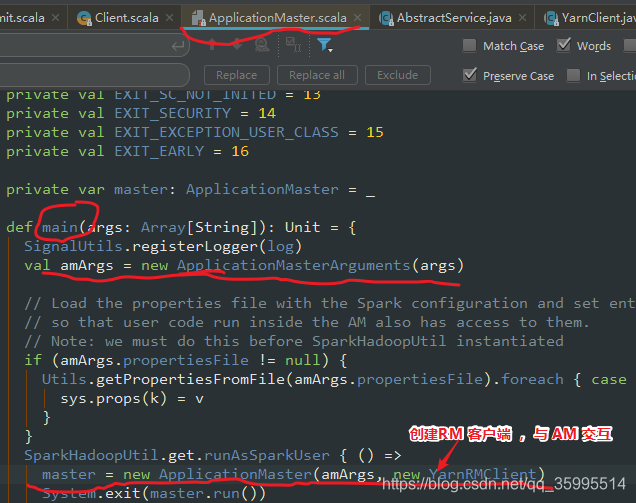
private var master: ApplicationMaster = _

  def main(args: Array[String]): Unit = {
    SignalUtils.registerLogger(log)
    val amArgs = new ApplicationMasterArguments(args)

    /**
      * 使用Spark配置加载属性文件,并将条目设置为系统属性,以便AM内部运行的用户代码也可以访问它
      * 们。 注意:我们必须在实例化SparkHadoopUtil之前执行此操作
      */
    if (amArgs.propertiesFile != null) {
      Utils.getPropertiesFromFile(amArgs.propertiesFile).foreach { case (k, v) =>
        sys.props(k) = v
      }
    }
    SparkHadoopUtil.get.runAsSparkUser { () =>
      // new YarnRMClient  RM 与 NM 交互的使者
      master = new ApplicationMaster(amArgs, new YarnRMClient)
      System.exit(master.run())
    }
  }

  private[spark] def sparkContextInitialized(sc: SparkContext): Unit = {
    master.sparkContextInitialized(sc)
  }

  private[spark] def getAttemptId(): ApplicationAttemptId = {
    master.getAttemptId
  }

}

/**
 * 该对象不提供任何特殊功能。 它的存在使得在使用诸如ps或jps之类的工具时,很容易区分客户端模式AM和
 * 集群模式AM。
 *
object ExecutorLauncher {

  def main(args: Array[String]): Unit = {
    ApplicationMaster.main(args)
  }
}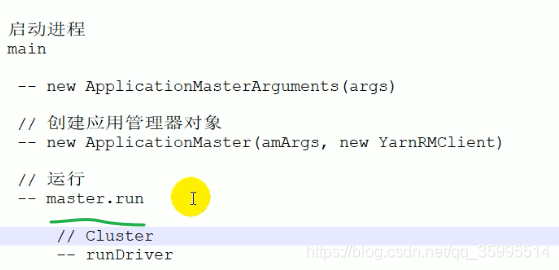

进入 runDriver
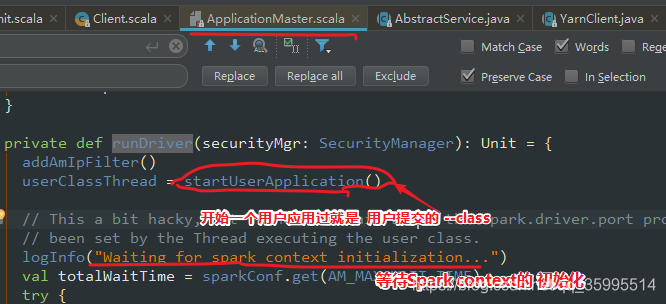
  /**
   * 在单独的线程中启动包含 Spark Driver 程序的用户类,
   *
   * 返回已启动的用户线程
   */
  private def startUserApplication(): Thread = {
    logInfo("Starting the user application in a separate Thread")

    val classpath = Client.getUserClasspath(sparkConf)
    val urls = classpath.map { entry =>
      new URL("file:" + new File(entry.getPath()).getAbsolutePath())
    }
    val userClassLoader =
      if (Client.isUserClassPathFirst(sparkConf, isDriver = true)) {
        new ChildFirstURLClassLoader(urls, Utils.getContextOrSparkClassLoader)
      } else {
        new MutableURLClassLoader(urls, Utils.getContextOrSparkClassLoader)
      }

    var userArgs = args.userArgs
    if (args.primaryPyFile != null && args.primaryPyFile.endsWith(".py")) {
      // When running pyspark, the app is run using PythonRunner. The second argument is the list
      // of files to add to PYTHONPATH, which Client.scala already handles, so it's empty.
      userArgs = Seq(args.primaryPyFile, "") ++ userArgs
    }
    if (args.primaryRFile != null && args.primaryRFile.endsWith(".R")) {
      // TODO(davies): add R dependencies here
    }
    // ====》 加载类的信息,获取用户应用的类的main方法, 就是我们写的 SparkConf 的main方法,
    val mainMethod = userClassLoader.loadClass(args.userClass)
      .getMethod("main", classOf[Array[String]])
    // =====》 启动一个线程 命名为 Driver, 用于执行用户类的 main方法
    val userThread = new Thread {
      override def run() {
        try {
          mainMethod.invoke(null, userArgs.toArray)
          finish(FinalApplicationStatus.SUCCEEDED, ApplicationMaster.EXIT_SUCCESS)
          logDebug("Done running users class")
        } catch {
          case e: InvocationTargetException =>
            e.getCause match {
              case _: InterruptedException =>
                // Reporter thread can interrupt to stop user class
              case SparkUserAppException(exitCode) =>
                val msg = s"User application exited with status $exitCode"
                logError(msg)
                finish(FinalApplicationStatus.FAILED, exitCode, msg)
              case cause: Throwable =>
                logError("User class threw exception: " + cause, cause)
                finish(FinalApplicationStatus.FAILED,
                  ApplicationMaster.EXIT_EXCEPTION_USER_CLASS,
                  "User class threw exception: " + cause)
            }
            sparkContextPromise.tryFailure(e.getCause())
        } finally {
          // Notify the thread waiting for the SparkContext, in case the application did not
          // instantiate one. This will do nothing when the user code instantiates a SparkContext
          // (with the correct master), or when the user code throws an exception (due to the
          // tryFailure above).
          sparkContextPromise.trySuccess(null)
        }
      }
    }
    userThread.setContextClassLoader(userClassLoader)
    userThread.setName("Driver")
    userThread.start()
    userThread
} 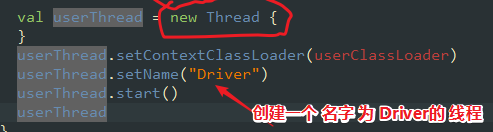
至此我们 终于知道 Driver 是个 什么 鬼了!在 Yarn-Cluster 他就是个 线程 在 ApplicationMaster 进程中启动的线程, 而 这个 Driver 类 可以说就是我们自己写的 那个 有主类的 应用程序
回到 startUserApplication
 private def runDriver(securityMgr: SecurityManager): Unit = {
    addAmIpFilter()
    // =======》 用户应用类 在 Driver线程中 运行
    userClassThread = startUserApplication()

    // This a bit hacky, but we need to wait until the spark.driver.port property has
    // been set by the Thread executing the user class.
    logInfo("Waiting for spark context initialization...")
    val totalWaitTime = sparkConf.get(AM_MAX_WAIT_TIME)
    try {
      val sc = ThreadUtils.awaitResult(sparkContextPromise.future,
        Duration(totalWaitTime, TimeUnit.MILLISECONDS))
      if (sc != null) {
        rpcEnv = sc.env.rpcEnv
        val driverRef = runAMEndpoint(
          sc.getConf.get("spark.driver.host"),
          sc.getConf.get("spark.driver.port"),
          isClusterMode = true)
        // =======》 注册,我们的 AppMaster向 Yarn 注册
        registerAM(sc.getConf, rpcEnv, driverRef, sc.ui.map(_.webUrl), securityMgr)
      } else {
        if (!finished) {
          throw new IllegalStateException("SparkContext is null but app is still running!")
        }
      }
      // ========》 我执行 完了,其他线程才能执行 ,就是将其他线程加入到当前线程
      userClassThread.join()
    } catch {
      case e: SparkException if e.getCause().isInstanceOf[TimeoutException] =>
        logError(
          s"SparkContext did not initialize after waiting for $totalWaitTime ms. " +
           "Please check earlier log output for errors. Failing the application.")
        finish(FinalApplicationStatus.FAILED,
          ApplicationMaster.EXIT_SC_NOT_INITED,
          "Timed out waiting for SparkContext.")
    }
  }
client 发送指令 bin/java 启动 ApplicationMaster , ApplicationMaster 反过来 向 ResourceManager 注册,看源码 进入
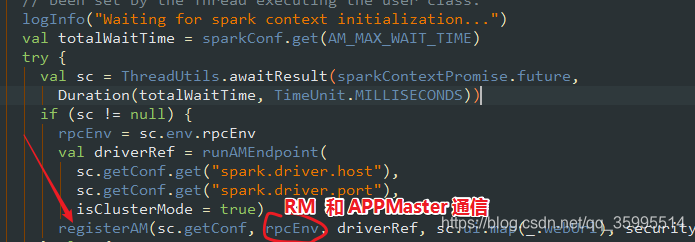
AppMaster 向 yarn 注册 ,进入 register , yarnRMClient 就是 ApplicationMaster 和 RM 交互的媒介

进入 client 看看,

呵呵,AM 向 RM 注册要资源, 会哭 的孩纸 有 奶吃
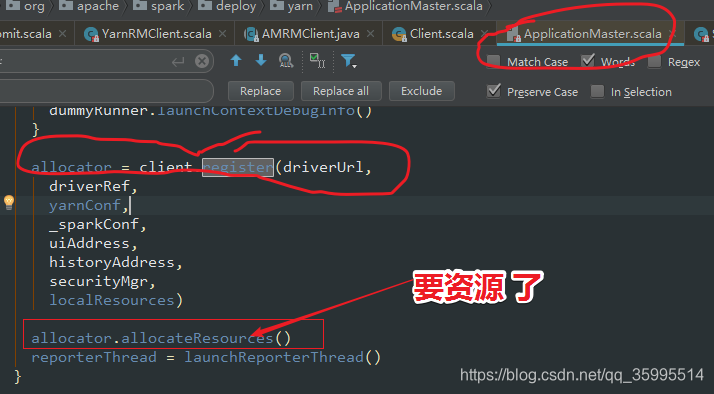
注意了!这里要分配资源了 里面 肯定有 container , 进入 allocationResources() 看看
 /**
   *  同步代码块
   */
  def allocateResources(): Unit = synchronized {
    updateResourceRequests()

    val progressIndicator = 0.1f
    // Poll the ResourceManager. This doubles as a heartbeat if there are no pending container
    // requests.
    val allocateResponse = amClient.allocate(progressIndicator)
    // =======》 拿到分配的容器
    val allocatedContainers = allocateResponse.getAllocatedContainers()
    // =======》 判断容器的大小
    if (allocatedContainers.size > 0) {
      logDebug("Allocated containers: %d. Current executor count: %d. Cluster resources: %s."
        .format(
          allocatedContainers.size,
          numExecutorsRunning,
          allocateResponse.getAvailableResources))
      // ======》 处理分配的 Container
      handleAllocatedContainers(allocatedContainers.asScala)
    }
} 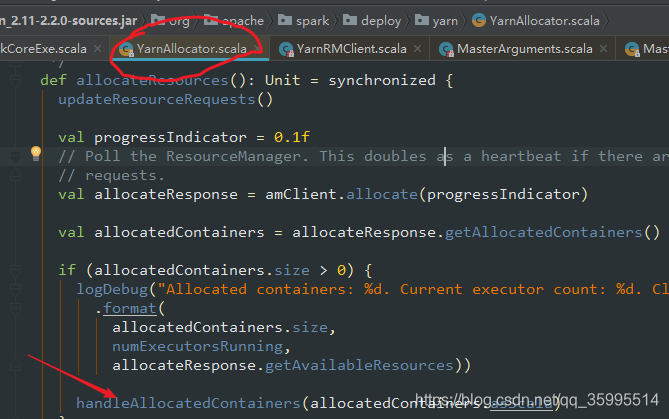
进入 handleAllocatedContainers 看看具体的实现
 /**
   * 通过启动 Executor 来处理 RM 授予的容器 ,查找与给定容器分配相匹配的给定位置的请求。
   */
  def handleAllocatedContainers(allocatedContainers: Seq[Container]): Unit = {
    val containersToUse = new ArrayBuffer[Container](allocatedContainers.size)

    // 匹配请求的主机 ,,进程 本地化
    val remainingAfterHostMatches = new ArrayBuffer[Container]
    for (allocatedContainer <- allocatedContainers) {
      matchContainerToRequest(allocatedContainer, allocatedContainer.getNodeId.getHost,
        containersToUse, remainingAfterHostMatches)
    }

    // 匹配机架 剩余的数量   本机架,其他节点
    val remainingAfterRackMatches = new ArrayBuffer[Container]
    for (allocatedContainer <- remainingAfterHostMatches) {
      val rack = resolver.resolve(conf, allocatedContainer.getNodeId.getHost)
      matchContainerToRequest(allocatedContainer, rack, containersToUse,
        remainingAfterRackMatches)
    }

    // 分配既不是节点本地也不是机架本地的剩余  其他机架
    val remainingAfterOffRackMatches = new ArrayBuffer[Container]
    for (allocatedContainer <- remainingAfterRackMatches) {
      matchContainerToRequest(allocatedContainer, ANY_HOST, containersToUse,
        remainingAfterOffRackMatches)
    }

    if (!remainingAfterOffRackMatches.isEmpty) {
      logDebug(s"Releasing ${remainingAfterOffRackMatches.size} unneeded containers that were " +
        s"allocated to us")
      for (container <- remainingAfterOffRackMatches) {
        internalReleaseContainer(container)
      }
    }
    // =======》 运行
    runAllocatedContainers(containersToUse)

    logInfo("Received %d containers from YARN, launching executors on %d of them."
      .format(allocatedContainers.size, containersToUse.size))
  }
补充:
本地化,RDD 五大 特性中 有这么 一个: 移动数据 不如 移动计算 (优先位置),当我的 数据要发往 Executor 时 ,最好发送到数据所在的节点 -----进程本地化, 或者是 同一个节点的 不同的进程中----节点本地化,
进入 runAllocatedContainers()
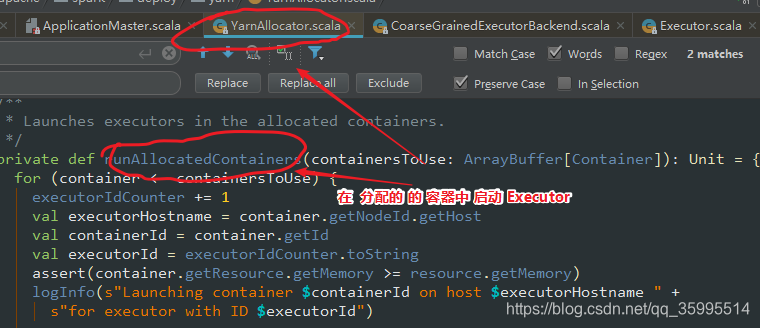
 /**
   * 在分配的容器中 启动执行程序
   */
  private def runAllocatedContainers(containersToUse: ArrayBuffer[Container]): Unit = {
    // 遍历可用 的容器
    for (container <- containersToUse) {
      executorIdCounter += 1
      val executorHostname = container.getNodeId.getHost
      // 容器ID
      val containerId = container.getId
      val executorId = executorIdCounter.toString
      assert(container.getResource.getMemory >= resource.getMemory)
      logInfo(s"Launching container $containerId on host $executorHostname " +
        s"for executor with ID $executorId")

      def updateInternalState(): Unit = synchronized {
        numExecutorsRunning += 1
        executorIdToContainer(executorId) = container
        containerIdToExecutorId(container.getId) = executorId

        val containerSet = allocatedHostToContainersMap.getOrElseUpdate(executorHostname,
          new HashSet[ContainerId])
        containerSet += containerId
        allocatedContainerToHostMap.put(containerId, executorHostname)
      }
      // 正在 运行的 Executor 小于 执行器的目标数
      if (numExecutorsRunning < targetNumExecutors) {
        if (launchContainers) {
          // 启动线程池, 线程中拿一个线程, 执行 Runnable 接口,重写 run 方法
          launcherPool.execute(new Runnable {
            override def run(): Unit = {
              try {
                new ExecutorRunnable(
                  Some(container),
                  conf,
                  sparkConf,
                  driverUrl,
                  executorId,
                  executorHostname,
                  executorMemory,
                  executorCores,
                  appAttemptId.getApplicationId.toString,
                  securityMgr,
                  localResources
                // =======》 启动 Executor
                ).run()
                updateInternalState()
              } catch {
                case NonFatal(e) =>
                  logError(s"Failed to launch executor $executorId on container $containerId", e)
                  // Assigned container should be released immediately to avoid unnecessary resource
                  // occupation.
                  amClient.releaseAssignedContainer(containerId)
              }
            }
          })
        } else {
          // For test only
          updateInternalState()
        }
      } else {
        logInfo(("Skip launching executorRunnable as runnning Excecutors count: %d " +
          "reached target Executors count: %d.").format(numExecutorsRunning, targetNumExecutors))
      }
    }
  }
进入 ExecutorRunnable 此处可以看到 ApplicationMaster 和 NodeManager 做交互了

NodeManager 的客户端 启动 , 申请到的容器启动
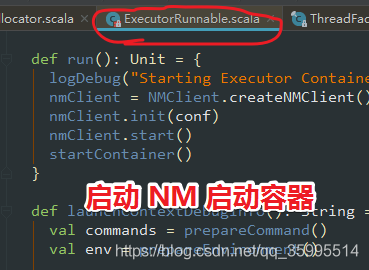
进入 startContainer()
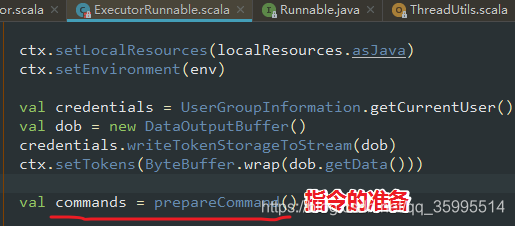
四、 CoarseGrainedExecutorBackend 分析
准备 command , NM进程的执行 ,向 NM 发送 指令,指令的 执行 启动进程
CoarseGrainedExecutorBackend

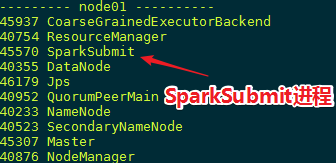
jps 查看一下 进程


有任务的话发给后台, Executor 去执行
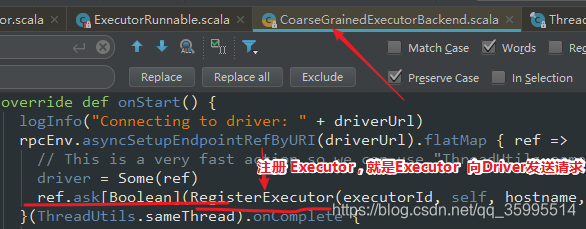
为什么 要注册 到 Driver ,因为 我不知道 你 准备 好了 啊, 你向我注册 ,告诉我 你后台已经启动 ExecutorBackend 反向注册到 Driver , 之后 Driver 会给 ExecutorBackend 一个 响应,ExecutorBackend 接收 响应 , 创建 Executor计算对象
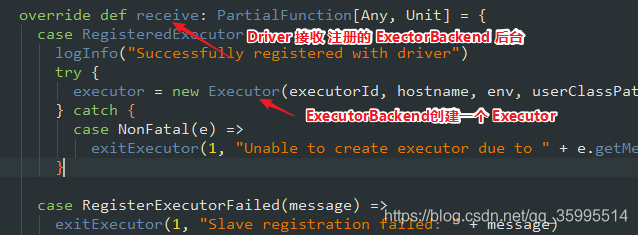
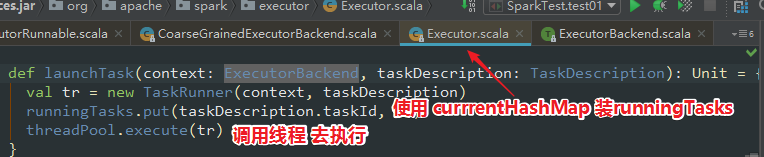
创建了 Executor 就要启动了
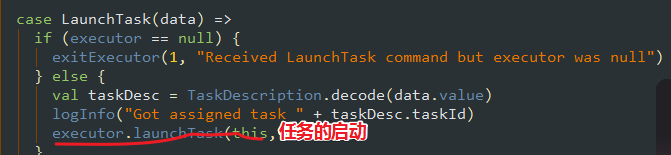
进入 launchTask 看两眼
至此 , Spark on yarn 的 任务提交 的源码 分析结束 , 之后Driver 会 一行一行的执行 Spark 代码,执行到 某个 action 算子的时候触发一个 job ,然后 DAGScheduler 会将 job 根据 RDD 宽窄 依赖划分为一个个的 stage , 为每个 stage 都创建指定数量的 task; TaskSchedule 将 每个 stage 的 task ,分配到 各个 Executor 上面去执行,随后 Task 会执行 算子函数。
五、Yarn-client与Yarn-cluster的区别
理解yarn-Client和yarn-Cluster深层次的区别之前先清楚一个概念:Application Master。
在YARN中,每个Application 实例都有一个ApplicationMaster进程,它是 Application 启动的第一个容器。它负责和ResourceManager 打交道并请求资源,获取资源之后告诉 NodeManager 为其启动 Container。从深层次的含义讲 YARN-Cluster和 YARN-Client 模式的区别其实就是 ApplicationMaster 进程的区别;
YARN-Cluster模式下,Driver运行在AM(Application Master)中,它负责向YARN申请资源,并监督作业的运行状况。当用户提交了作业之后,就可以关掉Client,作业会继续在YARN上运行,因而YARN-Cluster模式不适合运行交互类型的作业;
YARN-Client模式下,Application Master仅仅向YARN请求Executor,Client会和请求的Container通信来调度他们工作,也就是说Client不能离开;
