LinkedList里面涉及到的一些操作,非常细致,以避免出现的空指针,理解后对于其优点与确定会有一个更加整体的认识吧。
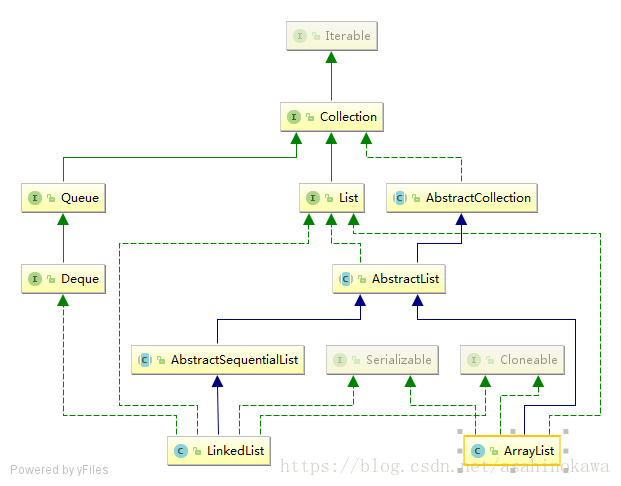
继承关系图(对比ArrayList)
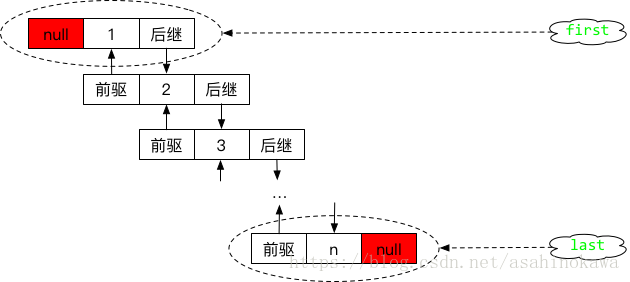
元素的存储结构
在LinkedList中,每一个元素都是Node存储,Node拥有一个存储值的item与一个前驱prev和一个后继next,如下:
// 典型的链表结构
private static class Node<E> {
    E item;// 存储元素
    Node<E> next;// 指向上一个元素
    Node<E> prev;// 指向下一个元素
    Node(Node<E> prev, E element, Node<E> next) {
        this.item = element;
        this.next = next;
        this.prev = prev;
    }
}
构造函数与成员变量
变量主要有3个:
transient int size = 0;//当前列表的元素个数
/**
 * Pointer to first node.
 * Invariant: (first == null && last == null) ||
 *            (first.prev == null && first.item != null)
 */
transient Node<E> first;// 第一个元素
/**
 * Pointer to last node.
 * Invariant: (first == null && last == null) ||
 *            (last.next == null && last.item != null)
 */
transient Node<E> last;// 最后一个元素
在LinkedList中的构造函数有两个,一个是无参的,另一个是带Collection参数的。
public LinkedList() {}//无参构造函数
public LinkedList(Collection<? extends E> c) {
    this();
    addAll(c);//将c中的元素都添加到此列表中
}
其添加的过程中,此时size = 0,如下:
public boolean addAll(Collection<? extends E> c) {
    return addAll(size, c);//此时 size == 0
}
如果index==size,则添加c中的元素到列表的尾部;否则,添加的第index个元素的前面;
public boolean addAll(int index, Collection<? extends E> c) {
    // 检查位置是否合法 位置是[0,size],注意是闭区间 否则报异常
    checkPositionIndex(index);
    Object[] a = c.toArray();// 得到一个元素数组
    int numNew = a.length;// c中元素的数量
    if (numNew == 0)
        return false;// 没有元素,添加失败

    // 主要功能是找到第size个元素的前驱和后继。得到此元素需要分情况讨论。
    // 这段代码是各种情况的总和,可能有一点点容易懵逼。
    Node<E> pred, succ;// 前驱与后继
    if (index == size) {// 如果位置与当前的size相同
        succ = null;// 无后继
        pred = last;// 前驱为last,即第size个元素(最后一个元素)
    } else {// 若与size不同,即index位于[0, size)之间
        succ = node(index);// 后继为第index个元素
        pred = succ.prev;// 前驱为后继的前驱
    }// 后文有详细的图片说明
    // 开始逐个插入
    for (Object o : a) {
        @SuppressWarnings("unchecked") E e = (E) o;
        // 新建一个以pred为前驱、null为后继、值为e的节点
        Node<E> newNode = new Node<>(pred, e, null);
        if (pred == null)// 前驱为空,则此节点被当做列表的第一个节点
            first = newNode;
        else// 规避掉了NullPointerException,感觉又达到了目的,又实现了逻辑
            pred.next = newNode;// 不为空,则将前驱的后继改成当前节点
        pred = newNode;// 将前驱改成当前节点,以便后续添加c中其它的元素
    }
    // 至此,c中元素已添加到链表上,但链表中从size开始的那些元素还没有链接到列表上
    // 此时就需要利用到之前找出来的succ值,它是作为这个c的整体后继
    if (succ == null) {// 如果后继为空,说明无整体后继
        last = pred;// c的最后一个元素应当作为列表的尾元素
    } else {// 有整体后继
        pred.next = succ;// pred即c中的最后一个元素,其后继指向succ,即整体后继
        succ.prev = pred;// succ的前驱指向c中的最后一个元素
    }
    // 添加完毕,修改参数
    size += numNew;
    modCount++;
    return true;
}
返回序号为index的元素节点。看这段代码中的if语句,真的是佩服,这样写代码,都可以这样减少查找次数。
Node<E> node(int index) {
    // assert isElementIndex(index);
    // 这个地方很有意思。视其与中值得差距,觉得从前遍历还是从后遍历。
    if (index < (size >> 1)) {
        Node<E> x = first;
        // 循环index次 迭代到所需要的元素
        for (int i = 0; i < index; i++)
            x = x.next;
        return x;
    } else {
        Node<E> x = last;
        // 循环size-1-index次
        for (int i = size - 1; i > index; i--)
            x = x.prev;
        return x;
    }
}
测试代码以及验证输出如下:
public class Main {
    public static void main(String[] args) {
        List<String> list = new LinkedList<>(Arrays.asList("1", "2", "3"));
        System.out.println(list.toString());
        list.addAll(2, Arrays.asList("4", "5"));
        System.out.println(list.toString());
        list.addAll(0, Arrays.asList("6", "7"));
        System.out.println(list.toString());
    }
}
---
[1, 2, 3]
[1, 2, 4, 5, 3]
[6, 7, 1, 2, 4, 5, 3]
增加元素
对于向列表中添加元素,先看一组基本的添加操作,具体如下:
将e链接成列表的第一个元素
源代码以及相应的分析如下:
private void linkFirst(E e) {
    final Node<E> f = first;
    // 前驱为空,值为e,后继为f
    final Node<E> newNode = new Node<>(null, e, f);
    first = newNode;// first指向newNode
    // 此时的f有可能为null
    if (f == null)// 若f为空,则表明列表中还没有元素
        last = newNode;// last也应该指向newNode
    else
        f.prev = newNode;// 否则,前first的前驱指向newNode
    size++;
    modCount++;
}
其过程大致如下两图所示:
初始状态:
后续状态:
添加元素作为第一个元素时,所需要做的工作,有下列所述:
首先,获取第一个节点,然后将该节点的前驱指向新添加的元素所在的节点;
接着,将新添加的节点的后继指向前第一个节点;
最后,将first指向新添加的元素的节点。添加完毕。

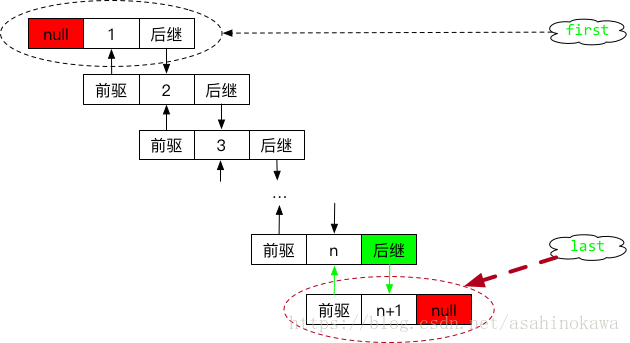
将e链接为最后一个元素
源代码以及相应的解释如下:
void linkLast(E e) {
    final Node<E> l = last;// 找到最后一个节点
    // 前驱为前last,值为e,后继为null
    final Node<E> newNode = new Node<>(l, e, null);
    last = newNode;// last一定会指向此节点
    if (l == null)// 最后一个节点为空,说明列表中无元素
        first = newNode;// first同样指向此节点
    else
        l.next = newNode;// 否则,前last的后继指向当前节点
    size++;
    modCount++;
}
其操作过程与前述linkFirst()的过程类似,因此其替换后的示意图如下:
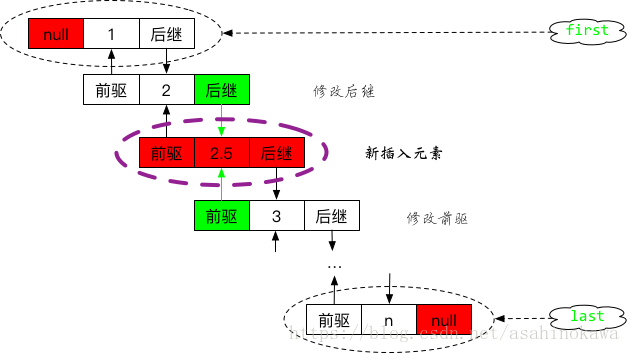
将e链接到节点succ前
源代码以及相应的解析如下:
void linkBefore(E e, Node<E> succ) {
    // assert succ != null;
    final Node<E> pred = succ.prev; // 找到succ的前驱
    // 前驱为pred,值为e,后继为succ
    final Node<E> newNode = new Node<>(pred, e, succ);
    // 将succ的前驱指向当前节点
    succ.prev = newNode;
    if (pred == null)// pred为空,说明此时succ为首节点
        first = newNode;// 指向当前节点
    else
        pred.next = newNode;// 否则,将succ之前的前驱的后继指向当前节点
    size++;
    modCount++;
}
这个操作有点类似将上述的两个操作整合到一起。其操作简图如下:
有了上述的分析,我们再来看一些添加的操作,这些操作基本上是做了一些逻辑判断,然后再调用上述三个方法去实现添加功能,这里略过就好。
 public boolean add(E e) {
     linkLast(e);
     return true;
 }
 // 只有这个是有一点逻辑的
 public void add(int index, E element) {
     checkPositionIndex(index);
     if (index == size)// 为最后一个节点,当然是添加到最后一个~
         linkLast(element);
     else
         linkBefore(element, node(index));
 }
 public void addFirst(E e) {
     linkFirst(e);
 }
 public void addLast(E e) {
     linkLast(e);
 }
删除元素
删除就是添加过程的逆过程。同样,在分析我们使用的接口前,先分析几个我们看不到的方法,如下:
删除首节点
private E unlinkFirst(Node<E> f) {
    // assert f == first && f != null;别忽略这里的断言
    final E element = f.item;// 取出首节点中的元素
    final Node<E> next = f.next;// 取出首节点中的后继
    f.item = null;
    f.next = null; // help GC
    first = next;// first指向前first的后继,也就是列表中的2号位
    if (next == null)// 如果此时2号位为空,那么列表中此时已无节点
        last = null;// last指向null
    else
        next.prev = null;// 首节点无前驱
    size--;
    modCount++;
    return element;// 返回首节点保存的元素值
}
删除尾节点
此处的操作与删除首节点的操作类似。
private E unlinkLast(Node<E> l) {
// assert l == last && l != null;别忽略这里的断言
final E element = l.item;// 取出尾节点中的元素
final Node<E> prev = l.prev;// 取出尾节点中的后继
l.item = null;
l.prev = null; // help GC
last = prev;// last指向前last的前驱,也就是列表中的倒数2号位
if (prev == null)// 如果此时倒数2号位为空,那么列表中已无节点
    first = null;// first指向null
else
    prev.next = null;// 尾节点无后继
size--;
modCount++;
return element;// 返回尾节点保存的元素值
}
删除某个非空节点
这个也类似添加元素时的第三个基本操作,与结合了上述两个操作有点类似。
// x即为要删除的节点
E unlink(Node<E> x) {
// assert x != null;
final E element = x.item;// 保存x的元素值
final Node<E> next = x.next;// 保存x的后继
final Node<E> prev = x.prev;// 保存x的前驱

if (prev == null) {// 前驱为null,说明x为首节点
    first = next;// first指向x的后继
} else {
    prev.next = next;// x的前驱的后继指向x的后继,即略过了x
    x.prev = null;// x.prev已无用处,置空引用
}

if (next == null) {// 后继为null,说明x为尾节点
    last = prev;// last指向x的前驱
} else {
    next.prev = prev;// x的后继的前驱指向x的前驱,即略过了x
    x.next = null;// x.next已无用处,置空引用
}

x.item = null;// 引用置空
size--;
modCount++;
return element;// 返回所删除的节点的元素值
}
有了上面的几个函数作为支撑,我们再来看下面的几个我们能用来删除节点的方法,他们也基本上是在一些逻辑判断的基础之上,再调用上述的基本操作:
public E removeFirst() {
    final Node<E> f = first;
    if (f == null)
        throw new NoSuchElementException();
    return unlinkFirst(f);
}
public E removeLast() {
    final Node<E> l = last;
    if (l == null)
        throw new NoSuchElementException();
    return unlinkLast(l);
}
// 遍历列表中所有的节点,找到相同的元素,然后删除它
public boolean remove(Object o) {
    if (o == null) {
        for (Node<E> x = first; x != null; x = x.next) {
            if (x.item == null) {
                unlink(x);
                return true;
            }
        }
    } else {
        for (Node<E> x = first; x != null; x = x.next) {
            if (o.equals(x.item)) {
                unlink(x);
                return true;
            }
        }
    }
    return false;
}
public E remove(int index) {
    checkElementIndex(index);
    return unlink(node(index));
}
修改元素
通过遍历,循环index次,获取到相应的节点后,再通过节点来修改元素值。
public E set(int index, E element) {
     checkElementIndex(index);
     Node<E> x = node(index);// 获取到需要修改元素的节点
     E oldVal = x.item;// 保存之前的值
     x.item = element;// 修改
     return oldVal;// 返回修改前的值
 }
查询元素
通过位置,循环index次,获取到节点,然后返回该节点中元素的值public E get(int index) {
    checkElementIndex(index);
    return node(index).item;// 获取节点,并返回节点中的元素值
}
还有两个获取首尾节点的元素的方法:

public E getFirst() {
    final Node<E> f = first;
    if (f == null)
        throw new NoSuchElementException();
    return f.item;
}
public E getLast() {
    final Node<E> l = last;
    if (l == null)
        throw new NoSuchElementException();
    return l.item;
}
获取元素位置
从0开始往后遍历public int indexOf(Object o) {
    int index = 0;
    if (o == null) {// null时分开处理
        for (Node<E> x = first; x != null; x = x.next) {
            if (x.item == null)// 说明找到
                return index;// 返回下标
            index++;
        }
    } else {
        for (Node<E> x = first; x != null; x = x.next) {
            if (o.equals(x.item))// 说明找到
                return index;// 返回下标
            index++;
        }
    }
    return -1;// 未找到,返回-1
}
从size - 1开始遍历。基本操作与上述操作类似,只是起始位置不同。

public int lastIndexOf(Object o) {
    int index = size;
    if (o == null) {
        for (Node<E> x = last; x != null; x = x.prev) {
            index--;
            if (x.item == null)
                return index;
        }
    } else {
        for (Node<E> x = last; x != null; x = x.prev) {
            index--;
            if (o.equals(x.item))
                return index;
        }
    }
    return -1;
}
额外的话
在上面的诸多函数中,有许多是需要进行位置判断的。在源码中,位置判断有两个函数,一个是下标,一个是位置。看到这两个函数,确实是有一些感触,这确实是需要比较强的总结能力以及仔细的观察能力。
// 下标,保证数组访问不越界。
private boolean isElementIndex(int index) {
    return index >= 0 && index < size;
}
// 位置
private boolean isPositionIndex(int index) {
    return index >= 0 && index <= size;
}
后记
LinkedList还实现了Queue这个接口,在实现这些接口时,仍然是做一些逻辑处理,然后调用上面所描述的基本操作,如link()、unlink()之类的,因此不再分析。还有其中的关于序列化、Iterator这两块,与ArrayList的实现也是不尽相同的,故在此可参考ArrayList中的解析。
