需求分析:
通过安卓打开相机相册,使用SSM框架搭建后台接口,前端使用retrofit2进行文件传输
注:低门槛实现系列就是不涉及过深的知识点,不做过多的异常捕获,不过滤版本不判空,面向小白。
正文
首先需要搭建SSM框架,默认你已经学会了,相应的接口可以看看下面这一篇文章
https://blog.csdn.net/qq_44403367/article/details/105690838
@Controller
@ResponseBody
@RequestMapping("Oss")
public class OssController {
    @Autowired
    private OssService ossService;

    @ApiOperation(value="文件上传", notes="文件上传")
    @ResponseBody
    @RequestMapping(value = "/uploadImage",method = RequestMethod.POST,consumes = "multipart/*",headers = "Content-Type=multipart/form-data")
    public BaseModel upload(@ApiParam("商品id") @RequestParam(value = "id") int id,
                            @ApiParam("上传的文件") @RequestParam("file")  MultipartFile file,HttpServletRequest request) throws Exception {
        BaseModel model = new BaseModel();
        ossService.getImagePath(id,file,model);
        return model;
    }

}
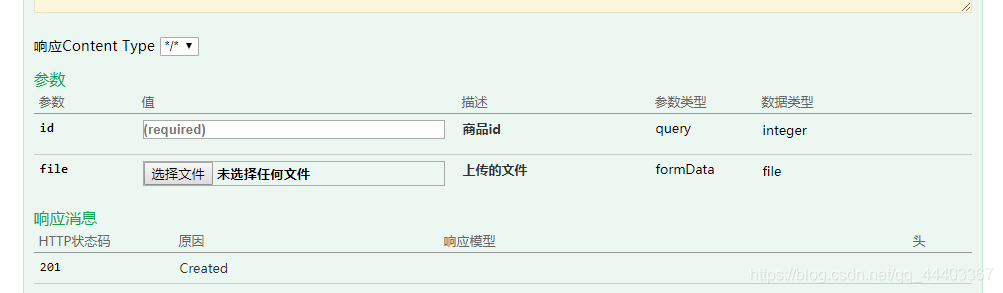
其中@RequestMapping注解指定了content-type类型是multipart,这里需要一点swagger的知识,声明的MultipartFile类型会被自动解析生成对应html组件如下图所示,而ossService.getImagePath(id,file,model);里面对file的本地化已经在刚刚推荐的链接里面了。
然后是打开安卓相机相册功能的实现
打开相册
先看一下demo的页面设计
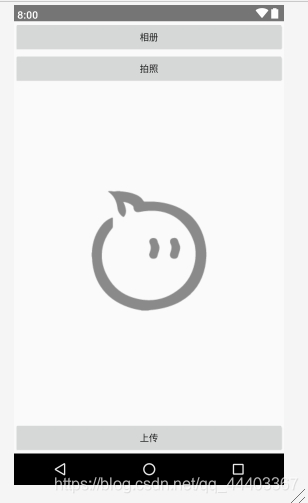
其中拍照按钮会输出一张图片到外部存储,在通过IO流加载到imageView里面,点击上传实现上传功能
//给个返回码,可以自定义
private static final int REQUEST_CODE_ALBUM = 100;//打开相册
private static final int REQUEST_CODE_CAMERA = 101;//打开相机
private File file;

//这个是打开相册按钮的监听事件,通过intent直接进入相册,写到按钮事件里去啊。
Intent intent = new Intent(Intent.ACTION_GET_CONTENT);
intent.setType("image/*");
startActivityForResult(intent,REQUEST_CODE_ALBUM);

//重写activity或fragment的onActivityResult方法获得返回结果
@Override
public void onActivityResult(int requestCode, int resultCode, Intent data) {
	super.onActivityResult(requestCode, resultCode, data);//这句不能丢掉,若是在fragment里面会影响返回链的传递
	if(requestCode == REQUEST_CODE_ALBUM && resultCode == RESULT_OK){
    	if (data != null) {
			// 照片的原始资源地址
        	Uri uri = data.getData();

        	//为了统一操作将图片Uri转file路径后再放到imageView里去,这个转化工具类下面给出。
            String imageAbsolutePath = UriToPath.getImageAbsolutePath(getActivity(), uri);

            //通过file路径加载图片的方法下面给出,这个判断文件是不是图片就自己做了啊。
            file = new File(imageAbsolutePath);
            setImageToView(file);

			//这里是使用Uri加载图片,可以了解一下,我这里为了统一就不用了,改用file路径加载。
/*          ContentResolver cr = getContext().getContentResolver();
*           try {
*           	Bitmap bitmap = BitmapFactory.decodeStream(cr.openInputStream(uri));
*		     	imageView.setImageBitmap(bitmap);
*           } catch (FileNotFoundException e) {
*           	Log.e("Exception", e.getMessage(), e);
*           }
*/
 		}
	}
}

private void setImageToView(File file){
    try {
        FileInputStream input = new FileInputStream(file);
        Bitmap bitmap = BitmapFactory.decodeStream(input);
        imageView.setImageBitmap(bitmap);
        input.close();
    } catch (FileNotFoundException e) {
        e.printStackTrace();
    } catch (IOException e) {
        e.printStackTrace();
    }
}
uri转file代码很长,是个工具类别怕。资料出自:https://blog.csdn.net/q445697127/article/details/40537945
public class UriToPath {

    public static String getImageAbsolutePath(Activity context, Uri imageUri) {
        if (context == null || imageUri == null)
            return null;
        if (android.os.Build.VERSION.SDK_INT >= android.os.Build.VERSION_CODES.KITKAT && DocumentsContract.isDocumentUri(context, imageUri)) {
            if (isExternalStorageDocument(imageUri)) {
                String docId = DocumentsContract.getDocumentId(imageUri);
                String[] split = docId.split(":");
                String type = split[0];
                if ("primary".equalsIgnoreCase(type)) {
                    return Environment.getExternalStorageDirectory() + "/" + split[1];
                }
            } else if (isDownloadsDocument(imageUri)) {
                String id = DocumentsContract.getDocumentId(imageUri);
                Uri contentUri = ContentUris.withAppendedId(Uri.parse("content://downloads/public_downloads"), Long.valueOf(id));
                return getDataColumn(context, contentUri, null, null);
            } else if (isMediaDocument(imageUri)) {
                String docId = DocumentsContract.getDocumentId(imageUri);
                String[] split = docId.split(":");
                String type = split[0];
                Uri contentUri = null;
                if ("image".equals(type)) {
                    contentUri = MediaStore.Images.Media.EXTERNAL_CONTENT_URI;
                } else if ("video".equals(type)) {
                    contentUri = MediaStore.Video.Media.EXTERNAL_CONTENT_URI;
                } else if ("audio".equals(type)) {
                    contentUri = MediaStore.Audio.Media.EXTERNAL_CONTENT_URI;
                }
                String selection = MediaStore.Images.Media._ID + "=?";
                String[] selectionArgs = new String[] { split[1] };
                return getDataColumn(context, contentUri, selection, selectionArgs);
            }
        } // MediaStore (and general)
        else if ("content".equalsIgnoreCase(imageUri.getScheme())) {
            // Return the remote address
            if (isGooglePhotosUri(imageUri))
                return imageUri.getLastPathSegment();
            return getDataColumn(context, imageUri, null, null);
        }
        // File
        else if ("file".equalsIgnoreCase(imageUri.getScheme())) {
            return imageUri.getPath();
        }
        return null;
    }

    public static String getDataColumn(Context context, Uri uri, String selection, String[] selectionArgs) {
        Cursor cursor = null;
        String column = MediaStore.Images.Media.DATA;
        String[] projection = { column };
        try {
            cursor = context.getContentResolver().query(uri, projection, selection, selectionArgs, null);
            if (cursor != null && cursor.moveToFirst()) {
                int index = cursor.getColumnIndexOrThrow(column);
                return cursor.getString(index);
            }
        } finally {
            if (cursor != null)
                cursor.close();
        }
        return null;
    }

    /**
     * @param uri The Uri to check.
     * @return Whether the Uri authority is ExternalStorageProvider.
     */
    public static boolean isExternalStorageDocument(Uri uri) {
        return "com.android.externalstorage.documents".equals(uri.getAuthority());
    }

    /**
     * @param uri The Uri to check.
     * @return Whether the Uri authority is DownloadsProvider.
     */
    public static boolean isDownloadsDocument(Uri uri) {
        return "com.android.providers.downloads.documents".equals(uri.getAuthority());
    }

    /**
     * @param uri The Uri to check.
     * @return Whether the Uri authority is MediaProvider.
     */
    public static boolean isMediaDocument(Uri uri) {
        return "com.android.providers.media.documents".equals(uri.getAuthority());
    }

    /**
     * @param uri The Uri to check.
     * @return Whether the Uri authority is Google Photos.
     */
    public static boolean isGooglePhotosUri(Uri uri) {
        return "com.google.android.apps.photos.content".equals(uri.getAuthority());
    }
}
打开相机
使用相机和上面一样,intent打开相机,onActivityResult返回结果就行了,相册相机都要有的话,else if合并在一起
//写到相机按钮的监听事件上去
Intent intent;
intent = new Intent(MediaStore.ACTION_IMAGE_CAPTURE);
file = new File(Environment.getExternalStorageDirectory().getPath(),System.currentTimeMillis() + ".jpg");
Log.i("dd",file.getAbsolutePath());
Uri uri = Uri.fromFile(file);
intent.putExtra(MediaStore.EXTRA_OUTPUT, uri);
// android 7.0系统解决拍照的问题
StrictMode.VmPolicy.Builder builder = new StrictMode.VmPolicy.Builder();
StrictMode.setVmPolicy(builder.build());
builder.detectFileUriExposure();
builder.detectFileUriExposure();

startActivityForResult(intent, REQUEST_CODE_CAMERA);

//和上面onActivityResult那段代码一样的,粘到它后面去
else if(requestCode == REQUEST_CODE_CAMERA && resultCode == RESULT_OK){
        setImageToView(file);
}
中间有一段是StrictMode的代码是安卓7.0新特性需要添加的,不加会报错
android.os.FileUriExposedException: file:///storage/emulated/0/XXX.png exposed beyond app through ClipData.Item.getUri()
详细参阅该文章:https://www.jianshu.com/p/55eae30d133c
需要注意的是intent.putExtra(MediaStore.EXTRA_OUTPUT, uri);若是不指定输出路径,拍出来的照片会保存在一个默认的文件夹下,并且data.getData( )返回相关信息,若是指定了输出目录,data.getData( )将为null,不过我试过好像不指定也返回null,索性就给它指定目录了,这样就不需要他返回任何信息,成功后指定目录自然有文件。(判空自己写哈)
Retrofit2网络请求
需要一定的Retrofit2框架的知识,不会的自学或者关注我,可能某天会更新
public interface OssService {

    @Multipart
    @POST("Oss/uploadImage")
    @Headers("Content-Type:form-data;charset=utf-8")
    Observable<HttpResult<OssImagePathEntity>> getImagePath(
            @Part("id") int id,
            @Part MultipartBody.Part file
    );
}
这里@Multipart注解表示传输文件,这里是单文件,多文件懒得写,去网上搜下
调用请求
//上传按钮监听事件
			public void onClick(View v) {
                if(file == null){
                    Toast.makeText(getActivity(), "还没选择文件呢!", Toast.LENGTH_SHORT).show();
                    return;
                }

                //这里是通过file路径解析出RequestBody再生成MultipartBody.Part。
                RequestBody requestFile = RequestBody.create(MediaType.parse("form-data"), file);
				//中文文件名问题,服务端本地化的时候记得解码
				String encodeName = null;
                try {
                    encodeName = URLEncoder.encode(file.getName(),"UTF-8");
                } catch (UnsupportedEncodingException e) {
                    e.printStackTrace();
                }
                MultipartBody.Part body = MultipartBody.Part.createFormData("file",encodeName,requestFile);

                //网络请求
                OssPresenter.getImagePath(new ProgressDialogSubscribe<HttpResult<OssImagePathEntity>>(getActivity()){
                    @Override
                    public void onNext(HttpResult<OssImagePathEntity> ossImagePathEntityHttpResult) {
                        super.onNext(ossImagePathEntityHttpResult);
                        Log.i("dd",ossImagePathEntityHttpResult.getData().getImagePath());
                //这里使用了订阅者模式,没使用该模式的自己类比一下,能够调用刚刚Retrofit中设置的方法就行了,没有该方面知识自己补一下。
                    }
                },1,body);
            }
注意:其中MultipartBody.Part.createFormData里面的“file”和开头服务器的@ApiParam(“上传的文件”) @RequestParam(“file”)的“file”相同

注意
文件名是中文会报错,需要用URLEncoder.encode(file.getName( ),“UTF-8”);和 URLDecoder.decode(file.getOriginalFilename(),“UTF-8”);进行编码和解码,
展示


