Android 入门第二讲02-相对布局RelativeLayout(线性布局缺点,相对布局属性,qq说说ui模仿,相对布局缺点)
Android 入门第二讲01-获取指定app的图片+按钮圆角(圆角,背景颜色,边框)
1.线性布局LinearLayout缺点
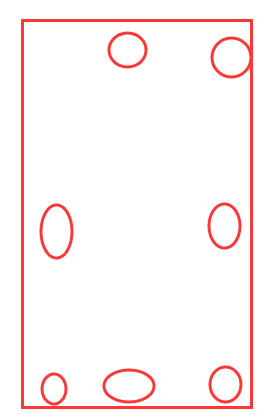
1.在某些角落的上的控件不好实现
居中也不好实现(主要是以下几个位置)
2.写布局的时候嵌套的层次太多了(效率不高)
一般来说写ui嵌套的层次越少越好,减少解析页面时候剖的遍历循环,于是我们需要学习相对布局
2.相对布局RelativeLayout(重点)
1. 定义:一种根据父布局 或 兄弟控件 或 布局定位的布局方式
可以解决线性布局存在的缺点,相对布局 第一步先找布局里面的控件有哪些处于四角
2.相对布局的父布局定位属性
- layout_alignParentLeft 排列在父布局的左边
- layout_alignParentRight 排列在父布局的右边
- layout_alignParentBottom 排列在父布局的底部
- layout_alignParentTop排列在父布局的顶部
- layout_centerHorizontal 水平方向的正中间
- layout_centerVertical 垂直方向的正中间
- layout_centerInParent 整个父布局的正中心

3.根据兄弟控件或布局定位属性
所谓的兄弟布局组件就是处于同一层次容器的组件
1.根据兄弟控件
- layout_toLeftOf 将该控件的右部置于给定ID的控件左边
- layout_toRightOf 将该控件的左部置于给定ID的控件右边
- layout_below 将该控件的底部置于给定ID的控件之下
- layout_above 将该控件的底部置于给定ID的控件之上
- layout_alignTop 将该控件的顶部边缘与给定ID的顶部边缘对齐;
- layout_alignBottom 将该控件的顶部边缘与给定ID的顶部边缘对齐;
- layout_alignRight 将该控件的右部边缘与给定ID的右部边缘对齐;
- layout_alignLeft 将该控件的左部边缘与给定ID的左部边缘对齐;

3.案例模仿

代码
<?xml version="1.0" encoding="utf-8"?>
<RelativeLayout xmlns:android="http://schemas.android.com/apk/res/android"
    xmlns:app="http://schemas.android.com/apk/res-auto"
    xmlns:tools="http://schemas.android.com/tools"
    android:layout_width="match_parent"
    android:layout_height="200dp"
    tools:context=".MainActivity">
    <ImageView
        android:id="@+id/img1"
        android:layout_width="50dp"
        android:layout_height="50dp"
        android:layout_margin="20dp"
        android:background="@mipmap/call"
        />
    <TextView
        android:layout_width="wrap_content"
        android:layout_height="wrap_content"
        android:text="浏览5次"
        android:layout_alignParentLeft="true"
        android:layout_alignParentBottom="true"
        android:layout_margin="10dp"/>
    <ImageView
        android:layout_width="40dp"
        android:layout_height="40dp"
        android:background="@mipmap/a4"
        android:layout_alignParentRight="true"
        android:layout_margin="10dp"
        />
    <ImageView
        android:id="@+id/share"
        android:layout_width="40dp"
        android:layout_height="40dp"
        android:background="@mipmap/a3"
        android:layout_alignParentRight="true"
        android:layout_alignParentBottom="true"
        android:layout_margin="10dp"/>
    <ImageView
        android:id="@+id/comment"
        android:layout_width="40dp"
        android:layout_height="40dp"
        android:background="@mipmap/a2"
        android:layout_alignParentBottom="true"
        android:layout_toLeftOf="@id/share"
        android:layout_marginBottom="10dp"/>
    <ImageView
        android:layout_width="40dp"
        android:layout_height="40dp"
        android:background="@mipmap/a1"
        android:layout_alignParentBottom="true"
       android:layout_toLeftOf="@id/comment"
        android:layout_marginRight="10dp"
        android:layout_marginBottom="10dp"/>
    <TextView
        android:id="@+id/text1"
        android:layout_width="wrap_content"
        android:layout_height="wrap_content"
        android:text="胡胡"
       android:layout_toRightOf="@+id/img1"
        android:layout_marginTop="25dp"
        android:textColor="#000000"
        android:textSize="24dp"/>
    <TextView
        android:layout_width="wrap_content"
        android:layout_height="wrap_content"
        android:text="今天 15:05"
        android:layout_below="@+id/text1"
        android:layout_toRightOf="@id/img1"
   />
  <TextView
      android:layout_width="wrap_content"
      android:layout_height="wrap_content"
      android:layout_centerInParent="true"
      android:text="我会告诉你我最喜欢吃张新发吗?"
      android:textColor="#000000"
      android:textSize="24dp"
      />


</RelativeLayout>
运行结果

4.相对布局RelativeLayout的缺点
- 无法实现均分
- 每次控件都要手动设置id
关于相对布局就讲到这里,谢谢您的阅读,此讲未完待续…
接下来登场的是我们布局扛把子-约束布局ConstraintLayout
Android 入门第二讲03-约束布局ConstraintLayout(可视化介绍,Chains链,MATCH_CONSTRAIN,百分比布局,圆形定位,Guideline,Barrier)