每个画布都有两个尺寸,一个是 drawingbuffer 的尺寸, 这个表示画布中有多少个像素。另一是画布显示的尺寸, CSS决定画布显示的尺寸。
你可以通过两种方式设置画布的 drawingbuffer尺寸。一种是使用HTML:
<canvas id="c" width="400" height="300"></canvas>
另一种是使用JavaScript:
<canvas id="c" ></canvas>var canvas = document.getElementById("c");
canvas.width = 400;
canvas.height = 300;如果我们在画布上绘制以一个单像素宽度的线,就会得到这样的结果:
"use strict";

function main() {
  // Get A WebGL context
  /** @type {HTMLCanvasElement} */
  var canvas = document.getElementById("canvas");
  var gl = canvas.getContext("webgl");
  if (!gl) {
    return;
  }

  // setup GLSL program
  var program = webglUtils.createProgramFromScripts(gl, ["2d-vertex-shader", "2d-fragment-shader"]);
  gl.useProgram(program);

  // look up where the vertex data needs to go.
  var positionAttributeLocation = gl.getAttribLocation(program, "a_position");

  // lookup uniforms
  var colorLocation = gl.getUniformLocation(program, "u_color");
  var matrixLocation = gl.getUniformLocation(program, "u_matrix");

  // Create a buffer to put three 2d clip space points in
  var positionBuffer = gl.createBuffer();

  // Bind it to ARRAY_BUFFER (think of it as ARRAY_BUFFER = positionBuffer)
  gl.bindBuffer(gl.ARRAY_BUFFER, positionBuffer);

  requestAnimationFrame(drawScene);

  // Draw the scene.
  function drawScene(now) {
    now *= 0.001;  // convert to seconds

    // Tell WebGL how to convert from clip space to pixels
    gl.viewport(0, 0, gl.canvas.width, gl.canvas.height);

    // Clear the canvas.
    gl.clear(gl.COLOR_BUFFER_BIT);

    // Tell it to use our program (pair of shaders)
    gl.useProgram(program);

    // Turn on the attribute
    gl.enableVertexAttribArray(positionAttributeLocation);

    // Bind the position buffer.
    gl.bindBuffer(gl.ARRAY_BUFFER, positionBuffer);

    // Tell the attribute how to get data out of positionBuffer (ARRAY_BUFFER)
    var size = 2;          // 2 components per iteration
    var type = gl.FLOAT;   // the data is 32bit floats
    var normalize = false; // don't normalize the data
    var stride = 0;        // 0 = move forward size * sizeof(type) each iteration to get the next position
    var offset = 0;        // start at the beginning of the buffer
    gl.vertexAttribPointer(
        positionAttributeLocation, size, type, normalize, stride, offset)

    // Set Geometry.
    var radius = Math.sqrt(gl.canvas.width * gl.canvas.width + gl.canvas.height * gl.canvas.height) * 0.5;
    var angle = now;
    var x = Math.cos(angle) * radius;
    var y = Math.sin(angle) * radius;
    var centerX = gl.canvas.width  / 2;
    var centerY = gl.canvas.height / 2;
    setGeometry(gl, centerX + x, centerY + y, centerX - x, centerY - y);

    // Compute the matrices
    var projectionMatrix = m3.projection(gl.canvas.width, gl.canvas.height);

    // Set the matrix.
    gl.uniformMatrix3fv(matrixLocation, false, projectionMatrix);

    // Draw in red
    gl.uniform4fv(colorLocation, [1, 0, 0, 1]);

    // Draw the geometry.
    var primitiveType = gl.LINES;
    var offset = 0;
    var count = 2;
    gl.drawArrays(primitiveType, offset, count);

    requestAnimationFrame(drawScene);
  }
}

// Fill the buffer with a line
function setGeometry(gl, x1, y1, x2, y2) {
  gl.bufferData(
      gl.ARRAY_BUFFER,
      new Float32Array([
          x1, y1,
          x2, y2]),
      gl.STATIC_DRAW);
}

main();
运行结果: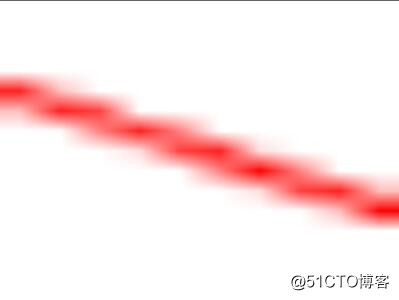
为什么它被模糊了?因为浏览器得到 10×15 像素的画布,将它拉伸到 400×300 像素, 然后在拉伸的过程中进行了插值。
假设我们想让画布填充满窗口该怎么做?首先使用CSS让浏览器将画布铺满窗口,例如:
<html>
  <head>
    <style>
      /* 移除边界 */
      body {
        border: 0;
        background-color: white;
      }
      /* 设置欢度大小为视域大小 */
      canvas {
        width: 100vw;
        height: 100vh;
        display: block;
      }
    <style>
  </head>
  <body>
    <canvas id="c"></canvas>
  </body>
</html>
现在只需要将 drawingbuffer 的尺寸设置为为浏览器拉伸后的画布尺寸。 我们可以使用 clientWidth 和 clientHeight 属性,这个属性是所有HTML元素都有的属性, 可以让JavaScript获取元素显示的尺寸。
function resize(canvas) {
  // 获取浏览器中画布的显示尺寸
  var displayWidth  = canvas.clientWidth;
  var displayHeight = canvas.clientHeight;

  // 检尺寸是否相同
  if (canvas.width  != displayWidth ||
      canvas.height != displayHeight) {

    // 设置为相同的尺寸
    canvas.width  = displayWidth;
    canvas.height = displayHeight;
  }
}
大多数WebGL应用是变化的,所以我们需要在绘制之前调用这个方法调画布为期望的大小。
function drawScene() {
   resize(gl.canvas);
   ...
运行下面的代码:
"use strict";

function main() {
  // Get A WebGL context
  /** @type {HTMLCanvasElement} */
  var canvas = document.getElementById("canvas");
  var gl = canvas.getContext("webgl");
  if (!gl) {
    return;
  }

  // setup GLSL program
  var program = webglUtils.createProgramFromScripts(gl, ["2d-vertex-shader", "2d-fragment-shader"]);
  gl.useProgram(program);

  // look up where the vertex data needs to go.
  var positionAttributeLocation = gl.getAttribLocation(program, "a_position");

  // lookup uniforms
  var colorLocation = gl.getUniformLocation(program, "u_color");
  var matrixLocation = gl.getUniformLocation(program, "u_matrix");

  // Create a buffer to put three 2d clip space points in
  var positionBuffer = gl.createBuffer();

  // Bind it to ARRAY_BUFFER (think of it as ARRAY_BUFFER = positionBuffer)
  gl.bindBuffer(gl.ARRAY_BUFFER, positionBuffer);

  requestAnimationFrame(drawScene);

  // Draw the scene.
  function drawScene(now) {
    now *= 0.001; // convert to seconds

    resize(gl.canvas);

    // Clear the canvas.
    gl.clear(gl.COLOR_BUFFER_BIT);

    // Tell it to use our program (pair of shaders)
    gl.useProgram(program);

    // Turn on the attribute
    gl.enableVertexAttribArray(positionAttributeLocation);

    // Bind the position buffer.
    gl.bindBuffer(gl.ARRAY_BUFFER, positionBuffer);

    // Tell the attribute how to get data out of positionBuffer (ARRAY_BUFFER)
    var size = 2;          // 2 components per iteration
    var type = gl.FLOAT;   // the data is 32bit floats
    var normalize = false; // don't normalize the data
    var stride = 0;        // 0 = move forward size * sizeof(type) each iteration to get the next position
    var offset = 0;        // start at the beginning of the buffer
    gl.vertexAttribPointer(
        positionAttributeLocation, size, type, normalize, stride, offset)

    // Set Geometry.
    var radius = Math.sqrt(gl.canvas.width * gl.canvas.width + gl.canvas.height * gl.canvas.height) * 0.5;
    var angle = now;
    var x = Math.cos(angle) * radius;
    var y = Math.sin(angle) * radius;
    var centerX = gl.canvas.width  / 2;
    var centerY = gl.canvas.height / 2;
    setGeometry(gl, centerX + x, centerY + y, centerX - x, centerY - y);

    // Compute the matrices
    var projectionMatrix = m3.projection(gl.canvas.width, gl.canvas.height);

    // Set the matrix.
    gl.uniformMatrix3fv(matrixLocation, false, projectionMatrix);

    // Draw in red
    gl.uniform4fv(colorLocation, [1, 0, 0, 1]);

    // Draw the geometry.
    var primitiveType = gl.LINES;
    var offset = 0;
    var count = 2;
    gl.drawArrays(primitiveType, offset, count);

    requestAnimationFrame(drawScene);
  }

  function resize(canvas) {
    // Lookup the size the browser is displaying the canvas.
    var displayWidth  = canvas.clientWidth;
    var displayHeight = canvas.clientHeight;

    // Check if the canvas is not the same size.
    if (canvas.width  != displayWidth ||
        canvas.height != displayHeight) {

      // Make the canvas the same size
      canvas.width  = displayWidth;
      canvas.height = displayHeight;
    }
  }
}

// Fill the buffer with a line
function setGeometry(gl, x1, y1, x2, y2) {
  gl.bufferData(
      gl.ARRAY_BUFFER,
      new Float32Array([
          x1, y1,
          x2, y2]),
      gl.STATIC_DRAW);
}

main();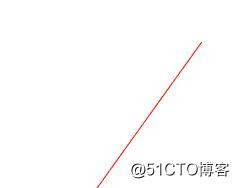
哪里出问题了?为什么这个线没有覆盖整个区域?
原因是当我们重置画布尺寸的时候还需要调用gl.viewport设置视域, gl.viewport告诉WebGL如何将裁剪空间(-1 到 +1)中的点转换到像素空间, 也就是画布内。当你第一次创建WebGL上下文的时候WebGL会设置视域大小和画布大小匹配, 但是在那之后就需要你自己设置。当你改变画布大小就需要告诉WebGL新的视域设置。
让我们来修改代码处理这个问题。由于WebGL上下文引用了画布,所以直接传递它的尺寸。
function drawScene() {
   resize(gl.canvas);
   gl.viewport(0, 0, gl.canvas.width, gl.canvas.height);
   ...
运行下面的代码:
"use strict";

function main() {
  // Get A WebGL context
  /** @type {HTMLCanvasElement} */
  var canvas = document.getElementById("canvas");
  var gl = canvas.getContext("webgl");
  if (!gl) {
    return;
  }

  // setup GLSL program
  var program = webglUtils.createProgramFromScripts(gl, ["2d-vertex-shader", "2d-fragment-shader"]);
  gl.useProgram(program);

  // look up where the vertex data needs to go.
  var positionAttributeLocation = gl.getAttribLocation(program, "a_position");

  // lookup uniforms
  var colorLocation = gl.getUniformLocation(program, "u_color");
  var matrixLocation = gl.getUniformLocation(program, "u_matrix");

  // Create a buffer to put three 2d clip space points in
  var positionBuffer = gl.createBuffer();

  // Bind it to ARRAY_BUFFER (think of it as ARRAY_BUFFER = positionBuffer)
  gl.bindBuffer(gl.ARRAY_BUFFER, positionBuffer);

  requestAnimationFrame(drawScene);

  // Draw the scene.
  function drawScene(now) {
    now *= 0.001; // convert to seconds

    resize(gl.canvas);

    gl.viewport(0, 0, gl.canvas.width, gl.canvas.height);

    // Clear the canvas.
    gl.clear(gl.COLOR_BUFFER_BIT);

    // Tell it to use our program (pair of shaders)
    gl.useProgram(program);

    // Turn on the attribute
    gl.enableVertexAttribArray(positionAttributeLocation);

    // Bind the position buffer.
    gl.bindBuffer(gl.ARRAY_BUFFER, positionBuffer);

    // Tell the attribute how to get data out of positionBuffer (ARRAY_BUFFER)
    var size = 2;          // 2 components per iteration
    var type = gl.FLOAT;   // the data is 32bit floats
    var normalize = false; // don't normalize the data
    var stride = 0;        // 0 = move forward size * sizeof(type) each iteration to get the next position
    var offset = 0;        // start at the beginning of the buffer
    gl.vertexAttribPointer(
        positionAttributeLocation, size, type, normalize, stride, offset)

    // Set Geometry.
    var radius = Math.sqrt(gl.canvas.width * gl.canvas.width + gl.canvas.height * gl.canvas.height) * 0.5;
    var angle = now;
    var x = Math.cos(angle) * radius;
    var y = Math.sin(angle) * radius;
    var centerX = gl.canvas.width  / 2;
    var centerY = gl.canvas.height / 2;
    setGeometry(gl, centerX + x, centerY + y, centerX - x, centerY - y);

    // Compute the matrices
    var projectionMatrix = m3.projection(gl.canvas.width, gl.canvas.height);

    // Set the matrix.
    gl.uniformMatrix3fv(matrixLocation, false, projectionMatrix);

    // Draw in red
    gl.uniform4fv(colorLocation, [1, 0, 0, 1]);

    // Draw the geometry.
    var primitiveType = gl.LINES;
    var offset = 0;
    var count = 2;
    gl.drawArrays(primitiveType, offset, count);

    requestAnimationFrame(drawScene);
  }

  function resize(canvas) {
    // Lookup the size the browser is displaying the canvas.
    var displayWidth  = canvas.clientWidth;
    var displayHeight = canvas.clientHeight;

    // Check if the canvas is not the same size.
    if (canvas.width  != displayWidth ||
        canvas.height != displayHeight) {

      // Make the canvas the same size
      canvas.width  = displayWidth;
      canvas.height = displayHeight;
    }
  }
}

// Fill the buffer with a line
function setGeometry(gl, x1, y1, x2, y2) {
  gl.bufferData(
      gl.ARRAY_BUFFER,
      new Float32Array([
          x1, y1,
          x2, y2]),
      gl.STATIC_DRAW);
}

main();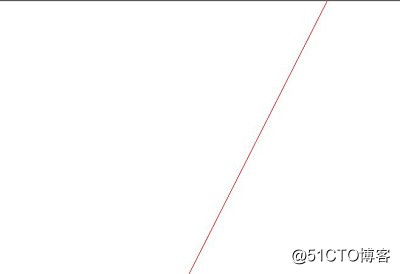
在窗口中打开,改变窗口大小,发现它总是填满窗口。
我知道你会问,为什么WebGL不在画布尺寸改变的时候自动帮我们修改视域? 原因是它不知道你如何以及为什么使用视域, 你可以渲染到一个帧缓冲或者做其他的事情需要不同的视域尺寸。 WebGL没办法知道你的意图所以就不能自动帮你设置视域。
如果你看了很多WebGL应用他们处理或者设置画布尺寸有很多不同的方式, 如果你好奇的话这里有一些我认为比较合适的方式。
对于 Retina 或 HD-DPI 该怎么办?
当你使用CSS像素值声明画布的尺寸时,这个叫做CSS像素值,可能不是真实像素值。 大多数现代智能手机有叫做高清显示(HD-DPI)或者苹果叫它“Retina Display”的特性。 对于文字和大多数CSS样式浏览器会自动绘制HD-DPI图形,但是对于WebGL, 由于你来控制绘制图形,所以取决于你想绘制一般分辨率还是“HD-DPI”品质。
为了实现这个我们需要获得window.devicePixelRatio的值, 这个值告诉我们1个CSS像素对应多少个实际像素。 我们可以修改 resize 方法处理这种情况。
function resize(gl) {
  var realToCSSPixels = window.devicePixelRatio;

  // 获取浏览器显示的画布的CSS像素值
  // 然后计算出设备像素设置drawingbuffer
  var displayWidth  = Math.floor(gl.canvas.clientWidth  * realToCSSPixels);
  var displayHeight = Math.floor(gl.canvas.clientHeight * realToCSSPixels);

  // 检查画布尺寸是否相同
  if (gl.canvas.width  !== displayWidth ||
      gl.canvas.height !== displayHeight) {

    // 设置为相同的尺寸
    gl.canvas.width  = displayWidth;
    gl.canvas.height = displayHeight;
  }
}
如果你有一个HD-DPI显示器,例如在智能手机上浏览这个网页的话, 你就会发现下面的线要比之前的线,也就是没有对HD-DPI做调整的线要细一些。
是否需要根据HD-DPI做调整取决于你自己。 在 iPhone4 或 iPhone5 上 window.devicePixelRatio 的值是 2, 意味着你要绘制 4 倍的像素个数。我确定在 iPhone6Plus 上那个值是 3, 意味着 9 倍的像素个数。这样就会拖慢你的应用, 实际上在游戏中常用的优化是绘制比显示数量要小的像素个数, 让GPU缩放它们。这其实取决于你的目的,如果你想绘制用于打印的图形, 你可能希望支持 HD-DPI,如果你想做一个游戏想给用户多种选择, 让他们根据自己的机器调整配置,控制显示分辨率。