文章目录
前言
1.随着网站的访问量增加,默认情况下Apache的单个日志文件也会越来越大
(1)日志文件占用磁盘空间很大查看相关信息不方便
2.对日志文件进行分割
(1)Apache自带rotatelogs分割工具实现
(2)第三方工具cronolog分割
一 .rotatelogs分割工具
1.配置网站的日志文件转交给rotatelogs分割处理
2.配置格式为
(1)错误日志
ErrorLog“| rotatelogs命令的绝对路径 -l 日志文件路径/网站名-error_%Y%m%d.log 86400%
(2)日常日志
CustomLog “| rotatelogs命令路径 -l 日志文件路径/网站名-access%Y%m%d.log 86400” combined
1.具体操作:
1.1.安装 httpd
yum install httpd -y
该软件会自带rotatelogs分割工具
1.2.然后修改相APACHE关配置
vi /etc/httpd/conf/httpd.conf


ErrorLog "| /usr/sbin/rotatelogs -l logs/www.one.error_%y%m%d.log 86400"
//会按天分割日志
ErrorLog "logs/error_log"    //保留此行会生成 error_log 文件,保存全部日志

 CustomLog "logs/access_log"combined  //保留此行会生成access_log文件,保存全部日志

CustomLog "| /usr/sbin/rotatelogs -l logs/www.two.access_%y%m%d.log 86400" common
//会按天分割日志
1.3 修改日期查看 ,果然按照每天日期进行分别创建当天日期命名的文件日志
[root@shanan conf]# date -s 09/06/20
Sun Sep  6 00:00:00 EDT 2020
[root@shanan conf]# date
Sun Sep  6 00:00:03 EDT 2020
[root@shanan conf]# su
[root@shanan conf]# cd /var/log/httpd/
[root@shanan httpd]# ls
access_log  www.one.error_200905.log   www.two.access_200905.log
err_log     www.two.access_200805.log
[root@shanan httpd]# ls
access_log  www.one.error_200905.log   www.two.access_200905.log
err_log     www.two.access_200805.log
[root@shanan httpd]# ls
access_log  www.one.error_200905.log   www.two.access_200905.log
err_log     www.two.access_200805.log  www.two.access_200906.log
[root@shanan httpd]# ls
access_log  error_log  www.one.error_200905.log  www.two.access_200805.log  www.two.access_200905.log  www.two.access_200906.log
[root@shanan httpd]# ll
total 96
-rw-r--r--. 1 root root 47529 Sep  6 00:01 access_log
-rw-r--r--. 1 root root  9991 Sep  6 00:01 error_log
-rw-r--r--. 1 root root  2019 Sep  5 01:36 www.one.error_200905.log
-rw-r--r--. 1 root root  4291 Aug  5 03:44 www.two.access_200805.log
-rw-r--r--. 1 root root 19463 Sep  5 01:38 www.two.access_200905.log
-rw-r--r--. 1 root root  3162 Sep  6 00:01 www.two.access_200906.log
二. Apache日志分割——第三方工具cronolog
1. rpm-ivh安装cronolog工具
2.配置网站日志文件转交给cronolog分割处理
配置格式为:
ErrorLog "| cronolog 命令的绝对路径  日志文件路径/网站名-error %Y%m%d.log"
CustomLog "| cronolog命令的绝对路径  日志文件路径/网站名%Y%m%d.log " combined
3.具体操作:
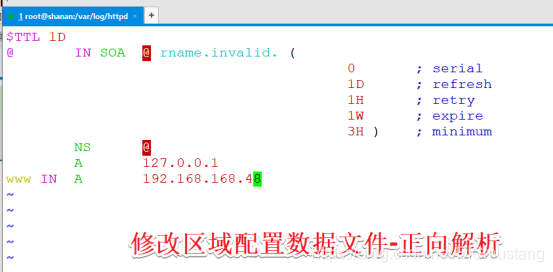
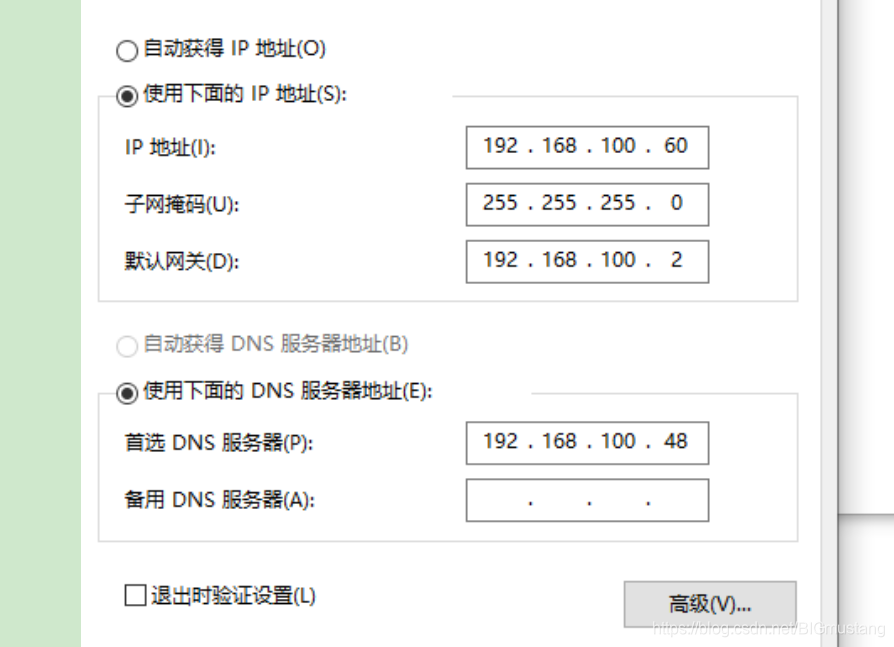
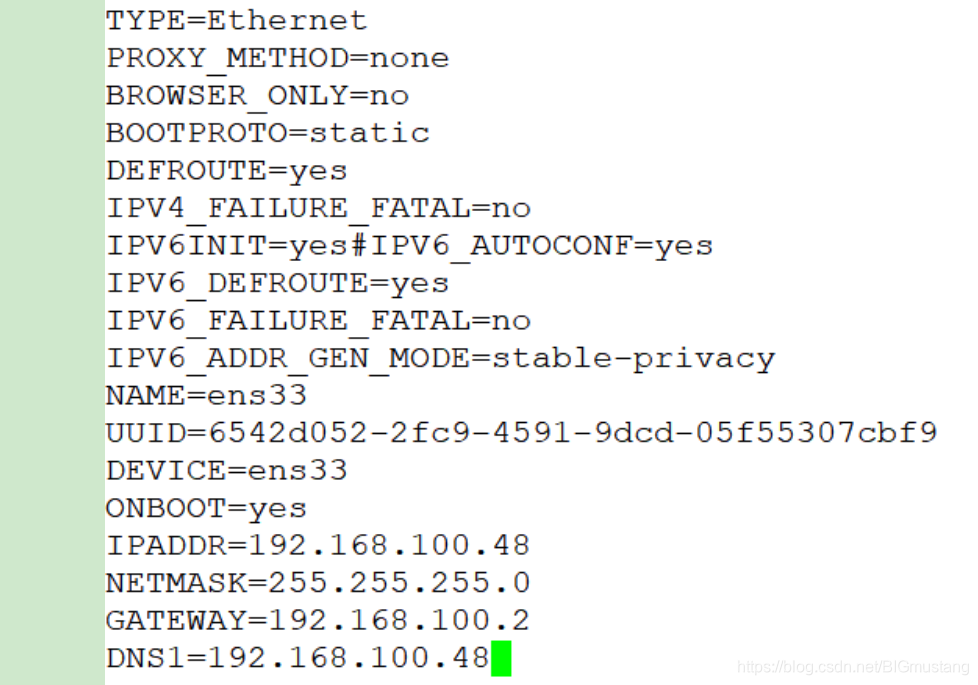
3.1修改DNS配置文件
[root@shanan httpd]# vi /etc/named.conf
[root@shanan httpd]# vi /etc/named.rfc1912.zones
cp -p /var/named/named.localhost /var/named/hello.com.zone
3.2 修改Apache 配置文件
[root@shanan conf]# vim httpd.conf
修改配置如下
ErrorLog "| /usr/sbin/cronolog logs/www.hello.com.error_%y%m%d.log"
CustomLog "| /usr/sbin/cronolog logs/www.hello.com.access_%y%m%d.log" combined
[root@shanan conf]# cd /var/log/httpd/
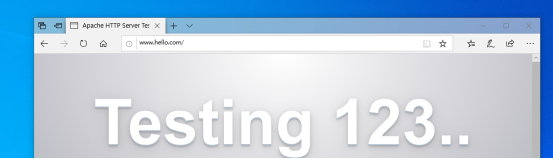
3.3访问浏览器,查看发现已自动生成了日志分割文件
[root@shanan httpd]# ls
www.hello.com.access_200906.log  www.hello.com.error_200906.log
三.部署AWStats日志分析系统
1.安装awstats
[root@shanan opt]# ls
awstats-7.6.tar.gz
[root@shanan opt]# tar zxvf awstats-7.6.tar.gz
[root@shanan awstats-7.6]# ls
docs  README.md  tools  wwwroot
[root@shanan awstats-7.6]# mv /opt/awstats-7.6 /usr/local/awstats
[root@shanan awstats-7.6]# cd /usr/local/awstats/tools/
[root@shanan tools]# ./awstats_configure.pl    //安装软件

----- AWStats awstats_configure 1.0 (build 20140126) (c) Laurent Destailleur-----
This tool will help you to configure AWStats to analyze statistics for
one web server. You can try to use it to let it do all that is possible
in AWStats setup, however following the step by step manual setup
documentation (docs/index.html) is often a better idea. Above all if:
- You are not an administrator user,
- You want to analyze downloaded log files without web server,
- You want to analyze mail or ftp log files instead of web log files,
- You need to analyze load balanced servers log files,
- You want to 'understand' all possible ways to use AWStats...
Read the AWStats documentation (docs/index.html).

-----> Running OS detected: Linux, BSD or Unix

-----> Check for web server install

Enter full config file path of your Web server.
Example: /etc/httpd/httpd.conf
Example: /usr/local/apache2/conf/httpd.conf
Example: c:\Program files\apache group\apache\conf\httpd.conf
Config file path ('none' to skip web server setup):
> /etc/httpd/conf/httpd.conf        // 手工输入

-----> Check and complete web server config file '/etc/httpd/conf/httpd.conf'
  Add 'Alias /awstatsclasses "/usr/local/awstats/wwwroot/classes/"'
  Add 'Alias /awstatscss "/usr/local/awstats/wwwroot/css/"'
  Add 'Alias /awstatsicons "/usr/local/awstats/wwwroot/icon/"'
  Add 'ScriptAlias /awstats/ "/usr/local/awstats/wwwroot/cgi-bin/"'
  Add '<Directory>' directive
  AWStats directives added to Apache config file.

-----> Update model config file '/usr/local/awstats/wwwroot/cgi-bin/awstats.model.conf'
  File awstats.model.conf updated.

-----> Need to create a new config file ?
Do you want me to build a new AWStats config/profile
file (required if first install) [y/N] ? y         //手工输入Y

-----> Define config file name to create
What is the name of your web site or profile analysis ?
Example: www.mysite.com
Example: demo
Your web site, virtual server or profile name:
> www.hello.com                                  // 手工输入

-----> Define config file path
In which directory do you plan to store your config file(s) ?
Default: /etc/awstats
Directory path to store config file(s) (Enter for default):
>                                                   // 回车

-----> Create config file '/etc/awstats/awstats.www.hello.com.conf'
 Config file /etc/awstats/awstats.www.hello.com.conf created.

-----> Restart Web server with '/sbin/service httpd restart'
Redirecting to /bin/systemctl restart httpd.service

-----> Add update process inside a scheduler
Sorry, configure.pl does not support automatic add to cron yet.
You can do it manually by adding the following command to your cron:
/usr/local/awstats/wwwroot/cgi-bin/awstats.pl -update -config=www.hello.com
Or if you have several config files and prefer having only one command:
/usr/local/awstats/tools/awstats_updateall.pl now
Press ENTER to continue...


A SIMPLE config file has been created: /etc/awstats/awstats.www.hello.com.conf
You should have a look inside to check and change manually main parameters.
You can then manually update your statistics for 'www.hello.com' with command:
> perl awstats.pl -update -config=www.hello.com
You can also read your statistics for 'www.hello.com' with URL:
> http://localhost/awstats/awstats.pl?config=www.hello.com

Press ENTER to finish...
2.安装完成,检查自动生成的配置文件


3.修改配置文件
vim awstats.www.hello.com.conf


修改图上两个参数
4. 创建文件夹 awstats
[root@shanan etc]# cd /var/lib
[root@shanan lib]# ls
alternatives  dbus       machines        polkit-1   selinux    vmware
authconfig    dhclient   misc            postfix    stateless  yum
chrony        games      NetworkManager  rpm        systemd
cs            initramfs  os-prober       rpm-state  tpm
dav           logrotate  plymouth        rsyslog    tuned
[root@shanan lib]# mkdir awstats
[root@shanan lib]# ls
alternatives  dav        logrotate       plymouth   rsyslog    tuned
authconfig    dbus       machines        polkit-1   selinux    vmware
awstats       dhclient   misc            postfix    stateless  yum
chrony        games      NetworkManager  rpm        systemd
cs            initramfs  os-prober       rpm-state  tpm
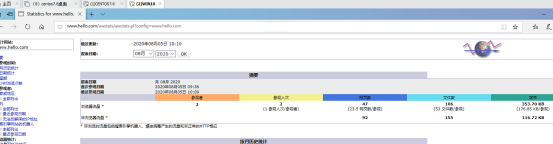
5.使用WIN10访问测试
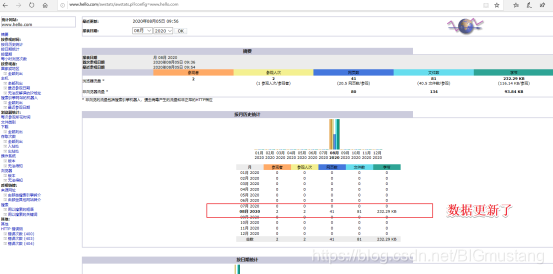
5.1访问http://www.hello.com/awstats/awstats.pl?config=www.hello.com
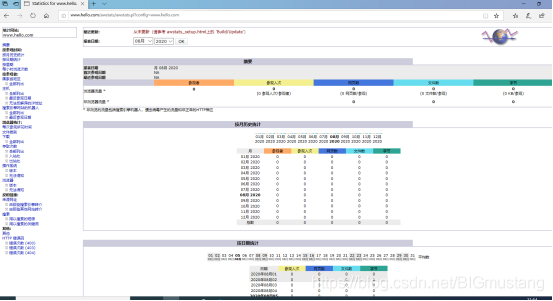
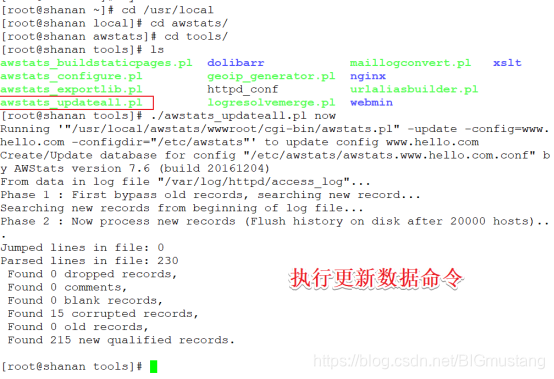
5.2这时后点击页面刷新,然后更新数据
6.优化方案
6.1 这样手动刷新比较麻烦,需要优化做个计划性任务,每5分钟自动刷新一次
[root@shanan tools]#
[root@shanan tools]# crontab -e
no crontab for root - using an empty one
crontab: installing new crontab

*/5 * * * * /usr/local/awstats/tools/awstats_updateall.pl now

[root@shanan tools]# crontab -l
*/5 * * * * /usr/local/awstats/tools/awstats_updateall.pl now
6.2 网页地址也比较长,我们进行优化一波…
[root@shanan tools]# cd /var/www/html
[root@shanan html]# vim aws.html
You have mail in /var/spool/mail/root
[root@shanan html]# systemctl restart httpd
[root@shanan html]# !vim
vim aws.html
You have new mail in /var/spool/mail/root
<html>
 <head>

  <meta http-equiv=refresh content="0;url=http://www.hello.com/awstats/awstats.pl?config=www.hello.com">
 </head>
 <body></body>
</html>

[root@shanan html]# systemctl restart httpd
下面就可以使用http://www.hello.com/aws.html 访问了