
介绍
最近写小程序,但是小程序的接口得通过https的形式访问,所以用nginx转发了一下。想到Google搜索引擎会提高https网站的权重,索性把我的网站改造成同时支持http和https了。看效果
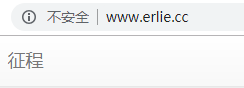
http形式访问
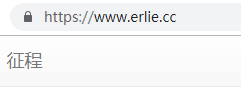
https形式访问
我是用LET’S ENCRYPT来生成证书的,这个应该是用的最多的一个工具,也很方便。
我直接参考了官方文档上关于在CentOS 7上用nginx来让网站支持https的教程
https://certbot.eff.org/lets-encrypt/centosrhel7-nginx
1.下载
sudo yum install certbot python2-certbot-nginx2.执行命令
默认修改/usr/local/nginx/conf目录下的nginx.conf文件
certbot --nginx -d www.erlie.cc如果不在这个目录可以用–nginx-server-root这个参数来指定
certbot --nginx --nginx-server-root=/yourpath -d www.erlie.cc 如果要为多个域名生成的话
-d 域名1 -d 域名2或者每次指定一个,执行多次
过程中会有2个选项1和2
如果选 1,则通过 HTTP 和 HTTPS 都可以访问。
如果选 2,则所有通过 HTTP 来的请求,都会被 301 重定向到 HTTPS
中途中可能会遇到各种环境问题,Google解决即可。
我说一个我遇到的坑,我原来编译的时候没有选择SSL module,所以我得重新编译一下,编译完成之后我是用如下命令重启的
nginx -s reload结果https访问一直有问题,后来我才意识到。sbin目录下重新生成的nginx得重启才能生效。
nginx -s reload只是热部署配置文件,二进制文件nginx并不生效
此时http://www.erlie.cc和https://www.erlie.cc就都可以访问了
nginx.conf配置
server {
	listen       80;
	server_name  www.erlie.cc;	#charset koi8-r;	access_log  /usr/local/nginx/logs/access.log combined;
	location = / {		root   /product/new-blog-fe/dist/view;		index  index.html;	}	location ~ .*\.html$ {		root   /product/new-blog-fe/dist/view;		index  index.html;	}	location / {		proxy_pass  http://127.0.0.1:8080/;
   }      location ~ .*\.(gif|jpeg|png|bmp|swf|flv|ico)$ {		root   /product/new-blog-fe;		if (-f $request_filename) {
		  expires 1d;
		  break;
	   }   }   location ~ .*\.(js|css)?$ {		root   /product/new-blog-fe;		if (-f $request_filename) {
		  expires 1d;
		  break;
	   }   }	#error_page  404              /404.html;
	# redirect server error pages to the static page /50x.html
	#	error_page   500 502 503 504  /50x.html;
	location = /50x.html {
		root   html;	}	listen 443 ssl; # managed by Certbot
	ssl_certificate /etc/letsencrypt/live/www.erlie.cc/fullchain.pem; # managed by Certbot	ssl_certificate_key /etc/letsencrypt/live/www.erlie.cc/privkey.pem; # managed by Certbot	include /etc/letsencrypt/options-ssl-nginx.conf; # managed by Certbot	ssl_dhparam /etc/letsencrypt/ssl-dhparams.pem; # managed by Certbot}123456789101112131415161718192021222324252627282930313233343536373839404142434445464748495051525354555657
最后面的5行就是前面的命令自动帮你生成的,非常方便,都不用自己配置。
可以看到我把接口的请求都转发到本地http://127.0.0.1:8080/,你应该猜到了这是一个Spring Boot项目
前端怎么写?
为了让前端在访客通过http方式访问的时候调用http接口。通过https访问的时候调用https接口,我是这样做的
nb.js
var conf = {
serverHot : window.location.origin};var _nb = { request: function (param) {
var _this = this; $.ajax({ type : param.method || 'get',
url : param.url || '',
dataType : param.type || 'json',
data : param.data || '',
xhrFields : {withCredentials: true},
crossDomain: true,
contentType: param.contentType || 'application/x-www-form-urlencoded;charset=UTF-8',
success: function (res) {
typeof param.success === 'function' && param.success(res.data, res.msg);
}, error: function (err) {
typeof param.error === 'function' && param.error(err.statusText);
} }) }, // 获取服务器地址 getServerUrl : function(path) {
return conf.serverHot + path;
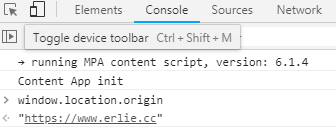
}}module.exports = _nb;123456789101112131415161718192021222324252627282930window.location.origin为拿到https://www.erlie.cc类似这样的请求地址,可以在浏览器自己试一下
user-service.js请求用户相关的接口
var _nb = require('util/nb.js');
var _user = {    // 用户登录    login : function(userInfo, resolve, reject){
        _nb.request({            url     : _nb.getServerUrl('/user/login'),
            data    : userInfo,            method  : 'POST',
            success : resolve,            error   : reject
        });    }}module.exports = _user;123456789101112131415
userInfo为请求参数
resolve为调用成功后执行的函数
reject为调用失败后执行的函数
自动续期
Let’s Encrypt 的证书90天就过期了,所以,你还要设置上自动化的更新脚本,最容易的莫过于使用 crontab 了。使用 crontab -e 命令加入如下的定时作业(每个月都强制更新一下)输入
0 0 * * * certbot renew