Listener监听器实现在线用户统计
1.前言
当大家刚开始接触Java Web做项目时,掌握了Servlet后,也许对Listener监听器的作用,以及代码编写并未能很好的掌握。本文通过实现在线用户统计以及在线用户列表的代码实操,让大家通过实际操作理解并能使用Listener监听器。
2.业务场景
你是否想在项目中显示一个在线人数而无从下手???
你是否想在自己的平台上查看当前登录的用户列表???
本文通过JSP+Servlet+监听器Listener为你实现,花5分钟一起来看看吧。
3.效果展示
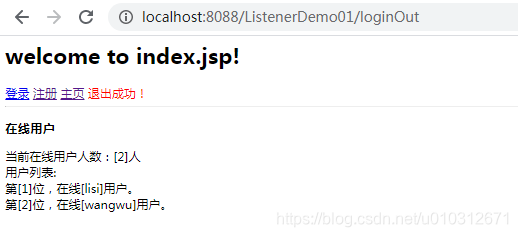
打开不同的浏览器进行登录。可以看到当前登录的人数以及用户列表。

当用户退出时,则注销当前用户。并且看到在线用户数量-1,以及用户列表也减少该用户。

4.代码实现
4.1 项目结构

4.2 页面准备
4.2.1 主页(index.jsp)
index.jsp用于显示当前登录用户(用户存在Session中),以及显示登录人数与登录用户的列表记录。还有login.jsp与register.jsp页面的跳转。由于登录用户的数据时存储在application域中的,因此需要在index.jsp中先注册,再登录。则可以看到用户登录列表。
<%@ page contentType="text/html;charset=UTF-8" language="java" %>
<%@ taglib prefix="c" uri="http://java.sun.com/jsp/jstl/core" %>
<%@ taglib prefix="fn" uri="http://java.sun.com/jsp/jstl/functions" %>
<html>
  <head>
    <title>主页</title>
  </head>
  <body>
  <h1>welcome to index.jsp!</h1>
  <c:if test="${session_user!=null}">
    欢迎您,${

    session_user.userName}
    <a href="loginOut">退出</a>
    <a href="">用户列表</a>
  </c:if>
  <c:if test="${session_user==null}">
    <a href="login.jsp">登录</a>
    <a href="register.jsp">注册</a>
  </c:if>
<a href="index.jsp">主页</a>
  <span style="color: red">${

    tip}</span>
  <hr/>
  <h3>在线用户</h3>
  当前在线用户人数:[${

    fn:length(onlineUser)}]人
  <br/>
  用户列表:<br/>
  <c:forEach items="${onlineUser}" var="user"  varStatus="u">
                第[${

    u.index+1}]位,在线[${

    user}]用户。<br/>
  </c:forEach>
  </body>
</html>
4.2.2 登录页(login.jsp)
PS:登录前,请先去register.jsp中注册用户。此处没有连接数据库,数据存储在缓存中。因此需要先注册,才能进行登录。
<%@ page contentType="text/html;charset=UTF-8" language="java" %>
<html>
<head>
    <title>Title</title>
</head>
<body>
<h1>登录页面</h1>
<form action="login.do" method="post">
    用户:<input type="text" name="username">
    <br/>
    密码:<input type="password" name="pwd"/>
    <br/>
    <input type="submit" value="登录" />
</form>
<span style="color: red">${

    tip}</span>
</body>
</html>
4.2.3 注册页(register.jsp)
PS:注册成功后,数据会存储在application域中。当用户登录时,把用户输入与application域的数据进行比较,用户存在则登录成功。
<%@ page contentType="text/html;charset=UTF-8" language="java" %>
<html>
<head>
    <title>Title</title>
</head>
<body>
<h1>注册页面</h1>
<form action="register.do" method="post">
    用户:<input type="text" name="username">
    <br/>
    密码:<input type="password" name="pwd"/>
    <br/>
    性别:<input type="radio" name="sex" value="1"/>男
        <input type="radio" name="sex" value="0"/>女
    <br/>
    <input type="submit" value="注册" />
</form>
</body>
</html>
4.2 Controller准备
4.2.1 处理登录的Controller
@WebServlet(name = "LoginServlet", urlPatterns = "/login.do")
public class LoginServlet extends HttpServlet {


    protected void doPost(HttpServletRequest request, HttpServletResponse response) throws ServletException, IOException {


        String username = request.getParameter("username");
        String pwd = request.getParameter("pwd");
        //先从缓存中拿出users
        ServletContext sc = request.getServletContext();
        List<User> users = (List<User>) sc.getAttribute("users");
       for (User u : users) {


           if(u.getUserName().equals(username)&&u.getPwd().equals(pwd)){


               //跳转到index.jsp
               HttpSession session = request.getSession();
               session.setAttribute("session_user",u);
               request.getRequestDispatcher("index.jsp").forward(request,response);
           }
        }
       //提示用户名密码不正确
        request.setAttribute("tip","用户名密码不正确!");
        request.getRequestDispatcher("login.jsp").forward(request, response);
    }

    protected void doGet(HttpServletRequest request, HttpServletResponse response) throws ServletException, IOException {


        this.doPost(request, response);
    }
}
4.2.2 处理退出的控制器
@WebServlet(name = "LoginOutServlet",urlPatterns = "/loginOut")
public class LoginOutServlet extends HttpServlet {


    protected void doPost(HttpServletRequest request, HttpServletResponse response) throws ServletException, IOException {


        HttpSession session  = request.getSession();
        session.removeAttribute("session_user");
        request.setAttribute("tip","退出成功!");
        request.getRequestDispatcher("index.jsp").forward(request,response);
    }

    protected void doGet(HttpServletRequest request, HttpServletResponse response) throws ServletException, IOException {


        this.doPost(request,response);
    }
}
4.2.3 注册功能的控制器
@WebServlet(name = "RegisterServlet",urlPatterns = "/register.do")
public class RegisterServlet extends HttpServlet {


    protected void doPost(HttpServletRequest request, HttpServletResponse response) throws ServletException, IOException {


        //接收参数
       String username =  request.getParameter("username");
       String pwd =  request.getParameter("pwd");
        String sex = request.getParameter("sex");
        User user = new User(username,pwd,Integer.parseInt(sex));
       //把注册用户存储起来
       ServletContext sc =  request.getServletContext();
       List<User> users = (List<User>) sc.getAttribute("users");
        //把user存到缓存中(application)
        users.add(user);
        sc.setAttribute("users",users);
        request.setAttribute("tip","注册成功!请登录");
        request.getRequestDispatcher("login.jsp").forward(request,response);
    }

    protected void doGet(HttpServletRequest request, HttpServletResponse response) throws ServletException, IOException {


        this.doPost(request,response);
    }
}
4.3 Listener监听器编写
监听器中,瓜瓜写了大量注释。简洁易懂,大家放心阅读。
/**
 *在线用户监听器
 */
@WebListener()
public class OnLineListener implements ServletContextListener,
        HttpSessionListener, HttpSessionAttributeListener {


    //创建一个application变量
    ServletContext  application = null;

    // Public constructor is required by servlet spec
    public OnLineListener() {


    }

    //监听服务器启动的method
    public void contextInitialized(ServletContextEvent sce) {


        System.out.println("------------服务器启动了---------------");
        //创建一个List<user>,并把该list存到application中
        List<User> users = new ArrayList<>();
        application =  sce.getServletContext();
        //创建一个onlineUser来存在线用户
        List<String> onlineUser = new ArrayList<>();
        application.setAttribute("users",users);
        application.setAttribute("onlineUser",onlineUser);
    }

    public void contextDestroyed(ServletContextEvent sce) {


        System.out.println("--------------服务器关闭了----------------");
    }

    // HttpSessionListener implementation
    //session是基于服务器端创建的。当一个浏览器访问服务器就会创建一个唯一session
    public void sessionCreated(HttpSessionEvent se) {


        System.out.println("-----session被创建了-----------");
        /**
         * 可以统计当前有多少人连接我们的服务器。(统计在线访问人数)
         */
    }

    public void sessionDestroyed(HttpSessionEvent se) {


        /* Session is destroyed. */
        System.out.println("--------session被销毁了------------");
        /**
         * 可以统计当前有多少人连接我们的服务器。(统计在线访问人数)
         */
    }

   /*
      attributeAdded()方法:监听session执行setAttr()时触发
      统计登录到该系统的用户
    */
    public void attributeAdded(HttpSessionBindingEvent sbe) {


        System.out.println("-----session设值----"+sbe.getName()+","+sbe.getValue());
        User user = (User) sbe.getValue();
        //创建一个list来记录在线用户
        HttpSession session = sbe.getSession();
        application  = session.getServletContext();
        //先从缓存application域中拿到  onlineUser
        List<String> onlineUser = (List<String>) application.getAttribute("onlineUser");
        if(onlineUser.indexOf(user.getUserName())==-1){

    //新增加的userName在onlineUser中不存在
            onlineUser.add(user.getUserName());
            //存储到application中
            application.setAttribute("onlineUser",onlineUser);
        }
    }

    /**
     * attributeRemoved方法:监听session.removeAttr(key,val)
     * 当用户退出时,则注销,并且更新在线用户数量与列表
     */
    public void attributeRemoved(HttpSessionBindingEvent sbe) {


        System.out.println("-----session销毁----"+sbe.getName()+","+sbe.getValue());
        //创建一个list来记录在线用户
        HttpSession session = sbe.getSession();
        application  = session.getServletContext();
        User user = (User) sbe.getValue();
        //先从缓存application域中拿到  onlineUser
        List<String> onlineUser = (List<String>) application.getAttribute("onlineUser");
        onlineUser.remove(user.getUserName());
        application.setAttribute("onlineUser",onlineUser);
    }

    public void attributeReplaced(HttpSessionBindingEvent sbe) {


    }
}
5. 知识点总结
5.1 Listener让我们更好的掌握4个作用域
Listener监听器,可以监听Session的创建与销毁;也可以监听application域的创建与销毁;还可以Session域的setAttribute(key,val),removeAttribute(key,val)方法进行监听。这些都需要我们对4个作用域有一定的理解与认识,才能更好的在开发中使用Listener监听器。(4个作用域的区别还不会??赶紧点我)
5.2 Listener其他扩展
5.2.1 实现网站点击率
sessionCreated(HttpSessionEvent se){

    }
sessionDestroyed(HttpSessionEvent se){

    }
当打开一个浏览器访问项目127.0.0.1:8080/项目名,sessionCreated(){}方法就会被执行。而当关闭该浏览器时,则会执行sessionDestroyed(){}。因此,我们可以通过这2个方法,实现一个访问人数,或者点击率的功能。
5.2.2 服务器日志
contextInitialized(ServletContextEvent sce){

    }
contextDestroyed(ServletContextEvent sce){

    }
这2个方法用于监听application域,本篇博客,瓜瓜也使用了这2个方法来进行创建在线登录人数List。这2个方法监听了整个Web容器的生命周期,我们可以拓展很多功能。
6. 附上完整源代码
源代码下载:https://download.csdn.net/download/u010312671/12562328