Introduction - 介绍
Raspbian 是专门用于 ARM 卡片式计算机 Raspberry Pi® “树莓派”的操作系统, 其基于 Debian 开发,针对 Raspberry Pi 硬件优化。
Raspbian 并非由树莓派的开发与维护机构 The Raspberry Pi Foundation “树莓派基金会” 官方支持。其维护者是一群 Raspberry Pi 硬件和 Debian 项目的爱好者。
准备的材料
笔记本电脑 Windows 10
解压软件(最新版win10自带zip解压),没有就下载 7zip
树莓派2B主板+电源
键盘+鼠标
显示器+HDMI线+电源
网线或者无线网卡(Pi 2没有wifi模块,二代之后才有)
键鼠用一次就基本用不上了。。显示器常规电脑显示器就行,没必要买树莓派专属坑爹屏幕,后面都可以远程解决

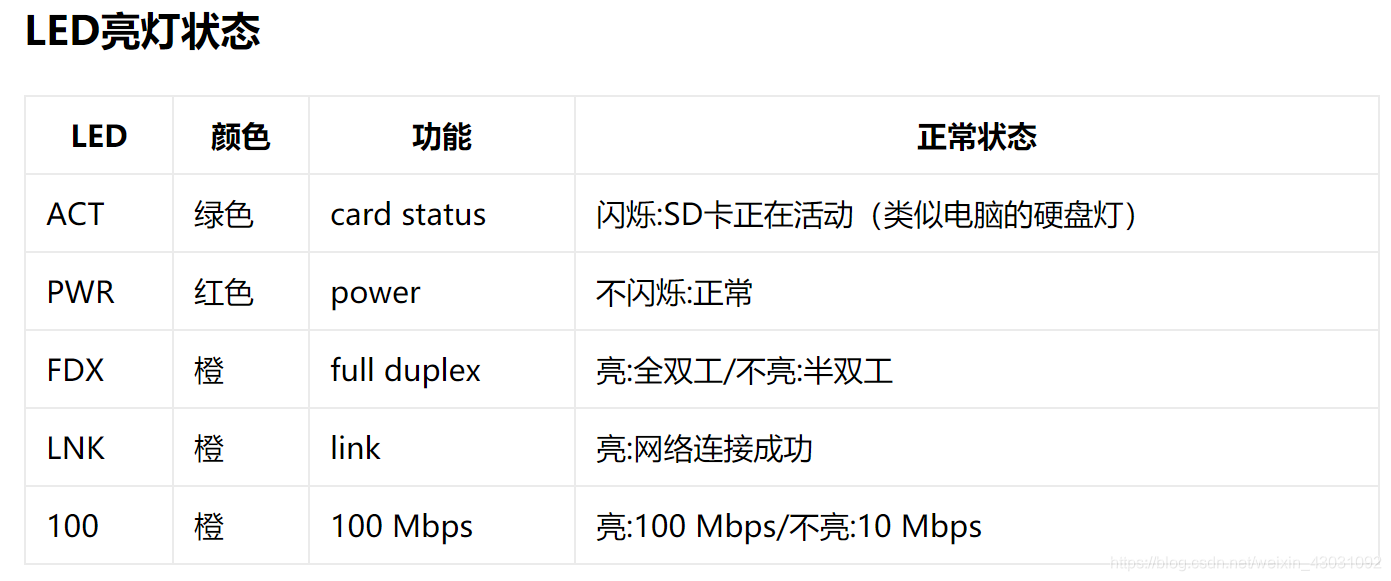
LED指示灯解读

Pi 2

参数
CPU: 900MHz ARM Cortex-A7
RAM: 1GB
USB ports: 4
40 GPIO 针脚
支持HDMI
3.5mm 音频接口
Camera interface (CSI)
Display interface (DSI)
MicroSD卡
Micro USB 5V,功率5W
RJ45网线接口(无WiFi、无蓝牙)
上手
下载系统镜像Raspberry Pi OS
Raspberry Pi OS (previously called Raspbian) is our official operating system for all models of the Raspberry Pi.
这段话出自Rasp中berry Pi Downloads - Software for the Raspberry Pi,说普通话就是树莓派家的原生系统支持所有型号的树莓派,所以我这里就选择Raspberry Pi OS 系统(以前叫做Raspbian)。它是由树莓派官方深度定制的硬件驱动与软件程序。我是第一次使用树莓派,还是下载这个为好。
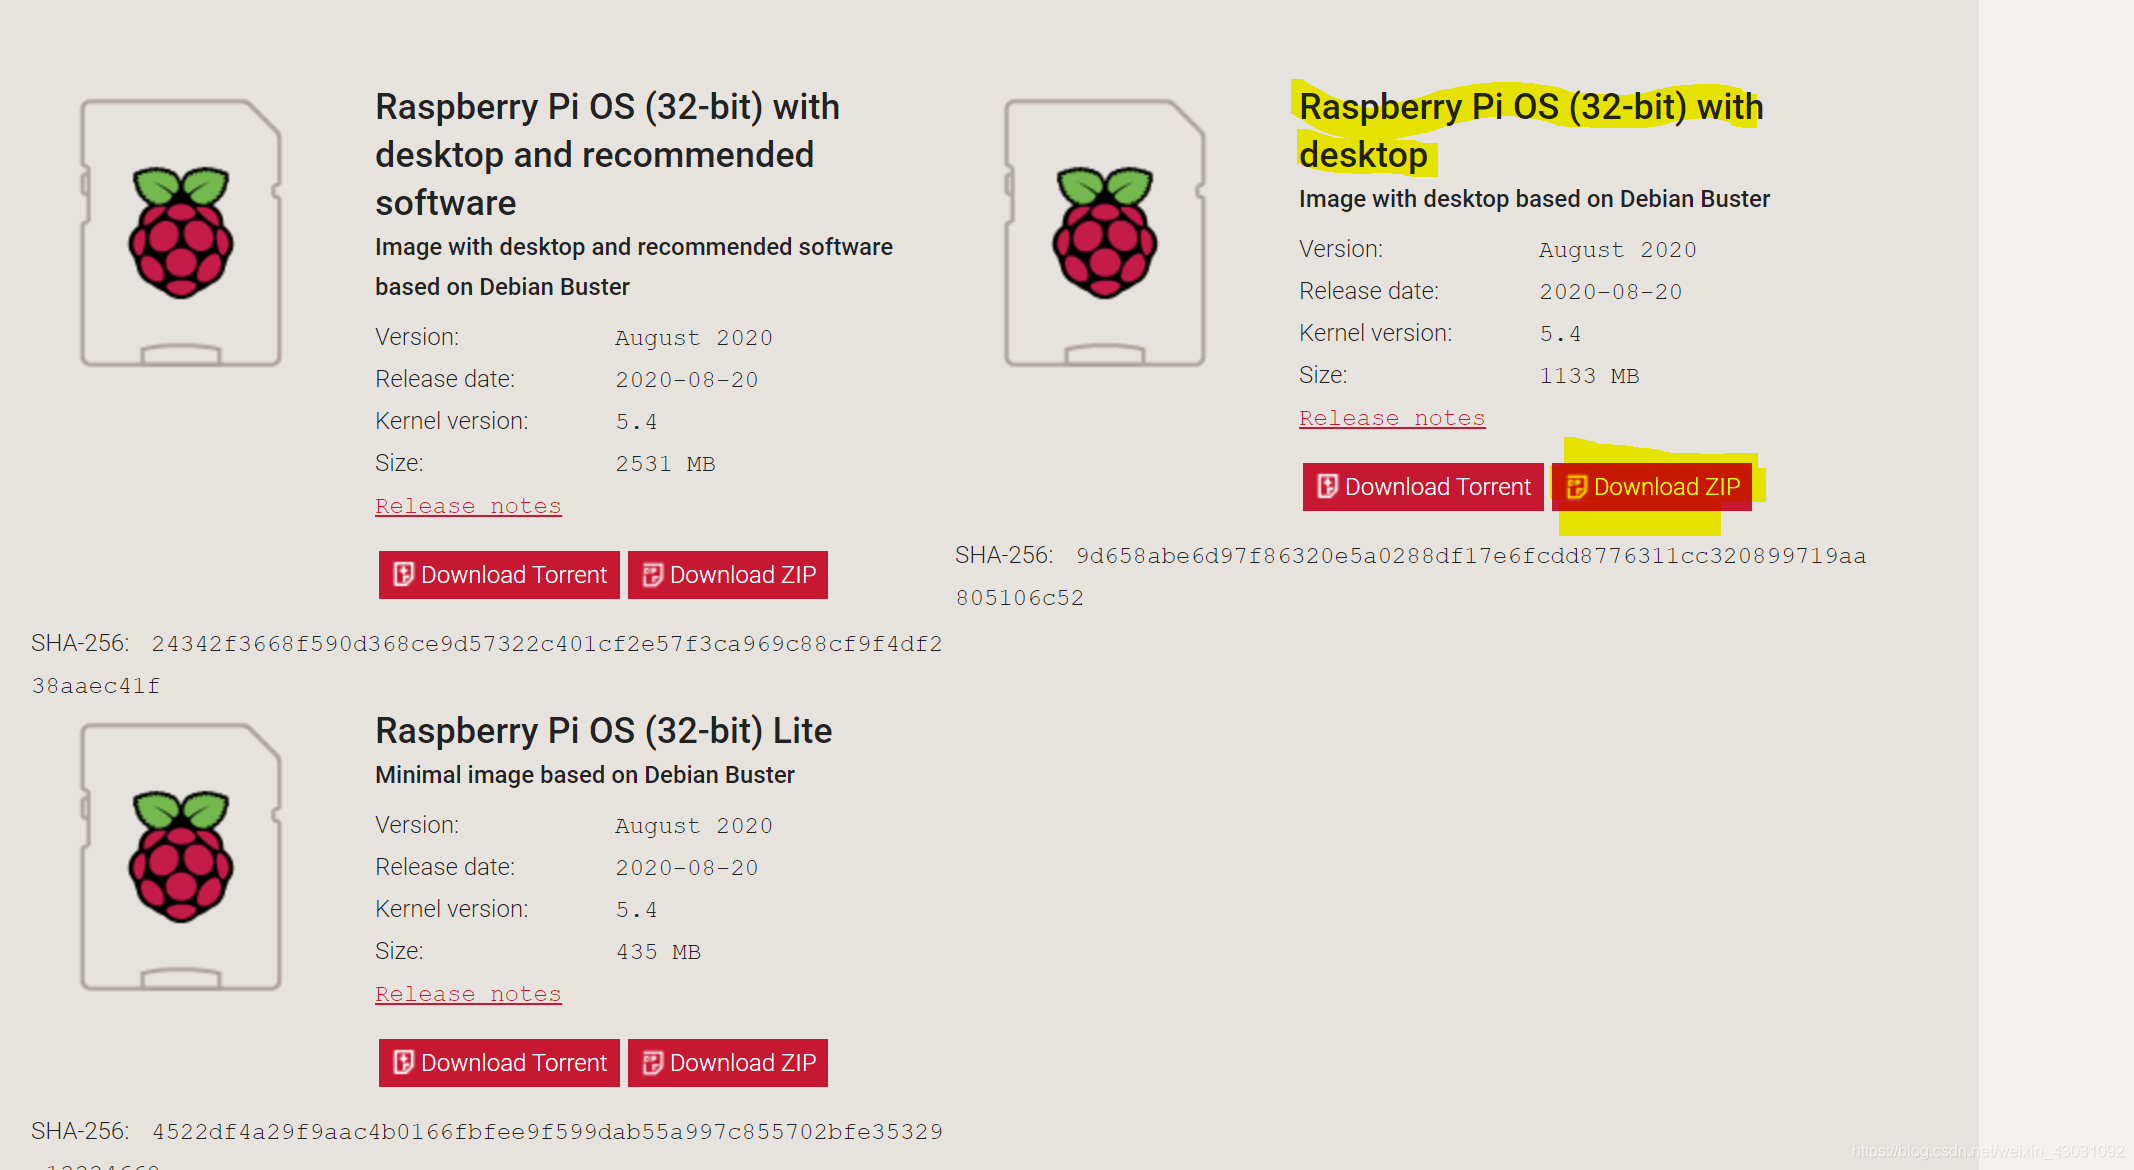
Raspberry Pi OS 也分为三种:
32 位 Lite 版(无桌面)
32 位桌面版
32 位桌面版(含常用软件)
我选择的是32 位桌面版,树莓派官方os下载地址(网速感人。。。),附上清华的ras os armhf链接
吐槽下清华的树莓派镜像源,人都看傻了。。看了好久才懂。。看来是我修为不够
不过清华镜像的Qt、conda镜像用起来真爽
raspios32 位 Lite 版(无桌面) 的清华下载链接

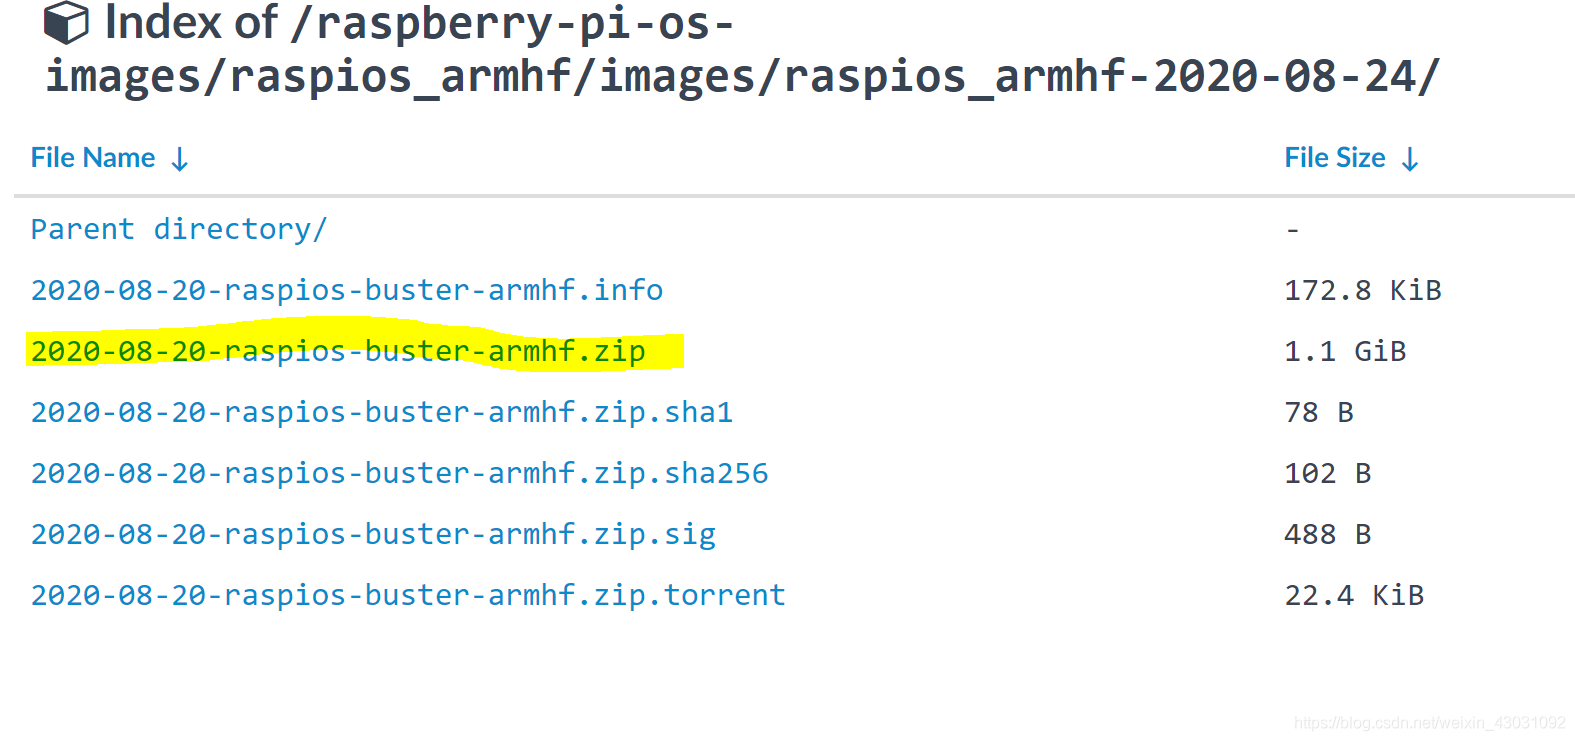
解压OS
把OS写入到SD卡
关于SD card 大小
For installation of Raspberry Pi OS with desktop and recommended software (Full) via NOOBS the minimum card size is 16GB. For the image installation of Raspberry Pi OS with desktop and recommended software, the minimum card size is 8GB. For Raspberry Pi OS Lite image installations we recommend a minimum of 4GB.
上面说的是OS桌面版(带常用软件的版本)通过NOOBS安装至少要16G卡,image安装OS桌面版(带常用软件的版本)至少8G,OS lite(无桌面)至少4G
关于SD card class种类
The card class determines the sustained write speed for the card; a class 4 card will be able to write at 4MB/s, whereas a class 10 should be able to attain 10 MB/s. However, it should be noted that this does not mean a class 10 card will outperform a class 4 card for general usage, because often this write speed is achieved at the cost of read speed and increased seek times.
这上面说了和没说一样,class10当然比class4快啊,但是也没有说最低的class。。。
所需软件
win32DiskImager国外下载地址
或者是 Raspberry Pi Imager for windows 下载地址
当然,国外xx网站下载慢,给出 Raspberry Pi Imager for windows 清华下载地址

安装完imager之后,打开之后点击最左边的按钮选择ERASE格式化,中间按钮选择SD卡,然后开始Write格式化。

格式化完成后点击最左边的按钮选择镜像,下拉到最底下选择Use Custom(自定义),其它都是在线下载(慢的一批)
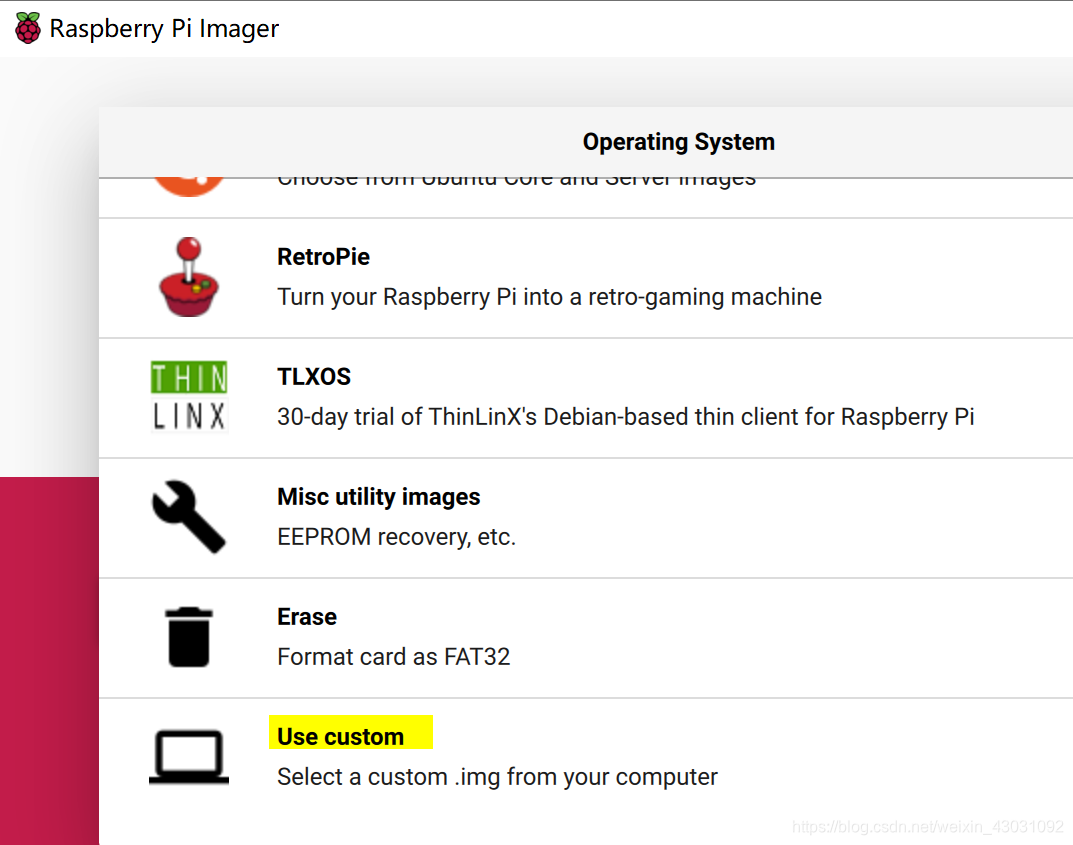

选择好自己下好的img镜像和sd卡之后,就可以开始写入了(Write),写入完成之后软件会自动检测(Verify)是否正确烧录


修改config.txt
重新插卡到电脑,打开该配置文件,默认是下面的样子
# For more options and information see
# http://rpf.io/configtxt
# Some settings may impact device functionality. See link above for details

# uncomment if you get no picture on HDMI for a default "safe" mode
#hdmi_safe=1

# uncomment this if your display has a black border of unused pixels visible
# and your display can output without overscan
#disable_overscan=1

# uncomment the following to adjust overscan. Use positive numbers if console
# goes off screen, and negative if there is too much border
#overscan_left=16
#overscan_right=16
#overscan_top=16
#overscan_bottom=16

# uncomment to force a console size. By default it will be display's size minus
# overscan.
#framebuffer_width=1280
#framebuffer_height=720

# uncomment if hdmi display is not detected and composite is being output
#hdmi_force_hotplug=1

# uncomment to force a specific HDMI mode (this will force VGA)
#hdmi_group=1
#hdmi_mode=1

# uncomment to force a HDMI mode rather than DVI. This can make audio work in
# DMT (computer monitor) modes
#hdmi_drive=2

# uncomment to increase signal to HDMI, if you have interference, blanking, or
# no display
#config_hdmi_boost=4

# uncomment for composite PAL
#sdtv_mode=2

#uncomment to overclock the arm. 700 MHz is the default.
#arm_freq=800

# Uncomment some or all of these to enable the optional hardware interfaces
#dtparam=i2c_arm=on
#dtparam=i2s=on
#dtparam=spi=on

# Uncomment this to enable infrared communication.
#dtoverlay=gpio-ir,gpio_pin=17
#dtoverlay=gpio-ir-tx,gpio_pin=18

# Additional overlays and parameters are documented /boot/overlays/README

# Enable audio (loads snd_bcm2835)
dtparam=audio=on

[pi4]
# Enable DRM VC4 V3D driver on top of the dispmanx display stack
dtoverlay=vc4-fkms-v3d
max_framebuffers=2

[all]
#dtoverlay=vc4-fkms-v3d
我是用的屏幕是实验室里的800*480的HDMI,参考树莓派配置文件config.txt详细介绍进行修改即可
所以修改后我的config.txt为
# For more options and information see
# http://rpf.io/configtxt
# Some settings may impact device functionality. See link above for details

# uncomment if you get no picture on HDMI for a default "safe" mode
#hdmi_safe=1

# uncomment this if your display has a black border of unused pixels visible
# and your display can output without overscan
disable_overscan=1

# uncomment the following to adjust overscan. Use positive numbers if console
# goes off screen, and negative if there is too much border
#overscan_left=16
#overscan_right=16
#overscan_top=16
#overscan_bottom=16

# uncomment to force a console size. By default it will be display's size minus
# overscan.
framebuffer_width=800
framebuffer_height=480

# uncomment if hdmi display is not detected and composite is being output
hdmi_force_hotplug=1

# uncomment to force a specific HDMI mode (this will force VGA)
hdmi_group=2
hdmi_mode=2

# uncomment to force a HDMI mode rather than DVI. This can make audio work in
# DMT (computer monitor) modes
#hdmi_drive=2

# uncomment to increase signal to HDMI, if you have interference, blanking, or
# no display
#config_hdmi_boost=4

# uncomment for composite PAL
#sdtv_mode=2

#uncomment to overclock the arm. 700 MHz is the default.
#arm_freq=800

# Uncomment some or all of these to enable the optional hardware interfaces
#dtparam=i2c_arm=on
#dtparam=i2s=on
#dtparam=spi=on

# Uncomment this to enable infrared communication.
#dtoverlay=gpio-ir,gpio_pin=17
#dtoverlay=gpio-ir-tx,gpio_pin=18

# Additional overlays and parameters are documented /boot/overlays/README

# Enable audio (loads snd_bcm2835)
dtparam=audio=on

[pi4]
# Enable DRM VC4 V3D driver on top of the dispmanx display stack
dtoverlay=vc4-fkms-v3d
max_framebuffers=2

[all]
#dtoverlay=vc4-fkms-v3d
start_x=1
gpu_mem=128
开机
For the official Raspberry Pi OS, if you need to manually log in, the default user name is pi, with password raspberry. Remember the default keyboard layout is set to UK.
根据上面的描述,开机之后默认账号 pi
默认密码 raspberry
然而现在2020年了开机都不用输入密码了。。。

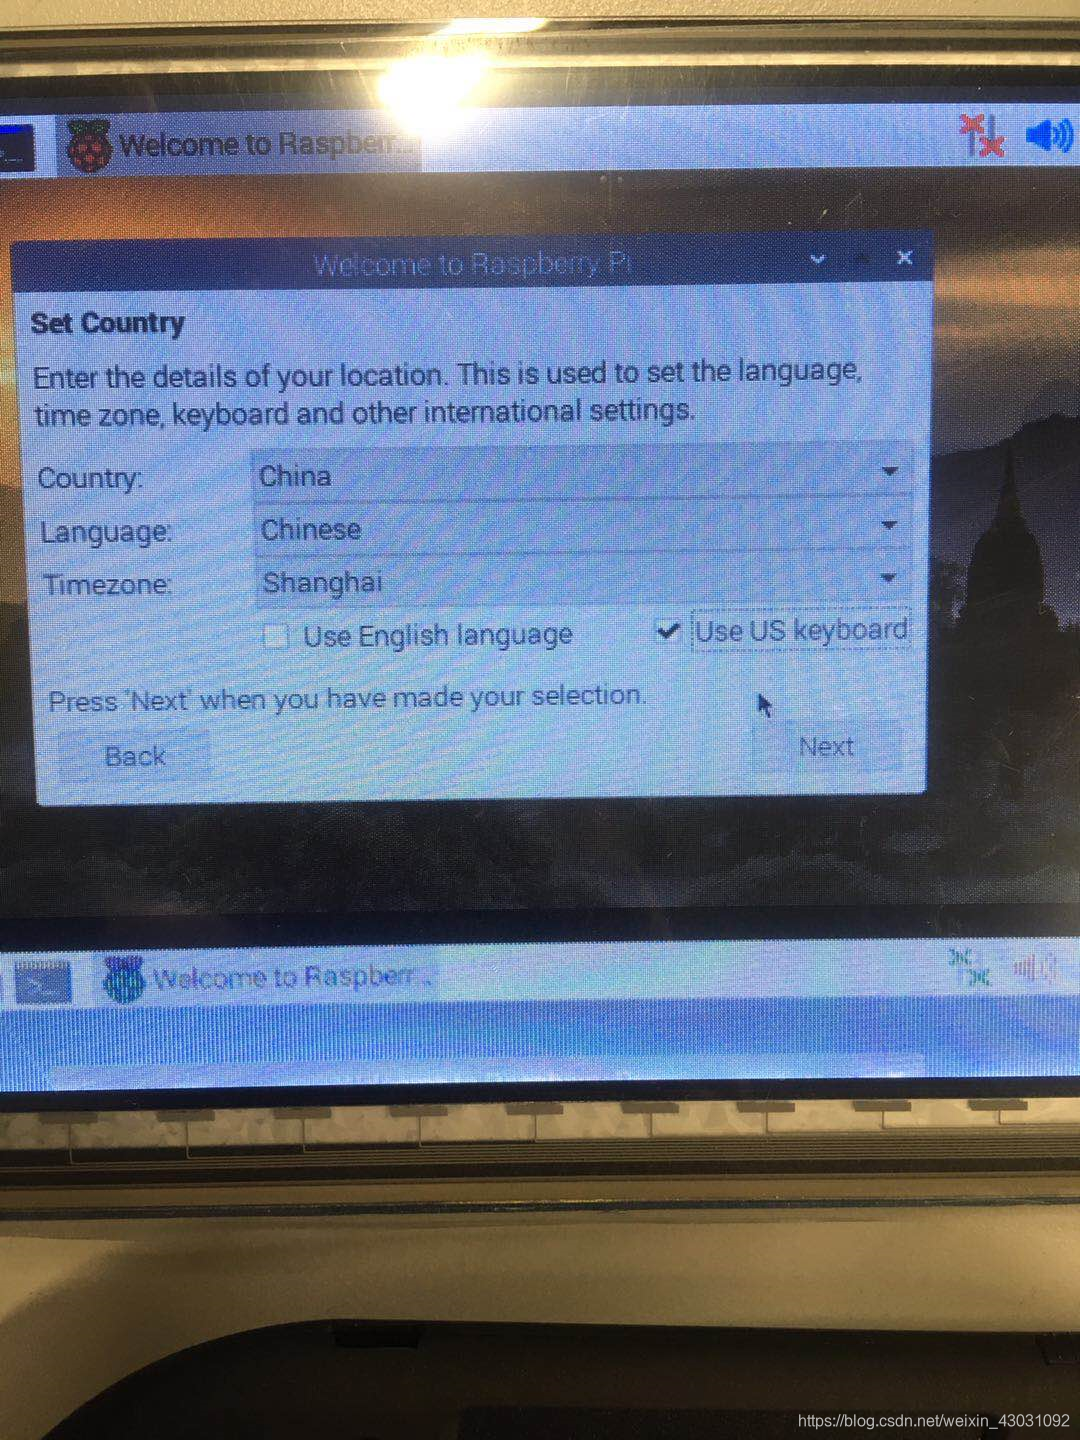
默认键盘布局为UK英国,我们需要修改密码和键盘布局(US)

下面这里是如果显示器有黑边就打勾,我不关心直接next

连接网络,这里随意

到Update Software的时候,建议不要Next,选择Skip跳过,毕竟没有设置国内镜像直接更新软件那速度不敢恭维

修改密码
修改完密码后不久会有一项更新软件 Update,先不要更新,慢的一批还浪费时间
设置国内清华镜像
这一步是为了之后下载软件的时候提高成功率和速度,原因你懂的,国外网速垃圾(防火墙保命)

这里修改这个文件需要root权限,在树莓派终端中输入下面的命令后回车
sudo passwd root
然后就可以设置root账户密码了,输入的时候是没有显示的哟,修改完之后运行reboot重启,然后在桌面新建一个文件sources.list,然后打开它粘贴进下面的内容,然后保存
deb http://mirrors.tuna.tsinghua.edu.cn/raspbian/raspbian/ buster main non-free contrib rpi
deb-src http://mirrors.tuna.tsinghua.edu.cn/raspbian/raspbian/ buster main non-free contrib rpi
在桌面新建一个文件raspi.list,然后打开它粘贴进下面的内容,然后保存
deb http://mirrors.tuna.tsinghua.edu.cn/raspberrypi/ buster main ui
随后注销(logout)当前用户pi,注销后选择其它other,输入root和密码即可使用root账户。

随后打开文件夹,进入/home/pi/Desktop目录后就能看到刚才建立的两个文件了,随后把sources.list复制到/etc/apt/sources.list,会弹窗选择覆盖,同理把新建立的raspi.list覆盖到/etc/apt/sources.list.d/raspi.list

然后打开终端,使用sudo apt-get update命令,更新软件源列表。

大概一分钟更新完之后注销root账户返回pi账户,回到pi账户就可以删除刚才在桌面新建立的文件了
安装远程连接
方法一 SSH
在树莓派中开启SSH
sudo /etc/init.d/ssh start
查看IP
ifconfig
然后使用putty或者其它支持ssh登录的软件登录上面显示出来的IP即可
方法二 windows自带的远程桌面连接
在树莓派中安装必备软件,
sudo apt-get install xrdp
apt-get install tightvncserver xrdp
随后还是用ifconfig查看IP,使用windows自带的远程桌面连接即可(笔记本电脑和树莓派要在同一个内部网络里面,可以是校园网、手机热点等,有公网IP的当我没说)


Conclusion
我在把镜像正确烧录到SD卡中插入树莓派后却不能像电脑装机一样进入配置界面。。。。。试了很多次花费了好几个小时,每一次打不开都想退坑,最后请教了一位闺蜜,她教我设置config就可以进入启动界面了,然后到我自己来的时候又不行了。。。试了不少的config内容。。。最后我换了一个Adafruit的电源就好了。。。。。都是5V2A的插头,咋就酱紫呢???
Whatever. Thank my bestie for patient and time. Thank CAU HV Lab for support.
References
- Buy a Raspberry Pi 2 Model B
- Raspberry Pi Downloads - Software for the Raspberry Pi
- 树莓派官方os下载地址
- Raspbian 镜像使用帮助
- 清华的ras os armhf链接
- SD cards大小需求官方解释
- win32DiskImager国外下载地址
- Raspberry Pi Imager for windows
- Raspberry Pi Imager for windows 清华下载地址
- raspios32 位 Lite 版(无桌面) 的清华下载链接
- Raspbian Lite配置
- 通过命令行在Raspbian Lite版本上配置树莓派无线网络WIFI
- 树莓派LED指示灯状态的解释
- 树莓派配置文件config.txt详细介绍
- 自定义树莓派分辨率
- 树莓派 Putty远程登录+远程桌面连接
- 实现windows远程登录树莓派桌面
- 树莓派 Raspberry Pi 启用 root 登陆账户
- 树莓派设置ssh远程登录root账户