先向大家报告一个好消息,11月15日,华为发布新版本的DevEco Studio和SDK,版本分别为2.0.10.201、3.0.1.93,支持Mac OS。
下载地址:DevEco Studio 2.0 Beta2 ,已安装过的同学可直接从DevEco更新。
版本说明:release notes
本文介绍了HarmonyOS Java应用的基本结构、资源文件、Page生命周期、Page导航、UI组件与布局、HiLog日志、ORM数据库等知识,展示了大部分UI组件的用法和页面效果。
本文是Hero系列文章之一,实现了完整的CRUD功能、支持国际化,可以运行在TV模拟器中,进行多页面交互与操作。另外,演示了Wearable Java应用开发。代码已上传到GitHub [Heroes-HarmonyOS],希望对初学者有所帮助。
项目概览
创建项目
首先通过DevEco Studio的模板创建我们的项目,进入File -> New -> New Project,然后选择TV设备、Empty Feature Ability(Java)模板: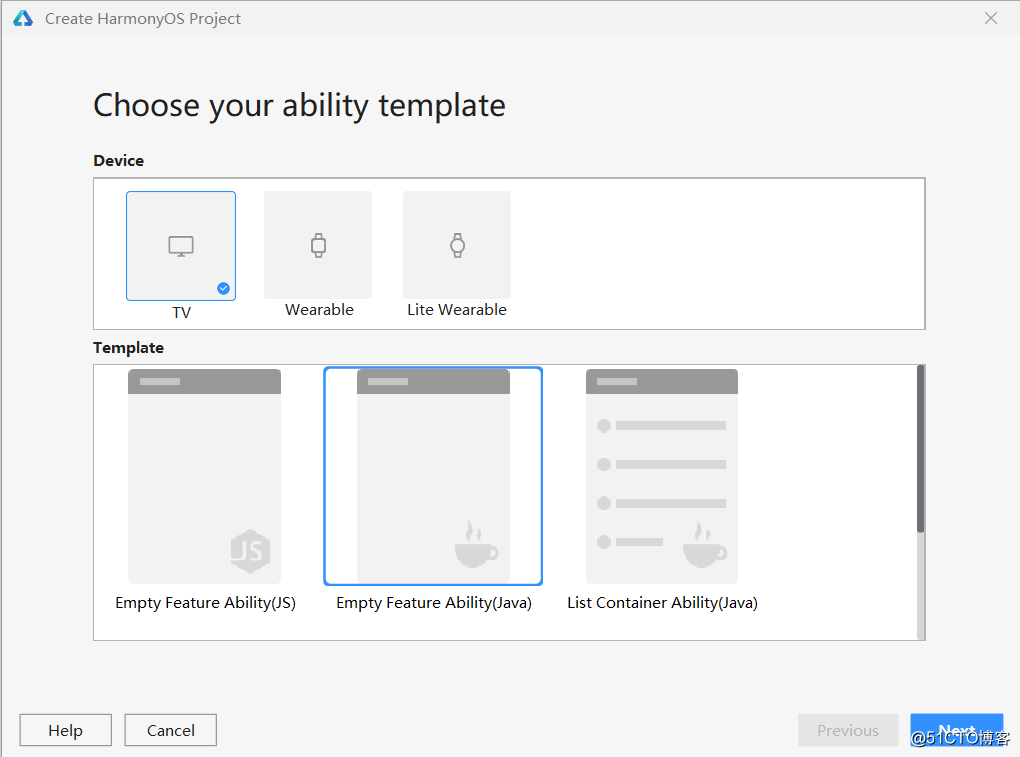
填写项目相关信息,创建项目。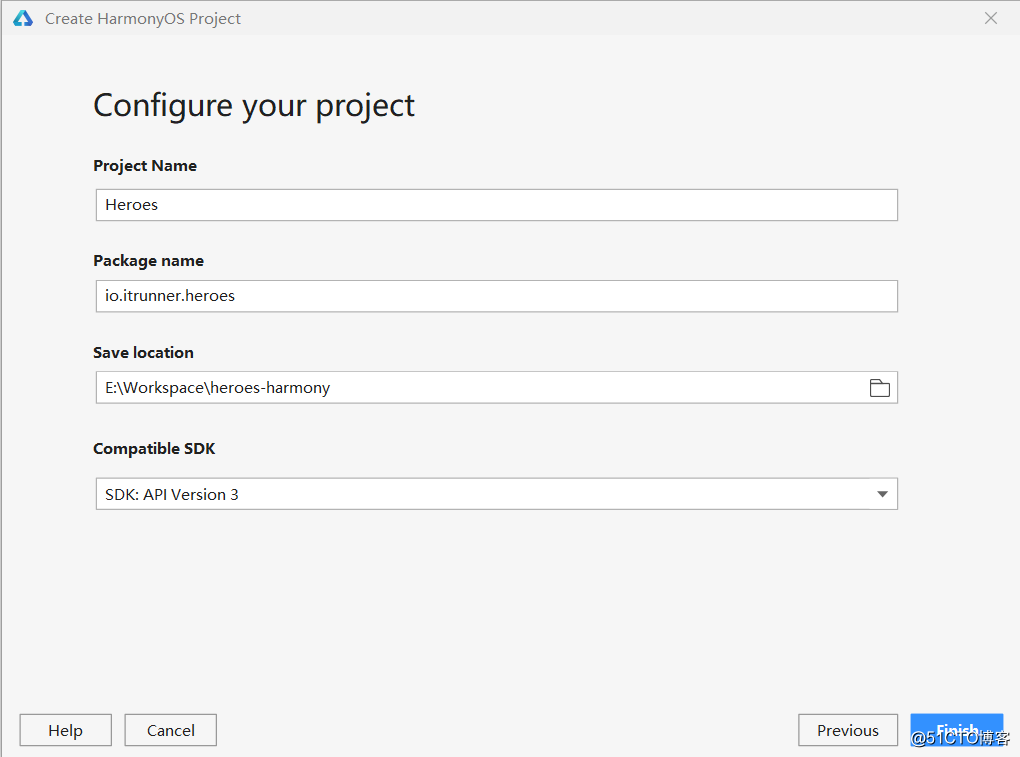
待下载编译完成后,进入Tools -> HVD Manager,启动TV模拟器: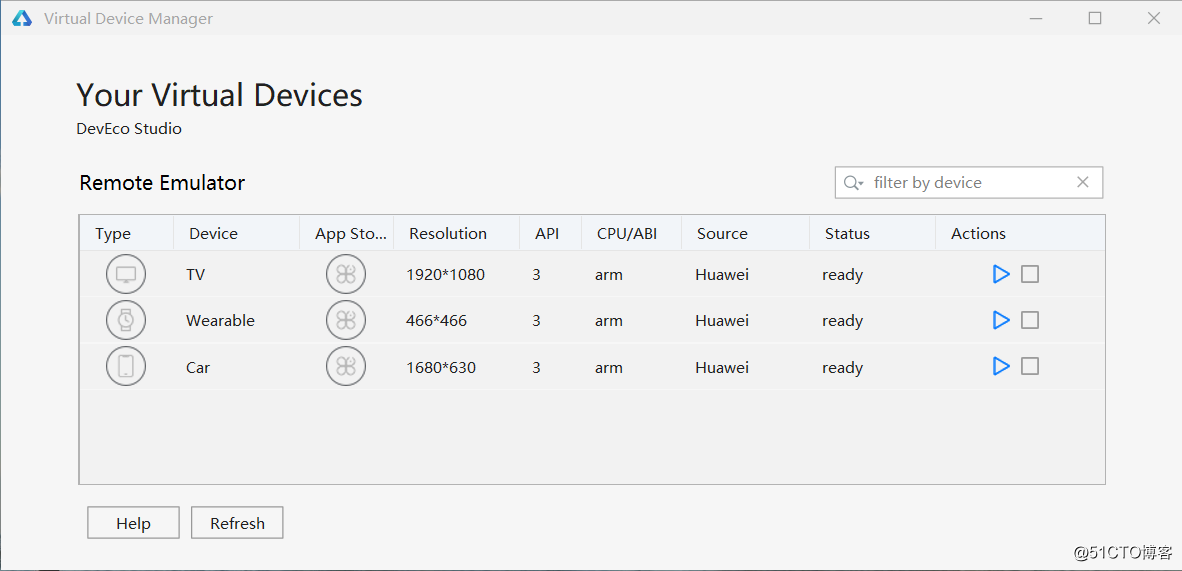
点击DevEco Studio工具栏中的【Run】按钮运行工程,在弹出的Select Deployment Target界面选择Connected Devices,在Run日志中会输出如下信息:
11/09 21:24:58: Launching io.itrunner.heroes
$ hdc shell am force-stop io.itrunner.heroes
$ hdc file send E:/Workspace/heroes-harmony/entry/build/outputs/hap/debug/entry-debug-unsigned.hap /sdcard/entry-debug-unsigned.hap
$ hdc shell bm install -p /sdcard/entry-debug-unsigned.hap
$ hdc shell am start -n "io.itrunner.heroes/io.itrunner.heroes.MainAbilityShellActivity"
从日志可以看到,启动项目后会把hap包发送到模拟器的sdcard目录进行安装。
成功启动后模拟器中显示如下界面: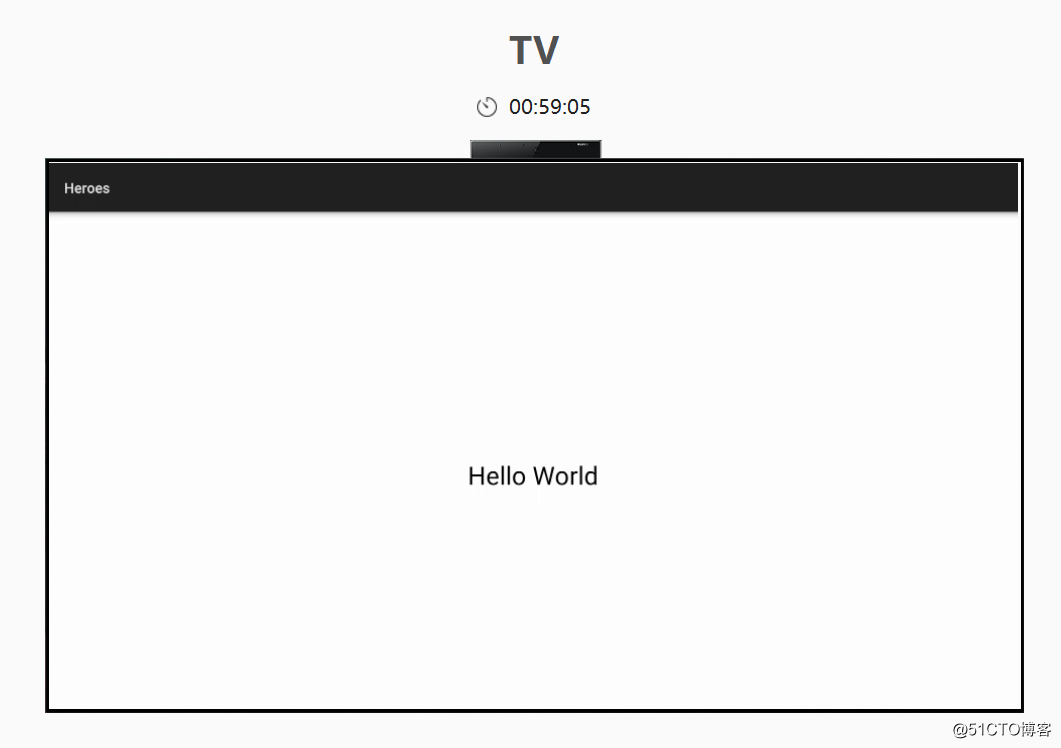
点击模拟器右侧工具栏中的圆形【Home】按钮回到主页面,按右箭头或拖动下方图标至末尾,点击【全部应用】,在打开的界面中可以找到Heroes应用,点击即可重新进入应用。
项目结构
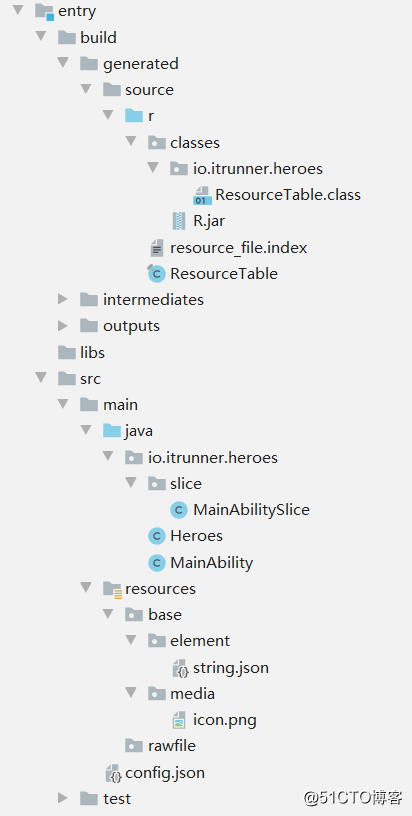
entry下有三个目录build、libs、src,分别保存编译后的代码或包、库文件、源代码。src采用了标准的Java工程目录结构,其中config.json为应用配置文件,主要包括应用的全局配置、设备配置、模块配置,详细信息请查阅官方文档配置文件的元素。例如,如果在"module"的"deviceType"属性中增加"wearable",则可以在手表中运行应用。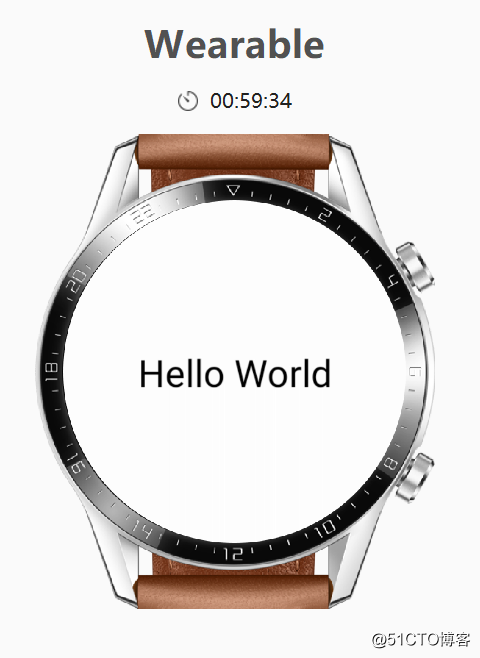
resources目录存放资源文件,可以存放element、media、animation、layout、graphic、profile、rawfile等资源。编译时根据资源类型、名称、ID等自动生成ResourceTable类。注意,不能手动修改这个文件,在Java程序中需要使用ResourceTable来引用资源。
ResourceTable
/*
 * Copyright(c) Huawei Technologies Co., Ltd. 2019 - 2020. All rights reserved.
 * Description: This header was automatically generated by restool from the resource data it found.
 *           It provides resource index information for applications, and should not be modified by hand.
 */

package io.itrunner.heroes;

public final class ResourceTable {
    public static final int Media_icon = 0x1000002;

    public static final int String_app_name = 0x1000000;
    public static final int String_mainability_description = 0x1000001;
}
源码中创建了Heroes、MainAbility、MainAbilitySlice三个Java类,三者分别继承了AbilityPackage、Ability、AbilitySlice,它们都是AbilityContext的子类。AbilityPackage是hap(模块)初始化的入口;一个Ability(这里指Page Ability,Feature Ability唯一支持的类型)即一个Page;AbilitySlice主要用于承载Ability的具体逻辑实现和界面UI,是应用显示、运行和跳转的最小单元。
资源文件
资源类型
resources目录包括两大类,一类为base与限定词目录,另一类为rawfile目录。
base与限定词目录
base目录是默认存在的目录;限定词目录需要开发者自行创建,目录名称由一个或多个表征应用场景或设备特征的限定词组合而成,包括语言、文字、国家或地区、横竖屏、设备类型和屏幕密度六个维度,以此实现国际化、不同屏幕不同布局、不同设备不同配置等。当resources目录中没有匹配的限定词目录时,会自动引用base目录中的资源文件。base目录与限定词目录均按照两级目录形式来组织,可以创建以下资源组目录来存放特定类型的资源文件:
| 资源组目录 | 目录说明 | 资源文件 |
|---|---|---|
| element | 元素资源,每一类数据都采用相应的JSON文件来表征。支持boolean(布尔型)、color(颜色)、float(浮点型)、intarray(整型数组)、integer(整型)、pattern(样式)、plural(复数形式)、strarray(字符串数组)、string(字符串) | 每个文件中只能包含同一类型的数据,文件名称建议与下面的文件名保持一致:boolean.json、color.json、float.json、intarray.json、integer.json、pattern.json、plural.json、strarray.json、string.json |
| media | 媒体资源,包括图片、音频、视频等非文本格式的文件 | 文件名可自定义 |
| animation | 动画资源,采用XML文件格式 | 文件名可自定义 |
| layout | 布局资源,采用XML文件格式 | 文件名可自定义 |
| graphic | 可绘制资源,采用XML文件格式 | 文件名可自定义 |
| profile | 其他类型文件,以原始文件形式保存 | 文件名可自定义 |
编译时,base与限定词目录中的资源文件会被编译成二进制文件,并赋予资源文件ID。
rawfile目录
rawfile目录支持创建多层子目录,目录名称可以自定义,其内可以自由放置各类资源文件。编译时,目录中的资源文件会被直接打包,不会赋予资源文件ID。
限定词目录
限定词目录的命名规则
- 限定词组合顺序:语言_文字_国家或地区-横竖屏-设备类型-屏幕密度。可以根据应用的使用场景和设备特征,选择其中的一类或几类限定词组成目录名称。
- 限定词连接方式:语言、文字、国家或地区之间采用下划线连接,其他限定词之间均采用中划线连接。例如:zh_Hant_CN、zh_CN-car-ldpi。
限定词取值范围
横竖屏:
- vertical:竖屏
- horizontal:横屏
设备类型
- car:车机
- tv:智慧屏
- wearable:智能穿戴
屏幕密度
- sdpi:小规模的屏幕密度(Small-scale Dots Per Inch),适用于120dpi及以下的设备。
- mdpi:中规模的屏幕密度(Medium-scale Dots Per Inch),适用于120dpi~160dpi的设备。
- ldpi:大规模的屏幕密度(Large-scale Dots Per Inch),适用于160dpi~240dpi的设备。
- xldpi:特大规模的屏幕密度(Extra Large-scale Dots Per Inch),适用于240dpi~320dpi的设备。
- xxldpi:超大规模的屏幕密度(Extra Extra Large-scale Dots Per Inch),适用于320dpi~480dpi的设备。
- xxxldpi:超特大规模的屏幕密度(Extra Extra Extra Large-scale Dots Per Inch),适用于480dpi~640dpi的设备。
引用资源
base与限定词目录中的资源
- XML文件和config.json引用资源文件的格式:$type:name。特别地,如果引用系统资源,则采用:$ohos:type:name。
在XML文件中引用string.json中名称为“app_name”的资源,如下:
<?xml version="1.0" encoding="utf-8"?>
<DirectionalLayout xmlns:ohos="http://schemas.huawei.com/res/ohos"
    ohos:width="match_parent"
    ohos:height="match_parent"
    ohos:orientation="vertical">
    <Text ohos:text="$string:app_name"/>
</DirectionalLayout>
在XML文件中引用graphic资源,如下:
<TextField
        ohos:id="$+id:hero_name"
        ohos:width="300vp"
        ohos:height="40vp"
        ohos:left_margin="20vp"
        ohos:text_size="20fp"
        ohos:text_alignment="vertical_center"
        ohos:padding="4vp"
        ohos:background_element="$graphic:black_border_element"/>
graphic目录中的black_border_element.xml文件内容如下:
<?xml version="1.0" encoding="utf-8"?>
<shape xmlns:ohos="http://schemas.huawei.com/res/ohos"
       ohos:shape="rectangle">
    <corners ohos:radius="10"/>
    <stroke ohos:width="2"
            ohos:color="#000"/>
</shape>
在config.json中引用资源,如下:
"icon": "$media:icon",
"description": "$string:mainability_description",- Java中引用资源文件的格式:ResourceTable.type_name。特别地,如果引用系统资源,则采用:ohos.global.systemres.ResourceTable.type_name。
在Java中引用color.json文件中类型为“Color”、名称为“red”的资源:
ohos.global.resource.ResourceManager resourceManager = abilityContext.getResourceManager();
int color = resourceManager.getElement(ResourceTable.Color_red).getColor();
在Java中引用string.json中的资源:
text.setText(ResourceTable.String_heroes);rawfile目录中的资源
通过指定文件路径来引用rawfile目录中的资源。
在Java中,引用一个路径为“resources/rawfile/example.js”的资源文件,如下:
ohos.global.resource.ResourceManager resourceManager = abilityContext.getResourceManager();
ohos.global.resource.RawFileEntry rawFileEntry = resourceManager.getRawFileEntry("resources/rawfile/example.js");
系统资源
| 系统资源名称 | 含义 | 类型 |
|---|---|---|
| ic_app | HarmonyOS应用的默认图标 | 媒体 |
| request_location_reminder_title | “请求使用设备定位功能”的提示标题 | 字符串 |
| request_location_reminder_content | “请求使用设备定位功能”的提示内容 | 字符串 |
HiLog日志
HarmonyOS Java SDK提供了HiLog来记录日志。DevEco专门提供了HiLog日志查看窗口。
HiLog
使用HiLog输出日志前需要定义HiLogLabel:
private static final HiLogLabel LOG_LABEL = new HiLogLabel(HiLog.LOG_APP, 0x00101, "Hero Database");HiLogLabel有三个参数type、domain和tag,意义和用法如下:
- type 日志类型,其值为HiLog.LOG_APP,表明为应用日志。
- domain service domain,十六进制整型,范围从0x0 到 0xFFFFF,建议使用0xAAABB格式,前三位代表子系统,后两位代表模块。
- tag 字符串常量,表明调用方法的类或服务。
HiLog支持DEBUG、INFO、WARN、ERROR、FATAL等日志级别,支持参数化输出:
HiLog.info(LOG_LABEL, "create database: %{public}s", DATABASE_NAME_ALIAS);参数支持隐私标识符 {public} 和 {private},当未提供时则为{private},日志输出时则显示为\<private>。
11-11 15:46:39.545 9579-9579/io.itrunner.heroes I 00101/Hero Database: create database: <private>查看HiLog
DevEco的HiLog窗口支持根据设备、包、日志级别显示日志,还可以输入domain、tag等关键字查询日志。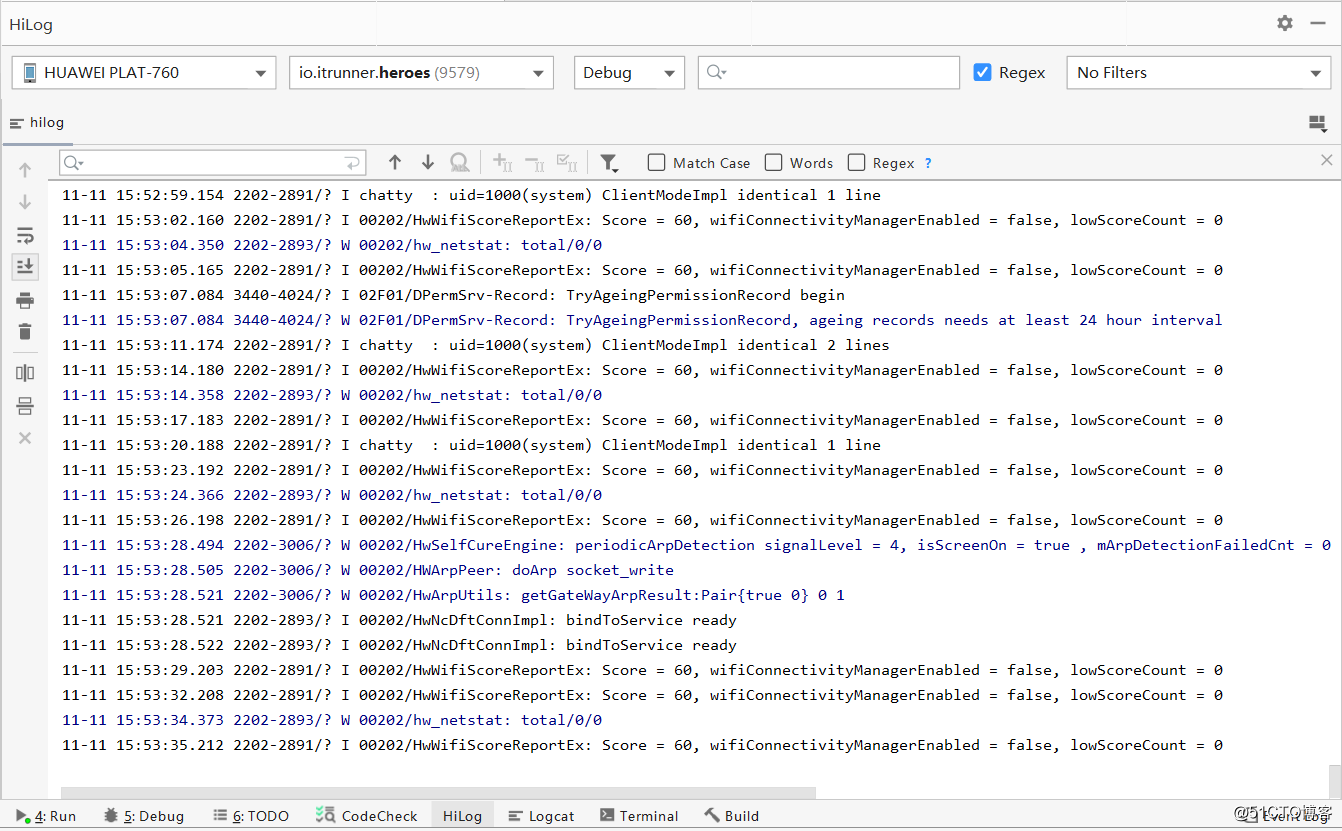
Page Ability
HarmonyOS Ability可以分为FA(Feature Ability)和PA(Particle Ability)两种类型。Page Ability是FA的唯一类型,提供与用户交互的能力。PA支持Service Ability和Data Ability,Service Ability用于运行后台任务,Data Ability用于提供统一的数据访问抽象。
每个Ability都必须在config.json中注册,例如:
"module": {
  ...
  "abilities": [
    {
      "skills": [
        {
          "entities": [
            "entity.system.home"
          ],
          "actions": [
            "action.system.home"
          ]
        }
      ],
      "orientation": "landscape",
      "formEnabled": false,
      "name": "io.itrunner.heroes.MainAbility",
      "icon": "$media:icon",
      "description": "$string:mainability_description",
      "label": "Heroes",
      "type": "page",
      "launchType": "standard"
    }
  ]
}
必须设定ability的type属性,可选值有page、service、data。通过DevEco菜单新建Ability会自动在config.json注册。
本文只涉及Page Ability。
Page与AbilitySlice
一个Page可以由一个或多个AbilitySlice构成(最多1024个,超出将crash),当然也可以仅使用Ability来创建页面,而不使用AbilitySlice,但一般不采用这种方式。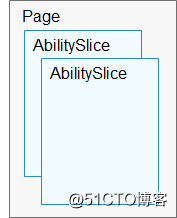
当一个Page由多个AbilitySlice共同构成时,这些AbilitySlice页面提供的业务能力应具有高度相关性。
在Ability中必须重写onStart()方法,在其中调用setMainRoute()指定默认的AbilitySlice。
public class MainAbility extends Ability {
    @Override
    public void onStart(Intent intent) {
        super.onStart(intent);
        super.setMainRoute(MainAbilitySlice.class.getName());
    }
}
直接使用Ability创建页面时,需调用setUIContent()方法,例如:
public class MainAbility extends Ability {

    @Override
    public void onStart(Intent intent) {
        super.onStart(intent);
        DirectionalLayout myLayout = new DirectionalLayout(this);
        DirectionalLayout.LayoutConfig config = new DirectionalLayout.LayoutConfig(DirectionalLayout.LayoutConfig.MATCH_PARENT, DirectionalLayout.LayoutConfig.MATCH_PARENT);
        myLayout.setLayoutConfig(config);
        ShapeElement element = new ShapeElement();
        element.setRgbColor(new RgbColor(255, 255, 255));
        myLayout.setBackground(element);

        Text text = new Text(this);
        text.setLayoutConfig(config);
        text.setText("Hello World");
        text.setTextColor(new Color(0xFF000000));
        text.setTextSize(50);
        text.setTextAlignment(TextAlignment.CENTER);
        myLayout.addComponent(text);
        super.setUIContent(myLayout);
    }

}
setUIContent()方法支持ComponentContainer和layoutResourceID(整型)两种参数类型,可以使用Java代码创建布局,也可以引用XML布局。
AbilitySlice承载具体的页面,必须重写onStart()方法,在其中调用setUIContent()设置页面,例如:
public class MainAbilitySlice extends AbilitySlice {

    @Override
    public void onStart(Intent intent) {
        super.onStart(intent);
        super.setUIContent(ResourceTable.Layout_main);
    }

}
生命周期
Page生命周期
Page的四种生命周期状态:
- INITIAL Page加载到内存,但尚未运行。
- INACTIVE Page变为ACTIVE或BACKGROUND前的中间状态,UI可能可见,但不接受输入事件。
- ACTIVE Page可见可交互。
- BACKGROUND Page不可见,如果系统内存不足,此状态的Page首先被销毁。
下图展示了page的完整生命周期: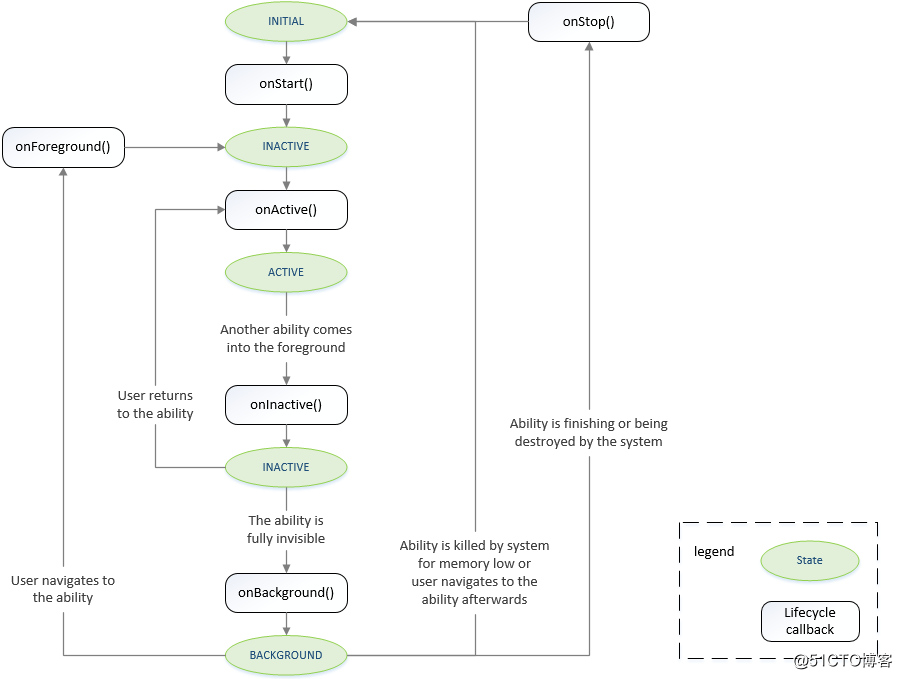
重写生命周期回调方法时,必须先调用相应的父类方法。
- onStart()
当系统创建Page实例时,触发该回调。对于一个Page实例,该回调在其生命周期过程中仅触发一次。 - onActive()
通常需要成对实现onActive()和onInactive(),并在onActive()中获取在onInactive()中被释放的资源。 - onInactive()
在此回调中实现Page失去焦点时应表现的行为。 - onBackground()
应在此回调中释放Page不可见时无用的资源,或在此回调中执行较为耗时的状态保存操作。 - onForeground()
处于BACKGROUND状态的Page仍然驻留在内存中,当重新回到前台时(比如用户重新导航到此Page),系统将调用onForeground()。应在此回调中重新申请在onBackground()中释放的资源。 - onStop()
系统要销毁Page时触发此回调函数,通知用户释放系统资源。销毁Page的可能原因包括以下几个方面:- 用户通过系统管理能力关闭Page,例如使用任务管理器关闭Page。
- 用户行为触发Page的terminateAbility()方法调用,例如使用应用的退出功能。
- 配置变更导致系统暂时销毁Page并重建。
- 系统出于资源管理目的,自动触发对处于BACKGROUND状态Page的销毁。
AbilitySlice生命周期
AbilitySlice作为Page的组成单元,其生命周期是依托于所属Page生命周期的。AbilitySlice和Page具有相同的生命周期状态和同名的回调,当Page生命周期发生变化时,它的AbilitySlice也会发生相同的生命周期变化。此外,AbilitySlice还具有独立于Page的生命周期变化,这发生在同一Page中的AbilitySlice之间导航时,此时Page的生命周期状态不会改变。
AbilitySlice实例创建和管理通常由应用负责,系统仅在特定情况下会创建AbilitySlice实例。例如,通过Ability的onStart()方法配置的路由导航到某个AbilitySlice时,但是在同一个Page中不同的AbilitySlice间导航时则由应用负责实例化。
Intent
Intent是对象之间传递信息的载体。例如,当一个Ability启动另一个Ability时,或者一个AbilitySlice导航到另一个AbilitySlice时,可以通过Intent指定启动的目标同时携带相关数据。Intent的构成元素包括Operation与Parameters,Parameters支持自定义参数,Operation支持以下参数:
| 属性 | 描述 |
|---|---|
| AbilityName | 待启动的Ability名称。如果同时指定了BundleName和AbilityName,则Intent可以直接匹配到指定的Ability。 |
| Action | 表示动作,通常使用系统预置Action,应用也可以自定义Action。例如Intent.ACTION_HOME表示返回桌面动作。 |
| BundleName | 包名称,如果同时指定了BundleName和AbilityName,则Intent可以直接匹配到指定的Ability。 |
| DeviceId | 指定设备ID,空串表示当前设备。 |
| Entity | 表示类别,通常使用系统预置Entity,应用也可以自定义Entity。例如Intent.ENTITY_HOME表示在桌面显示图标。 |
| Flags | 表示处理Intent的方式。例如Intent.FLAG_ABILITY_CONTINUATION标记在本地的一个Ability是否可以迁移到远端设备继续运行。 |
| Uri | 如果指定了Uri,则Intent将匹配指定的Uri信息,包括scheme, schemeSpecificPart, authority和path信息。 |
Intent的用法请见接下来的导航章节。
Page导航
利用startAbility()方法并传递Intent参数启动新的Ability。
根据Ability的全称导航
我们新建一个HeroesAbility,选择工程的entry目录,点击鼠标右键,在弹出菜单中依次选择New > Ability > Empty Feature Ability(Java),填写Ability相关信息,创建Ability。然后将HeroesAbilitySlice的文本内容改为“Back”。接下来为MainAbilitySlice的文本添加导航到HeroesAbility的ClickedListener,如下:
text.setClickedListener(component -> {
    Intent toHeroes = new Intent();

    // 通过Intent中的OperationBuilder类构造operation对象,指定设备标识(空串表示当前设备)、应用包名、Ability名称
    Operation operation = new Intent.OperationBuilder()
            .withDeviceId("")
            .withBundleName("io.itrunner.heroes")
            .withAbilityName("io.itrunner.heroes.HeroesAbility")
            .build();

    toHeroes.setOperation(operation);
    startAbility(toHeroes);
});
您可以为MainAbility和HeroesAbility的生命周期回调方法添加日志,查看状态变化。下面是应用启动后,依次点击 MainAbility文本 > 模拟器Back按钮 > 模拟器Home按钮的情况:
11-12 13:07:13.057 4689-4689/? I 00101/MainAbility: onStart
11-12 13:07:13.104 4689-4689/? I 00101/MainAbility: onActive
11-12 13:07:34.063 4689-4689/io.itrunner.heroes I 00101/MainAbility: onInactive
11-12 13:07:34.118 4689-4689/io.itrunner.heroes I 00101/HeroesAbility: onStart
11-12 13:07:34.140 4689-4689/io.itrunner.heroes I 00101/HeroesAbility: onActive
11-12 13:07:35.341 4689-4689/io.itrunner.heroes I 00101/MainAbility: onBackground
11-12 13:07:45.361 4689-4689/io.itrunner.heroes I 00101/HeroesAbility: onInactive
11-12 13:07:45.371 4689-4689/io.itrunner.heroes I 00101/MainAbility: onForeground
11-12 13:07:45.374 4689-4689/io.itrunner.heroes I 00101/MainAbility: onActive
11-12 13:07:46.494 4689-4689/io.itrunner.heroes I 00101/HeroesAbility: onBackground
11-12 13:07:46.496 4689-4689/io.itrunner.heroes I 00101/HeroesAbility: onStop
11-12 13:07:48.779 4689-4689/io.itrunner.heroes I 00101/MainAbility: onInactive
Back
我们注意到当点击Back时,HeroesAbility被销毁。那自己怎样实现同样的back操作呢?仅需调用terminateAbility()方法,为HeroesAbilitySlice的Back文本添加ClickedListener,如下:
text.setClickedListener(component -> terminateAbility());Action导航
下面我们使用Action属性导航到HeroesAbility。首先在config.json的HeroesAbility中增加action配置,声明对外提供的能力,如下:
{
  "skills": [
    {
      "actions": [
        "action.hero.heroes"
      ]
    }
  ],
  "orientation": "landscape",
  "formEnabled": false,
  "name": "io.itrunner.heroes.HeroesAbility",
  "icon": "$media:icon",
  "description": "$string:heroesability_description",
  "label": "entry",
  "type": "page",
  "launchType": "standard"
}
修改MainAbilitySlice的导航事件,如下:
text.setClickedListener(component -> {
    Intent toHeroes = new Intent();
    Operation operation = new Intent.OperationBuilder()
            .withAction("action.hero.heroes")
            .build();
    toHeroes.setOperation(operation);
    startAbility(toHeroes);
});
导航到指定AbilitySlice并返回结果
在上面的导航中,实际上是导航到Page的默认AbilitySlice页面了。如果Page有多个AbilitySlice页面,如何导航到指定AbilitySlice呢?除要在config.json中注册action外,还要在Ability中添加ActionRoute。
- 目标Ability
为了演示,我们复制HeroesAbilitySlice,将其重命名为HeroDetailsAbilitySlice,然后在config.json中添加action:
...
"skills": [
  {
    "actions": [
      "action.hero.heroes",
      "action.hero.details"
    ]
  }
],
...
在HeroesAbility中添加ActionRoute:
@Override
public void onStart(Intent intent) {
    HiLog.info(LOG_LABEL, "onStart");
    super.onStart(intent);
    super.setMainRoute(HeroesAbilitySlice.class.getName());

    addActionRoute("action.hero.details", HeroDetailsAbilitySlice.class.getName());
}
为了返回结果,需要在Ability内调用setResult()方法:
@Override
protected void onActive() {
    HiLog.info(LOG_LABEL, "onActive");
    super.onActive();

    Intent resultIntent = new Intent();
    resultIntent.setParam("name", "Jason");
    setResult(0, resultIntent);
}- 请求Ability
若要从目标Ability返回时,能够获得其返回结果,应使用startAbilityForResult()方法发起请求,修改MainAbilitySlice的导航事件,如下:
text.setClickedListener(component -> {
    Intent toHeroDetails = new Intent();
    Operation operation = new Intent.OperationBuilder()
            .withAction("action.hero.details")
            .build();
    toHeroDetails.setOperation(operation);
    startAbilityForResult(toHeroDetails, 0);
});
然后重写onAbilityResult()方法,对请求结果进行处理:
@Override
protected void onAbilityResult(int requestCode, int resultCode, Intent resultData) {
    switch (requestCode) {
        case 0:
            text.setText("Hello " + resultData.getStringParam("name"));
            return;
    }
}
再次运行应用并导航到HeroesAbilitySlice,然后点击Back,MainAbility将收到结果。
AbilitySlice导航
在同一个Page中不同的AbilitySlice间导航时,通过present()方法实现导航:
Button heroesBtn = ...;
heroesBtn.setClickedListener(component -> present(new HeroesAbilitySlice(), new Intent()));
如果要从导航目标AbilitySlice返回时获得返回值,则应使用presentForResult()实现导航。
Button heroesBtn  = ...;
heroesBtn.setClickedListener(component -> presentForResult(new HeroesAbilitySlice(), new Intent(), 0));
从目标AbilitySlice返回时,系统将回调onResult()来接收和处理返回结果:
@Override
protected void onResult(int requestCode, Intent resultIntent) {
    if (requestCode == 0) {
        text.setText("Hello " + resultIntent.getStringParam("name"));
    }
}
返回结果由目标AbilitySlice通过setResult()进行设置,然后调用terminate()方法返回到请求方:
text.setClickedListener(component -> {
    Intent resultIntent = new Intent();
    resultIntent.setParam("name", "Jason");
    setResult(resultIntent);

    terminate();
});
Java UI
组件和布局
根据组件的功能,可以将组件分为布局类、显示类、交互类三类:
| 组件类别 | 组件名称 | 功能描述 |
|---|---|---|
| 布局类 | PositionLayout、DirectionalLayout、StackLayout、DependentLayout、TableLayout、AdaptiveBoxLayout | 提供了不同布局规范的组件容器,例如以单一方向排列的DirectionalLayout、以相对位置排列的DependentLayout、以确切位置排列的PositionLayout等。 |
| 显示类 | Text、Image、Clock、TickTimer、ProgressBar | 提供了单纯的内容显示,例如用于文本显示的Text,用于图像显示的Image等。 |
| 交互类 | TextField、Button、Checkbox、RadioButton/RadioContainer、Switch、ToggleButton、Slider、ScrollView、TabList、ListContainer、PageSlider、PageFlipper、PageSliderIndicator、Picker、TimePicker、DatePicker、SurfaceProvider、ComponentProvider | 提供了具体场景下与用户交互响应的功能,例如Button提供了点击响应功能,Slider提供了进度选择功能等。 |
组件在未被添加到布局中时,既无法显示也无法交互,因此一个用户界面至少包含一个布局。
在Java UI框架中,提供了两种编写布局的方式:
- 代码中创建布局:用代码创建Component和ComponentContainer对象,为这些对象设置合适的布局参数和属性值,并将Component添加到ComponentContainer中。
- XML中声明布局:按层级结构来描述Component和ComponentContainer的关系,给组件节点设定合适的布局参数和属性值,代码中可直接加载生成此布局。
这两种方式创建出的布局没有本质差别,在XML中声明布局,在加载后同样可在代码中对该布局进行修改。在XML中声明布局更直观、简洁,因此是更常用的方式。
组件示例
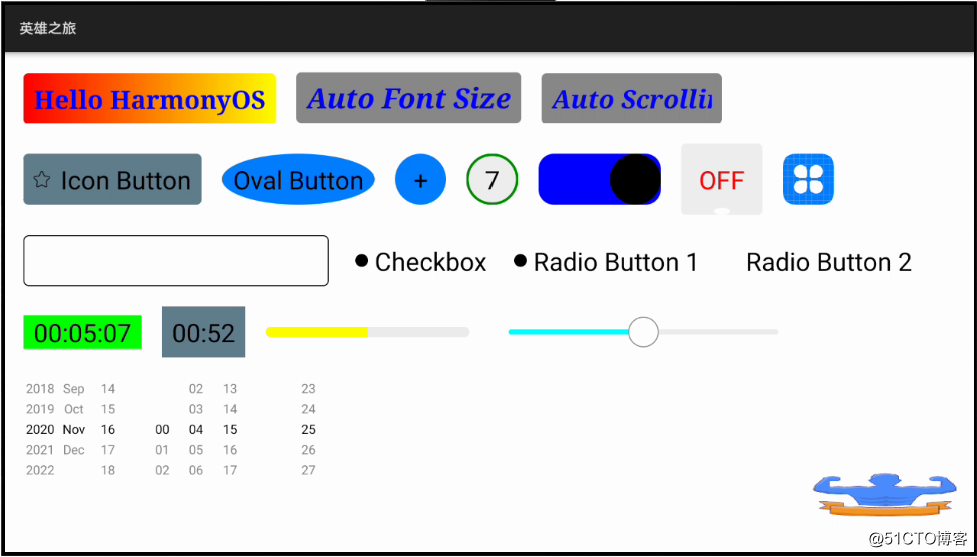
默认,大多数组件是没有背景、边框、圆角等样式的,需要自定义。简单的背景色、背景图片可以直接使用background_element设置,比如:
ohos:background_element="#607D8B"
或
ohos:background_element="green"

ohos:background_element="$media:hero"
Shape Element
复杂背景则需使用shape element。在base下新建graphic目录,添加如下的shape文件:
渐变圆角背景【gradient_element.xml】:
<?xml version="1.0" encoding="utf-8"?>
<shape xmlns:ohos="http://schemas.huawei.com/res/ohos" ohos:shape="rectangle">
    <corners ohos:radius="10"/>
    <gradient ohos:orientation="LEFT_TO_RIGHT"/>
    <solid ohos:colors="red,yellow"/>
</shape>
灰色圆角背景【gray_element.xml】
<?xml version="1.0" encoding="utf-8"?>
<shape xmlns:ohos="http://schemas.huawei.com/res/ohos" ohos:shape="rectangle">
    <corners ohos:radius="10"/>
    <solid ohos:color="gray"/>
</shape>
蓝色椭圆背景【blue_oval_button_element.xml】
<?xml version="1.0" encoding="utf-8"?>
<shape xmlns:ohos="http://schemas.huawei.com/res/ohos" ohos:shape="oval">
    <solid ohos:color="#FF007DFF"/>
</shape>
绿色圆环背景【green_ring_button_element.xml】
<?xml version="1.0" encoding="utf-8"?>
<shape xmlns:ohos="http://schemas.huawei.com/res/ohos" ohos:shape="oval">
    <stroke ohos:width="5" ohos:color="#ff008B00"/>
    <solid ohos:color="#ffeeeeee"/>
</shape>
黑色圆角边框【black_border_element.xml】
<?xml version="1.0" encoding="utf-8"?>
<shape xmlns:ohos="http://schemas.huawei.com/res/ohos" ohos:shape="rectangle">
    <corners ohos:radius="10"/>
    <stroke ohos:width="2" ohos:color="black"/>
</shape>
XML布局示例
在base下新建layout目录,然后点击右键,在弹出的菜单中选择New > Layout Resource File,新建component_example布局文件: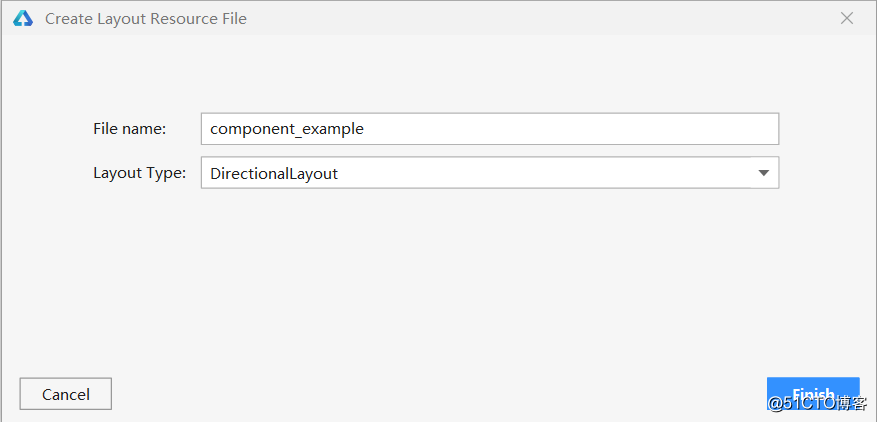
内容如下:
<?xml version="1.0" encoding="utf-8"?>
<DirectionalLayout
    xmlns:ohos="http://schemas.huawei.com/res/ohos"
    ohos:height="match_parent"
    ohos:width="match_parent"
    ohos:orientation="vertical"
    ohos:padding="20vp">

    <DirectionalLayout
        ohos:height="match_content"
        ohos:width="match_parent"
        ohos:orientation="horizontal">

        <Text
            ohos:height="50vp"
            ohos:width="match_content"
            ohos:background_element="$graphic:gradient_element"
            ohos:left_padding="10vp"
            ohos:right_padding="10vp"
            ohos:text="Hello HarmonyOS"
            ohos:text_alignment="vertical_center"
            ohos:text_color="blue"
            ohos:text_font="serif"
            ohos:text_size="25fp"
            ohos:text_weight="700"/>

        <Text
            ohos:id="$+id:text_auto_font"
            ohos:height="50vp"
            ohos:width="220vp"
            ohos:auto_font_size="true"
            ohos:background_element="$graphic:gray_element"
            ohos:italic="true"
            ohos:left_margin="20vp"
            ohos:left_padding="10vp"
            ohos:right_padding="10vp"
            ohos:text="Auto Font Size"
            ohos:text_alignment="vertical_center"
            ohos:text_color="blue"
            ohos:text_font="serif"
            ohos:text_weight="700"
            ohos:truncation_mode="ellipsis_at_end"/>

        <Text
            ohos:id="$+id:text_auto_scrolling"
            ohos:height="50vp"
            ohos:width="177vp"
            ohos:background_element="$graphic:gray_element"
            ohos:italic="true"
            ohos:left_margin="20vp"
            ohos:left_padding="10vp"
            ohos:right_padding="10vp"
            ohos:text="Auto Scrolling"
            ohos:text_alignment="vertical_center"
            ohos:text_color="blue"
            ohos:text_font="serif"
            ohos:text_size="25fp"
            ohos:text_weight="700"
            ohos:truncation_mode="auto_scrolling"/>
    </DirectionalLayout>

    <DirectionalLayout
        ohos:height="match_content"
        ohos:width="match_parent"
        ohos:orientation="horizontal"
        ohos:top_margin="20vp">

        <Button
            ohos:height="50vp"
            ohos:width="match_content"
            ohos:background_element="$graphic:blue_button_element"
            ohos:element_left="$media:star"
            ohos:element_padding="10vp"
            ohos:left_padding="10vp"
            ohos:right_padding="10vp"
            ohos:text="Icon Button"
            ohos:text_size="25fp"/>

        <Button
            ohos:height="50vp"
            ohos:width="150vp"
            ohos:background_element="$graphic:blue_oval_button_element"
            ohos:left_margin="20vp"
            ohos:text="Oval Button"
            ohos:text_size="25fp"/>

        <Button
            ohos:height="50vp"
            ohos:width="50vp"
            ohos:background_element="$graphic:blue_oval_button_element"
            ohos:left_margin="20vp"
            ohos:text="+"
            ohos:text_size="25fp"/>

        <Button
            ohos:height="50vp"
            ohos:width="50vp"
            ohos:background_element="$graphic:green_ring_button_element"
            ohos:left_margin="20vp"
            ohos:text="7"
            ohos:text_size="25fp"/>

        <Switch
            ohos:height="50vp"
            ohos:width="120vp"
            ohos:layout_alignment="vertical_center"
            ohos:left_margin="20vp"/>

        <ToggleButton
            ohos:height="70vp"
            ohos:width="80vp"
            ohos:background_element="$graphic:gray_button_element"
            ohos:left_margin="20vp"
            ohos:text_color_off="red"
            ohos:text_color_on="green"
            ohos:text_size="25fp"/>

        <Image
            ohos:id="$+id:image_components"
            ohos:height="50vp"
            ohos:width="50vp"
            ohos:image_src="$media:icon"
            ohos:layout_alignment="vertical_center"
            ohos:left_margin="20vp"
            ohos:scale_mode="inside"/>
    </DirectionalLayout>

    <DirectionalLayout
        ohos:height="match_content"
        ohos:width="match_parent"
        ohos:orientation="horizontal"
        ohos:top_margin="20vp">

        <TextField
            ohos:height="50vp"
            ohos:width="300vp"
            ohos:background_element="$graphic:black_border_element"
            ohos:padding="10vp"
            ohos:text_alignment="vertical_center"
            ohos:text_size="25fp"/>

        <Checkbox
            ohos:id="$+id:check_box"
            ohos:height="50vp"
            ohos:width="match_content"
            ohos:left_margin="20vp"
            ohos:text="Checkbox"
            ohos:text_size="25fp"/>

        <RadioContainer
            ohos:height="match_content"
            ohos:width="match_content"
            ohos:left_margin="20vp"
            ohos:orientation="horizontal">

            <RadioButton
                ohos:id="$+id:radio_button_1"
                ohos:height="50vp"
                ohos:width="match_content"
                ohos:text="Radio Button 1"
                ohos:text_size="25fp"/>

            <RadioButton
                ohos:id="$+id:radio_button_2"
                ohos:height="50vp"
                ohos:width="match_content"
                ohos:left_margin="20vp"
                ohos:text="Radio Button 2"
                ohos:text_size="25fp"/>
        </RadioContainer>
    </DirectionalLayout>

    <DirectionalLayout
        ohos:height="match_content"
        ohos:width="match_parent"
        ohos:orientation="horizontal"
        ohos:top_margin="20vp">

        <Clock
            ohos:height="match_content"
            ohos:width="match_content"
            ohos:background_element="green"
            ohos:left_padding="10vp"
            ohos:right_padding="10vp"
            ohos:text_size="25fp"/>

        <TickTimer
            ohos:id="$+id:tick_timer"
            ohos:height="50vp"
            ohos:width="match_content"
            ohos:background_element="#607D8B"
            ohos:left_margin="20vp"
            ohos:left_padding="10vp"
            ohos:right_padding="10vp"
            ohos:text_size="25fp"/>

        <ProgressBar
            ohos:height="50vp"
            ohos:width="200vp"
            ohos:left_margin="20vp"
            ohos:max="100"
            ohos:min="0"
            ohos:progress="50"
            ohos:progress_color="yellow"
            ohos:progress_width="10vp"/>

        <Slider
            ohos:height="50vp"
            ohos:width="300vp"
            ohos:left_margin="20vp"
            ohos:max="100"
            ohos:min="0"
            ohos:progress="50"
            ohos:progress_width="5vp"/>
    </DirectionalLayout>

    <DependentLayout
        ohos:height="160vp"
        ohos:width="match_parent">

        <DirectionalLayout
            ohos:height="match_content"
            ohos:width="match_content"
            ohos:orientation="horizontal"
            ohos:top_margin="20vp">

            <DatePicker
                ohos:height="100vp"
                ohos:width="100vp"
                ohos:year_fixed="true"/>

            <TimePicker
                ohos:height="100vp"
                ohos:width="100vp"
                ohos:left_margin="20vp"/>

            <Picker
                ohos:height="100vp"
                ohos:width="80vp"
                ohos:left_margin="20vp"
                ohos:max_value="50"
                ohos:min_value="10"
                ohos:value="25"/>
        </DirectionalLayout>

        <Button
            ohos:id="$+id:button_hero"
            ohos:height="50vp"
            ohos:width="150vp"
            ohos:align_parent_bottom="true"
            ohos:align_parent_right="true"
            ohos:background_element="$media:hero"/>
    </DependentLayout>
</DirectionalLayout>
加载、调整布局,绑定事件
public class ComponentsAbilitySlice extends AbilitySlice {
    private boolean isRunning = false;

    @Override
    public void onStart(Intent intent) {
        super.onStart(intent);
        super.setUIContent(ResourceTable.Layout_component_examples);

        // 自动调整字体
        Text autoFontText = (Text) findComponentById(ResourceTable.Id_text_auto_font);
        autoFontText.setAutoFontSizeRule(30, 100, 1);
        autoFontText.setClickedListener(component -> autoFontText.setText(autoFontText.getText() + "!"));

        // 启动跑马灯效果
        Text autoScrollingText = (Text) findComponentById(ResourceTable.Id_text_auto_scrolling);
        autoScrollingText.startAutoScrolling();

        // 复选框
        Checkbox checkbox = (Checkbox) findComponentById(ResourceTable.Id_check_box);
        checkbox.setChecked(true);

        // 单选钮
        RadioButton radioButton = (RadioButton) findComponentById(ResourceTable.Id_radio_button_1);
        radioButton.setChecked(true);

        // 启停计时器
        TickTimer tickTimer = (TickTimer) findComponentById(ResourceTable.Id_tick_timer);
        tickTimer.start();
        isRunning = true;
        tickTimer.setClickedListener(component -> {
            if (isRunning) {
                tickTimer.stop();
            } else {
                tickTimer.start();
            }

            isRunning = !isRunning;
        });

        // Hero Button
        Button heroBtn = (Button) findComponentById(ResourceTable.Id_button_hero);
        heroBtn.setClickedListener(component -> terminateAbility());
    }

    @Override
    public void onActive() {
        super.onActive();
    }

    @Override
    public void onForeground(Intent intent) {
        super.onForeground(intent);
    }
}
ORM数据库
HarmonyOS支持关系数据库、ORM数据库、轻量级偏好数据库、分布式数据服务、分布式文件服务等数据管理方式。本文使用ORM数据库来管理我们的数据。
HarmonyOS对象关系映射(ORM)数据库是一款基于SQLite的数据库框架,提供单设备上结构化数据的存储和访问能力。ORM数据库跟关系数据库一样,都使用SQLite作为持久化引擎,底层使用的是同一套数据库连接池和数据库连接机制,在关系型数据库操作的基础上又实现了对象关系映射等特性,提供了增删改查等面向对象接口。
基础配置
使用ORM数据库前,需要配置“build.gradle”文件,在其中的“ohos”节点中添加以下配置:
compileOptions{
    annotationEnabled true
}
创建数据库
- 定义数据库类,继承OrmDatabase,再通过@Database注解内的entities属性指定数据库的Entity。
package io.itrunner.heroes.data;

import ohos.data.orm.OrmDatabase;
import ohos.data.orm.annotation.Database;

@Database(entities = {Hero.class}, version = 1)
public abstract class HeroStore extends OrmDatabase {
}
version为数据库版本号。
- 定义Entity,创建一个继承OrmObject并用@Entity注解的类。
package io.itrunner.heroes.data;

import ohos.data.orm.OrmObject;
import ohos.data.orm.annotation.Column;
import ohos.data.orm.annotation.Entity;
import ohos.data.orm.annotation.Index;
import ohos.data.orm.annotation.PrimaryKey;

@Entity(tableName = "hero", indices = {@Index(value = {"hero_name"}, name = "name_index", unique = true)})
public class Hero extends OrmObject {
    @PrimaryKey(autoGenerate = true)
    private Long id;

    @Column(name = "hero_name", notNull = true)
    private String name;

    public Hero() {
    }

    // getter and setter
        ...
}- 创建、初始化数据库。
下面的createDatabase方法调用DatabaseHelper的getOrmContext方法创建数据库。如果数据库已经存在,不会重复创建。通过context.getDatabaseDir()方法可以获取数据库文件所在的目录。
package io.itrunner.heroes.data;

import io.itrunner.heroes.ResourceTable;
import ohos.app.Context;
import ohos.data.DatabaseHelper;
import ohos.data.orm.OrmContext;
import ohos.global.resource.ResourceManager;
import ohos.hiviewdfx.HiLog;
import ohos.hiviewdfx.HiLogLabel;

public class DBUtils {
    public static final String DATABASE_NAME = "HeroStore.db";
    public static final String DATABASE_NAME_ALIAS = "HeroStore";

    private static final HiLogLabel LOG_LABEL = new HiLogLabel(HiLog.LOG_APP, 0x00101, "Hero Database");

    public static void createDatabase(Context context) {
        HiLog.info(LOG_LABEL, "create database: %{public}s", DATABASE_NAME_ALIAS);

        DatabaseHelper helper = new DatabaseHelper(context);
        helper.getOrmContext(DATABASE_NAME_ALIAS, DATABASE_NAME, HeroStore.class);

        HiLog.info(LOG_LABEL, "local database path: %{public}s", context.getDatabaseDir().getPath());
    }

    public static void initDatabase(Context context) {
        HiLog.info(LOG_LABEL, "initial database ...");

        OrmContext ormContext = getOrmContext(context);
        try {
            ResourceManager resourceManager = context.getResourceManager();
            String[] heroes = resourceManager.getElement(ResourceTable.Strarray_heroes).getStringArray();

            for (String name : heroes) {
                ormContext.insert(new Hero(name));
            }

            ormContext.flush();
        } catch (Exception e) {
            HiLog.error(LOG_LABEL, e.getMessage());
        }
    }

    static OrmContext getOrmContext(Context context) {
        DatabaseHelper helper = new DatabaseHelper(context);
        return helper.getOrmContext(DATABASE_NAME_ALIAS);
    }
}
上面的initDatabase方法负责初始化数据库,数据来源于资源文件strarray.json,内容如下:
{
  "strarray": [
    {
      "name": "heroes",
      "value": [
        {
          "value": "Dr Nice"
        },
        {
          "value": "Narco"
        },
        {
          "value": "Bombasto"
        },
        {
          "value": "Celeritas"
        },
        {
          "value": "Magneta"
        },
        {
          "value": "RubberMan"
        },
        {
          "value": "Dynama"
        },
        {
          "value": "Dr IQ"
        },
        {
          "value": "Magma"
        },
        {
          "value": "Tornado"
        }
      ]
    }
  ]
}
最后在系统启动时调用创建、初始化数据库的方法:
public class MainAbility extends Ability {

    @Override
    public void onStart(Intent intent) {
        super.onStart(intent);
        super.setMainRoute(MainAbilitySlice.class.getName());

        createDatabase(this);
        initDatabase(this);
    }

}
定义Repository
OrmContext提供了CRUD和where方法,操作数据库一般不需要编写SQL语句。下面是本文将使用的HeroRepository:
package io.itrunner.heroes.data;

import ohos.app.Context;
import ohos.data.orm.OrmContext;
import ohos.data.orm.OrmPredicates;
import ohos.data.rdb.ValuesBucket;

import java.util.List;

public class HeroRepository {
    private static final String ID = "id";
    private static final String HERO_NAME = "hero_name";

    private OrmContext ormContext;

    public HeroRepository(Context context) {
        ormContext = DBUtils.getOrmContext(context);
    }

    public List<Hero> queryTop4() {
        OrmPredicates predicates = ormContext.where(Hero.class);
        predicates.orderByAsc(HERO_NAME);
        predicates.limit(4);
        return ormContext.query(predicates);
    }

    public List<Hero> queryAll() {
        OrmPredicates predicates = ormContext.where(Hero.class);
        predicates.orderByAsc(HERO_NAME);
        return ormContext.query(predicates);
    }

    public Hero getOne(Long id) {
        OrmPredicates predicates = ormContext.where(Hero.class);
        predicates.equalTo(ID, id);
        List<Hero> heroes = ormContext.query(predicates);
        return heroes.isEmpty() ? null : heroes.get(0);
    }

    public List<Hero> queryByName(String name) {
        OrmPredicates predicates = ormContext.where(Hero.class);
        predicates.contains(HERO_NAME, name);
        predicates.orderByAsc(HERO_NAME);
        return ormContext.query(predicates);
    }

    public void insert(Hero hero) {
        ormContext.insert(hero);
        ormContext.flush();
    }

    public void update(Hero hero) {
        OrmPredicates predicates = ormContext.where(Hero.class);
        predicates.equalTo(ID, hero.getId());

        ValuesBucket valuesBucket = new ValuesBucket();
        valuesBucket.putString(HERO_NAME, hero.getName());
        ormContext.update(predicates, valuesBucket);
    }

    public void delete(Long id) {
        OrmPredicates predicates = ormContext.where(Hero.class);
        predicates.equalTo(ID, id);
        ormContext.delete(predicates);
        ormContext.flush();
    }
}
备份与恢复
ORM数据库提供了备份、恢复、删除数据库的方法,如下:
public class DBUtils {
    public static final String DATABASE_NAME = "HeroStore.db";
    public static final String DATABASE_NAME_ALIAS = "HeroStore";

    ...

    /**
     * @param destPath the path for backing up the database
     */
    public static void backupDatabase(Context context, String destPath) {
        HiLog.info(LOG_LABEL, "backup database to %{public}s", destPath);
        OrmContext ormContext = getOrmContext(context);
        ormContext.backup(destPath);
        ormContext.close();
    }

    /**
     * @param srcPath the path where the database file is stored
     */
    public static void restoreDatabase(Context context, String srcPath) {
        HiLog.info(LOG_LABEL, "restore database from %{public}s", srcPath);
        OrmContext ormContext = getOrmContext(context);
        ormContext.restore(srcPath);
        ormContext.close();
    }

    /**
     * @param name the database name, for example: HeroStore.db
     */
    public static void deleteDatabase(Context context, String name) {
        HiLog.info(LOG_LABEL, "delete database: %{public}s", name);
        DatabaseHelper helper = new DatabaseHelper(context);
        helper.deleteRdbStore(name);
    }

    static OrmContext getOrmContext(Context context) {
        DatabaseHelper helper = new DatabaseHelper(context);
        return helper.getOrmContext(DATABASE_NAME_ALIAS);
    }
}
说明:备份与恢复需要提供完整的数据库路径;删除只需提供数据库文件名,会自动从DatabaseDir下删除数据库。例如:
public class MainAbility extends Ability {

    @Override
    public void onStart(Intent intent) {
        super.onStart(intent);
        super.setMainRoute(MainAbilitySlice.class.getName());

        createDatabase(this);
        initDatabase(this);
        backupDatabase(this, getDatabaseDir() + "/HeroStoreBackup.db");
        restoreDatabase(this, getDatabaseDir() + "/HeroStoreBackup.db");
        deleteDatabase(this, "HeroStoreBackup.db");
    }

}
Hero UI
本部分将创建Dashboard、Hero列表、Hero详情三个页面。当前模拟器运行page导航时,页面切换效果不大美观,因此只使用了AbilitySlice导航。本节不做过多讲解,直接上代码。
说明,在TV模拟器中运行应用时,组件布局可能错位,如点击后没有响应,请往上一点试试(现在模拟器好像已解决了这个问题)。
国际化
在资源文件一节,我们介绍过在XML布局和Java文件中引用资源文件实现国际化的方法。下面是将在XML布局文件中引用的string.json文件,内容如下:
{
  "string": [
    {
      "name": "app_name",
      "value": "Tour of Heroes"
    },
    {
      "name": "mainability_description",
      "value": "heroes page"
    },
    {
      "name": "dashboard",
      "value": "Dashboard"
    },
    {
      "name": "heroes",
      "value": "Heroes"
    },
    {
      "name": "top_heroes",
      "value": "Top Heroes"
    },
    {
      "name": "hero_search",
      "value": "Hero Search"
    },
    {
      "name": "my_heroes",
      "value": "My Heroes"
    },
    {
      "name": "hero_name",
      "value": "Hero Name"
    },
    {
      "name": "add",
      "value": "Add"
    },
    {
      "name": "delete",
      "value": "Delete"
    },
    {
      "name": "no",
      "value": "No"
    },
    {
      "name": "name",
      "value": "Name"
    },
    {
      "name": "hero_details",
      "value": "Hero Details"
    },
    {
      "name": "id",
      "value": "ID"
    },
    {
      "name": "back",
      "value": "Back"
    },
    {
      "name": "save",
      "value": "Save"
    }
  ]
}
限于篇幅,这里不再列出中文版。
切换语言
在TV模拟器中,返回Home页面,向左拖动图标,找到【设置】并进入,然后依次点击【通用】 > 【高级设置】 > 【语言】,选择语言。
Dashboard
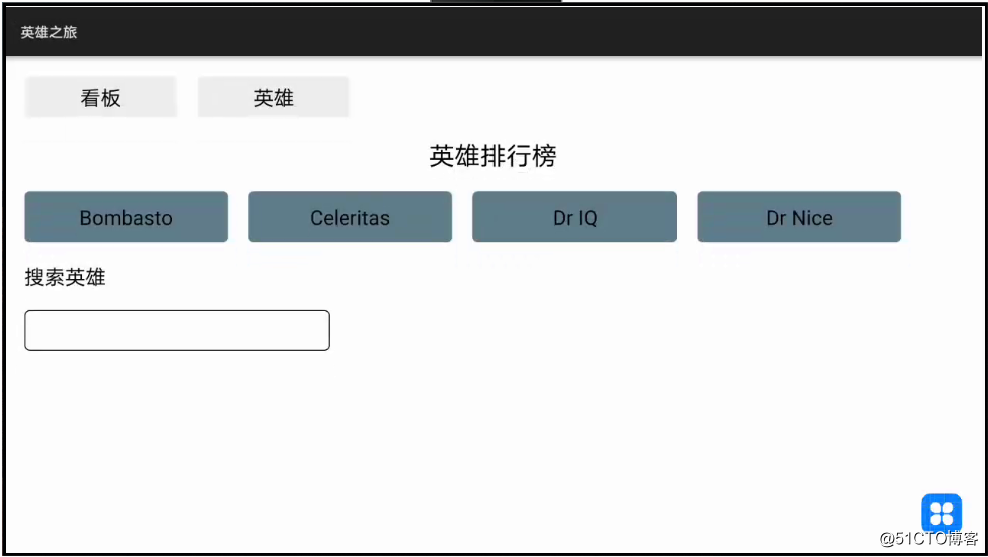
Dashboard页面显示TOP 4英雄榜,点击hero进入Hero详情页面,可根据名字查询hero。
XML布局 main.xml
<?xml version="1.0" encoding="utf-8"?>
<DirectionalLayout
    xmlns:ohos="http://schemas.huawei.com/res/ohos"
    ohos:height="match_content"
    ohos:width="match_parent"
    ohos:orientation="vertical"
    ohos:padding="20vp">

    <DirectionalLayout
        ohos:height="match_content"
        ohos:width="match_content"
        ohos:orientation="horizontal">

        <Button
            ohos:height="40vp"
            ohos:width="150vp"
            ohos:background_element="$graphic:gray_button_element"
            ohos:text="$string:dashboard"
            ohos:text_alignment="center"
            ohos:text_size="20fp"/>

        <Button
            ohos:id="$+id:button_heroes"
            ohos:height="40vp"
            ohos:width="150vp"
            ohos:background_element="$graphic:gray_button_element"
            ohos:left_margin="20vp"
            ohos:text="$string:heroes"
            ohos:text_alignment="center"
            ohos:text_size="20fp"/>
    </DirectionalLayout>

    <Text
        ohos:height="match_content"
        ohos:width="match_content"
        ohos:bottom_margin="20vp"
        ohos:layout_alignment="horizontal_center"
        ohos:text="$string:top_heroes"
        ohos:text_size="25fp"
        ohos:top_margin="20vp"/>

    <TableLayout
        ohos:id="$+id:top_heroes"
        ohos:height="match_content"
        ohos:width="match_parent"
        ohos:column_count="4"
        ohos:layout_alignment="center">
    </TableLayout>

    <Text
        ohos:height="match_content"
        ohos:width="match_content"
        ohos:bottom_margin="20vp"
        ohos:layout_alignment="left"
        ohos:text="$string:hero_search"
        ohos:text_size="20fp"
        ohos:top_margin="20vp"/>

    <TextField
        ohos:id="$+id:search"
        ohos:height="40vp"
        ohos:width="300vp"
        ohos:background_element="$graphic:black_border_element"
        ohos:padding="4vp"
        ohos:text_alignment="vertical_center"
        ohos:text_size="20fp"/>

    <DependentLayout
        ohos:height="180vp"
        ohos:width="match_parent">

        <ListContainer
            ohos:id="$+id:search_list"
            ohos:height="180vp"
            ohos:width="300vp"/>

        <Image
            ohos:id="$+id:image_components"
            ohos:height="40vp"
            ohos:width="40vp"
            ohos:align_parent_bottom="true"
            ohos:align_parent_right="true"
            ohos:image_src="$media:icon"/>
    </DependentLayout>
</DirectionalLayout>
MainAbilitySlice
package io.itrunner.heroes.slice;

import io.itrunner.heroes.ResourceTable;
import io.itrunner.heroes.data.Hero;
import io.itrunner.heroes.data.HeroRepository;
import ohos.aafwk.ability.AbilitySlice;
import ohos.aafwk.content.Intent;
import ohos.aafwk.content.Operation;
import ohos.agp.components.*;
import ohos.agp.components.ComponentContainer.LayoutConfig;
import ohos.agp.components.element.ShapeElement;
import ohos.hiviewdfx.HiLog;
import ohos.hiviewdfx.HiLogLabel;
import ohos.multimodalinput.event.KeyEvent;

import java.util.List;

public class MainAbilitySlice extends AbilitySlice {
    private static final String TAG = "MainAbilitySlice";
    private static final String ACTION_COMPONENTS = "action.hero.components";

    private static final HiLogLabel LOG_LABEL = new HiLogLabel(HiLog.LOG_APP, 0x00101, TAG);

    private HeroRepository repository;
    private TextField searchText;

    @Override
    public void onStart(Intent intent) {
        HiLog.info(LOG_LABEL, "onStart");
        super.onStart(intent);
        super.setUIContent(ResourceTable.Layout_main);

        repository = new HeroRepository(this);

        bindNavListener();
        bindSearchListener();
    }

    @Override
    public void onActive() {
        HiLog.info(LOG_LABEL, "onActive");
        super.onActive();

        queryTopHeroes();
    }

    @Override
    protected void onInactive() {
        HiLog.info(LOG_LABEL, "onInactive");
        super.onInactive();
    }

    @Override
    protected void onBackground() {
        HiLog.info(LOG_LABEL, "onBackground");
        super.onBackground();
    }

    @Override
    public void onForeground(Intent intent) {
        HiLog.info(LOG_LABEL, "onForeground");
        super.onForeground(intent);
    }

    @Override
    protected void onStop() {
        HiLog.info(LOG_LABEL, "onStop");
        super.onStop();
    }

    private void bindNavListener() {
        // to heroes slice
        Button heroesBtn = (Button) findComponentById(ResourceTable.Id_button_heroes);
        heroesBtn.setClickedListener(component -> present(new HeroesAbilitySlice(), new Intent()));

        // to components page
        Image componentsImg = (Image) findComponentById(ResourceTable.Id_image_components);
        componentsImg.setScaleMode(Image.ScaleMode.INSIDE);
        componentsImg.setClickedListener(component -> {
            Intent intent = new Intent();
            Operation operation = new Intent.OperationBuilder()
                    .withAction(ACTION_COMPONENTS)
                    .build();
            intent.setOperation(operation);

            startAbility(intent);
        });

    }

    private void bindSearchListener() {
        searchText = (TextField) findComponentById(ResourceTable.Id_search);
        searchText.setKeyEventListener((component, keyEvent) -> {
            if (keyEvent.isKeyDown() && keyEvent.getKeyCode() == KeyEvent.KEY_ENTER && !searchText.getText().isEmpty()) {
                fillSearchList(searchText.getText());
                return true;
            }
            return false;
        });
    }

    private void fillSearchList(String name) {
        List<Hero> heroes = repository.queryByName(name);

        ListContainer container = (ListContainer) findComponentById(ResourceTable.Id_search_list);
        ListItemProvider itemProvider = new ListItemProvider(this, heroes);
        container.setItemProvider(itemProvider);
        container.setItemClickedListener((listContainer, component, position, id) -> {
            gotoHeroDetails(itemProvider.getItemId(position));
            clear();
        });
    }

    private void queryTopHeroes() {
        TableLayout tableLayout = (TableLayout) findComponentById(ResourceTable.Id_top_heroes);
        ShapeElement background = new ShapeElement(this, ResourceTable.Graphic_blue_button_element);
        LayoutConfig config = new LayoutConfig(400, 100);
        config.setMargins(0, 0, 40, 0);

        tableLayout.removeAllComponents();

        List<Hero> heroes = repository.queryTop4();
        for (Hero hero : heroes) {
            Button heroBtn = new Button(this);
            heroBtn.setText(hero.getName());
            heroBtn.setTextSize(40);
            heroBtn.setBackground(background);
            heroBtn.setLayoutConfig(config);
            heroBtn.setClickedListener(component -> gotoHeroDetails(hero.getId()));

            tableLayout.addComponent(heroBtn);
        }
    }

    private void gotoHeroDetails(Long id) {
        Intent intent = new Intent();
        intent.setParam("id", id);
        present(new HeroDetailsAbilitySlice(), intent);
    }

    private void clear() {
        searchText.setText("");
    }

}
ListContainer
给Hero查询列表ListContainer填充数据相对复杂一些,需要使用ListItemProvider,其实现如下:
package io.itrunner.heroes.slice;

import io.itrunner.heroes.ResourceTable;
import io.itrunner.heroes.data.Hero;
import ohos.aafwk.ability.AbilitySlice;
import ohos.agp.components.*;

import java.util.List;

public class ListItemProvider extends BaseItemProvider {
    private List<Hero> data;
    private AbilitySlice slice;

    ListItemProvider(AbilitySlice abilitySlice, List<Hero> data) {
        slice = abilitySlice;
        this.data = data;
    }

    @Override
    public int getCount() {
        return data.size();
    }

    @Override
    public Object getItem(int i) {
        return this.data.get(i);
    }

    @Override
    public long getItemId(int position) {
        return data.get(position).getId();
    }

    @Override
    public Component getComponent(int position, Component convertView, ComponentContainer parent) {
        Component component = LayoutScatter.getInstance(slice).parse(ResourceTable.Layout_list_item, null, false);
        if (!(component instanceof ComponentContainer)) {
            return null;
        }
        ComponentContainer rootLayout = (ComponentContainer) component;
        Text leftText = (Text) rootLayout.findComponentById(ResourceTable.Id_list_content);
        leftText.setText(data.get(position).getName());
        return component;
    }
}
List中每一行的布局如下:
list_item.xml
<?xml version="1.0" encoding="utf-8"?>
<DirectionalLayout
    xmlns:ohos="http://schemas.huawei.com/res/ohos"
    ohos:height="40vp"
    ohos:width="match_parent"
    ohos:orientation="horizontal">

    <Text
        ohos:id="$+id:list_content"
        ohos:height="match_content"
        ohos:width="match_content"
        ohos:text="hero"
        ohos:text_alignment="left"
        ohos:text_size="16vp"
        ohos:top_padding="8vp"/>
</DirectionalLayout>
Hero列表
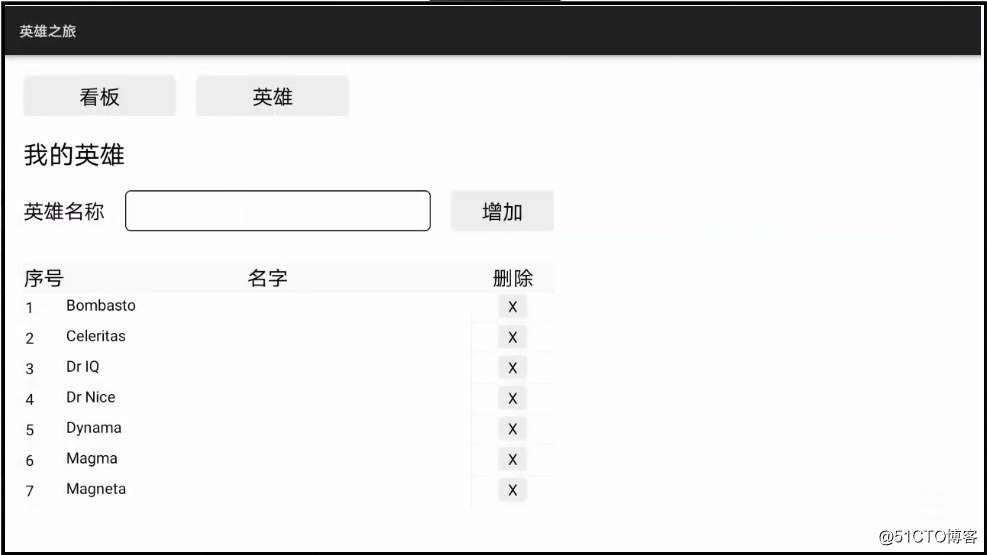
Hero列表页面可以增加、删除hero,点击hero可以进入Hero详情页面。本页面使用了ScrollView组件,上下拖动表格可以查看所有数据。
XML布局 heroes.xml
<?xml version="1.0" encoding="utf-8"?>
<DirectionalLayout
    xmlns:ohos="http://schemas.huawei.com/res/ohos"
    ohos:height="match_parent"
    ohos:width="match_parent"
    ohos:orientation="vertical"
    ohos:padding="20vp">

    <DirectionalLayout
        ohos:height="match_content"
        ohos:width="match_content"
        ohos:orientation="horizontal">

        <Button
            ohos:id="$+id:button_dashboard"
            ohos:height="40vp"
            ohos:width="150vp"
            ohos:background_element="$graphic:gray_button_element"
            ohos:text="$string:dashboard"
            ohos:text_alignment="center"
            ohos:text_size="20fp"/>

        <Button
            ohos:height="40vp"
            ohos:width="150vp"
            ohos:background_element="$graphic:gray_button_element"
            ohos:left_margin="20vp"
            ohos:text="$string:heroes"
            ohos:text_alignment="center"
            ohos:text_size="20fp"/>
    </DirectionalLayout>

    <Text
        ohos:height="match_content"
        ohos:width="match_content"
        ohos:bottom_margin="20vp"
        ohos:text="$string:my_heroes"
        ohos:text_size="25fp"
        ohos:top_margin="20vp"/>

    <DirectionalLayout
        ohos:height="50vp"
        ohos:width="match_content"
        ohos:orientation="horizontal">

        <Text
            ohos:height="match_content"
            ohos:width="match_content"
            ohos:text="$string:hero_name"
            ohos:text_size="20fp"/>

        <TextField
            ohos:id="$+id:hero_name"
            ohos:height="40vp"
            ohos:width="300vp"
            ohos:background_element="$graphic:black_border_element"
            ohos:left_margin="20vp"
            ohos:padding="4vp"
            ohos:text_alignment="vertical_center"
            ohos:text_size="20fp"/>

        <Button
            ohos:id="$+id:button_add"
            ohos:height="40vp"
            ohos:width="100vp"
            ohos:background_element="$graphic:gray_button_element"
            ohos:left_margin="20vp"
            ohos:text="$string:add"
            ohos:text_alignment="center"
            ohos:text_size="20fp"/>
    </DirectionalLayout>

    <ScrollView
        ohos:id="$+id:scroll_view"
        ohos:height="240vp"
        ohos:width="match_parent"
        ohos:rebound_effect="true"
        ohos:top_margin="20vp"/>
</DirectionalLayout>
HeroesAbilitySlice
package io.itrunner.heroes.slice;

import io.itrunner.heroes.ResourceTable;
import io.itrunner.heroes.data.Hero;
import io.itrunner.heroes.data.HeroRepository;
import ohos.aafwk.ability.AbilitySlice;
import ohos.aafwk.content.Intent;
import ohos.agp.components.*;
import ohos.agp.components.TableLayout.LayoutConfig;
import ohos.agp.components.element.ShapeElement;
import ohos.hiviewdfx.HiLog;
import ohos.hiviewdfx.HiLogLabel;

import java.util.List;

public class HeroesAbilitySlice extends AbilitySlice {
    private static final String TAG = "HeroesAbilitySlice";

    private static final HiLogLabel LOG_LABEL = new HiLogLabel(HiLog.LOG_APP, 0x00101, TAG);

    private HeroRepository repository;
    private TextField heroText;

    @Override
    public void onStart(Intent intent) {
        HiLog.info(LOG_LABEL, "onStart");
        super.onStart(intent);
        super.setUIContent(ResourceTable.Layout_heroes);

        repository = new HeroRepository(this);

        bindNavListener();
        bindAddListener();
    }

    @Override
    public void onActive() {
        HiLog.info(LOG_LABEL, "onActive");
        super.onActive();

        queryHeroes();
    }

    @Override
    protected void onInactive() {
        HiLog.info(LOG_LABEL, "onInactive");
        super.onInactive();
    }

    @Override
    protected void onBackground() {
        HiLog.info(LOG_LABEL, "onBackground");
        super.onBackground();
    }

    @Override
    public void onForeground(Intent intent) {
        HiLog.info(LOG_LABEL, "onForeground");
        super.onForeground(intent);
    }

    @Override
    protected void onStop() {
        HiLog.info(LOG_LABEL, "onStop");
        super.onStop();
    }

    private void bindNavListener() {
        // goto dashboard page
        Button dashboardBtn = (Button) findComponentById(ResourceTable.Id_button_dashboard);
        dashboardBtn.setClickedListener(component -> present(new MainAbilitySlice(), new Intent()));
    }

    private void bindAddListener() {
        heroText = (TextField) findComponentById(ResourceTable.Id_hero_name);
        Button addBtn = (Button) findComponentById(ResourceTable.Id_button_add);
        addBtn.setClickedListener(component -> addHero());
    }

    private void addHero() {
        String heroName = heroText.getText().trim();
        if (heroName.length() > 2) {
            repository.insert(new Hero(heroName));
            heroText.setText("");
            queryHeroes();
        }
    }

    private void queryHeroes() {
        TableLayout heroesTable = (TableLayout) LayoutScatter.getInstance(this).parse(ResourceTable.Layout_hero_table, null, false);

        LayoutConfig columnConfig = new LayoutConfig(160, 60);
        LayoutConfig buttonConfig = new LayoutConfig(58, LayoutConfig.MATCH_CONTENT);
        buttonConfig.setMargins(50, 4, 0, 4);

        ShapeElement grayButtonElement = new ShapeElement(this, ResourceTable.Graphic_gray_button_element);
        ShapeElement columnElement = new ShapeElement(this, ResourceTable.Graphic_white_column_element);

        List<Hero> heroes = repository.queryAll();

        int i = 1;
        for (Hero hero : heroes) {

            Text no = new Text(this);
            no.setText(i++ + "");
            no.setTextSize(30);
            no.setWidth(80);
            no.setHeight(58);
            no.setPadding(4, 4, 4, 4);
            no.setBackground(columnElement);

            Button heroNameBtn = new Button(this);
            heroNameBtn.setText(hero.getName());
            heroNameBtn.setTextSize(30);
            heroNameBtn.setTextAlignment(1);
            heroNameBtn.setWidth(800);
            heroNameBtn.setHeight(58);
            heroNameBtn.setPadding(4, 4, 4, 4);
            heroNameBtn.setBackground(columnElement);
            heroNameBtn.setClickedListener(component -> gotoHeroDetails(hero.getId()));

            Button deleteBtn = new Button(this);
            deleteBtn.setText("X");
            deleteBtn.setTextSize(30);
            deleteBtn.setPadding(4, 4, 4, 4);
            deleteBtn.setLayoutConfig(buttonConfig);
            deleteBtn.setBackground(grayButtonElement);
            deleteBtn.setClickedListener(component -> {
                repository.delete(hero.getId());
                queryHeroes();
            });
            DirectionalLayout deleteCol = new DirectionalLayout(this);
            deleteCol.setLayoutConfig(columnConfig);
            deleteCol.setBackground(columnElement);
            deleteCol.addComponent(deleteBtn);

            heroesTable.addComponent(no);
            heroesTable.addComponent(heroNameBtn);
            heroesTable.addComponent(deleteCol);
        }

        ScrollView scrollView = (ScrollView) findComponentById(ResourceTable.Id_scroll_view);
        scrollView.removeAllComponents();
        scrollView.addComponent(heroesTable);
    }

    private void gotoHeroDetails(Long id) {
        Intent intent = new Intent();
        intent.setParam("id", id);
        present(new HeroDetailsAbilitySlice(), intent);
    }

}
Hero Table
Dashboard的表格没有表头,而本页面的表格增加了表头,动态添加数据时就需特殊处理一下。这里没有将TableLayout放到页面布局里,而是单独生成一个文件,在代码中通过LayoutScatter的parse()方法加载。
hero_table.xml的内容如下:
<?xml version="1.0" encoding="utf-8"?>
<TableLayout
    xmlns:ohos="http://schemas.huawei.com/res/ohos"
    ohos:id="$+id:heroes"
    ohos:height="match_content"
    ohos:width="match_parent"
    ohos:column_count="3">

    <Text
        ohos:height="30vp"
        ohos:width="40vp"
        ohos:background_element="$graphic:gray_column_element"
        ohos:text="$string:no"
        ohos:text_alignment="center"
        ohos:text_size="20fp"/>

    <Text
        ohos:height="30vp"
        ohos:width="400vp"
        ohos:background_element="$graphic:gray_column_element"
        ohos:text="$string:name"
        ohos:text_alignment="center"
        ohos:text_size="20fp"/>

    <Text
        ohos:height="30vp"
        ohos:width="80vp"
        ohos:background_element="$graphic:gray_column_element"
        ohos:text="$string:delete"
        ohos:text_alignment="center"
        ohos:text_size="20fp"/>
</TableLayout>
Hero详情
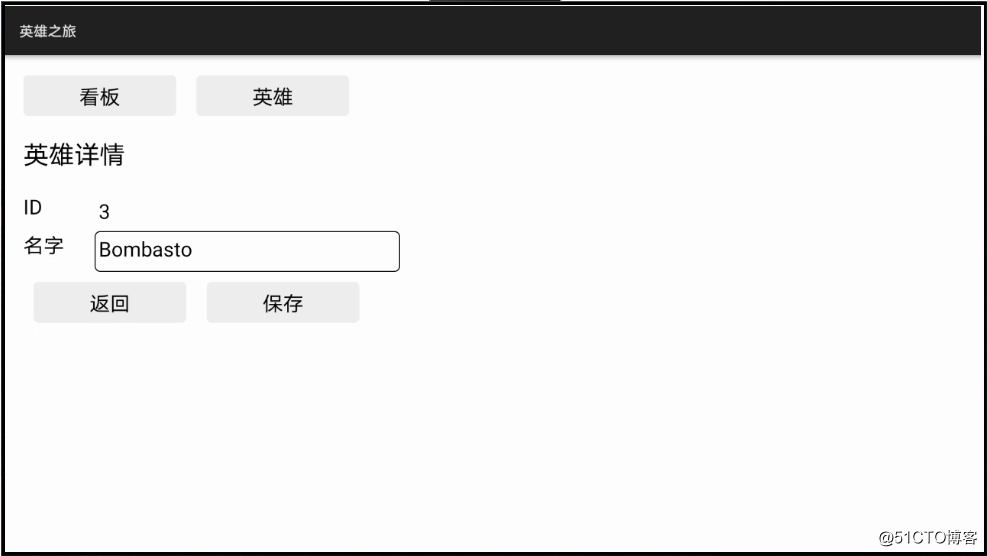
本页面功能较简单,只负责修改英雄名字。
XML布局 hero_details.xml
<?xml version="1.0" encoding="utf-8"?>
<DirectionalLayout
    xmlns:ohos="http://schemas.huawei.com/res/ohos"
    ohos:height="match_content"
    ohos:width="match_content"
    ohos:orientation="vertical"
    ohos:padding="20vp">

    <DirectionalLayout
        ohos:height="match_content"
        ohos:width="match_content"
        ohos:orientation="horizontal">

        <Button
            ohos:id="$+id:button_dashboard"
            ohos:height="40vp"
            ohos:width="150vp"
            ohos:background_element="$graphic:gray_button_element"
            ohos:text="$string:dashboard"
            ohos:text_alignment="center"
            ohos:text_size="20fp"/>

        <Button
            ohos:id="$+id:button_heroes"
            ohos:height="40vp"
            ohos:width="150vp"
            ohos:background_element="$graphic:gray_button_element"
            ohos:left_margin="20vp"
            ohos:text="$string:heroes"
            ohos:text_alignment="center"
            ohos:text_size="20fp"/>
    </DirectionalLayout>

    <Text
        ohos:height="match_content"
        ohos:width="match_content"
        ohos:bottom_margin="20vp"
        ohos:text="$string:hero_details"
        ohos:text_size="25fp"
        ohos:top_margin="20vp"/>

    <DirectionalLayout
        ohos:height="match_content"
        ohos:width="match_content"
        ohos:orientation="horizontal">

        <Text
            ohos:height="match_content"
            ohos:width="70vp"
            ohos:text="$string:id"
            ohos:text_size="20fp"/>

        <Text
            ohos:id="$+id:hero_id"
            ohos:height="40vp"
            ohos:width="match_content"
            ohos:padding="4vp"
            ohos:text_size="20fp"/>
    </DirectionalLayout>

    <DirectionalLayout
        ohos:height="match_content"
        ohos:width="match_content"
        ohos:orientation="horizontal">

        <Text
            ohos:height="match_content"
            ohos:width="70vp"
            ohos:text="$string:name"
            ohos:text_size="20fp"/>

        <TextField
            ohos:id="$+id:hero_name"
            ohos:height="40vp"
            ohos:width="300vp"
            ohos:background_element="$graphic:black_border_element"
            ohos:padding="4vp"
            ohos:text_size="20fp"/>
    </DirectionalLayout>

    <DirectionalLayout
        ohos:height="match_content"
        ohos:width="match_content"
        ohos:orientation="horizontal"
        ohos:padding="10vp">

        <Button
            ohos:id="$+id:button_back"
            ohos:height="40vp"
            ohos:width="150vp"
            ohos:background_element="$graphic:gray_button_element"
            ohos:text="$string:back"
            ohos:text_alignment="center"
            ohos:text_size="20fp"/>

        <Button
            ohos:id="$+id:button_save"
            ohos:height="40vp"
            ohos:width="150vp"
            ohos:background_element="$graphic:gray_button_element"
            ohos:left_margin="20vp"
            ohos:text="$string:save"
            ohos:text_alignment="center"
            ohos:text_size="20fp"/>
    </DirectionalLayout>
</DirectionalLayout>
HeroDetailsAbilitySlice
package io.itrunner.heroes.slice;

import io.itrunner.heroes.ResourceTable;
import io.itrunner.heroes.data.Hero;
import io.itrunner.heroes.data.HeroRepository;
import ohos.aafwk.ability.AbilitySlice;
import ohos.aafwk.content.Intent;
import ohos.agp.components.Button;
import ohos.agp.components.Text;
import ohos.agp.components.TextField;
import ohos.hiviewdfx.HiLog;
import ohos.hiviewdfx.HiLogLabel;

public class HeroDetailsAbilitySlice extends AbilitySlice {
    private static final String TAG = "HeroDetailsAbilitySlice";

    private static final HiLogLabel LOG_LABEL = new HiLogLabel(HiLog.LOG_APP, 0x00101, TAG);

    private HeroRepository repository;

    @Override
    public void onStart(Intent intent) {
        HiLog.info(LOG_LABEL, "onStart");
        super.onStart(intent);
        super.setUIContent(ResourceTable.Layout_hero_details);

        repository = new HeroRepository(this);

        bindNavListener();
        bindButtonListener();
        showHeroDetails(intent);
    }

    @Override
    public void onActive() {
        HiLog.info(LOG_LABEL, "onActive");
        super.onActive();
    }

    @Override
    public void onForeground(Intent intent) {
        HiLog.info(LOG_LABEL, "onForeground");
        super.onForeground(intent);
    }

    private void bindNavListener() {
        // Dashboard Button
        Button dashboardBtn = (Button) findComponentById(ResourceTable.Id_button_dashboard);
        dashboardBtn.setClickedListener(component -> present(new MainAbilitySlice(), new Intent()));

        // Heroes Button
        Button heroesBtn = (Button) findComponentById(ResourceTable.Id_button_heroes);
        heroesBtn.setClickedListener(component -> present(new HeroesAbilitySlice(), new Intent()));
    }

    private void bindButtonListener() {
        // Back Button
        Button backBtn = (Button) findComponentById(ResourceTable.Id_button_back);
        backBtn.setClickedListener(component -> back());

        // Save Button
        Button saveBtn = (Button) findComponentById(ResourceTable.Id_button_save);
        saveBtn.setClickedListener(component -> {
            updateHero();
            back();
        });
    }

    private void showHeroDetails(Intent intent) {
        long id = intent.getLongParam("id", 0);
        Hero hero = repository.getOne(id);
        if (hero != null) {
            Text heroId = (Text) findComponentById(ResourceTable.Id_hero_id);
            heroId.setText(id + "");

            TextField heroName = (TextField) findComponentById(ResourceTable.Id_hero_name);
            heroName.setText(hero.getName());
        }
    }

    private void updateHero() {
        Text idText = (Text) findComponentById(ResourceTable.Id_hero_id);
        TextField nameText = (TextField) findComponentById(ResourceTable.Id_hero_name);

        Hero hero = new Hero();
        hero.setId(Long.parseLong(idText.getText()));
        hero.setName(nameText.getText().trim());

        repository.update(hero);
    }

    private void back() {
        terminate();
    }

}
需要说明的一点,导航到此页面时需要通过Intent传入Hero ID参数,如下:
private void gotoHeroDetails(Long id) {
    Intent intent = new Intent();
    intent.setParam("id", id);
    present(new HeroDetailsAbilitySlice(), intent);
}
Wearable
目前DevEco还不支持同时运行多个模拟器,无法演示分布式数据服务、分布式任务、跨设备迁移等。本节仅介绍基本的Java UI开发方法,没有使用TV的数据。
创建Wearable Module
在工程根目录点击右键,在弹出的菜单中选择New > Module:
选择Wearable > Empty Feature Ability(Java),然后填写module相关信息,创建module。
HarmonyOS应用有entry和feature两种模块类型,一个APP中,对于同一设备类型必须有且只有一个entry类型的模块,可以包含一个或多个feature类型的模块。开始我们创建的模块只支持TV设备,因此新创建的Wearable模块也为entry类型。
"deviceType": [
  "wearable"
],
"distro": {
  "deliveryWithInstall": true,
  "moduleName": "wearable",
  "moduleType": "entry"
},
Wearable UI
PageSlider支持左右或上下滑动切换页面,这是手表切换页面的主要方式之一。本节演示PageSlider组件的用法,开发如下两个页面: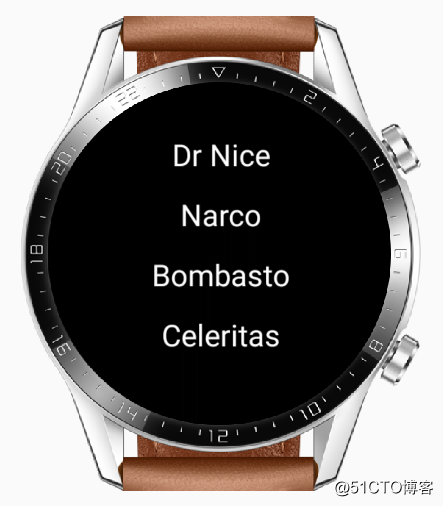
主布局 main.xml
MainAbilitySlice加载的布局。
<?xml version="1.0" encoding="utf-8"?>
<DirectionalLayout
    xmlns:ohos="http://schemas.huawei.com/res/ohos"
    ohos:height="match_parent"
    ohos:width="match_parent">

    <PageSlider
        ohos:id="$+id:page_slider"
        ohos:height="match_parent"
        ohos:width="match_parent"
        ohos:orientation="horizontal"/>
</DirectionalLayout>
Hero列表子页面 heroes.xml
使用了ScrollView组件,上下拖动可以查看所有数据。
<?xml version="1.0" encoding="utf-8"?>
<DirectionalLayout
xmlns:ohos="http://schemas.huawei.com/res/ohos"
ohos:height="match_parent"
ohos:width="match_parent"
ohos:background_element="#FF000000"
ohos:bottom_padding="30vp"
ohos:orientation="vertical"
ohos:top_padding="30vp">
<ScrollView
ohos:height="match_parent"
ohos:width="match_parent">
<DirectionalLayout
ohos:id="$+id:heroes"
ohos:height="match_content"
ohos:width="match_parent"
ohos:orientation="vertical"/>
</ScrollView>
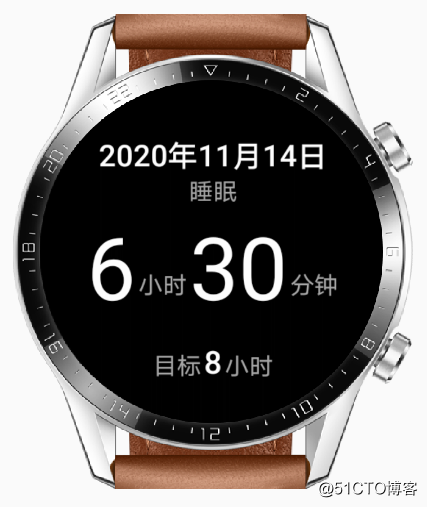
</DirectionalLayout>Heor Details子页面 hero_details.xml
<?xml version="1.0" encoding="utf-8"?>
<DirectionalLayout
    xmlns:ohos="http://schemas.huawei.com/res/ohos"
    ohos:height="match_parent"
    ohos:width="match_parent"
    ohos:background_element="#FF000000"
    ohos:orientation="vertical">

    <Text
        ohos:id="$+id:detail_date"
        ohos:height="25vp"
        ohos:width="match_content"
        ohos:layout_alignment="horizontal_center"
        ohos:text_alignment="bottom"
        ohos:text_color="white"
        ohos:text_size="20vp"
        ohos:text_weight="600"
        ohos:top_margin="40vp"/>

    <Text
        ohos:height="20vp"
        ohos:width="match_parent"
        ohos:alpha="0.66"
        ohos:layout_alignment="horizontal_center"
        ohos:text="$string:sleep"
        ohos:text_alignment="center"
        ohos:text_color="white"
        ohos:text_size="16vp"/>

    <DirectionalLayout
        ohos:height="65vp"
        ohos:width="match_content"
        ohos:layout_alignment="horizontal_center"
        ohos:orientation="horizontal"
        ohos:top_margin="8vp">

        <Text
            ohos:id="$+id:sleep_hour_text"
            ohos:height="match_content"
            ohos:width="match_content"
            ohos:layout_alignment="center"
            ohos:text="6"
            ohos:text_alignment="center"
            ohos:text_color="white"
            ohos:text_size="58vp"/>

        <Text
            ohos:height="match_content"
            ohos:width="match_content"
            ohos:alpha="0.66"
            ohos:bottom_padding="10vp"
            ohos:layout_alignment="bottom"
            ohos:left_margin="2vp"
            ohos:text="$string:hour"
            ohos:text_color="white"
            ohos:text_size="16vp"/>

        <Text
            ohos:id="$+id:sleep_minute_text"
            ohos:height="match_content"
            ohos:width="match_content"
            ohos:layout_alignment="center"
            ohos:left_margin="2vp"
            ohos:text="30"
            ohos:text_alignment="center"
            ohos:text_color="white"
            ohos:text_size="58vp"/>

        <Text
            ohos:height="match_content"
            ohos:width="match_content"
            ohos:alpha="0.66"
            ohos:bottom_padding="10vp"
            ohos:layout_alignment="bottom"
            ohos:left_margin="2vp"
            ohos:text="$string:minute"
            ohos:text_color="white"
            ohos:text_size="16vp"/>
    </DirectionalLayout>

    <DirectionalLayout
        ohos:height="25vp"
        ohos:width="match_content"
        ohos:layout_alignment="horizontal_center"
        ohos:orientation="horizontal"
        ohos:top_margin="20vp">

        <Text
            ohos:height="20vp"
            ohos:width="match_content"
            ohos:alpha="0.66"
            ohos:bottom_margin="1vp"
            ohos:text="$string:goal"
            ohos:text_alignment="bottom"
            ohos:text_color="white"
            ohos:text_size="16vp"/>

        <Text
            ohos:id="$+id:sleep_goal_text"
            ohos:height="match_parent"
            ohos:width="match_content"
            ohos:bottom_padding="2vp"
            ohos:left_margin="2vp"
            ohos:text="8"
            ohos:text_color="white"
            ohos:text_size="21vp"
            ohos:text_weight="600"/>

        <Text
            ohos:height="20vp"
            ohos:width="match_content"
            ohos:alpha="0.66"
            ohos:left_margin="2vp"
            ohos:text="$string:hour"
            ohos:text_color="white"
            ohos:text_size="16vp"/>
    </DirectionalLayout>
</DirectionalLayout>
国际化 string.json
当前手表模拟器不支持多语言,为了测试可以在启动时指定语言。
{
  "string": [
    {
      "name": "app_name",
      "value": "英雄之旅"
    },
    {
      "name": "mainability_description",
      "value": "英雄之旅"
    },
    {
      "name": "sleep",
      "value": "睡眠"
    },
    {
      "name": "hour",
      "value": "小时"
    },
    {
      "name": "minute",
      "value": "分钟"
    },
    {
      "name": "goal",
      "value": "目标"
    }
  ]
}
MainAbilitySlice
package io.itrunner.heroes.wearable.slice;

import io.itrunner.heroes.wearable.ResourceTable;
import io.itrunner.heroes.wearable.slice.slider.HeroDetailsComponent;
import io.itrunner.heroes.wearable.slice.slider.HeroesComponent;
import io.itrunner.heroes.wearable.slice.slider.PageSliderProviderImpl;
import ohos.aafwk.ability.AbilitySlice;
import ohos.aafwk.content.Intent;
import ohos.agp.components.PageSlider;
import ohos.hiviewdfx.HiLog;
import ohos.hiviewdfx.HiLogLabel;

public class MainAbilitySlice extends AbilitySlice {
    private static final String TAG = "MainAbilitySlice";

    private static final HiLogLabel LOG_LABEL = new HiLogLabel(HiLog.LOG_APP, 0x00102, TAG);

    @Override
    public void onStart(Intent intent) {
        HiLog.info(LOG_LABEL, "onStart");
        super.onStart(intent);
        super.setUIContent(ResourceTable.Layout_main);

        // 添加子页面
        addComponents();
    }

    @Override
    public void onActive() {
        HiLog.info(LOG_LABEL, "onActive");
        super.onActive();
    }

    @Override
    public void onForeground(Intent intent) {
        HiLog.info(LOG_LABEL, "onForeground");
        super.onForeground(intent);
    }

    private void addComponents() {
        PageSliderProviderImpl provider = new PageSliderProviderImpl();
        provider.addComponent(new HeroesComponent(this));
        provider.addComponent(new HeroDetailsComponent(this));

        PageSlider slider = (PageSlider) findComponentById(ResourceTable.Id_page_slider);
        slider.setProvider(provider);
    }

}
PageSlider使用PageSliderProvider填充数据,其实现如下:
PageSliderProviderImpl
package io.itrunner.heroes.wearable.slice.slider;

import ohos.agp.components.Component;
import ohos.agp.components.ComponentContainer;
import ohos.agp.components.PageSliderProvider;
import ohos.hiviewdfx.HiLog;
import ohos.hiviewdfx.HiLogLabel;

import java.util.ArrayList;
import java.util.List;
import java.util.Optional;

public class PageSliderProviderImpl extends PageSliderProvider {
    private static final String TAG = "PageSliderProvider";

    private static final HiLogLabel LOG_LABEL = new HiLogLabel(HiLog.LOG_APP, 0x00102, TAG);

    private List<ComponentOwner> components = new ArrayList<>();

    public void addComponent(ComponentOwner component) {
        components.add(component);
    }

    @Override
    public int getCount() {
        return components.size();
    }

    @Override
    public Object createPageInContainer(ComponentContainer componentContainer, int index) {
        HiLog.info(LOG_LABEL, "create page in container, the index is %{public}d", index);
        if (componentContainer == null || index >= components.size()) {
            return Optional.empty();
        }

        components.get(index).init();
        Component component = components.get(index).getComponent();
        componentContainer.addComponent(component);

        return component;
    }

    @Override
    public void destroyPageFromContainer(ComponentContainer componentContainer, int index, Object object) {
        HiLog.info(LOG_LABEL, "destroy page from container, the index is %{public}d", index);
        if (componentContainer == null || index >= components.size()) {
            return;
        }
        Component component = components.get(index).getComponent();
        componentContainer.removeComponent(component);
    }

    @Override
    public boolean isPageMatchToObject(Component component, Object object) {
        return component == object;
    }

}
为了能在PageSliderProvider统一处理所有页面,定义了ComponentOwner接口。
ComponentOwner
package io.itrunner.heroes.wearable.slice.slider;

import ohos.agp.components.Component;

public interface ComponentOwner {
    /*
    获取存放的component
     */
    Component getComponent();

    /*
    当包含的component被添加到容器时回调
     */
    void init();
}
HeroesComponent
Hero列表页面读取strarray.json中的数据填充列表。
package io.itrunner.heroes.wearable.slice.slider;

import io.itrunner.heroes.wearable.ResourceTable;
import ohos.agp.components.Component;
import ohos.agp.components.DirectionalLayout;
import ohos.agp.components.LayoutScatter;
import ohos.agp.components.Text;
import ohos.agp.utils.Color;
import ohos.agp.utils.TextAlignment;
import ohos.app.AbilityContext;
import ohos.global.resource.ResourceManager;
import ohos.hiviewdfx.HiLog;
import ohos.hiviewdfx.HiLogLabel;

public class HeroesComponent implements ComponentOwner {
    private static final String TAG = "HeroesComponent";

    private static final HiLogLabel LOG_LABEL = new HiLogLabel(HiLog.LOG_APP, 0x00102, TAG);

    private AbilityContext context;

    private Component root;

    public HeroesComponent(AbilityContext context) {
        this.context = context;
        this.root = LayoutScatter.getInstance(context).parse(ResourceTable.Layout_heroes, null, false);
    }

    @Override
    public Component getComponent() {
        return root;
    }

    @Override
    public void init() {
        fillHeroes();
    }

    private void fillHeroes() {
        DirectionalLayout layout = (DirectionalLayout) root.findComponentById(ResourceTable.Id_heroes);
        layout.removeAllComponents();

        ResourceManager resourceManager = context.getResourceManager();
        try {
            String[] heroes = resourceManager.getElement(ResourceTable.Strarray_heroes).getStringArray();
            for (String heroName : heroes) {
                Text hero = new Text(context);
                hero.setText(heroName);
                hero.setTextSize(40);
                hero.setTextAlignment(TextAlignment.CENTER);
                hero.setTextColor(Color.WHITE);
                hero.setWidth(DirectionalLayout.LayoutConfig.MATCH_PARENT);
                hero.setHeight(80);
                layout.addComponent(hero);
            }
        } catch (Exception e) {
            HiLog.error(LOG_LABEL, e.getMessage());
        }
    }
}
HeroDetailsComponent
本页面较简单,填充了固定的数据,待能从模拟器读取传感器数据时,再更新代码。
package io.itrunner.heroes.wearable.slice.slider;

import io.itrunner.heroes.wearable.ResourceTable;
import ohos.agp.components.Component;
import ohos.agp.components.LayoutScatter;
import ohos.agp.components.Text;
import ohos.app.AbilityContext;

import java.time.LocalDate;
import java.time.format.DateTimeFormatter;
import java.time.format.FormatStyle;

public class HeroDetailsComponent implements ComponentOwner {
    private static final DateTimeFormatter DATE_FORMATTER = DateTimeFormatter.ofLocalizedDate(FormatStyle.LONG);

    private AbilityContext context;

    private Component root;

    public HeroDetailsComponent(AbilityContext context) {
        this.context = context;
        this.root = LayoutScatter.getInstance(context).parse(ResourceTable.Layout_hero_details, null, false);
    }

    @Override
    public Component getComponent() {
        return root;
    }

    @Override
    public void init() {
        Text date = (Text) root.findComponentById(ResourceTable.Id_detail_date);
        date.setText(LocalDate.now().format(DATE_FORMATTER));

        Text hour = (Text) root.findComponentById(ResourceTable.Id_sleep_hour_text);
        hour.setText("6");

        Text minute = (Text) root.findComponentById(ResourceTable.Id_sleep_minute_text);
        minute.setText("30");

        Text goal = (Text) root.findComponentById(ResourceTable.Id_sleep_goal_text);
        goal.setText("8");
    }
}
期待HarmonyOS官网提供更完善的文档和示例代码,能够在线展示效果;期待DevEco Studio提供更多强劲的功能,支持多模拟器;期待HarmonyOS开放更多源码,提高更新频率,方便与促进开学者学习。祝HarmonyOS越来越好。