1.Pinpoint架构
官网地址:https://github.com/pinpoint-apm/pinpoint
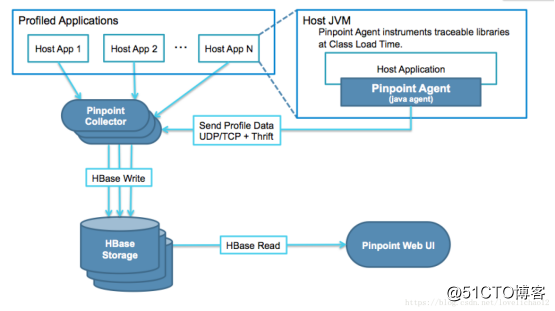
从下图来看,Pinpoint主要分成几个部分:
1)Agent,负责从应用服务端收集数据,上传到collector;
2)Collector,负责接收Agent上传的数据,并存储到Hbase中;
3)Web,负责展示性能监控数据;
4)Hbase,负责存储性能监控数据;
下载地址:https://github.com/pinpoint-apm/pinpoint/releases/tag/v2.1.0
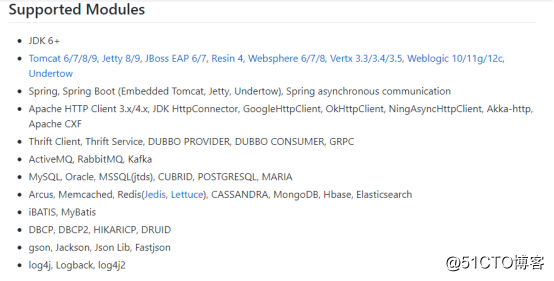
2.支持模块
到pinpoint的github官方地址查看支持的模块
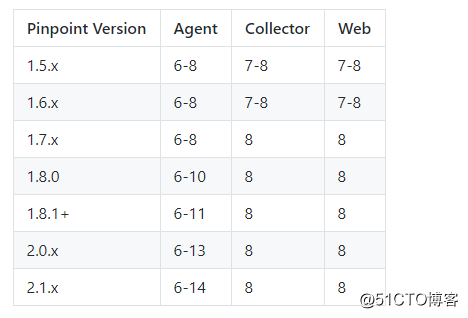
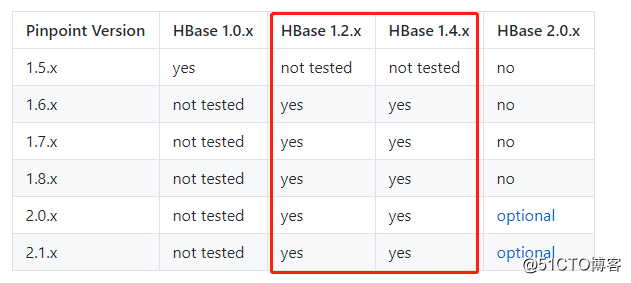
3.版本兼容矩阵
从这里来看,collector和web目前仍然只支持JDK8,而Agent最高已经可以支持JDK14
Hbase建议使用1.2.x或者1.4.x版本
4.安装Hbase
Hbase支持集群或者单机部署,集群部署比较麻烦点,需要先部署zookeeper和hadoop集群,这也是很多人觉得
pinpoint的存储过于笨重的原因,但是其实我们可以采用单机部署,就可以简单很多,因为普通压力下,
APM的监控数据,并不需要这么强大的存储负载均衡能力。

下载地址:https://archive.apache.org/dist/hbase/

解压 tar -xvzf  hbase-1.2.6-bin.tar.gz

修改conf下的hbase-site.xml文件,指定数据的存储位置。
添加
<configuration>
        <property>
                <name>hbase.rootdir</name>
                <value>file:///data/pinpoint/hbase</value>
        </property>
</configuration>

修改conf下的hbase-env.sh文件
添加jdk,并且使用hbase自带的zk:
export JAVA_HOME=/usr/local/java/jdk1.8.0_191
export HBASE_MANAGES_ZK=true

启动
./bin/start-hbase.sh

启动后,可通过以下页面进行访问
http://172.16.208.79:16010/master-status

./hbase shell
创建Hbase Schemas ,将下面内容拷贝到hbase shell执行

https://github.com/pinpoint-apm/pinpoint/blob/master/hbase/scripts/hbase-create.hbase

注意:pinpoint默认的TTL存储策略是存储一年的,如果pinpoint监控的系统请求量是很大的,那么需要注意pinpoint所在服务器的存储空间是否够用。
解决方案:修改上述hbase建表脚本中的TTL值,比如:
create 'AgentInfo', { NAME => 'Info', TTL => 31536000(改为604800,存储7天), DATA_BLOCK_ENCODING => 'PREFIX' }
5.安装Pinpoint-collector
启动:nohup java -Dpinpoint.zookeeper.address=localhost -jar /data/tools/pinpoint/pinpoint-collector-boot-2.1.0.jar >~/logs/pinpoint-collector.log 2>&1 &

机器有启用防火墙的,注意放开:TCP 9991~9994端口,UDP 9995~9996端口
6.安装Pinpoint-web
启动
nohup java -Dpinpoint.zookeeper.address=localhost -jar /data/tools/pinpoint/pinpoint-web-boot-2.1.0.jar >~/logs/pinpoint-web.log 2>&1 &
其他同上

访问端口:
http://172.16.208.79:8080/
7.安装PinPoint客户端
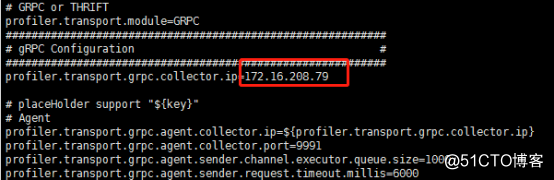
修改配置文件/profiles/release/pinpoint.config:
将collector的ip配置为监控收集服务pinpoint-collector的IP:
修改采集比例,默认只有5%,如果没有改,会感觉好像采集不到监控数据。

应用服务集成pinpoint-agent
-javaagent:/home/perf/pinpoint/pinpoint-bootstrap-2.1.0.jar -Dpinpoint.agentId=serviceName -Dpinpoint.applicationName=applicationName
8.告警配置
创建数据库:
create database pinpoint default character set utf8 collate utf8_general_ci;
create user pinpoint@'%' identified by 'password.';
grant all on pinpoint.* to 'pinpoint'@'%';
grant REFERENCES on pinpoint.* to  pinpoint@'%';
FLUSH PRIVILEGES;

创建相关表
https://github.com/pinpoint-apm/pinpoint/blob/master/web/src/main/resources/sql/CreateTableStatement-mysql.sql
https://github.com/pinpoint-apm/pinpoint/blob/master/web/src/main/resources/sql/SpringBatchJobRepositorySchema-mysql.sql

创建文件 ./config/web.properties,内容如下:
spring.profiles.active=release,batch
pinpoint.zookeeper.address=localhost
batch.server.ip=172.16.208.79
pinpoint.url=http://172.16.208.79:8080/
alarm.mail.server.url=smtp.mail.com
alarm.mail.server.port=994
alarm.mail.server.username=username
alarm.mail.server.password=password
[email protected]
jdbc.driverClassName=com.mysql.jdbc.Driver
jdbc.url=jdbc:mysql://localhost:3306/pinpoint??serverTimezone=GMT%2B8&useUnicode=true&characterEncoding=utf8&useSSL=false
jdbc.username=pinpoint
jdbc.password=password

改用读取配置文件的方式来启动web端,配置如下:
nohup java -jar /data/tools/pinpoint/pinpoint-web-boot-2.1.0.jar --spring.config.additional-location=/data/tools/pinpoint/config/web.properties >~/logs/pinpoint-web.log 2>&1 &
9.FAQ
9.1.zk删除表
./bin/hbase zkcli

ls /hbase/table  --罗列表名
rmr /hbase/table/你要删除的表名

rmr /hbase/table/AgentInfo
rmr /hbase/table/AgentStatV2
rmr /hbase/table/AgentStatV2
rmr /hbase/table/ApplicationStatAggre
rmr /hbase/table/ApplicationIndex
rmr /hbase/table/AgentLifeCycle
rmr /hbase/table/AgentEvent
rmr /hbase/table/StringMetaData
rmr /hbase/table/ApiMetaData
rmr /hbase/table/SqlMetaData_Ver2
rmr /hbase/table/TraceV2
rmr /hbase/table/ApplicationTraceIndex
rmr /hbase/table/ApplicationMapStatisticsCaller_Ver2
rmr /hbase/table/ApplicationMapStatisticsCallee_Ver2
rmr /hbase/table/ApplicationMapStatisticsSelf_Ver2
rmr /hbase/table/HostApplicationMap_Ver2
9.2.Hbase修改TTL存储策略
./bin/hbase shell  --进入shell命令行

修改TTL,不然数据暂用太凶
desc 'AgentInfo'
修改1天后过期
disable 'AgentInfo'
alter 'AgentInfo',NAME=>'Info',TTL=>'43200'
enable 'AgentInfo'

desc 'AgentStatV2'
修改1天后过期
disable 'AgentStatV2'
alter 'AgentStatV2',NAME=>'S',TTL=>'86400'
enable 'AgentStatV2'
9.3.Hbase删除或者刷新表
https://github.com/pinpoint-apm/pinpoint/blob/master/hbase/scripts/hbase-drop.hbase
https://github.com/pinpoint-apm/pinpoint/blob/master/hbase/scripts/hbase-flush-table.hbase
9.4.监控Tomcat
CATALINA_OPTS="$CATALINA_OPTS -javaagent:$AGENT_PATH/pinpoint-bootstrap-$VERSION.jar"
CATALINA_OPTS="$CATALINA_OPTS -Dpinpoint.agentId=$AGENT_ID"
CATALINA_OPTS="$CATALINA_OPTS -Dpinpoint.applicationName=$APPLICATION_NAME"
9.5.启动/停止pinpoint脚本
启动:
/data/tools/pinpoint/hbase-1.2.6/bin/start-hbase.sh

sleep 5

#nohup java -jar -Dpinpoint.zookeeper.address=localhost /data/tools/pinpoint/pinpoint-web-boot-2.1.0.jar >~/logs/pinpoint-web.log 2>&1 &
nohup java -jar /data/tools/pinpoint/pinpoint-web-boot-2.1.0.jar --spring.config.additional-location=/data/tools/pinpoint/config/web.properties >~/logs
/pinpoint-web.log 2>&1 &nohup java -jar -Dpinpoint.zookeeper.address=localhost /data/tools/pinpoint/pinpoint-collector-boot-2.1.0.jar >~/logs/pinpoint-collector.log 2>&1 &

停止:
ps -ef | grep pinpoint-collector-boot | grep -v grep | awk '{print $2}' | xargs kill -9

ps -ef | grep pinpoint-web-boot | grep -v grep | awk '{print $2}' | xargs kill -9

/data/tools/pinpoint/hbase-1.2.6/bin/stop-hbase.sh