学习目标
-
React-Redux学习(不需用subscribe)
-
mapStateToProps
-
mapDispatchToProps
-
connect
- Provider组件:自动的将store里的state和组件进行关联。
- MapStatetoProps:这个函数用于将store的state映射到组件的里props
- mapdispatchToProps:将store中的dispatch映射到组件的props里,实现了方法的共享。
- Connect方法:将组件和数据(方法)进行连接\
mapStateToProps(state, ownProps)
-
state: store的state
-
订阅store的状态变化,每次store发生改变时,mapStateToProps都会被调用。
-
ownProps(可选)
-
ownProps代表组件本身的props,如果写了第二个参数ownProps,那么当prop发生变化的时候,mapStateToProps也会被调用。例如,当 props接收到来自父组件一个小小的改动,那么你所使用的 ownProps 参数,mapStateToProps 都会被重新计算)。
-
如果不传,组件不会监听store的变化,也就是说Store的更新不会引起UI的更新
-
mapDispatchToProps
-
mapDispatchToProps用于建立组件跟store.dispatch的映射关系
-
可以是一个object,也可以传入函数
-
如果mapDispatchToProps是一个函数,它可以传入dispatch,ownProps, 定义UI组件如何发出action,实际上就是要调用dispatch这个方法
connect([mapStateToProps], [mapDispatchToProps], [mergeProps], [options])
-
mapStateToProps(state, ownProps) : stateProps
-
将store中的数据作为props绑定到组件上。
-
-
mapDispatchToProps(dispatch, ownProps): dispatchProps
-
将action作为props绑定到组件上。
-
-
[mergeProps(stateProps, dispatchProps, ownProps): props]
-
mapStateToProps() 与 mapDispatchToProps() 的执行结果和组件自身的 props 将传入到这个回调函数中。该回调函数返回的对象将作为 props 传递到被包装的组件中。
-
通常情况可以不传这个参数, connect就会使用 Object.assign 替代该方法。
-
-
options
-
定制connector行为。
-
很少用到,可略过。
-
mapStateToProps是必选,如果为空,可以写成:
connect(null,mapDispatchToProps)(Topic)、connect(() => {return {}},mapDispatchToProps)(Topic)
实例一 React-Redux使用
import React from 'react';
import ReactDOM from 'react-dom';
import {createStore} from 'redux';
import {Provider, connect, dispatch} from 'react-redux'
class Counter extends React.Component {
render() {
// 计数,通过store的state传给props,直接通过props就可以将state的数据获取
const value = this.props.value;
// 将修改数据的事件或者方法传入到props
const onAddClick = this.props.onAddClick;
// 等同于vuex的mapMutation mapState
return (
<div>
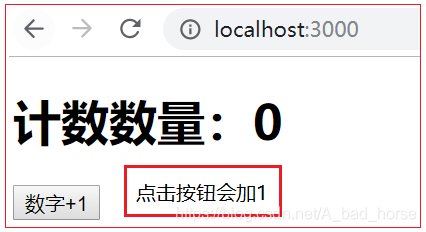
<h1>计数数量:{value}</h1>
<button onClick={onAddClick}>数字+1</button>
</div>
)
}
}
const addAction = {
type: 'add'
}
function reducer(state={num:0}, action) {
switch(action.type) {
case "add":
state.num++;
break;
default:
break;
}
return {...state};
}
const store = createStore(reducer);
//第一步:将state映射到props中
function mapStateToProps(state) {
return {
value: state.num
}
}
//第二步:将修改state数据的方法,映射到props,默认会传入store里的dispatch方法
function mapDispatchToProps(dispatch) {
return {
onAddClick:()=>{dispatch(addAction)}
}
}
// 将上面的2个方法,将数据仓库的state和修改state的方法映射到组件上,形成新的组件
const App = connect(
mapStateToProps, // 第一步
mapDispatchToProps // 第二步
)(Counter)
ReactDOM.render(
<Provider store={store}>
<App/>
</Provider>,
document.querySelector('#root')
)
实例二 通过ActionFnObj实现多个函数
import React from 'react';
import ReactDOM from 'react-dom';
import {createStore} from 'redux';
import {Provider, connect, dispatch} from 'react-redux'
class Counter extends React.Component {
render() {
// 计数,通过store的state传给props,直接通过props就可以将state的数据获取
const value = this.props.value;
// 将修改数据的事件或者方法传入到props
const onAddClick = this.props.onAddClick;
// 等同于vuex的mapMutation mapState
return (
<div>
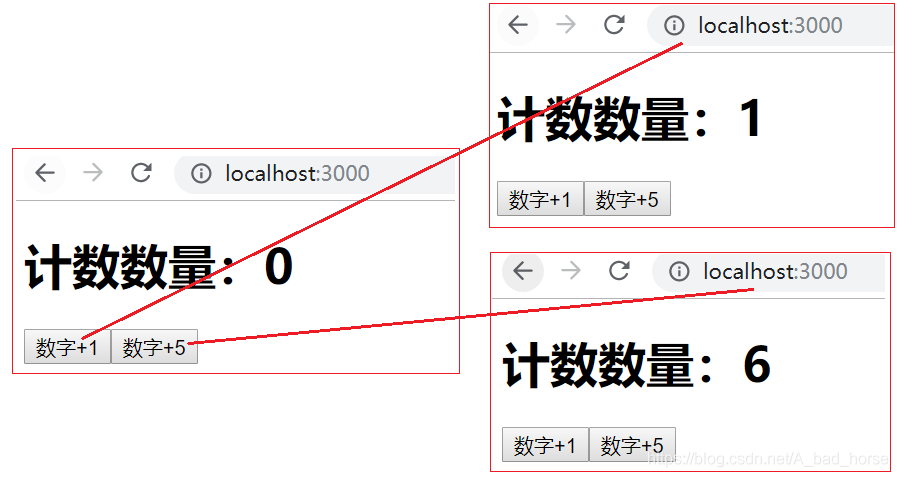
<h1>计数数量:{value}</h1>
<button onClick={onAddClick}>数字+1</button>
<button onClick={this.props.onAddClick5}>数字+5</button>
</div>
)
}
}
const addAction = {
type: 'add'
}
let ActionFnObj = {
add: function (state,action) {
state.num++;
return state
},
addNum: function (state, action) {
state.num = state.num + action.num;
return state
}
}
function reducer(state={num:0}, action) {
if (action.type.indexOf('redux') == -1) {
state = ActionFnObj[action.type](state, action)
return {...state};
} else {
return state;
}
}
const store = createStore(reducer);
//第一步:将state映射到props中
function mapStateToProps(state) { // state作为形参是固定的
return {
value: state.num
}
}
//第二步:将修改state数据的方法,映射到props,默认会传入store里的dispatch方法
function mapDispatchToProps(dispatch) { // dispatch作为形参是固定的
return {
onAddClick:()=>{dispatch(addAction)},
onAddClick5:()=>{dispatch({type:"addNum", num:5})}
}
}
// 将上面的2个方法,将数据仓库的state和修改state的方法映射到组件上,形成新的组件
const App = connect(
mapStateToProps, // 第一步
mapDispatchToProps // 第二步
)(Counter)
ReactDOM.render(
<Provider store={store}>
<App/>
</Provider>,
document.querySelector('#root')
)
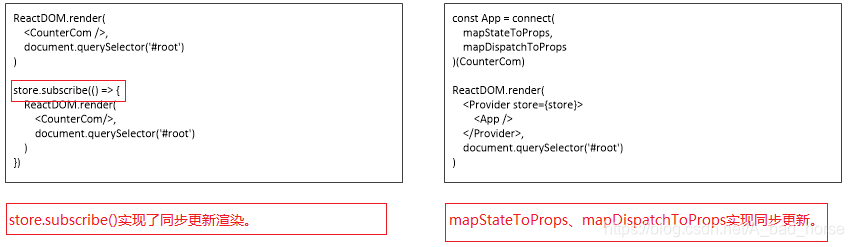
实例三 react-redux 使用前后代码比较

import React from 'react';
import ReactDOM from 'react-dom';
import {createStore} from 'redux';
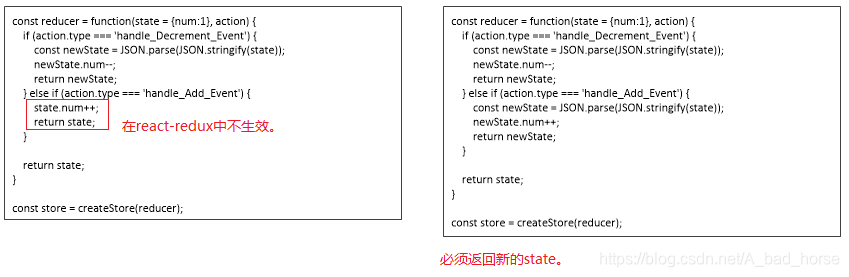
const reducer = function(state = {num:1}, action) {
if (action.type === 'handle_Decrement_Event') {
const newState = JSON.parse(JSON.stringify(state));
newState.num--;
return newState;
} else if (action.type === 'handle_Add_Event') {
state.num++;
return state;
}
return state;
}
const store = createStore(reducer);
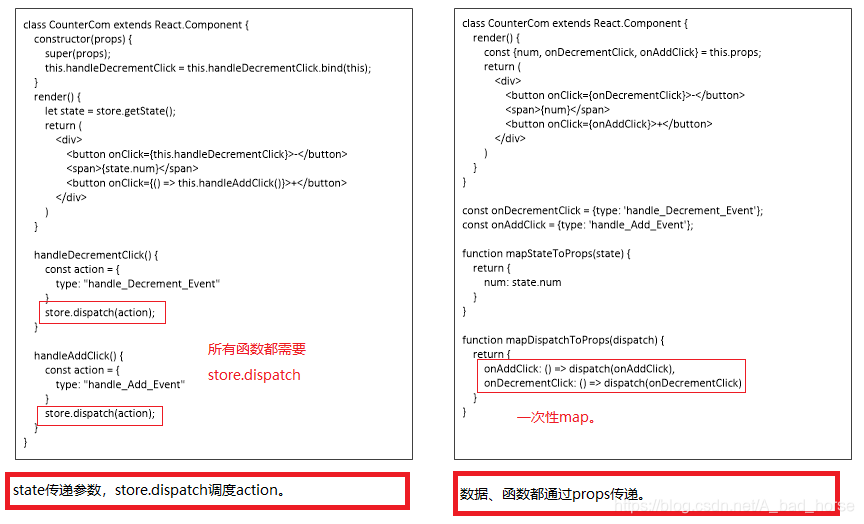
class CounterCom extends React.Component {
constructor(props) {
super(props);
this.handleDecrementClick = this.handleDecrementClick.bind(this);
}
render() {
let state = store.getState();
return (
<div>
<button onClick={this.handleDecrementClick}>-</button>
<span>{state.num}</span>
<button onClick={() => this.handleAddClick()}>+</button>
</div>
)
}
handleDecrementClick() {
const action = {
type: "handle_Decrement_Event"
}
store.dispatch(action);
}
handleAddClick() {
const action = {
type: "handle_Add_Event"
}
store.dispatch(action);
}
}
ReactDOM.render(
<CounterCom />,
document.querySelector('#root')
)
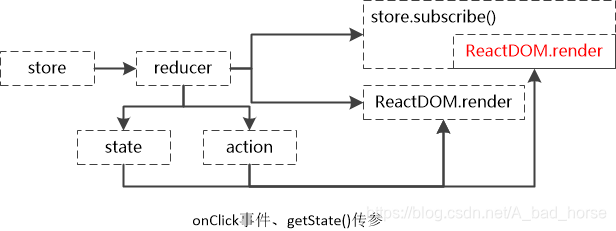
store.subscribe(() => {
ReactDOM.render(
<CounterCom/>,
document.querySelector('#root')
)
})import React from 'react';
import ReactDOM from 'react-dom';
import {createStore} from 'redux';
import {Provider, connect} from 'react-redux'
class CounterCom extends React.Component {
render() {
const {num, onDecrementClick, onAddClick} = this.props;
return (
<div>
<button onClick={onDecrementClick}>-</button>
<span>{num}</span>
<button onClick={onAddClick}>+</button>
</div>
)
}
}
const onDecrementClick = {type: 'handle_Decrement_Event'};
const onAddClick = {type: 'handle_Add_Event'};
const reducer = function(state = {num:1}, action) {
if (action.type === 'handle_Decrement_Event') {
const newState = JSON.parse(JSON.stringify(state));
newState.num--;
return newState;
} else if (action.type === 'handle_Add_Event') {
const newState = JSON.parse(JSON.stringify(state));
newState.num++;
return newState;
}
return state;
}
const store = createStore(reducer);
function mapStateToProps(state) {
return {
num: state.num
}
}
function mapDispatchToProps(dispatch) {
return {
onAddClick: () => dispatch(onAddClick),
onDecrementClick: () => dispatch(onDecrementClick)
}
}
const App = connect(
mapStateToProps,
mapDispatchToProps
)(CounterCom)
ReactDOM.render(
<Provider store={store}>
<App />
</Provider>,
document.querySelector('#root')
)