前言:
最近在一些web进行练习,对我个人而言,web无非就是就是将后端数据库的数据传送到前端页面上,前端再将接收到的数据进行遍历渲染出来以供参考。个人感觉还是比较简单的。对于这一部分的数据库传值,前端渲染这些后面会专门写一期笔记以供参考。那么本篇笔记呢。主要是针对我在之前的练习中遇到的一个偏难的点,什么呢,那就是分页技术。可能好多人都想。这有什么难的,插件一搜一大把。但是我想说的是我本次所写的分页所使用的技术是原生js以及sevelt等基础所写。如有更好的,望留言分享。
一:效果
首先来看下大致需求:
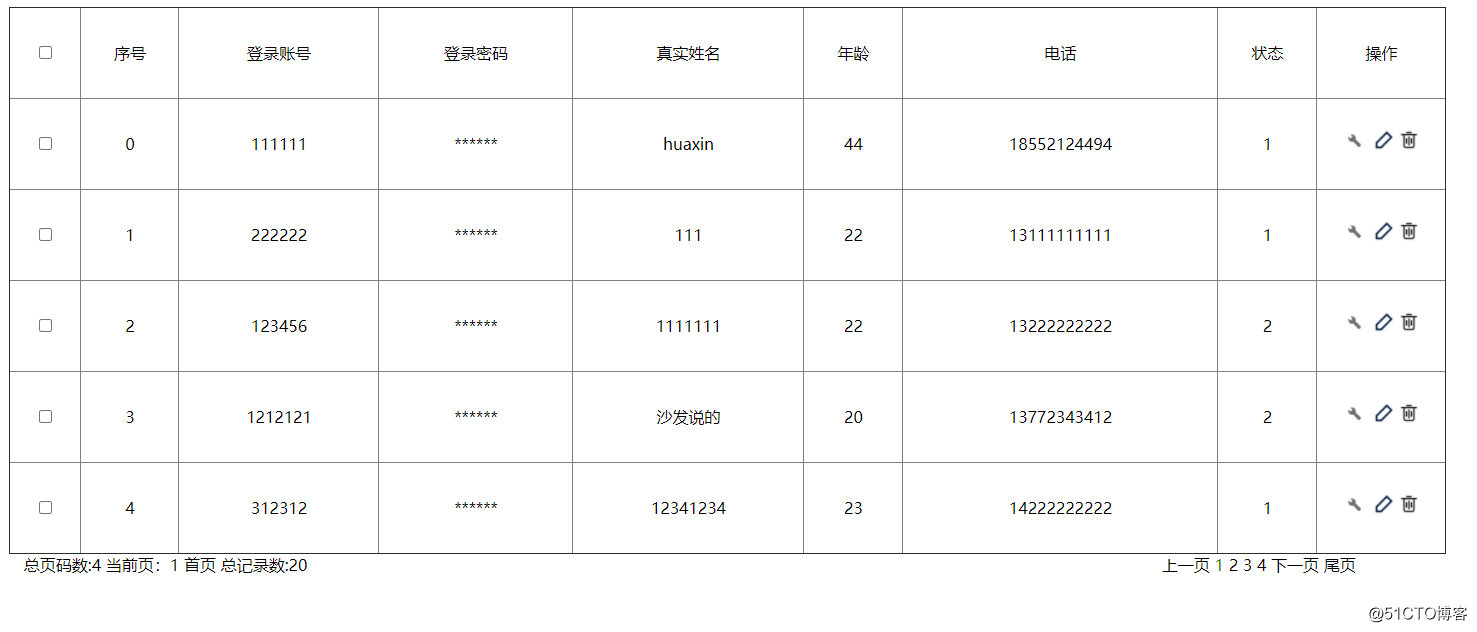
我在这里设计的是每页显示五条数据,然后是总共多少页,当前页,跳转到首页以及尾页,还有总共多少条数据等等。这些都可根据自己需求进行设计。
二:实现思路
- 首先我们需要肯定的就是每页显示多少条数据。
- 然后从前端传回一个当前页。
- 根据当前页进行数据库查询。
- 将查询到的数据封装到集合中。
- 将集合封装到分页对象中。
- 将分页对象传到前端。
- 前端进行数据渲染。
三:代码实现
首先是html页面。
<table border="1">
<tr>
<td width="5%">
<input id="one" type="checkbox" value="">
</td>
<td>序号</td>
<td>名称</td>
<td>描述</td>
<td>添加时间</td>
<td width="9%">操作</td>
</tr>
<form action="/roleDeleteBatches" method="post">
<c:forEach items="${list}" var="user">
<tr>
<td><input class="two" type="checkbox"value="${user.r_id}" name="key"></td>
<td>${user.r_id}</td>
<td>${user.r_name}</td>
<td>${user.r_des}</td>
<td>${user.r_addTime}</td>
<td>
<a href="roleQuery?id=${user.r_id}" target="i">
<img src="../../image/alert-circle.png" width="20px" height="20px">
</a>
<a href="roleUpdate?id=${user.r_id}" target="i">
<img src="../../image/edit-2.png" width="20px" height="20px">
</a>
<a href="roleDelete?id=${user.r_id}">
<img src="../../image/delete2.png" width="20px" height="20px">
</a>
</td>
</tr>
</c:forEach>
//我写的分页当成了插件使用,所以需要引用
<jsp:include page="../../pageInfo.jsp">
<jsp:param name="path" value="${pageContext.request.contextPath}/user/userManager"/>
</jsp:include>
然后是插件页面。
<%@ page contentType="text/html;charset=UTF-8" language="java" %>
<%@ taglib prefix="c" uri="http://java.sun.com/jsp/jstl/core" %>
<html>
<head>
    <title>分页</title>
</head>
<body>
<div style="float: left;width: 300px;">
    <span>总页码数:${pageModel.totalPage}</span>
    <span>当前页:${pageModel.currentPage}</span>
    <sapn><a href="${param.path}?currentPage=1">首页</a></sapn>
    <span>总记录数:${pageModel.totalPage * 5}</span>//这里由于本人在测试,所以是将所有的页数乘以5,有点问题,如果需要的话可以增加一个变量
</div>
<div style="float: right;width: 300px">
    <c:choose>
        <c:when test="${pageModel.currentPage == 1}">
            <a>上一页</a>
        </c:when>
        <c:otherwise>
            <a href="${param.path}?currentPage=${pageModel.currentPage -1}">上一页</a>
        </c:otherwise>
    </c:choose>
    <c:forEach begin="${pageModel.beginPage}" end="${pageModel.endPage}" varStatus="status">
        <c:choose>
            <c:when test="${pageModel.currentPage == status.index}">
                <a style="color: green">${status.index}</a>
            </c:when>
            <c:otherwise>
                <a href="${param.path}?currentPage=${status.index}">${status.index}</a>
            </c:otherwise>
        </c:choose>
    </c:forEach>
    <c:choose>
        <c:when test="${pageModel.currentPage == pageModel.totalPage}">
            <a>下一页</a>
        </c:when>
        <c:otherwise>
            <a href="${param.path}?currentPage=${pageModel.currentPage + 1}">下一页</a>
        </c:otherwise>
    </c:choose>
    <span><a href="${param.path}?currentPage=${pageModel.totalPage}">尾页</a></span>
</div>
</body>
</html>
接下来是severlet类(注意:由于初学,所以将severce合并在了severlet里面,如果有需要,可以将逻辑提取出来)
@WebServlet("/userQueryAll")
public class UserQueryAllServlet extends HttpServlet {
    protected void doPost(HttpServletRequest request, HttpServletResponse response) throws ServletException, IOException {
        response.setContentType("text/html;charset=utf-8");
        String currentPage = request.getParameter("currentPage");
        int currNum = currentPage == null ? 1 : Integer.parseInt("currentPage");
        UserDaoImpl dao = new UserDaoImpl();
        List<User> list = dao.findAllUser(currNum);
        int count = dao.findAllUserCount();
        PageModel<User> page = new PageModel<User>(currNum, (count + 4 ) / 5, 11, list);
        request.getSession().setAttribute("pageModel", page);
        request.getRequestDispatcher("./Adminastrator/user/userManager.jsp").forward(request, response);
    }

    protected void doGet(HttpServletRequest request, HttpServletResponse response) throws ServletException, IOException {
        doPost(request, response);
    }
}
然后是看下我们的实体类,这里解释下,由于生产set与get拉扯的代码太长了,因此将变量写出来以供大家参考,具体需求还需大家自己生成。
    private int currentPage;// 当前页
    private int beginPage;// 起始页
    private int endPage;// 结束页
    private int totalPage;// 总页码数
    private int pageNum;// 页码数
    private List<T> list;
分页实体看完后还需要用户的实体,这里也做一个说明,每个人的代码不同,所以需要根据自己的实际情况来确定字段,本人写的是仅供参考。
    private Integer u_id;
    private String u_account;
    private String u_password;
    private String u_name;
    private Integer u_age;
    private String u_phone;
    private Integer u_status;
最后就是数据库查询(注意:我在这使用了spring框架中的beans架包,以及queryrunner类,如果看不懂请改成jdbc尝试)。
private QueryRunner qur = new QueryRunner(DBUtil.getDataSource());

public List<User> findAllUser(int currentPage) {
        String sql = "select * from user limit ?,5";
        List<User> list = null;
        try {
            list = qur.query(sql, new BeanListHandler<>(User.class), (currentPage - 1) * 5);
        } catch (SQLException throwables) {
            throwables.printStackTrace();
        }
        return list;
    }
public int findAllUserCount() {
        String sql = "select * from user";
        try {
            List<User> query = qur.query(sql, new BeanListHandler<>(User.class));
            return query.size();
        } catch (SQLException throwables) {
            throwables.printStackTrace();
        }
        return 0;
    }
四:总结
总的来说就这些东西,怎么说呢,在搞这个东西的时候,好多人从头懵到尾,我在写的时候也思考了许久。如果说不难,确实有些逻辑,但如果说难的话,对于那些干了有些时间的来说只是入门而已。所以说根据自己的实际情况来确定难易程度。好了,今日的分享就这样吧。希望对大家有所帮助!!!