文章目录
一、LinearGradient 线性渐变渲染
Paint 的 LinearGradient 是 线性渐变渲染 ;
LinearGradient 文档地址 : https://developer.android.google.cn/reference/android/graphics/LinearGradient
LinearGradient 线性渐变渲染 使用时 , 直接使用构造函数创建即可 ;
LinearGradient 提供了 4 4 4 个构造函数 , 分为 2 2 2 大类 , 分别是设置 2 2 2 个颜色渐变的构造函数 , 和设置 多个颜色渐变的构造函数 , 后者可以设置 2 2 2 个以上的颜色值 ;
1、设置 2 个颜色的渐变
设置 2 2 2 个颜色渐变的构造函数原型如下 : 二者的区别是 颜色值可以使用 int , 也可以使用 long 进行表示 ;
    /**
     * Create a shader that draws a linear gradient along a line.
     *
     * @param x0       The x-coordinate for the start of the gradient line
     * @param y0       The y-coordinate for the start of the gradient line
     * @param x1       The x-coordinate for the end of the gradient line
     * @param y1       The y-coordinate for the end of the gradient line
     * @param color0   The sRGB color at the start of the gradient line.
     * @param color1   The sRGB color at the end of the gradient line.
     * @param tile     The Shader tiling mode
     */
    public LinearGradient(float x0, float y0, float x1, float y1,
            @ColorInt int color0, @ColorInt int color1,
            @NonNull TileMode tile) {


        this(x0, y0, x1, y1, Color.pack(color0), Color.pack(color1), tile);
    }

    /**
     * Create a shader that draws a linear gradient along a line.
     *
     * @param x0       The x-coordinate for the start of the gradient line
     * @param y0       The y-coordinate for the start of the gradient line
     * @param x1       The x-coordinate for the end of the gradient line
     * @param y1       The y-coordinate for the end of the gradient line
     * @param color0   The color at the start of the gradient line.
     * @param color1   The color at the end of the gradient line.
     * @param tile     The Shader tiling mode
     *
     * @throws IllegalArgumentException if the colors do
     *      not share the same {@link ColorSpace} or do not use a valid one.
     */
    public LinearGradient(float x0, float y0, float x1, float y1,
            @ColorLong long color0, @ColorLong long color1,
            @NonNull TileMode tile) {


        this(x0, y0, x1, y1, new long[] {

    color0, color1}, null, tile);
    }
3、设置多个颜色的渐变
设置多个颜色渐变的构造函数原型如下 : 二者的区别是 颜色值可以使用 int , 也可以使用 long 进行表示 ;
    /**
     * Create a shader that draws a linear gradient along a line.
     *
     * @param x0           The x-coordinate for the start of the gradient line
     * @param y0           The y-coordinate for the start of the gradient line
     * @param x1           The x-coordinate for the end of the gradient line
     * @param y1           The y-coordinate for the end of the gradient line
     * @param colors       The sRGB colors to be distributed along the gradient line
     * @param positions    May be null. The relative positions [0..1] of
     *                     each corresponding color in the colors array. If this is null,
     *                     the the colors are distributed evenly along the gradient line.
     * @param tile         The Shader tiling mode
     */
    public LinearGradient(float x0, float y0, float x1, float y1, @NonNull @ColorInt int[] colors,
            @Nullable float[] positions, @NonNull TileMode tile) {


        this(x0, y0, x1, y1, convertColors(colors), positions, tile,
                ColorSpace.get(ColorSpace.Named.SRGB));
    }

    /**
     * Create a shader that draws a linear gradient along a line.
     *
     * @param x0           The x-coordinate for the start of the gradient line
     * @param y0           The y-coordinate for the start of the gradient line
     * @param x1           The x-coordinate for the end of the gradient line
     * @param y1           The y-coordinate for the end of the gradient line
     * @param colors       The colors to be distributed along the gradient line
     * @param positions    May be null. The relative positions [0..1] of
     *                     each corresponding color in the colors array. If this is null,
     *                     the the colors are distributed evenly along the gradient line.
     * @param tile         The Shader tiling mode
     *
     * @throws IllegalArgumentException if there are less than two colors, the colors do
     *      not share the same {@link ColorSpace} or do not use a valid one, or {@code positions}
     *      is not {@code null} and has a different length from {@code colors}.
     */
    public LinearGradient(float x0, float y0, float x1, float y1, @NonNull @ColorLong long[] colors,
            @Nullable float[] positions, @NonNull TileMode tile) {


        this(x0, y0, x1, y1, colors.clone(), positions, tile, detectColorSpace(colors));
    }
二、LinearGradient 线性渐变渲染重要参数分析
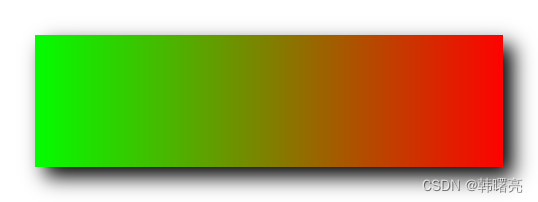
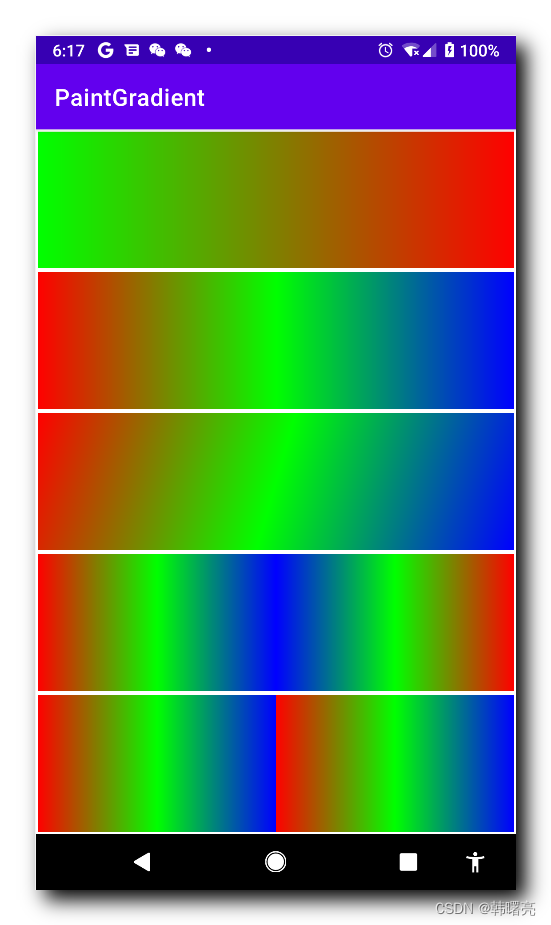
1、正常渲染
正常的线性渲染 :
    private void initRect(int width, int height) {


        mRectF = new RectF(0, 0, width, height);
        mPaint.setShader(new LinearGradient(0, 0, mRectF.right, 0,
                Color.GREEN, Color.RED, Shader.TileMode.CLAMP));
    }
效果图 :
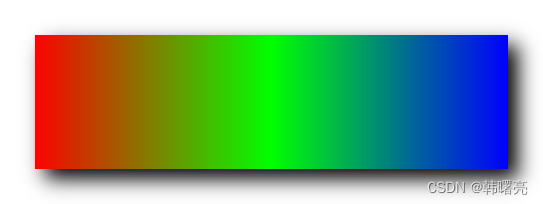
2、设置多个渐变颜色渲染
设置多个渐变颜色渲染 :
    private void initRect(int width, int height) {


        mRectF = new RectF(0, 0, width, height);
        mPaint.setShader(new LinearGradient(0, 0, mRectF.right, 0,
                new int[]{

    Color.RED, Color.GREEN, Color.BLUE},
                new float[]{

    0f, 0.5f, 1.0f},
                Shader.TileMode.CLAMP));
    }
效果图 :
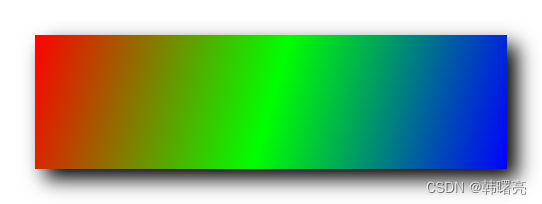
3、设置渲染方向
设置渲染方向 :
    private void initRect(int width, int height) {


        mRectF = new RectF(0, 0, width, height);
        mPaint.setShader(new LinearGradient(0, 0, mRectF.right, mRectF.bottom,
                new int[]{

    Color.RED, Color.GREEN, Color.BLUE},
                new float[]{

    0f, 0.5f, 1.0f},
                Shader.TileMode.CLAMP));
    }
效果图 :
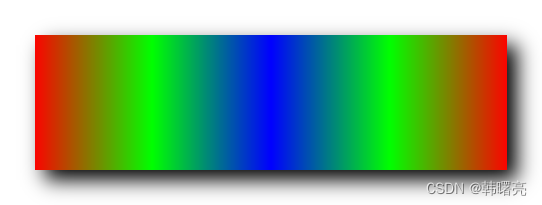
4、设置 Shader.TileMode.MIRROR 渲染模式
设置 Shader.TileMode.MIRROR 渲染模式 :
    private void initRect(int width, int height) {


        mRectF = new RectF(0, 0, width, height);
        mPaint.setShader(new LinearGradient(0, 0, mRectF.right / 2, 0,
                new int[]{

    Color.RED, Color.GREEN, Color.BLUE},
                new float[]{

    0f, 0.5f, 1.0f},
                Shader.TileMode.MIRROR));
    }
效果图 :
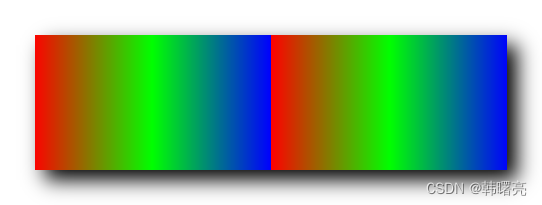
5、设置 Shader.TileMode.REPEAT 渲染模式
设置 Shader.TileMode.REPEAT 渲染模式 :
    private void initRect(int width, int height) {


        mRectF = new RectF(0, 0, width, height);
        mPaint.setShader(new LinearGradient(0, 0, mRectF.right / 2, 0,
                new int[]{

    Color.RED, Color.GREEN, Color.BLUE},
                new float[]{

    0f, 0.5f, 1.0f},
                Shader.TileMode.REPEAT));
    }
效果图 :
三、代码示例
1、正常渲染
package kim.hsl.paintgradient.linear;

import android.content.Context;
import android.graphics.Canvas;
import android.graphics.Color;
import android.graphics.LinearGradient;
import android.graphics.Paint;
import android.graphics.RectF;
import android.graphics.Shader;
import android.util.AttributeSet;
import android.view.View;

import androidx.annotation.Nullable;

public class LinearGradientView extends View {


    /**
     * 画笔工具
     * 线性渐变渲染 需要设置给该 画笔工具
     */
    private Paint mPaint;

    /**
     * 使用线性渐变绘制的区域
     */
    private RectF mRectF;

    public LinearGradientView(Context context) {


        this(context, null);
    }

    public LinearGradientView(Context context, @Nullable AttributeSet attrs) {


        this(context, attrs, 0);
    }

    public LinearGradientView(Context context, @Nullable AttributeSet attrs, int defStyleAttr) {


        super(context, attrs, defStyleAttr);
        initPaint();
    }

    /**
     * 初始化 画笔工具, 主要是设置该画笔的渲染
     */
    private void initPaint() {


        mPaint = new Paint();
        mPaint.setAntiAlias(true);
        mPaint.setStyle(Paint.Style.FILL);
    }

    private void initRect(int width, int height) {


        mRectF = new RectF(0, 0, width, height);
        mPaint.setShader(new LinearGradient(0, 0, mRectF.right, 0,
                Color.GREEN, Color.RED, Shader.TileMode.CLAMP));
    }

    @Override
    protected void onSizeChanged(int width, int height, int oldWidth, int oldHeight) {


        super.onSizeChanged(width, height, oldWidth, oldHeight);
        initRect(width, height);
    }

    @Override
    protected void onDraw(Canvas canvas) {


        super.onDraw(canvas);
        // 正式绘制矩形
        canvas.drawRect(mRectF, mPaint);
    }

}
2、设置多个渐变颜色渲染
package kim.hsl.paintgradient.linear;

import android.content.Context;
import android.graphics.Canvas;
import android.graphics.Color;
import android.graphics.LinearGradient;
import android.graphics.Paint;
import android.graphics.RectF;
import android.graphics.Shader;
import android.util.AttributeSet;
import android.view.View;

import androidx.annotation.Nullable;

public class LinearGradientView2 extends View {


    /**
     * 画笔工具
     * 线性渐变渲染 需要设置给该 画笔工具
     */
    private Paint mPaint;

    /**
     * 使用线性渐变绘制的区域
     */
    private RectF mRectF;

    public LinearGradientView2(Context context) {


        this(context, null);
    }

    public LinearGradientView2(Context context, @Nullable AttributeSet attrs) {


        this(context, attrs, 0);
    }

    public LinearGradientView2(Context context, @Nullable AttributeSet attrs, int defStyleAttr) {


        super(context, attrs, defStyleAttr);
        initPaint();
    }

    /**
     * 初始化 画笔工具, 主要是设置该画笔的渲染
     */
    private void initPaint() {


        mPaint = new Paint();
        mPaint.setAntiAlias(true);
        mPaint.setStyle(Paint.Style.FILL);
    }

    private void initRect(int width, int height) {


        mRectF = new RectF(0, 0, width, height);
        mPaint.setShader(new LinearGradient(0, 0, mRectF.right, 0,
                new int[]{

    Color.RED, Color.GREEN, Color.BLUE},
                new float[]{

    0f, 0.5f, 1.0f},
                Shader.TileMode.CLAMP));
    }

    @Override
    protected void onSizeChanged(int width, int height, int oldWidth, int oldHeight) {


        super.onSizeChanged(width, height, oldWidth, oldHeight);
        initRect(width, height);
    }

    @Override
    protected void onDraw(Canvas canvas) {


        super.onDraw(canvas);
        // 正式绘制矩形
        canvas.drawRect(mRectF, mPaint);
    }

}
3、设置渲染方向
package kim.hsl.paintgradient.linear;

import android.content.Context;
import android.graphics.Canvas;
import android.graphics.Color;
import android.graphics.LinearGradient;
import android.graphics.Paint;
import android.graphics.RectF;
import android.graphics.Shader;
import android.util.AttributeSet;
import android.view.View;

import androidx.annotation.Nullable;

public class LinearGradientView3 extends View {


    /**
     * 画笔工具
     * 线性渐变渲染 需要设置给该 画笔工具
     */
    private Paint mPaint;

    /**
     * 使用线性渐变绘制的区域
     */
    private RectF mRectF;

    public LinearGradientView3(Context context) {


        this(context, null);
    }

    public LinearGradientView3(Context context, @Nullable AttributeSet attrs) {


        this(context, attrs, 0);
    }

    public LinearGradientView3(Context context, @Nullable AttributeSet attrs, int defStyleAttr) {


        super(context, attrs, defStyleAttr);
        initPaint();
    }

    /**
     * 初始化 画笔工具, 主要是设置该画笔的渲染
     */
    private void initPaint() {


        mPaint = new Paint();
        mPaint.setAntiAlias(true);
        mPaint.setStyle(Paint.Style.FILL);
    }

    private void initRect(int width, int height) {


        mRectF = new RectF(0, 0, width, height);
        mPaint.setShader(new LinearGradient(0, 0, mRectF.right, mRectF.bottom,
                new int[]{

    Color.RED, Color.GREEN, Color.BLUE},
                new float[]{

    0f, 0.5f, 1.0f},
                Shader.TileMode.CLAMP));
    }

    @Override
    protected void onSizeChanged(int width, int height, int oldWidth, int oldHeight) {


        super.onSizeChanged(width, height, oldWidth, oldHeight);
        initRect(width, height);
    }

    @Override
    protected void onDraw(Canvas canvas) {


        super.onDraw(canvas);
        // 正式绘制矩形
        canvas.drawRect(mRectF, mPaint);
    }

}
4、设置 Shader.TileMode.MIRROR 渲染模式
package kim.hsl.paintgradient.linear;

import android.content.Context;
import android.graphics.Canvas;
import android.graphics.Color;
import android.graphics.LinearGradient;
import android.graphics.Paint;
import android.graphics.RectF;
import android.graphics.Shader;
import android.util.AttributeSet;
import android.view.View;

import androidx.annotation.Nullable;

public class LinearGradientView4 extends View {


    /**
     * 画笔工具
     * 线性渐变渲染 需要设置给该 画笔工具
     */
    private Paint mPaint;

    /**
     * 使用线性渐变绘制的区域
     */
    private RectF mRectF;

    public LinearGradientView4(Context context) {


        this(context, null);
    }

    public LinearGradientView4(Context context, @Nullable AttributeSet attrs) {


        this(context, attrs, 0);
    }

    public LinearGradientView4(Context context, @Nullable AttributeSet attrs, int defStyleAttr) {


        super(context, attrs, defStyleAttr);
        initPaint();
    }

    /**
     * 初始化 画笔工具, 主要是设置该画笔的渲染
     */
    private void initPaint() {


        mPaint = new Paint();
        mPaint.setAntiAlias(true);
        mPaint.setStyle(Paint.Style.FILL);
    }

    private void initRect(int width, int height) {


        mRectF = new RectF(0, 0, width, height);
        mPaint.setShader(new LinearGradient(0, 0, mRectF.right / 2, 0,
                new int[]{

    Color.RED, Color.GREEN, Color.BLUE},
                new float[]{

    0f, 0.5f, 1.0f},
                Shader.TileMode.MIRROR));
    }

    @Override
    protected void onSizeChanged(int width, int height, int oldWidth, int oldHeight) {


        super.onSizeChanged(width, height, oldWidth, oldHeight);
        initRect(width, height);
    }

    @Override
    protected void onDraw(Canvas canvas) {


        super.onDraw(canvas);
        // 正式绘制矩形
        canvas.drawRect(mRectF, mPaint);
    }

}
5、设置 Shader.TileMode.REPEAT 渲染模式
package kim.hsl.paintgradient.linear;

import android.content.Context;
import android.graphics.Canvas;
import android.graphics.Color;
import android.graphics.LinearGradient;
import android.graphics.Paint;
import android.graphics.RectF;
import android.graphics.Shader;
import android.util.AttributeSet;
import android.view.View;

import androidx.annotation.Nullable;

public class LinearGradientView5 extends View {


    /**
     * 画笔工具
     * 线性渐变渲染 需要设置给该 画笔工具
     */
    private Paint mPaint;

    /**
     * 使用线性渐变绘制的区域
     */
    private RectF mRectF;

    public LinearGradientView5(Context context) {


        this(context, null);
    }

    public LinearGradientView5(Context context, @Nullable AttributeSet attrs) {


        this(context, attrs, 0);
    }

    public LinearGradientView5(Context context, @Nullable AttributeSet attrs, int defStyleAttr) {


        super(context, attrs, defStyleAttr);
        initPaint();
    }

    /**
     * 初始化 画笔工具, 主要是设置该画笔的渲染
     */
    private void initPaint() {


        mPaint = new Paint();
        mPaint.setAntiAlias(true);
        mPaint.setStyle(Paint.Style.FILL);
    }

    private void initRect(int width, int height) {


        mRectF = new RectF(0, 0, width, height);
        mPaint.setShader(new LinearGradient(0, 0, mRectF.right / 2, 0,
                new int[]{

    Color.RED, Color.GREEN, Color.BLUE},
                new float[]{

    0f, 0.5f, 1.0f},
                Shader.TileMode.REPEAT));
    }

    @Override
    protected void onSizeChanged(int width, int height, int oldWidth, int oldHeight) {


        super.onSizeChanged(width, height, oldWidth, oldHeight);
        initRect(width, height);
    }

    @Override
    protected void onDraw(Canvas canvas) {


        super.onDraw(canvas);
        // 正式绘制矩形
        canvas.drawRect(mRectF, mPaint);
    }

}
四、效果展示
代码下载地址 :