第十一章 装备购买、经验条以及环境碰撞器
本章内容较零散,主要是完善几个功能,即借助之前做好的装备系统实现装备商店与物品栏的交互,以及经验条和环境碰撞器的添加。
11.1 装备购买功能
我们首先添加商店NPC,类似药品商人,可参考7.2.1节(
链接)
添加完NPC后,正式进入装备商店的设计。由于装备比药品多,需要要装备商店的UI要结合药品商店和技能列表的下拉功能,如下左图所示。
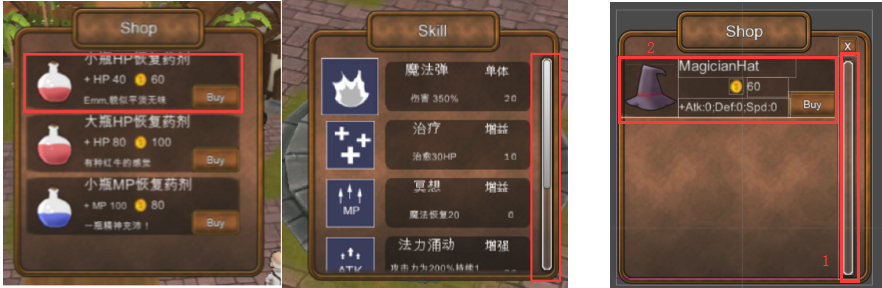
在UI root下新建EquipmentShop作为装备商店的UI。将UI界面下Skill的SkillGrid和ScrollBar、DrugShop下的一个Item(上右图中(1)),复制一份到EquipmentShop下,将DrugShop中的Item改名为EquipmentShopItem(上右图中(2))
为EquipmentShopItem创建一个脚本EquipmentShopItem,用以显示物品信息,代码如下
using UnityEngine;
using System.Collections;

public class EquipmentShopItem : MonoBehaviour {

    public static EquipmentShopItem _instance;
    private int id;
    private ObjectsInfo.ObjectInfo info;
    private UISprite icon_name;    //添加各子物体的引用
    private UILabel equipment_label;
    private UILabel equipment_buyMoney;
    private UILabel equipment_describe;

    void Awake()
    {
        _instance = this;
    }

    public void SetId(int id)    //通过id更新EquipmentShopItem下子物体的信息
    {
        InitProperty ();
        this.id = id;
        info = ObjectsInfo._instance.GetObjectInfoFromDict (id);
        icon_name.spriteName = info.icon_name;
        equipment_label.text = info.name;
        equipment_buyMoney.text = info.price_buy.ToString();
        if (info.attack > 0)
        {
            equipment_describe.text = "+Attack:" + info.attack;

        }
        else if (info.defense > 0)
        {
            equipment_describe.text = "+Defense:" + info.defense;
        }
        else if(info.speed > 0)
        {
            equipment_describe.text = "Speed:" + info.speed;
        }
    }

    void InitProperty()    //初始化子物体
    {

        icon_name = transform.Find ("Equip").GetComponent<UISprite> ();
        equipment_label = transform.Find ("EquipLabel").GetComponent<UILabel> ();
        equipment_buyMoney = transform.Find ("BuyMoney").GetComponent<UILabel> ();
        equipment_describe = transform.Find ("Describe").GetComponent<UILabel> ();
    }

}
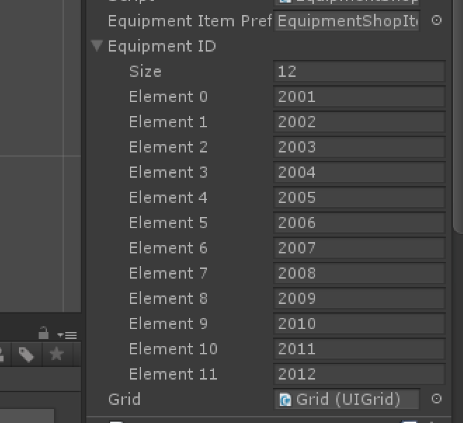
之后需要通过访问ObjectsInfoInList中的装备信息,在EquipmentShop脚本中新建一个数组,用以管理所有的装备id(2001~2012),并添加一个grid引用,用于管理grid并实现动态添加装备的功能。
    public GameObject equipmentItemPrefab;
    public int[] EquipmentID;
    public UIGrid grid;
将动态创建装备写成一个函数,命名为InitEquipShop,代码如下(参考9.2.1的Grid,
链接)
    void InitEquipShop()
    {
        foreach (int id in EquipmentID)    //遍历所有装备id并创建
        {
            GameObject itemGO = NGUITools.AddChild(grid.gameObject,equipmentItemPrefab);
            grid.AddChild(itemGO.transform);
            itemGO.GetComponent<EquipmentShopItem>().SetId(id);
        }
    }
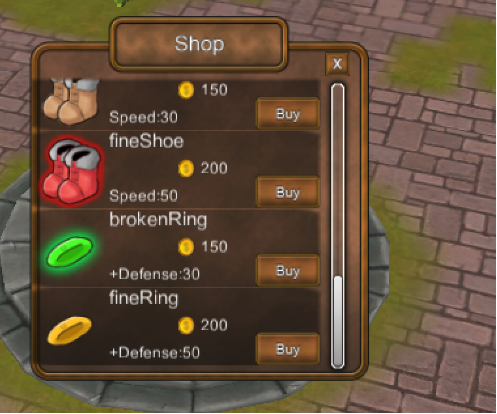
结果如下图所示。
购买装备同样参照药品的购买。我们在EquipmentShop脚本中新建一个函数OnBuyButtonClick(),并赋值给Prefab中的EquipmentShopItem的BuyButton,访问EquipmentShop中的Buy()函数,它们各自的实现如下
    public void OnBuyButtonClick()
    {
        EquipmentShop._instance.Buy (id);
    }

    public void Buy(int id)
    {
        int buyMoney = ObjectsInfo._instance.GetObjectInfoFromDict (id).price_buy;    //获取装备价格
        bool success = Inventory._instance.IsGetCoinSuccess (buyMoney);    //判断当前剩余金额是否大于装备价格
        if (success)
        {
            Inventory._instance.GetId(id);

        }
    }
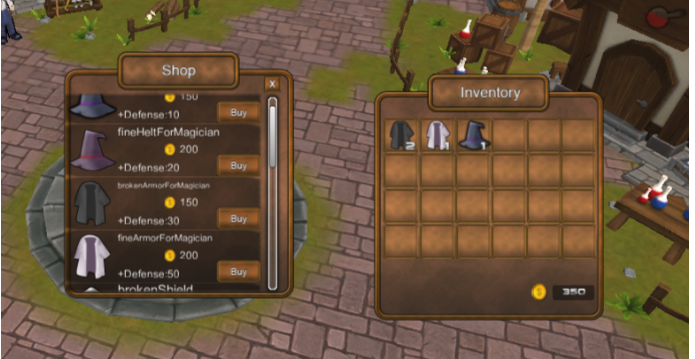
即可实现购买功能(这里的功能完全可以在OnBuyButtonClick()函数中直接实现,多此一举的原因主要是因为面向对象的编程方式,在EquipmentShop进行购买会更易于维护)
11.2 经验条的显示
经验条用Colored Progress Bar显示,并添加一个EXPBar脚本控制,代码如下。
using UnityEngine;
using System.Collections;

public class EXPBar : MonoBehaviour {

    public static EXPBar _instance;
    private UISlider progress;

    void Awake()
    {
        _instance = this;
        progress = this.GetComponent<UISlider> ();    //取得进度条信息
    }

    public void SetValue(float value)
    {
        progress.value = value;    //改变进度条的显示
    }

}
经验条涉及到经验属性,因此在PlayerStatus中添加这一属性,并通过一个函数控制
    public float expCurrent = 0;    //当前经验
    public void GetExp(float exp)
    {
        this.expCurrent += exp;    //当前exp加上杀怪获取
        int totalExp = 100 + this.level * 30;    //等级与经验的对应公式
        while (this.expCurrent >= totalExp)    //用while循环判断角色是否连升多级,若是,每升级一次,都增加技能点,并更新expCurrent的显示
        {
            ++level;
            expCurrent -= totalExp;
            point_remain += 5;
            totalExp = 100 + this.level * 30;
        }
        EXPBar._instance.SetValue (this.expCurrent / totalExp);    //更新进度条的显示
    }
在之后击杀怪物时,我们再完善这一功能。
11.3 给环境添加碰撞器
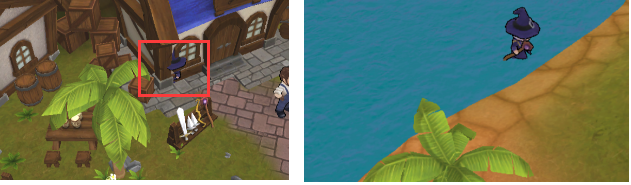
现在角色在移动时可以穿越障碍物、直接过河等操作,这显然是不合理的,如下图所示
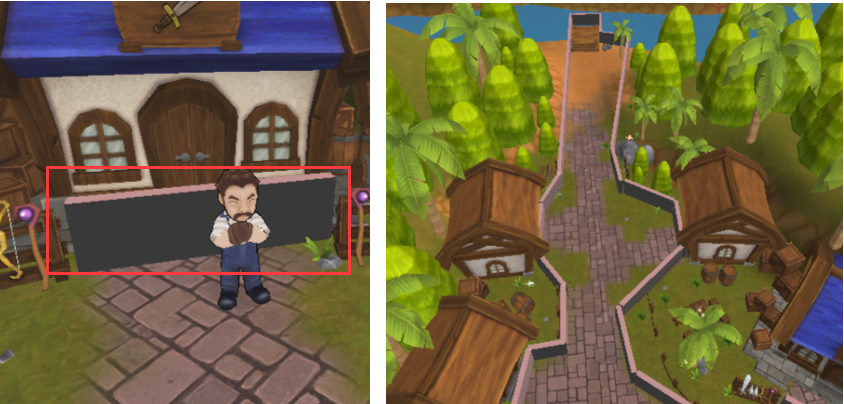
因此本节对此问题进行改善。我们在Hierarchy中添加一个空的Empty,命名为Colliders,作为碰撞器的存储位置,新建一个3D的Cube,作为碰撞器,如下左图所示。通过Crrl+D复制,以达到地图边界创建的效果,如下右图
对于一些可以行走的地方,例如桥,我们需要添加Mesh Collider,并更改它的Tag为Ground以实现在桥上的行走效果。为了去除围墙的显示效果,我们将Mesh Filter和Mesh Render移出即可。