文章目录
三、Navigation 导航
目前业界的最佳实践是 单 Activity-多 Fragment,随之而来的问题是需要用 FragmentManager 和 FragmentTransaction 来管理 Fragment 之间的切换、传参数。我们可用 Jetpack 的 navigation 库来更方便的使用,其优点如下:
- 可视化的 destination 和 action 导航,页面间的关系非常可视化
- 通过 NavigationUI类,可对菜单、导航底部、抽屉菜单,统一地管理
其包括如下元素:
- Navigation Graph:通过 xml 可以描述页面间的关系。
- NavHostFragment:是一个特殊的 Fragment,是其他 Fragment 的容器。
- NavController:是 Kotlin 的对象,用来在 Navigation Graph 中切换页面。
当你想切换 Fragment 时,告诉 NavController 对象你想要去 Navigation Graph 中的哪个 Fragment,其会将你要去的 Fragment 展示在 NavHostFragment 中。
3.1 使用 Navigation
3.1.1 创建 Navigation Graph
在 res 文件夹 -》New -》 Android Resource File 新建一个名为 nav_graph 的 Navigation Graph 文件,示例如下:

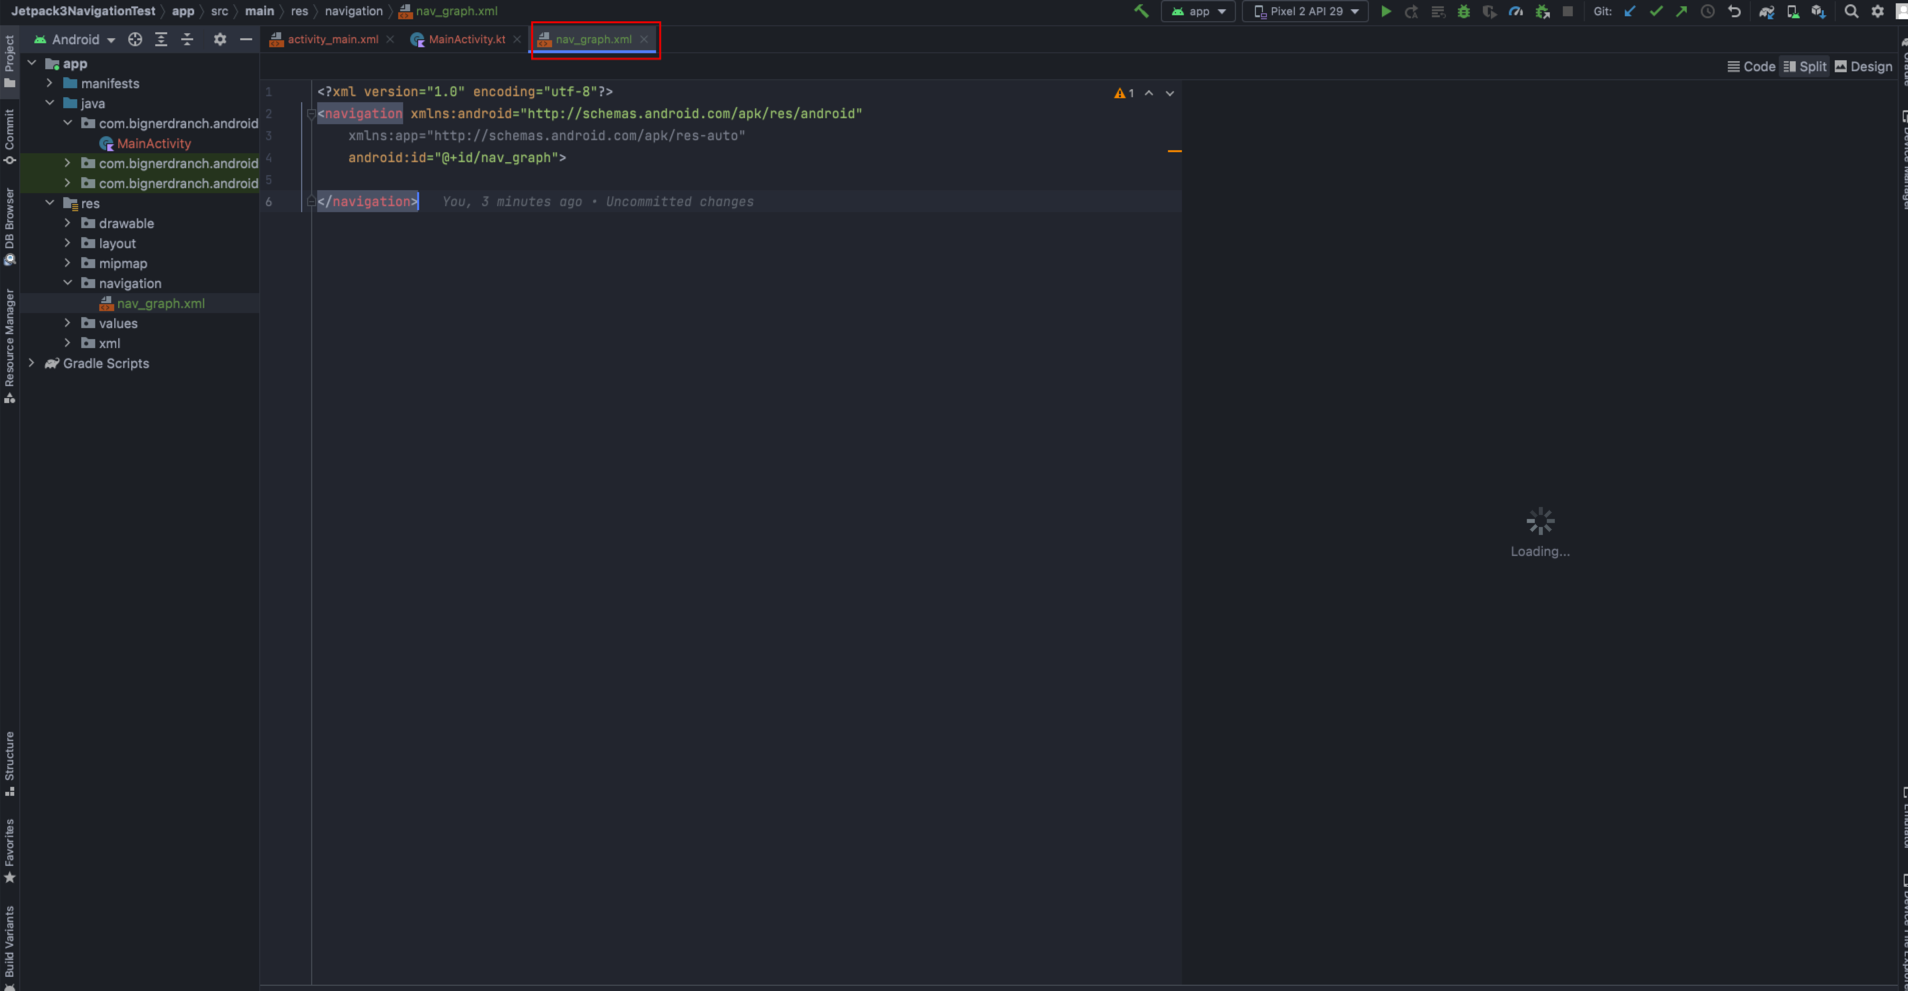
随后,会生成 res/navigation/nav_graph.xml 的导航文件,暂无任何内容,效果如下:
然后,在 build.gradle 中添加 nav 的依赖,依赖如下:
dependencies {


    // nav
    // Kotlin
    implementation("androidx.navigation:navigation-fragment-ktx:2.5.2")
    implementation("androidx.navigation:navigation-ui-ktx:2.5.2")
    // Feature module Support
    implementation("androidx.navigation:navigation-dynamic-features-fragment:2.5.2")
}
3.1.2 添加 NavHostFragment
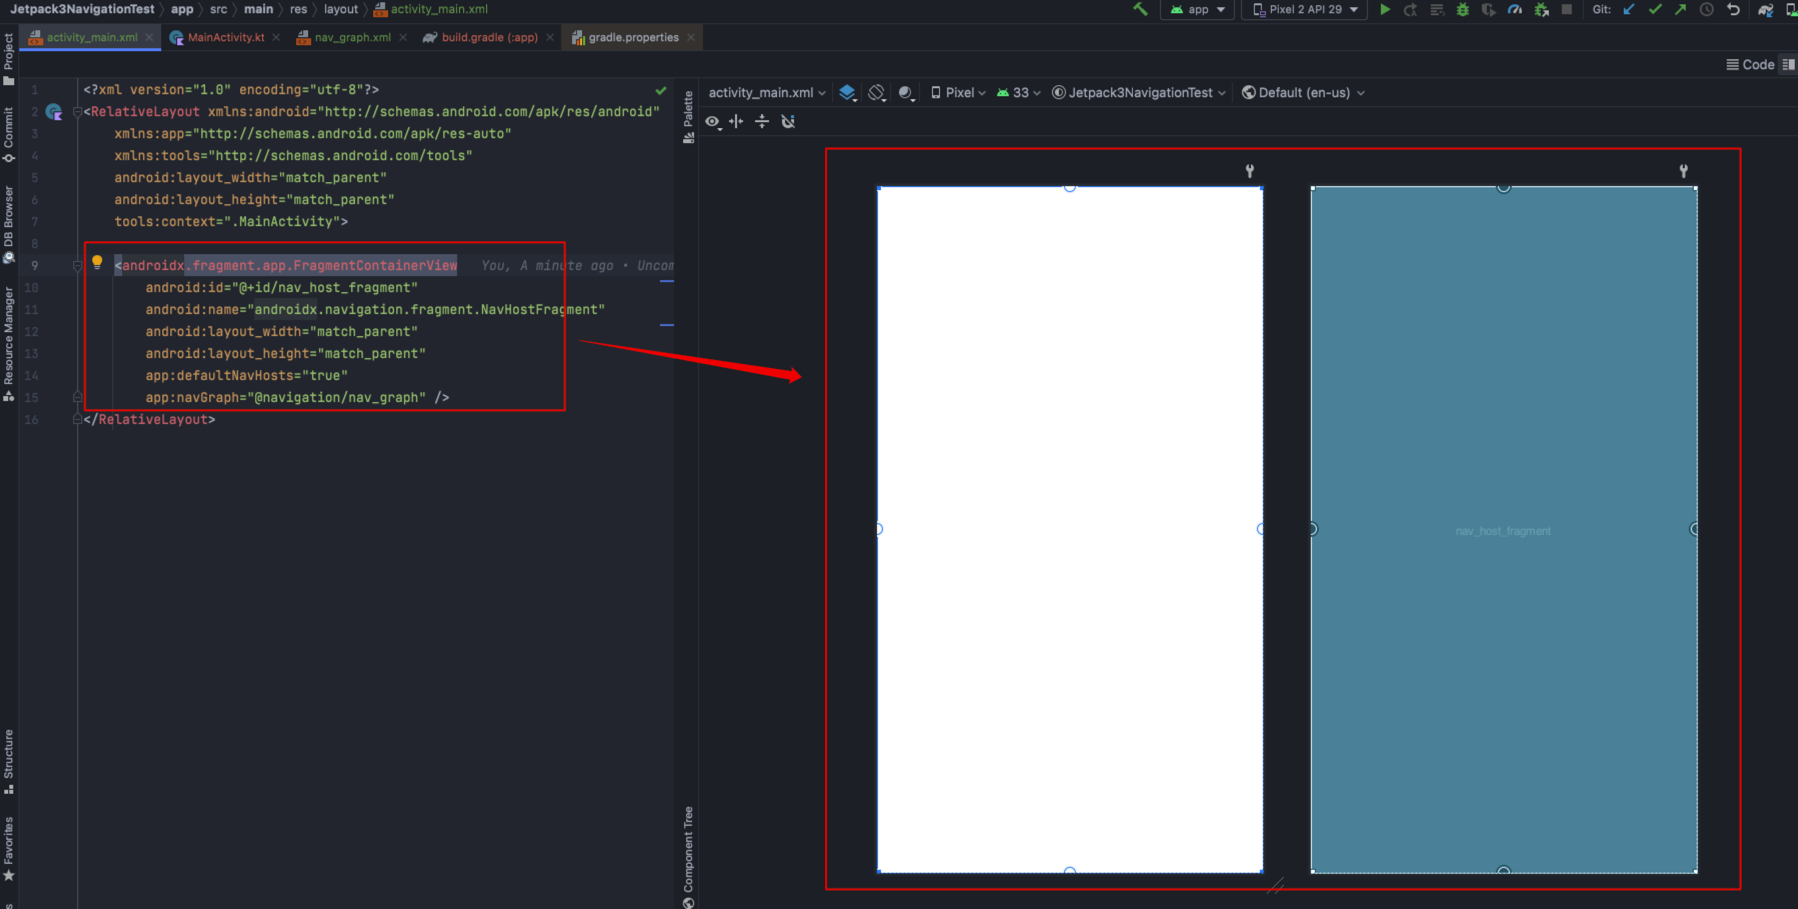
NavHostFragment 是一个特殊的 Fragment,我们将它添加到 activity_main.xml 中作为其他 Fragment 的容器,activity_main.xml 的布局如下:
<?xml version="1.0" encoding="utf-8"?>
<RelativeLayout xmlns:android="http://schemas.android.com/apk/res/android"
    xmlns:app="http://schemas.android.com/apk/res-auto"
    xmlns:tools="http://schemas.android.com/tools"
    android:layout_width="match_parent"
    android:layout_height="match_parent"
    tools:context=".MainActivity">

    <androidx.fragment.app.FragmentContainerView
        android:id="@+id/nav_host_fragment"
        android:name="androidx.navigation.fragment.NavHostFragment"
        android:layout_width="match_parent"
        android:layout_height="match_parent"
        app:defaultNavHost="true"
        app:navGraph="@navigation/nav_graph" />
</RelativeLayout>
其中,各配置项含义如下:
android:name="androidx.navigation.fragment.NavHostFragment"指这是特殊的 Fragment,即 NavHostFragmentapp:defaultNavHost="true"指该 按下手机的 Back 键时,该 Fragment 会正常退出app:navGraph="@navigation/nav_graph"指在 res/layout/activity_main.xml 中引用 res/navigation/nav_graph.xml 布局
设置后,布局效果如下:
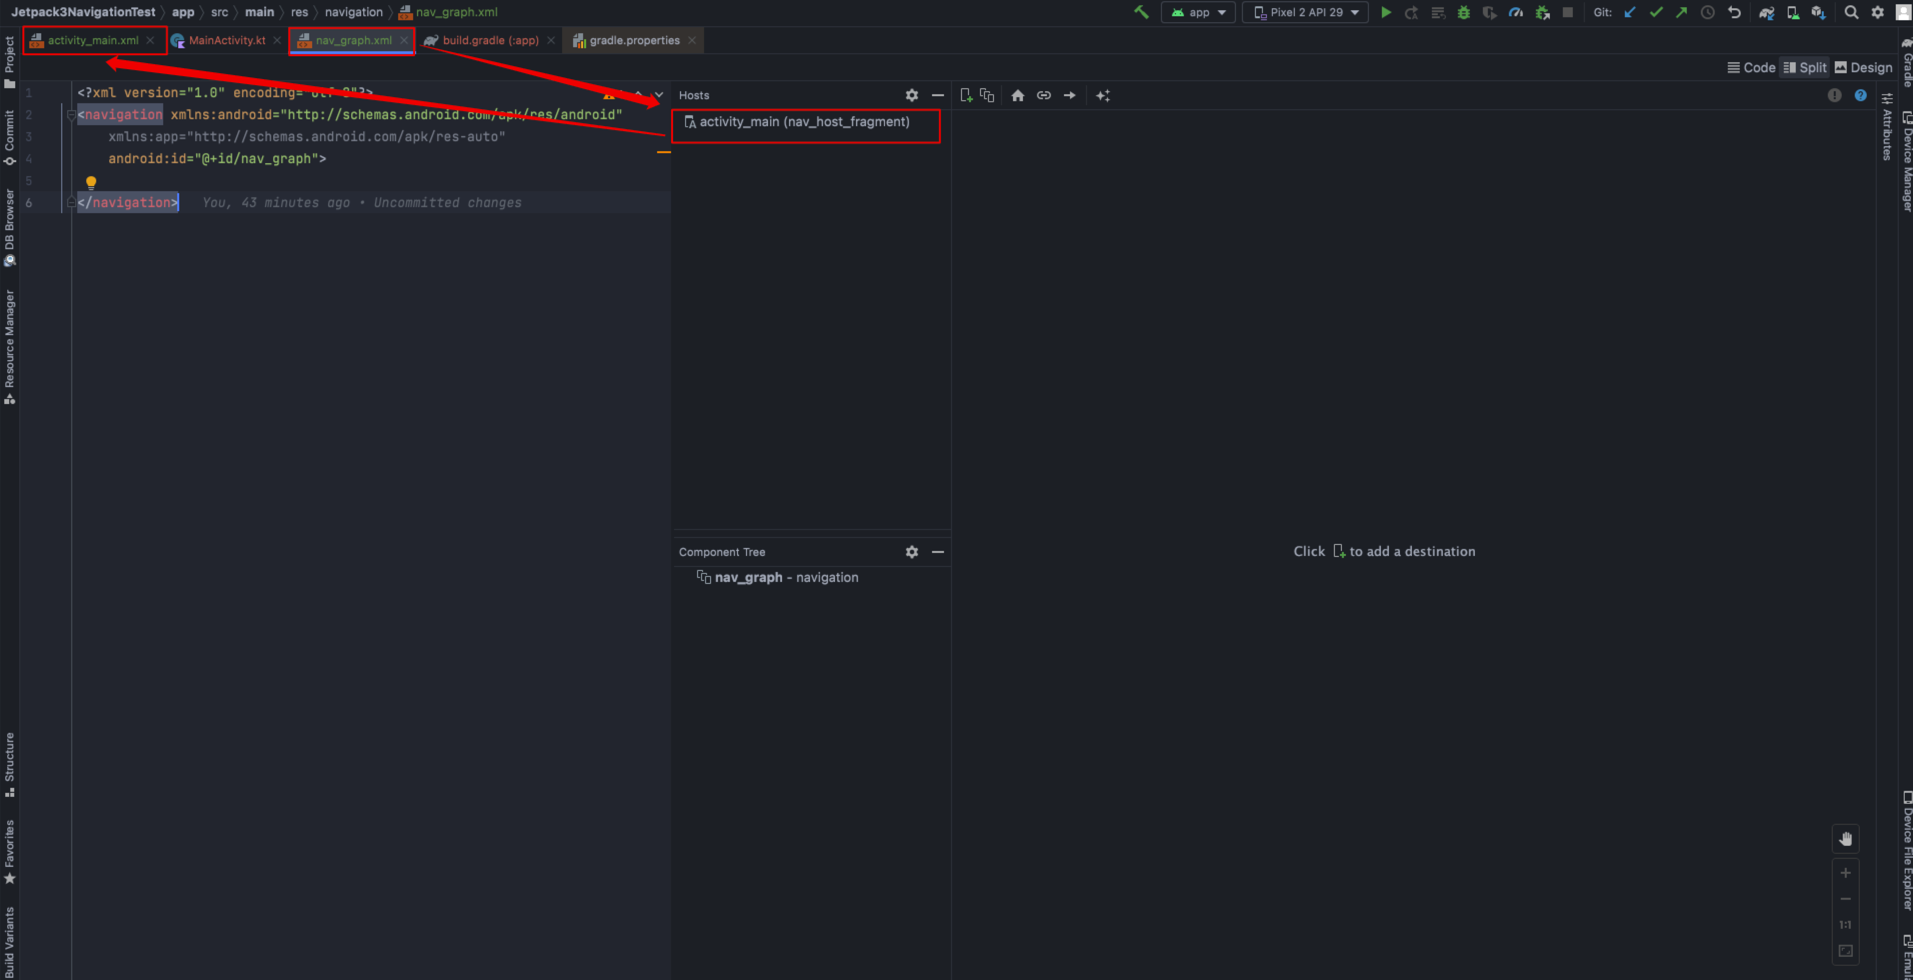
设置后,nav_graph.xml 的布局会添加 activity_main(nav_host_fragment) 的引用,效果如下:
3.1.3 创建 MainFragment 的 destination
在 nav_graph.xml 布局中,点击 Create new destination 按钮创建一个 destination,效果如下:
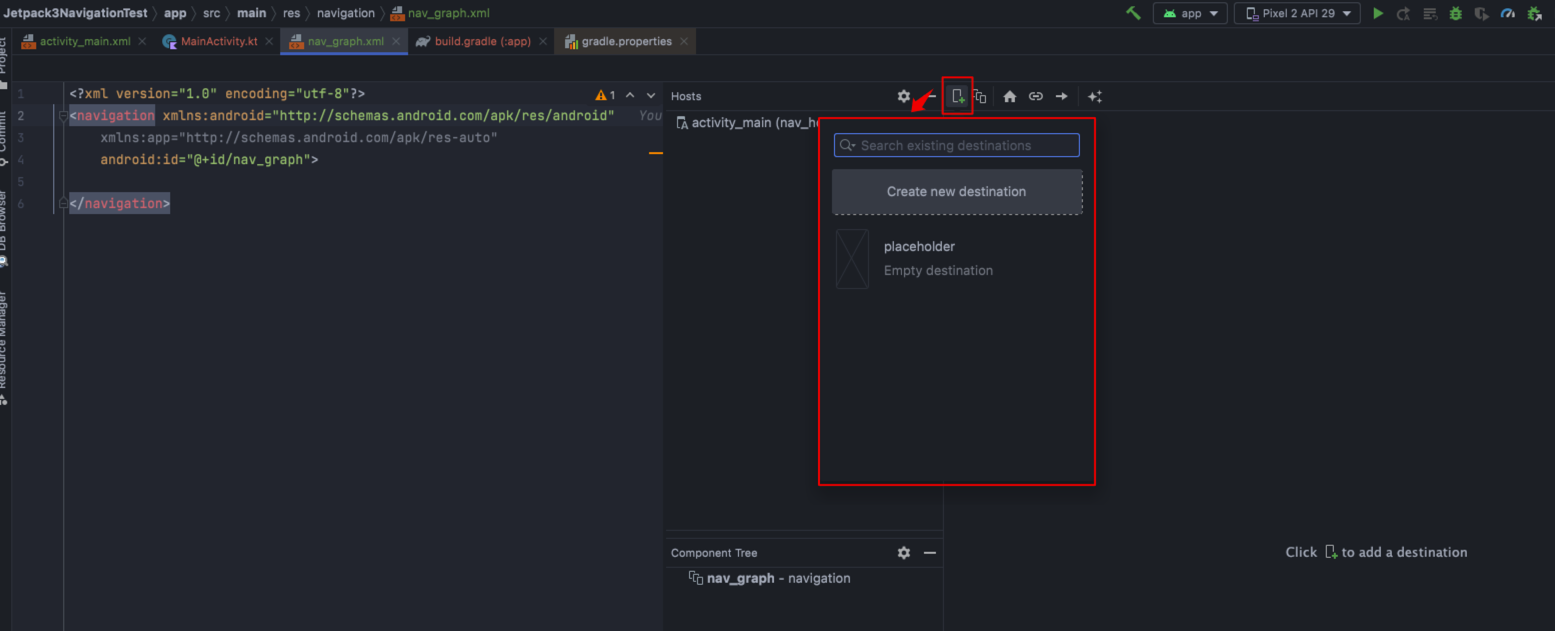
destination 是目的地,可以是 Fragment 或 Activity,因为通常是一个 Activity 管理多个 Fragment,所以最常见的是 Fragment。
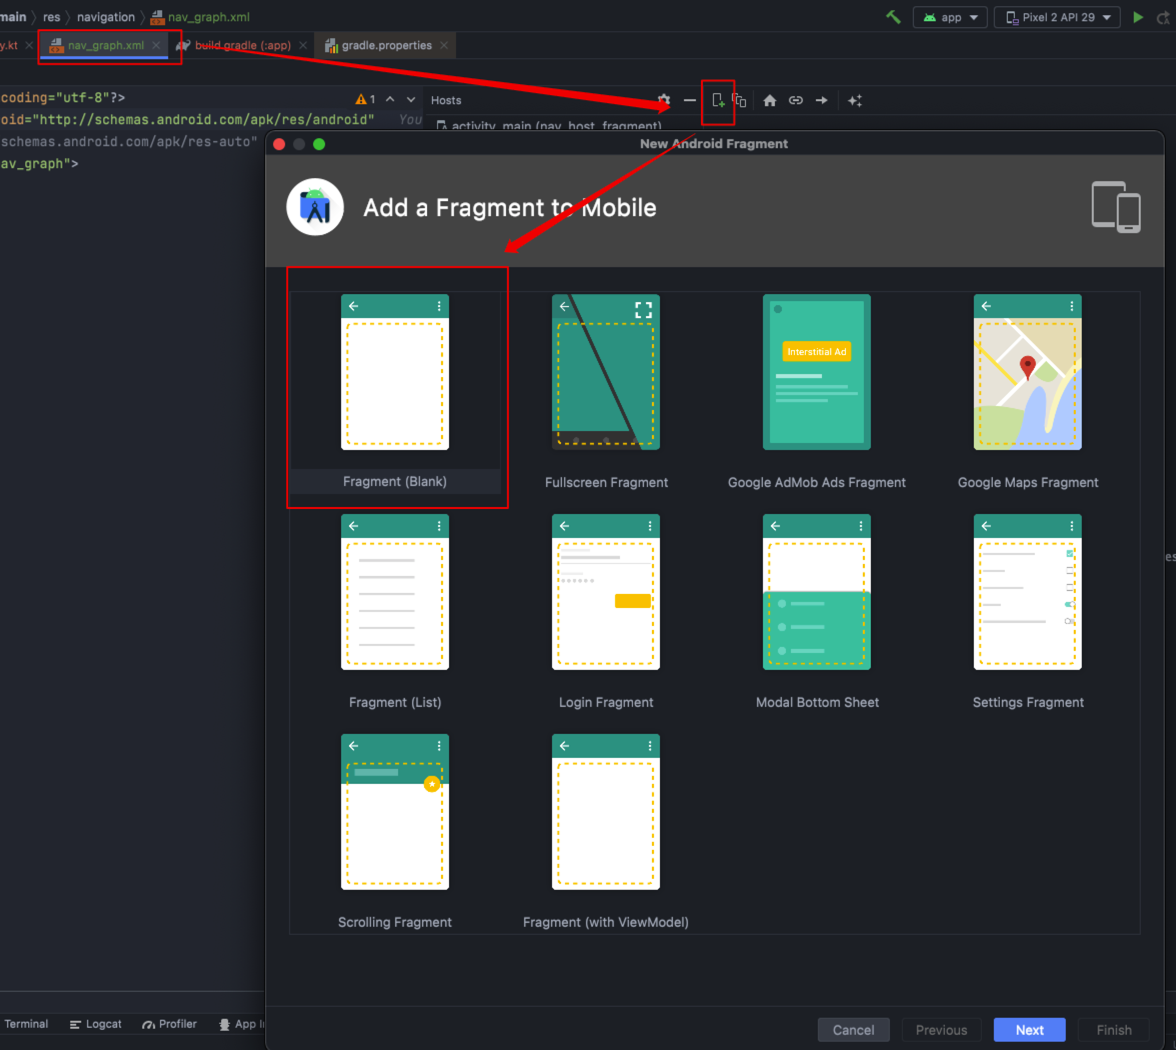
本例中,我们先创建一个 destination,示例如下:
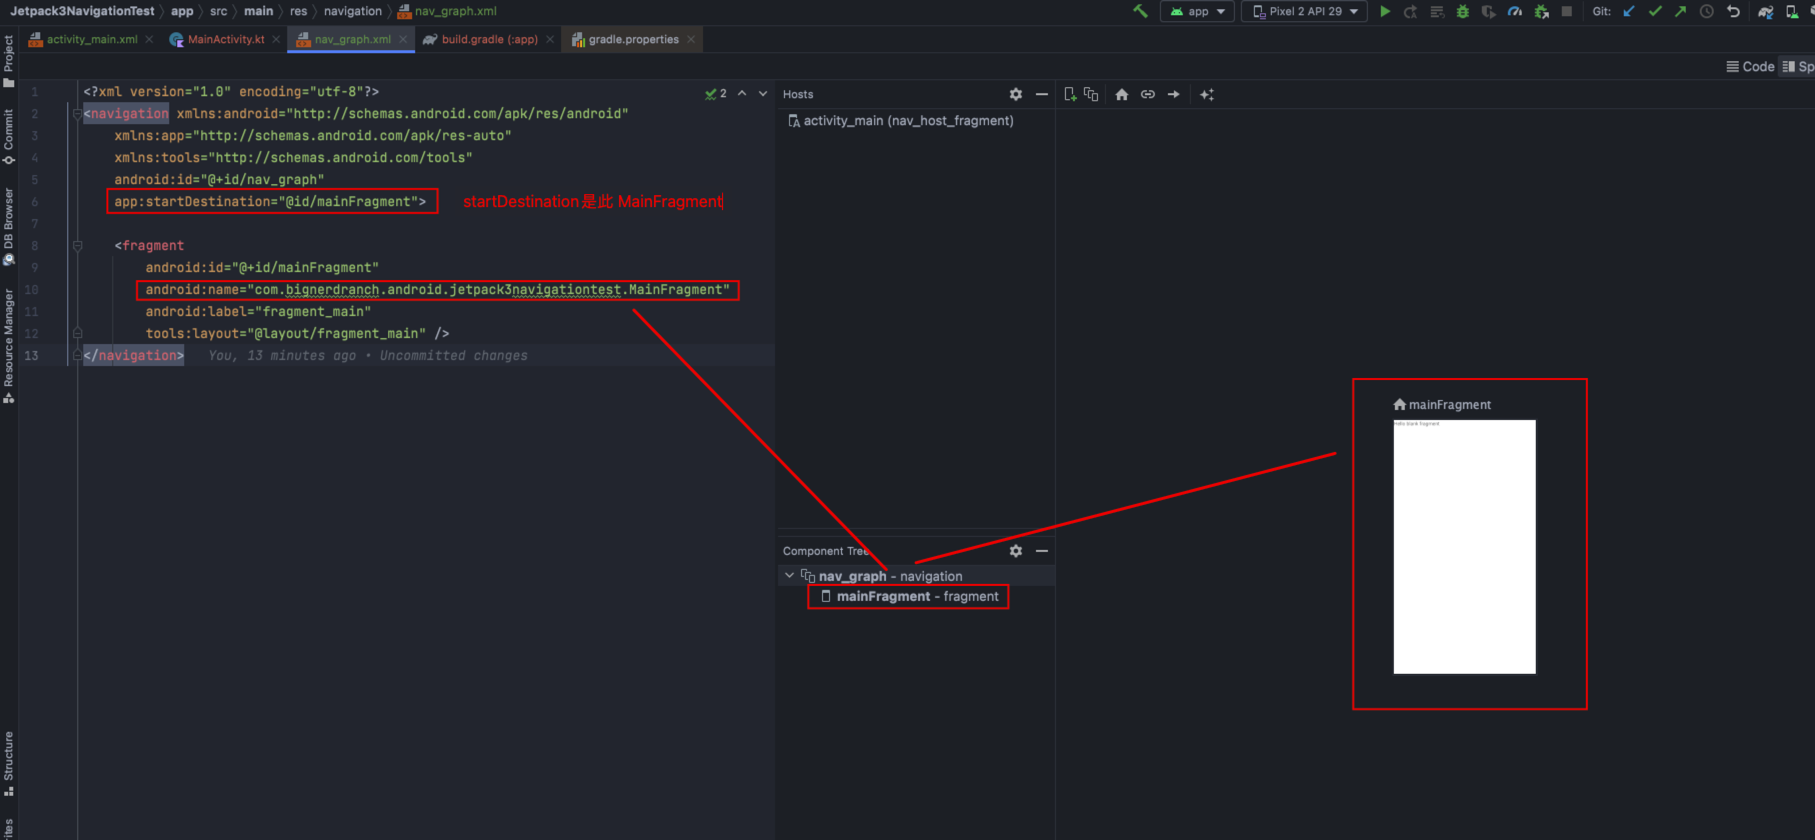
然后,将 destination 命名为 MainFragment,示例如下:

最终,生成的 MainFragment 是 nav_graph 的 startDestination,效果如下:
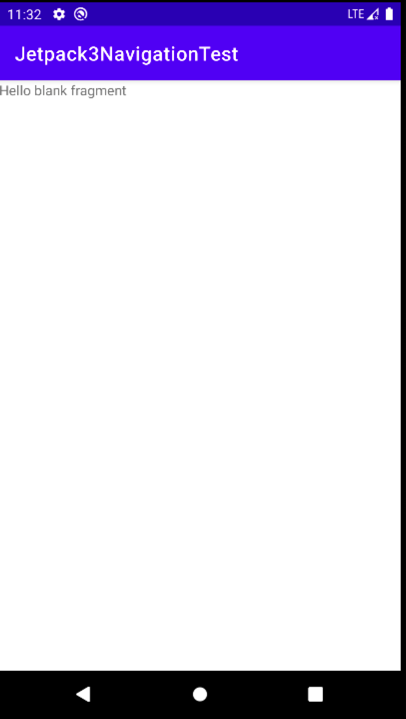
运行后,显示 MainFragment 了,效果如下:
3.1.4 通过 action 连接 各Fragment
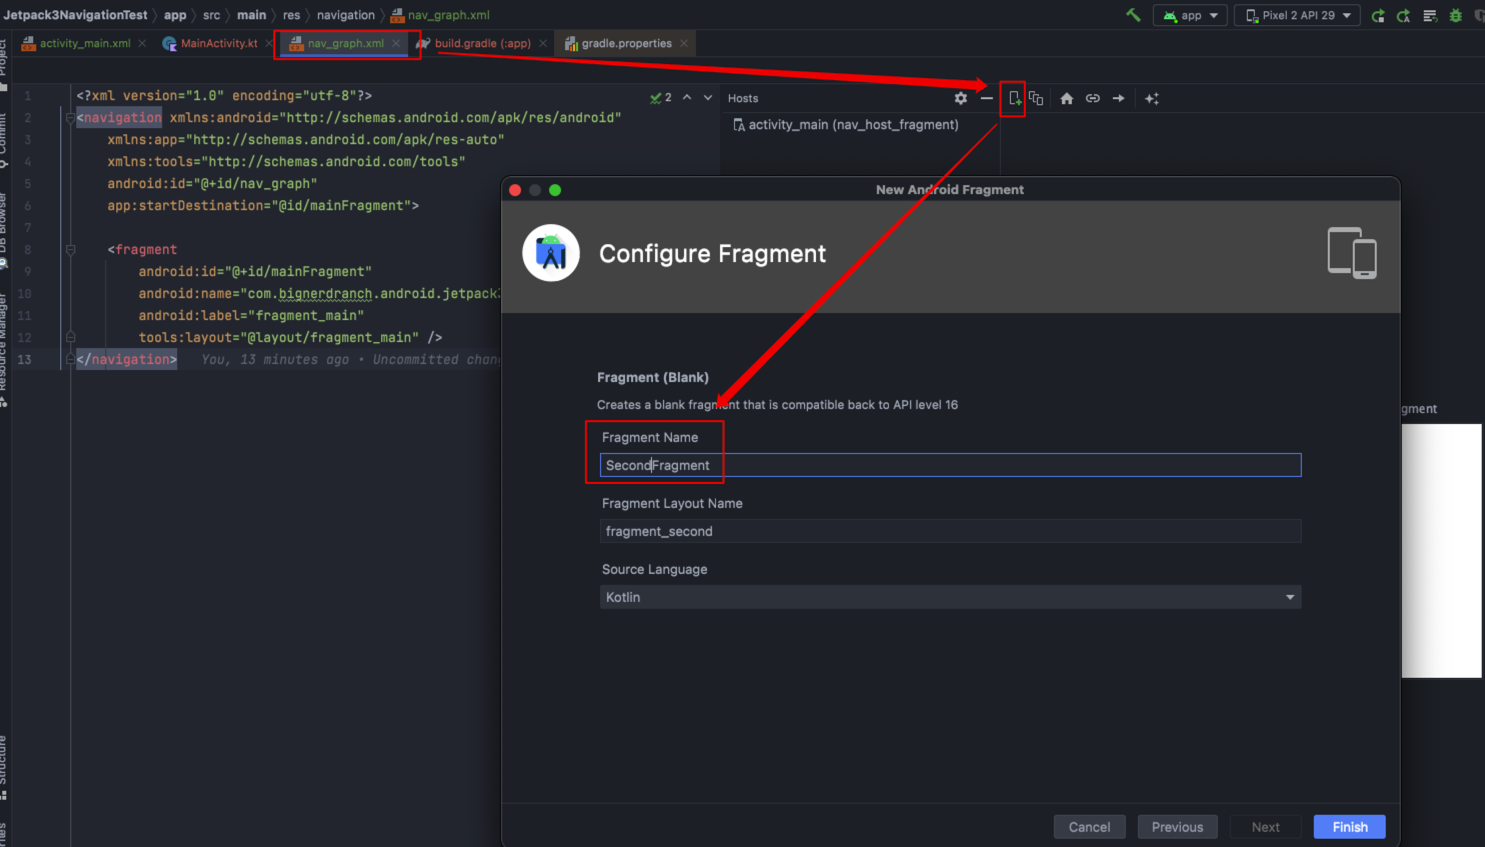
类似的,首先创建一个 SecondFragment,效果如下:
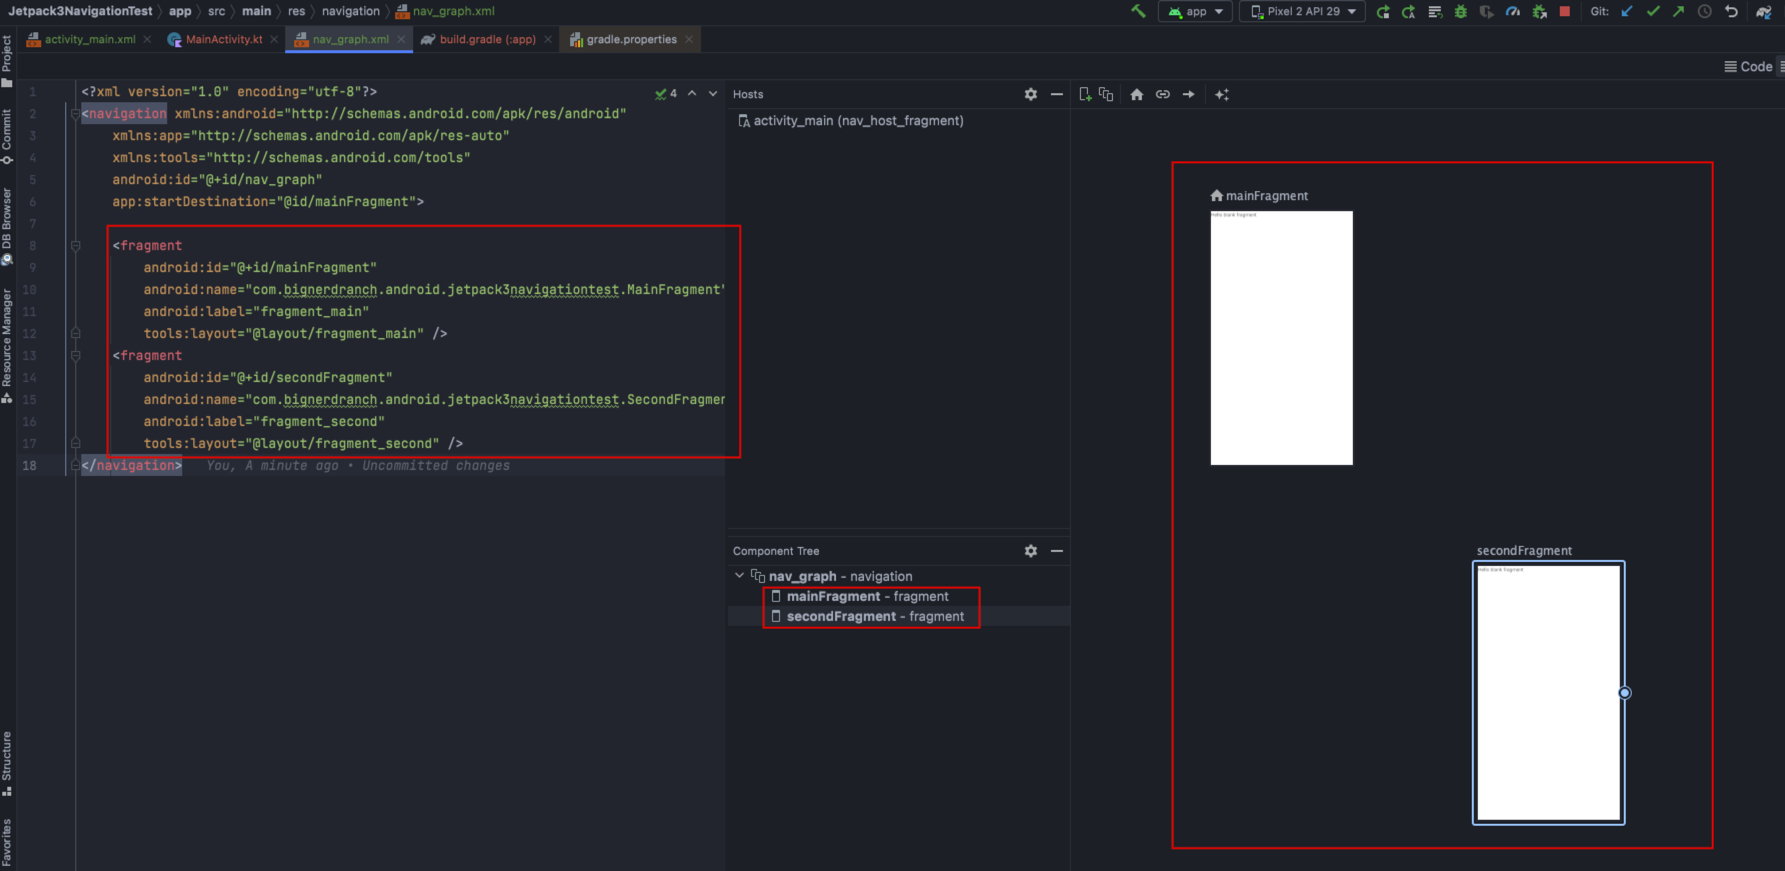
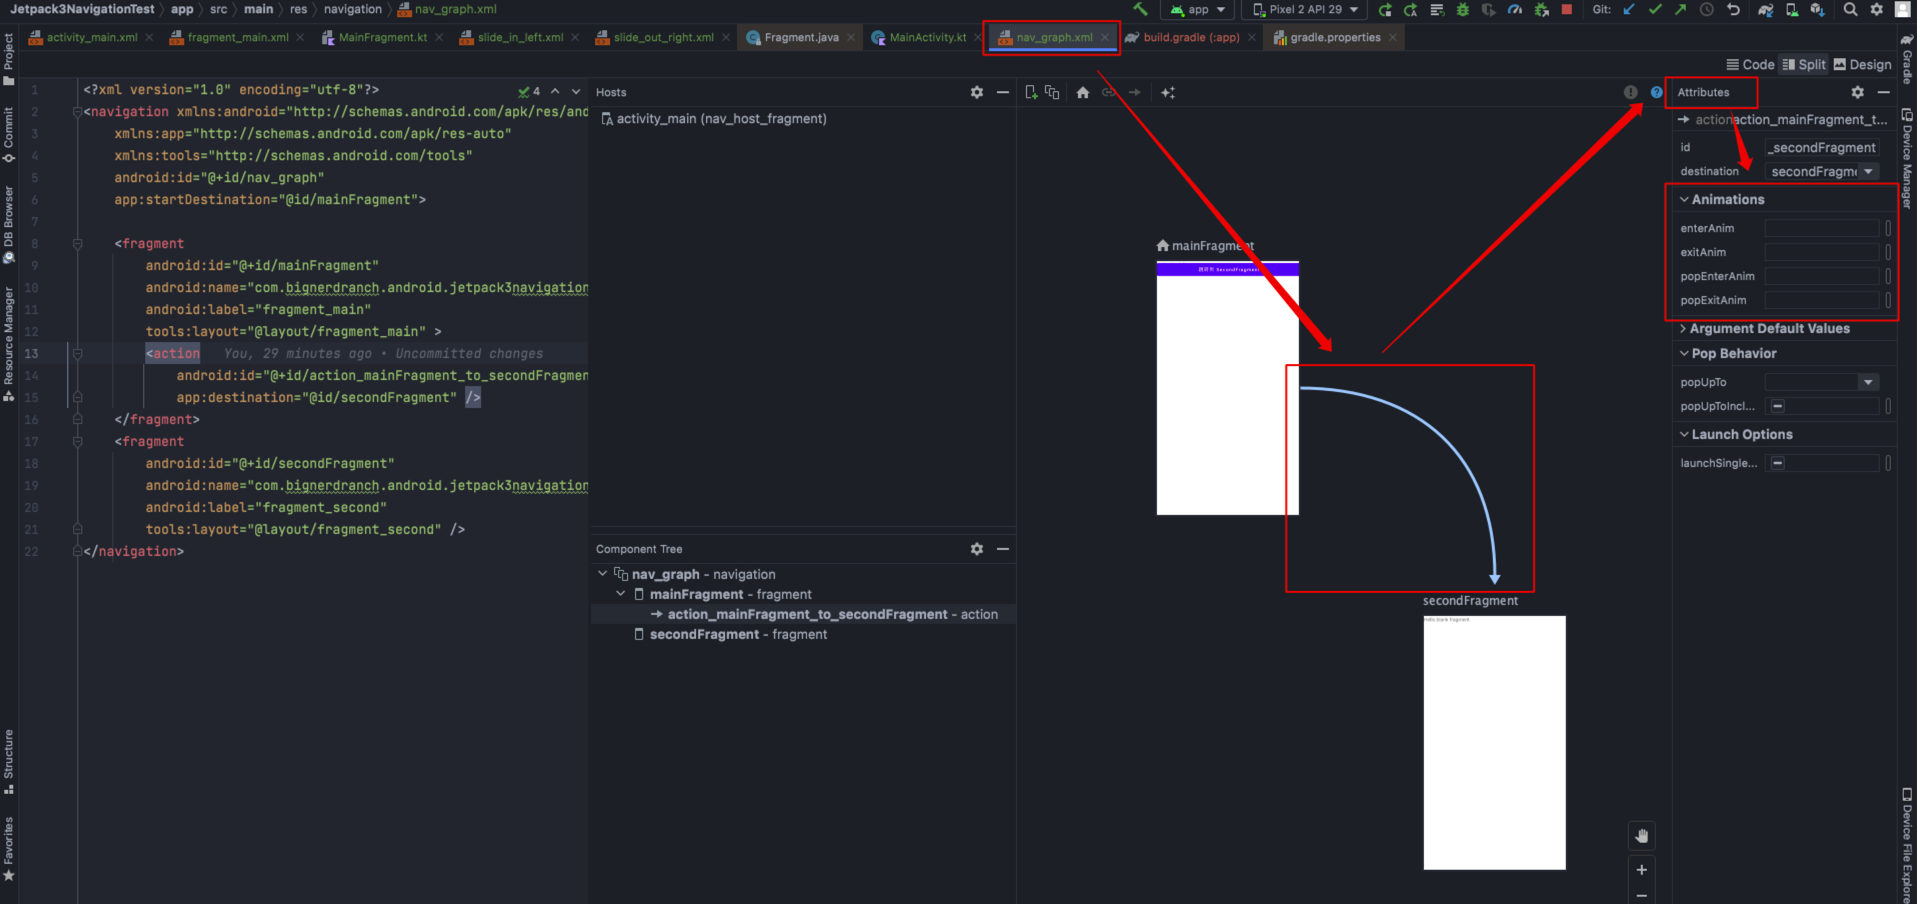
创建后,nav_graph.xml 中出现了两个 Fragment,效果如下:
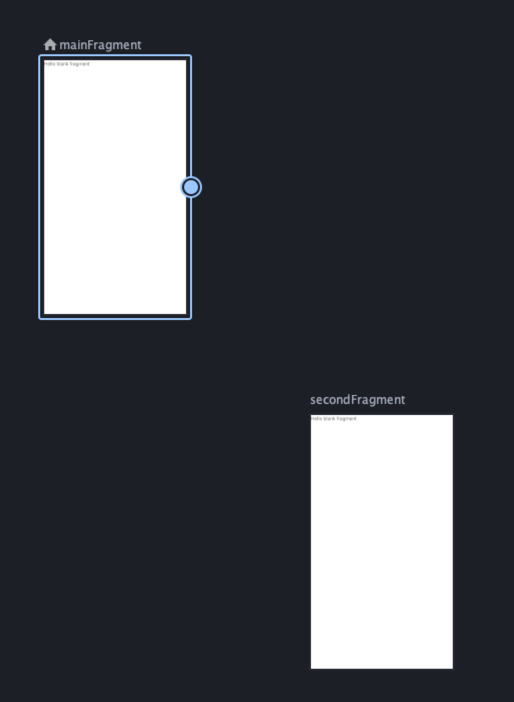
接下来,点击 MainFragment,鼠标选中其右侧圆圈,拖拽到 SecondFragment,再松开鼠标,效果如下:
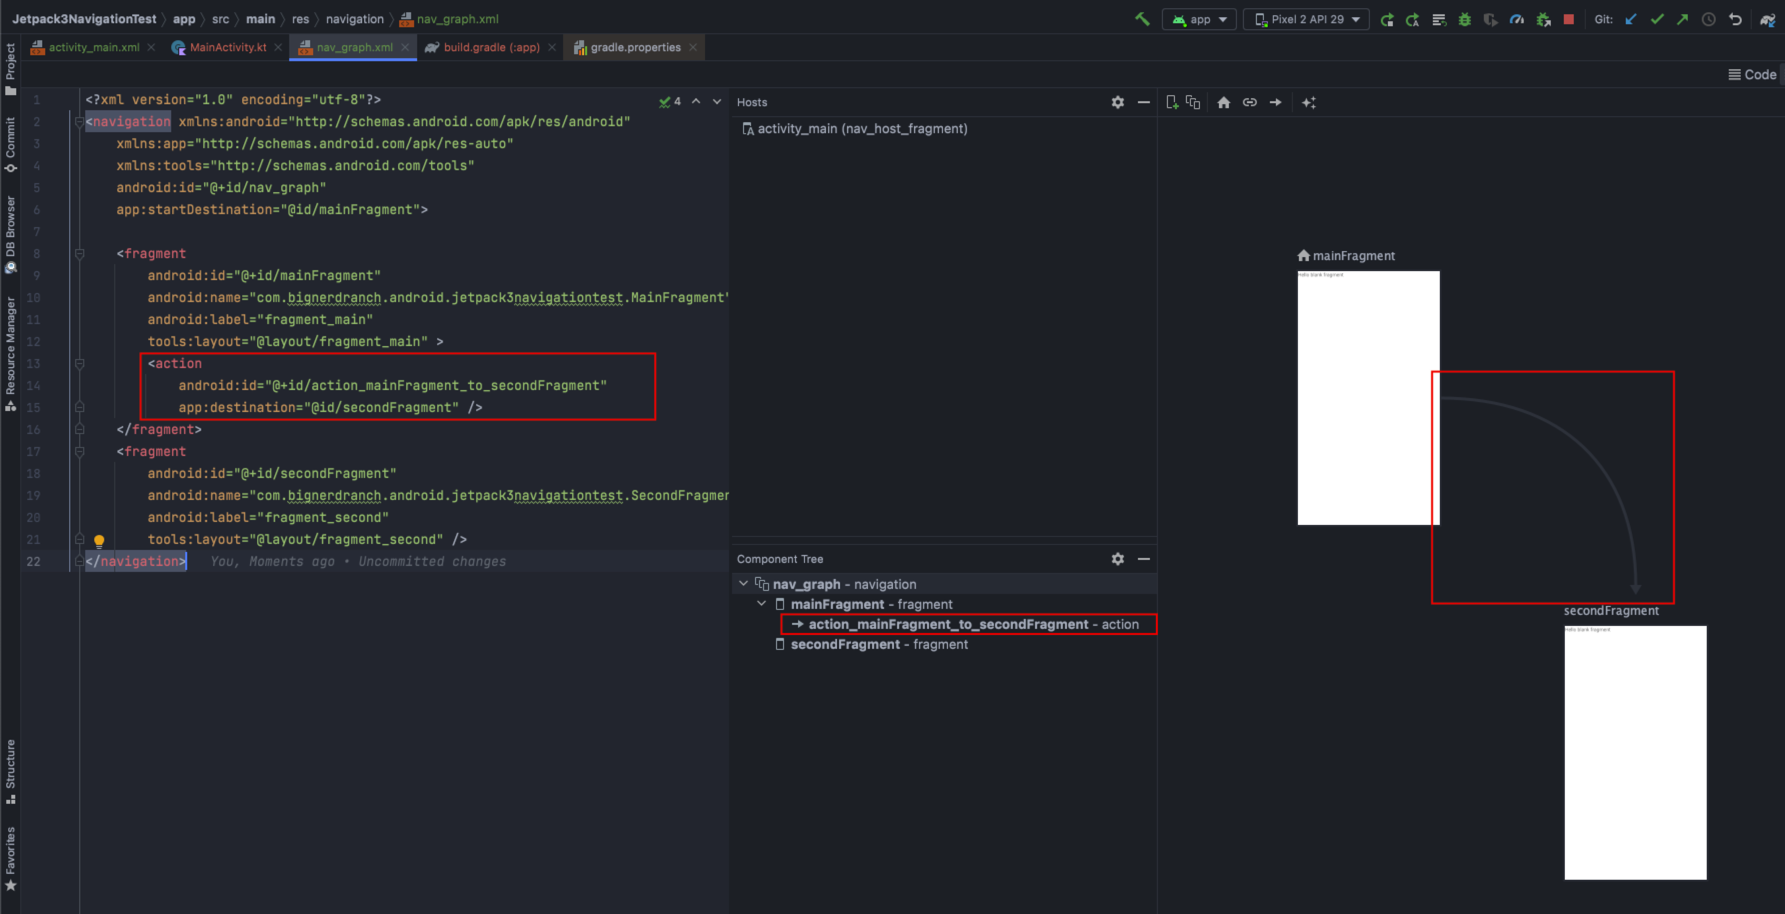
两个 Fragment 连接后,效果如下:
3.1.5 用 NavController 页面跳转
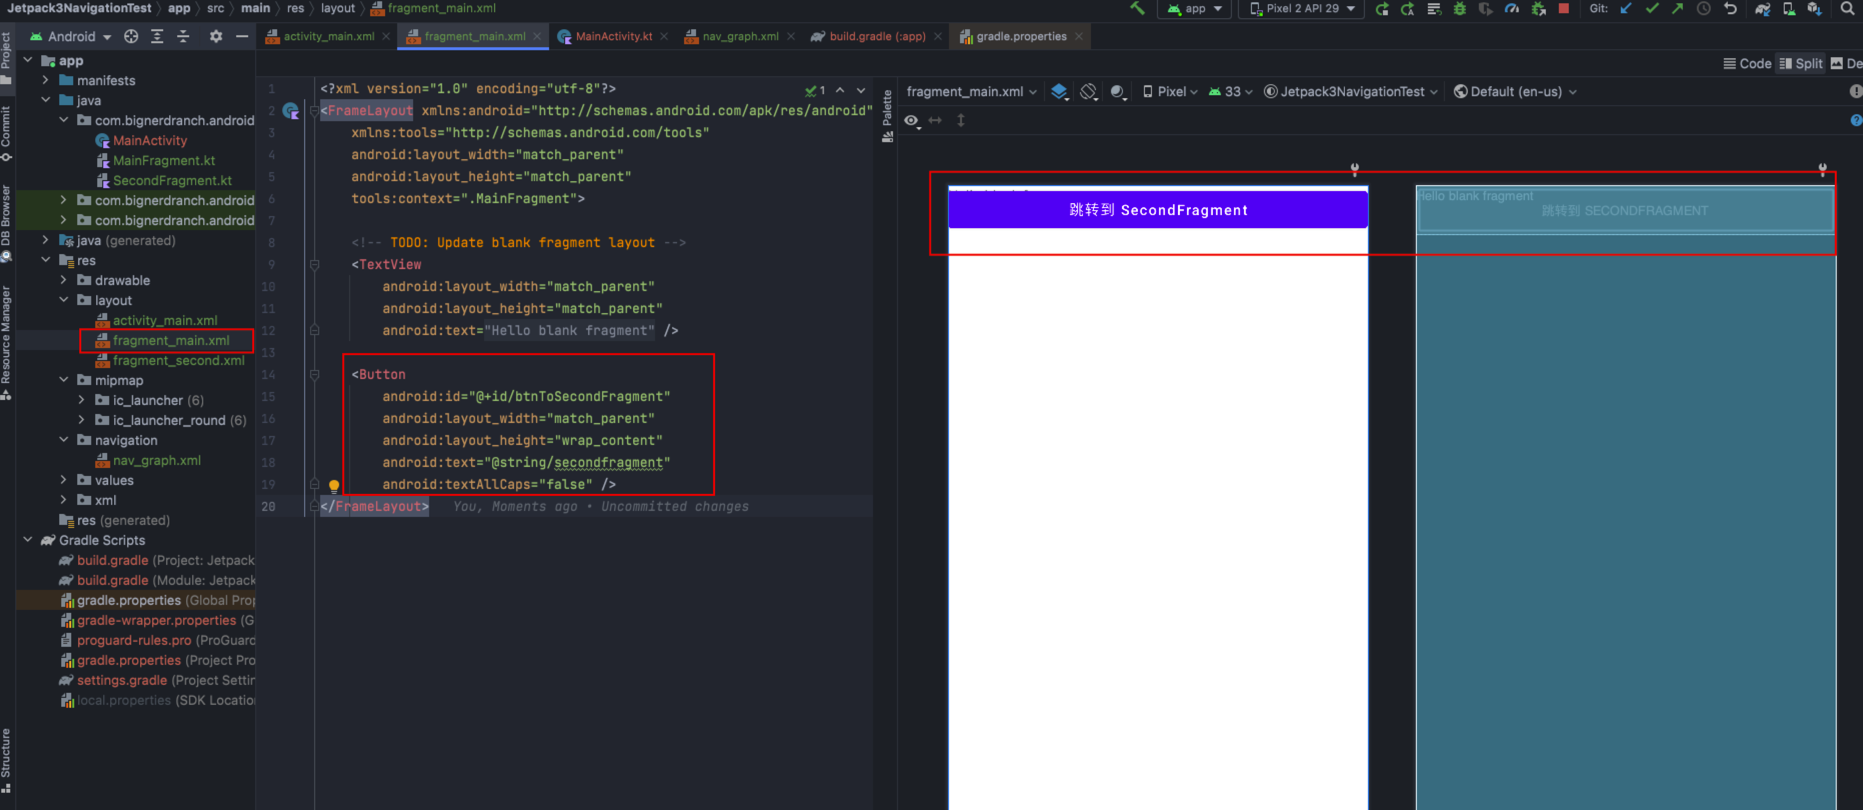
首先,在 fragment_main.xml 中创建一个 Button,布局如下:
<?xml version="1.0" encoding="utf-8"?>
<FrameLayout xmlns:android="http://schemas.android.com/apk/res/android"
    xmlns:tools="http://schemas.android.com/tools"
    android:layout_width="match_parent"
    android:layout_height="match_parent"
    tools:context=".MainFragment">

    <!-- TODO: Update blank fragment layout -->
    <TextView
        android:layout_width="match_parent"
        android:layout_height="match_parent"
        android:text="@string/hello_blank_fragment" />

    <Button
        android:id="@+id/btnToSecondFragment"
        android:layout_width="match_parent"
        android:layout_height="wrap_content"
        android:text="@string/secondfragment"
        android:textAllCaps="false" />
</FrameLayout>
fragment_main.xml 的布局效果如下:
然后,在 MainFragment 中添加按钮点击事件,完成页面跳转逻辑,代码如下:
class MainFragment : Fragment() {


    override fun onCreateView(inflater: LayoutInflater, container: ViewGroup?, savedInstanceState: Bundle?): View? {


        // Inflate the layout for this fragment
        val view = inflater.inflate(R.layout.fragment_main, container, false)
        view.findViewById<Button>(R.id.btnToSecondFragment)
            .setOnClickListener(Navigation.createNavigateOnClickListener(R.id.action_mainFragment_to_secondFragment))
        return view
    }
}
运行后,效果如下:
3.1.6 Animations 动画:用于页面切换
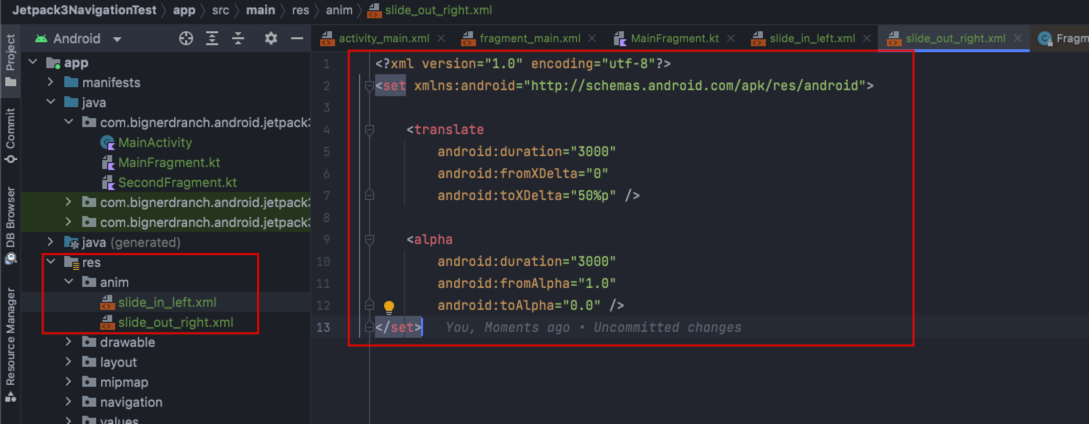
首先,在 res/anim 文件夹下添加如下动画文件
res/anim/slide_in_left.xml 内容如下:
<?xml version="1.0" encoding="utf-8"?>
<set xmlns:android="http://schemas.android.com/apk/res/android" >
    <translate
        android:duration="3000"
        android:fromXDelta="-50%p"
        android:toXDelta="0" />

    <alpha
        android:duration="3000"
        android:fromAlpha="0.0"
        android:toAlpha="1.0" />
</set>
res/anim/slide_out_right.xml 内容如下:
<?xml version="1.0" encoding="utf-8"?>
<set xmlns:android="http://schemas.android.com/apk/res/android" >

    <translate
        android:duration="3000"
        android:fromXDelta="0"
        android:toXDelta="50%p" />

    <alpha
        android:duration="3000"
        android:fromAlpha="1.0"
        android:toAlpha="0.0" />
</set>
anim 文件放置后,效果如下:
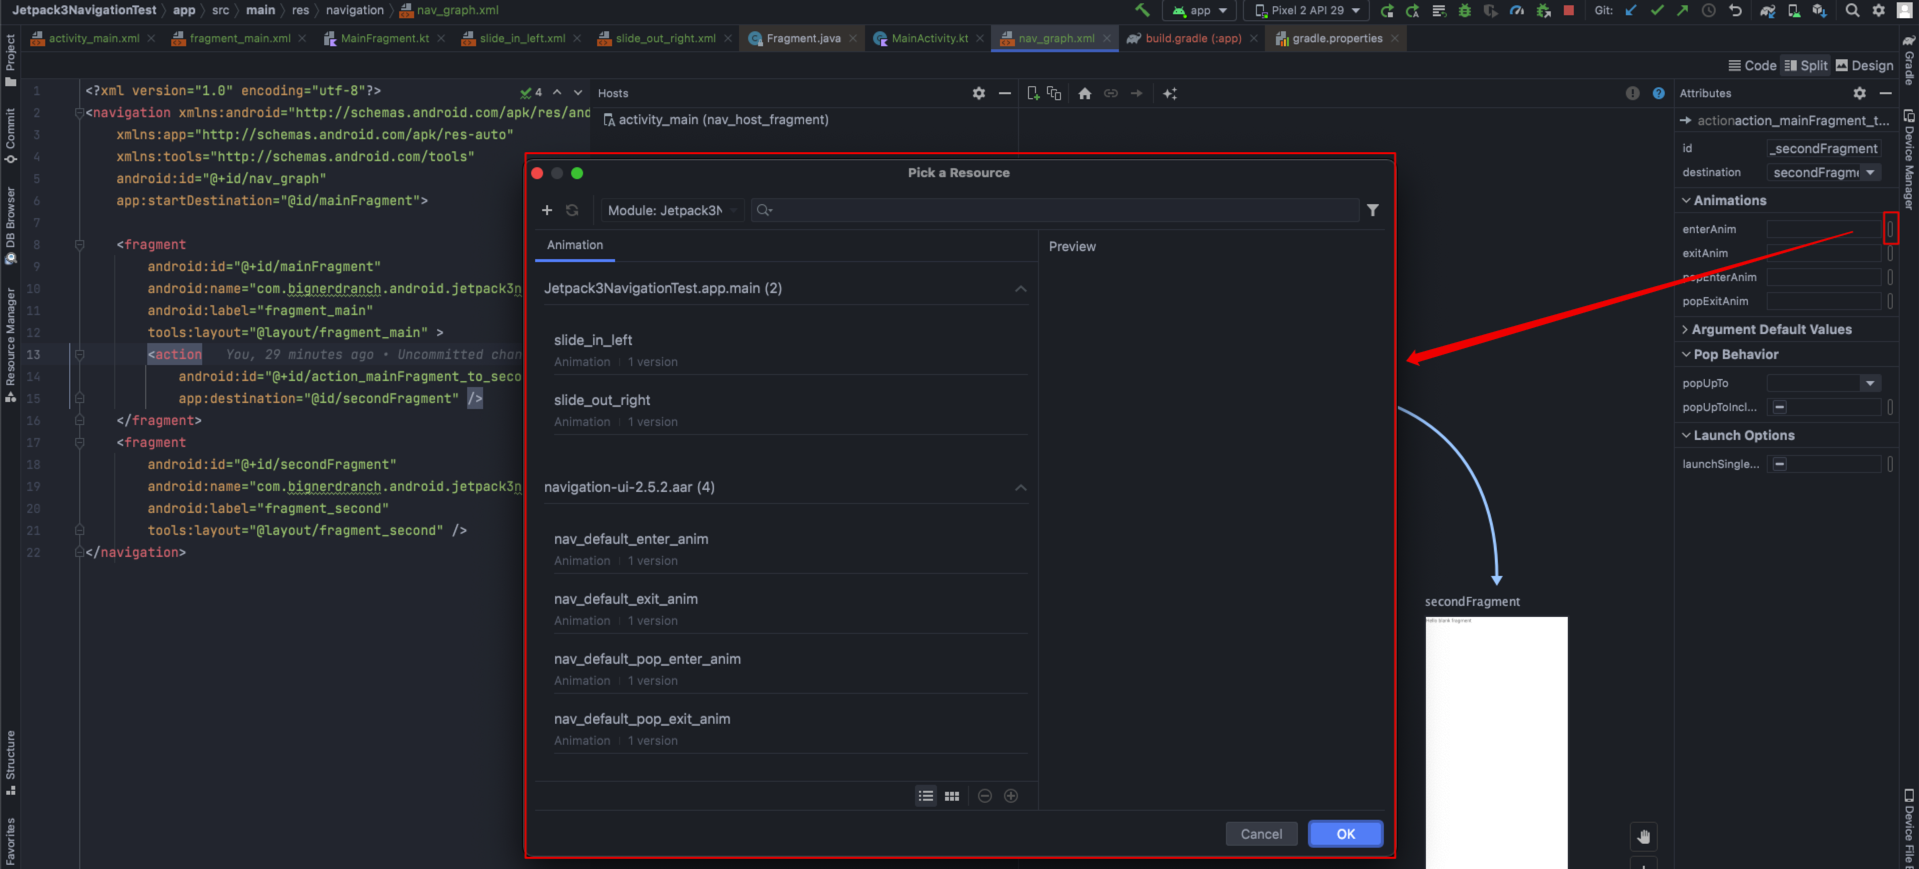
然后,在 nav_graph.xml 中双击 action 连线,设置其 Animations,效果如下:
Animations 的选择界面如下:
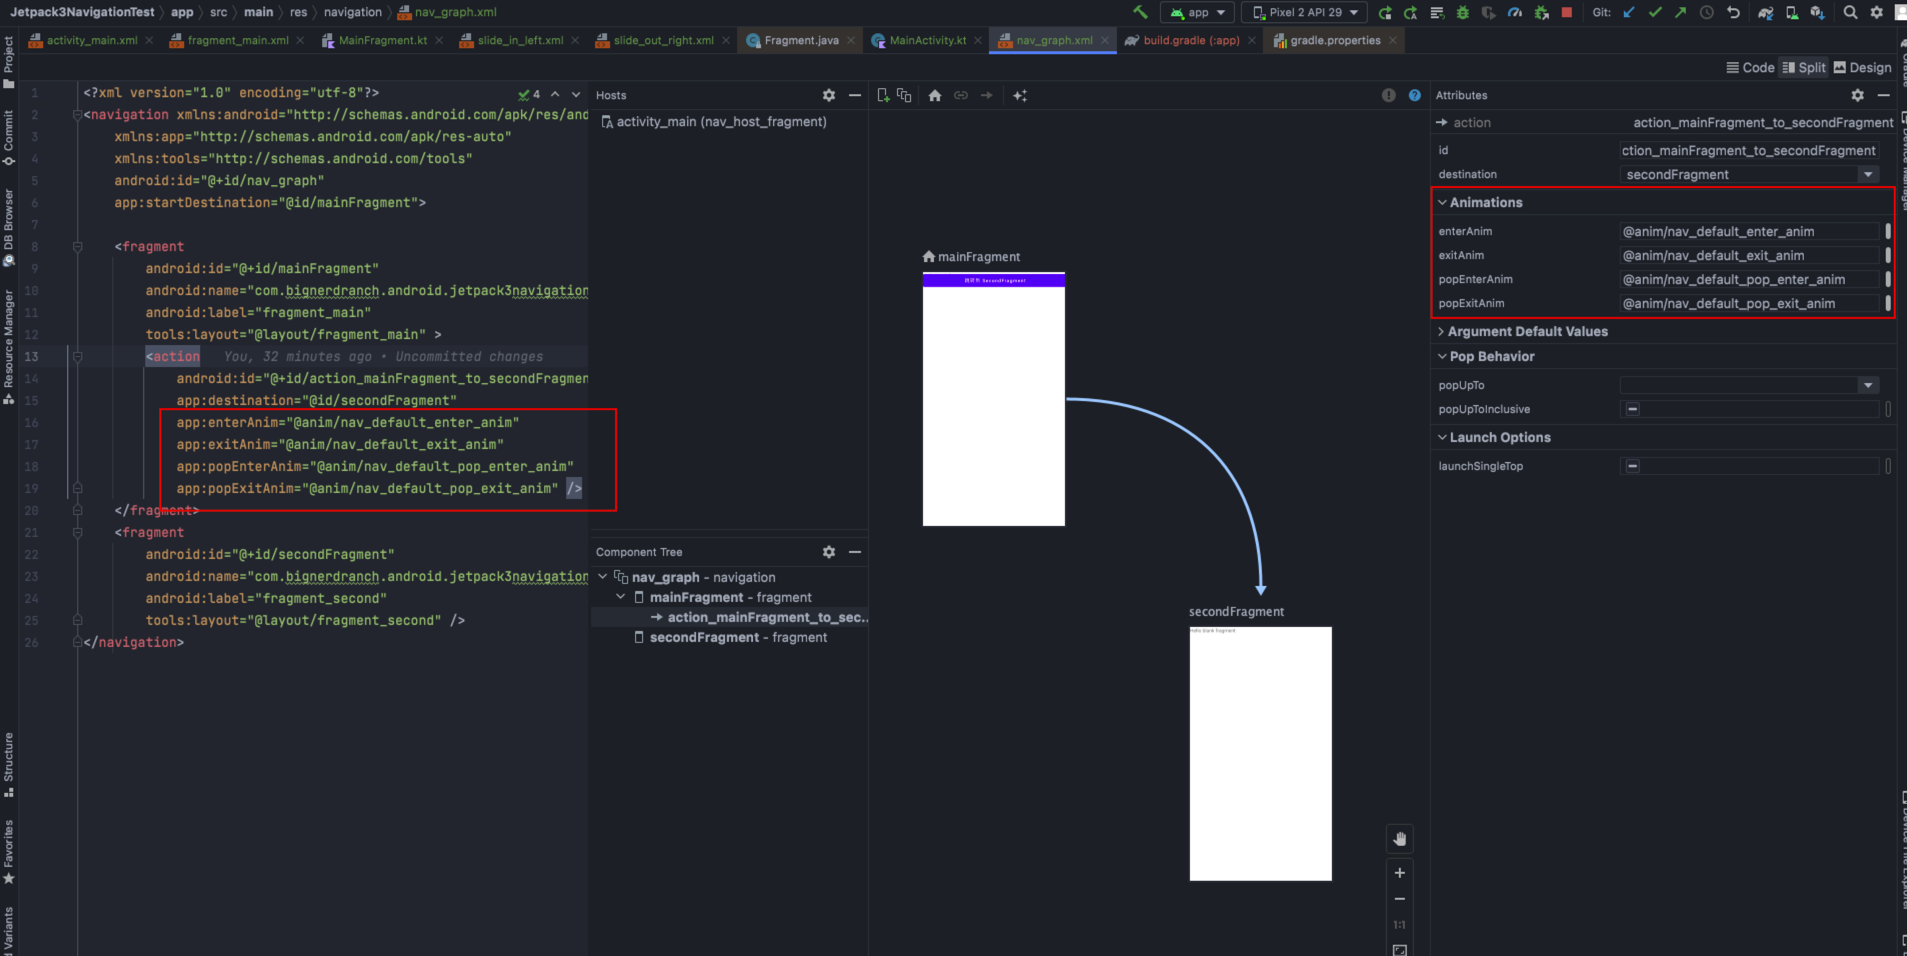
Animations 设置后,效果如下:
运行后,有了淡入淡出的 Animation 动画,效果如下:
3.2 用 safe args 插件来传参
3.2.1 常见的 Bundle 传参方式
通常用 Bundle 传参,其传递参数方式如下:
Bundle bundle = new Bundle();
bundle.putString("user_name", "Michael");
bundle.putInt("age", 30);
Navigation.findNavController(v).navigate(R.id.action_mainFragment_to_secondFragment, bundle);
其接收参数方式如下:
Bundle bundle = get Arguments();
if (bundle != null) {


	String userName = bundle.getString("user_name");
	int age = bundle.getInt("age");
	TextView tvSub = view.findViewById(R.id.tvSub);
	tvSub.setText(userName + age);
}
3.2.2 用 safe args 传参
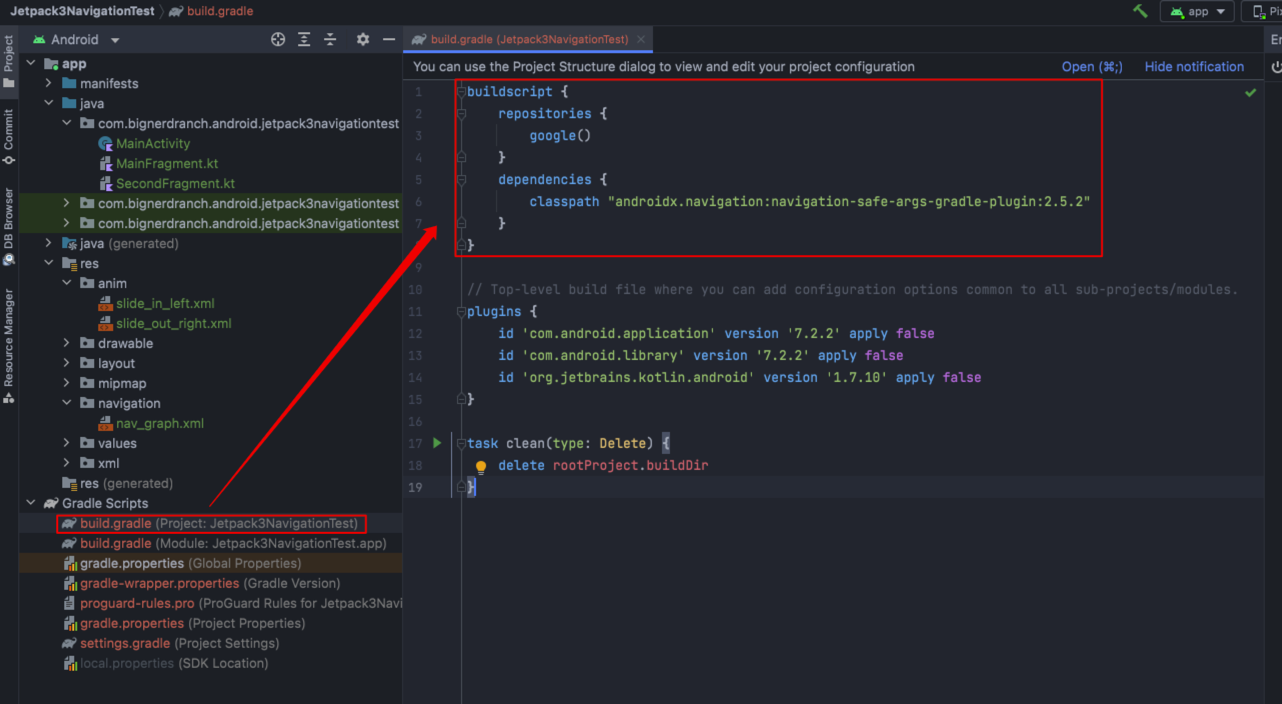
首先,安装 safe args 插件,在 build.gradle(Project) 中添加如下配置:
buildscript {


    repositories {


        google()
    }
    dependencies {


        classpath "androidx.navigation:navigation-safe-args-gradle-plugin:2.5.2"
    }
}
build.gradle(Project) 配置的效果如下:
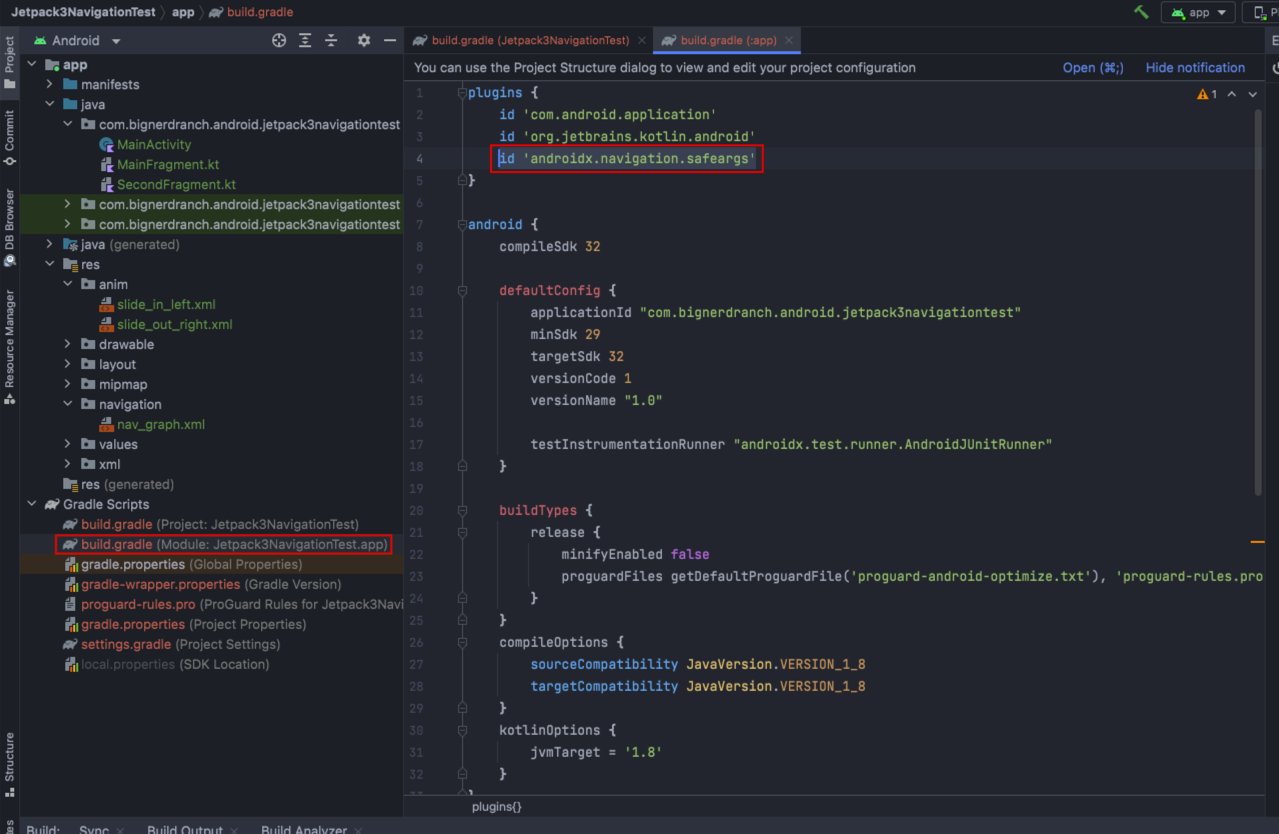
其次,在 build.gradle(app) 中引用 safe args 插件,配置如下:
plugins {


    id 'com.android.application'
    id 'org.jetbrains.kotlin.android'
    id 'androidx.navigation.safeargs'
}
build.gradle(app) 配置的效果如下:
在 nav_graph.xml 中为 MainFragment 添加 <argument/> 参数,代码如下:
<?xml version="1.0" encoding="utf-8"?>
<navigation xmlns:android="http://schemas.android.com/apk/res/android"
    xmlns:app="http://schemas.android.com/apk/res-auto"
    xmlns:tools="http://schemas.android.com/tools"
    android:id="@+id/nav_graph"
    app:startDestination="@id/mainFragment">

    <fragment
        android:id="@+id/mainFragment"
        android:name="com.bignerdranch.android.jetpack3navigationtest.MainFragment"
        android:label="fragment_main"
        tools:layout="@layout/fragment_main">
        <action
            android:id="@+id/action_mainFragment_to_secondFragment"
            app:destination="@id/secondFragment"
            app:enterAnim="@anim/nav_default_enter_anim"
            app:exitAnim="@anim/nav_default_exit_anim"
            app:popEnterAnim="@anim/nav_default_pop_enter_anim"
            app:popExitAnim="@anim/nav_default_pop_exit_anim" />
        <argument
            android:name="user_name"
            android:defaultValue='"unknown"'
            app:argType="string" />
        <argument
            android:name="age"
            android:defaultValue="0"
            app:argType="integer" />
    </fragment>
    <fragment
        android:id="@+id/secondFragment"
        android:name="com.bignerdranch.android.jetpack3navigationtest.SecondFragment"
        android:label="fragment_second"
        tools:layout="@layout/fragment_second" />
</navigation>
然后,在 MainFragment 的 onCreateView() 中设置 Button 的点击事件函数,通过 MainFragmentArgs 类(此类是自动生成的),即可通过 setUserName() 和 setAge() 向 MainFragment 传参,代码如下:
    override fun onCreateView(inflater: LayoutInflater, container: ViewGroup?, savedInstanceState: Bundle?): View? {


        // Inflate the layout for this fragment
        val view = inflater.inflate(R.layout.fragment_main, container, false)

        // view.findViewById<Button>(R.id.btnToSecondFragment).setOnClickListener(Navigation.createNavigateOnClickListener(R.id.action_mainFragment_to_secondFragment))
        view.findViewById<Button>(R.id.btnToSecondFragment).setOnClickListener {

     view ->
            val bundle = MainFragmentArgs.Builder().setUserName("ZhangSan").setAge(20).build().toBundle()
            Navigation.findNavController(view).navigate(R.id.action_mainFragment_to_secondFragment, bundle)
        }
        return view
    }
然后,在 SecondFragment 中即可接收 setUserName() 和 setAge() 的传参,并做业务展示,效果如下:
class SecondFragment : Fragment() {


    override fun onCreateView(inflater: LayoutInflater, container: ViewGroup?, savedInstanceState: Bundle?): View? {


        // Inflate the layout for this fragment
        val view = inflater.inflate(R.layout.fragment_second, container, false)
        val bundle = arguments
        if (bundle != null) {


            val userName = MainFragmentArgs.fromBundle(bundle).userName
            val age = MainFragmentArgs.fromBundle(bundle).age
            val tvSub: TextView = view.findViewById<TextView>(R.id.tv_sub)
            tvSub.text = userName + age
        }
        return view
    }
}
运行后,即可从 MainFragment 通过 safe args 向 SecondFragment 传参,效果如下:
3.3 NavigationUI 配合 AppBar 的 menu 菜单,绑定页面的跳转
因为 AppBar 的按钮、菜单 也需要控制导航,所以使用NavigationUI 组件可以将 AppBar 和 导航图的页面关联起来,减少重复工作。
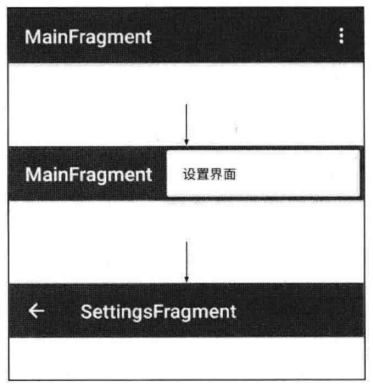
假如有 MainFragment 和 SettingsFragment 两个页面,均属于 MainActivity,我们希望二者可通过 ActionBar 互相跳转,即 MainFragment 的 ActionBar 右侧按钮点击可跳转到 SetttingsFragment,且希望 SettingsFragment 的 ActionBar 左侧按钮点击可跳转到 MainFragment,效果如下图:
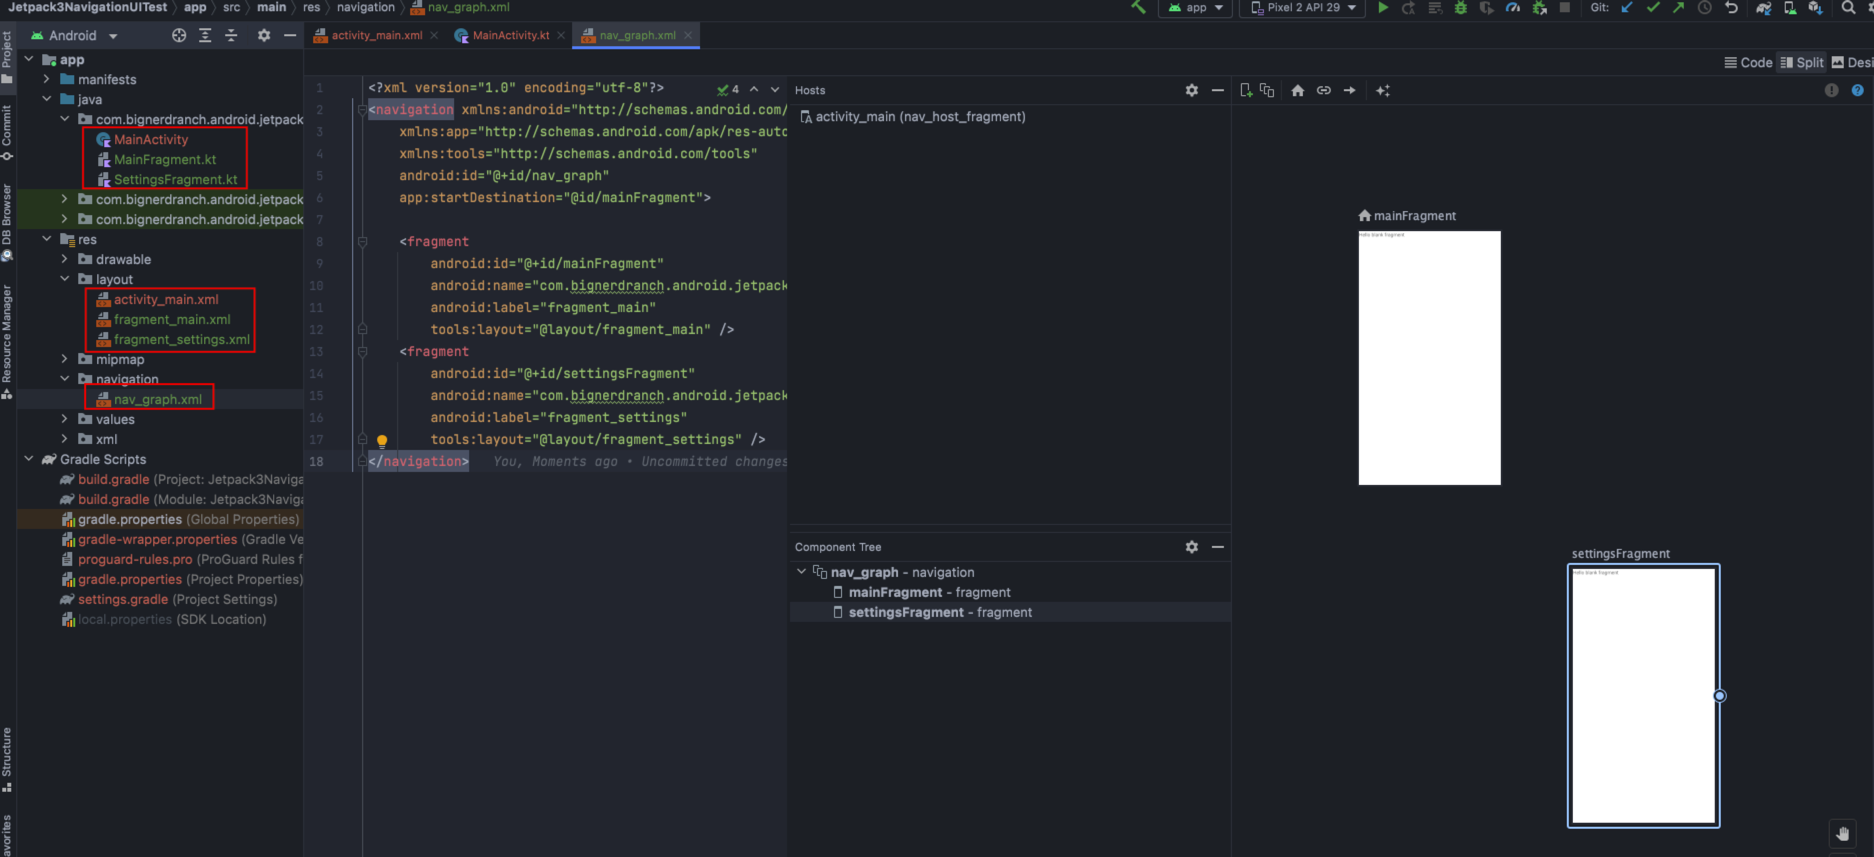
首先,新建一个名为 Jetpack3NavigationUITest 的项目,创建一个 nav_graph.xml,设置如下导航:
其次,新建 res/menu/menu_settings.xml 文件,示例如下:
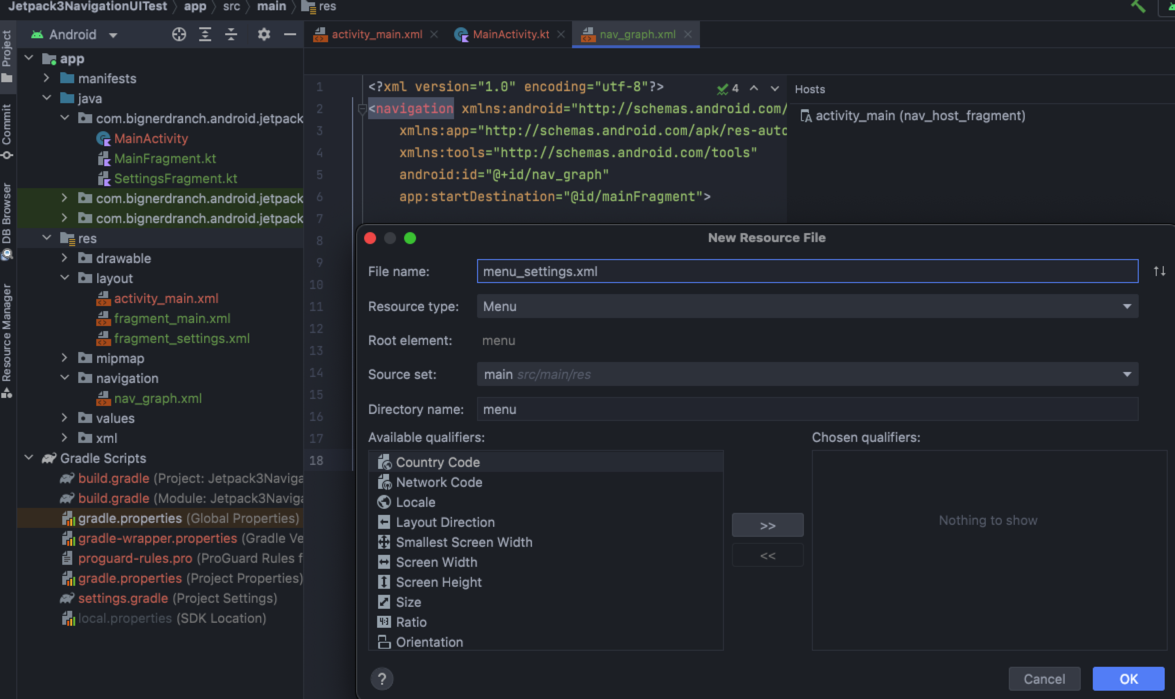
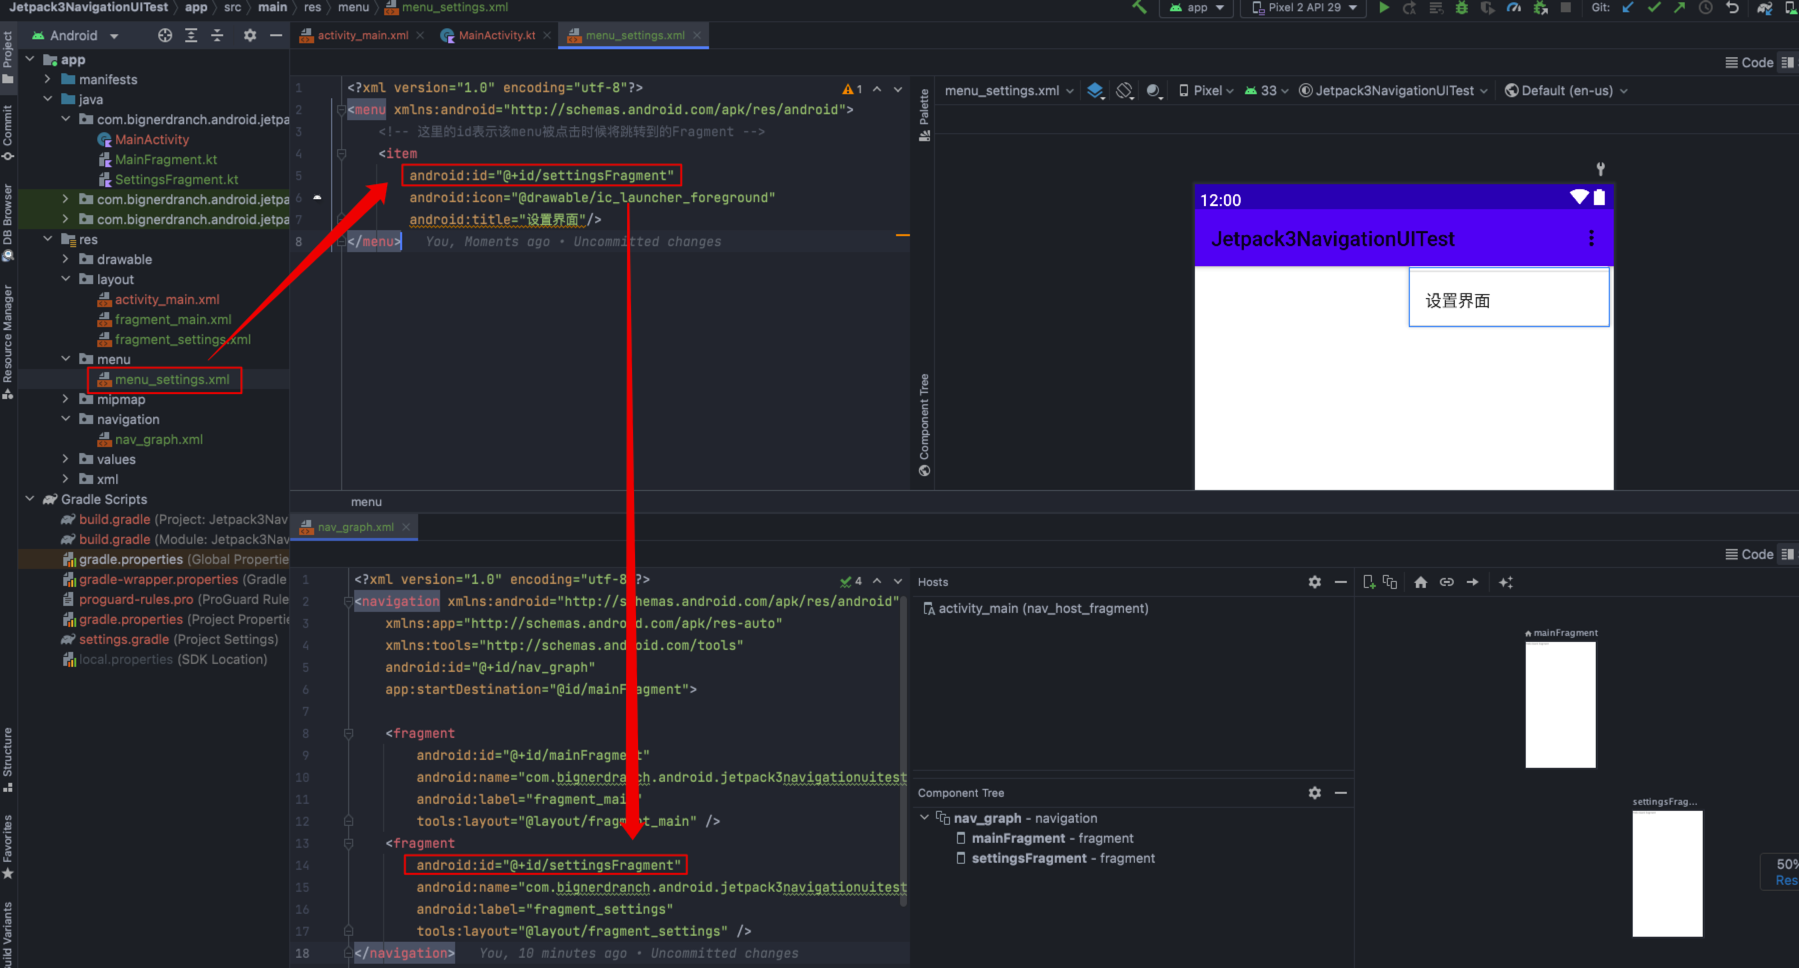
在 res/menu/menu_settings.xml 中写入如下布局,其中 menu 的 item 的 id 就是 SettingsFragment 的 id,这样当该 menu 的 item 被点击时,就会跳转到 SettingsFragment,menu 的布局如下所示:
<?xml version="1.0" encoding="utf-8"?>
<menu xmlns:android="http://schemas.android.com/apk/res/android">
    <!-- 这里的id表示该menu被点击时候将跳转到的Fragment -->
    <item
        android:id="@+id/settingsFragment"
        android:icon="@drawable/ic_launcher_foreground"
        android:title="设置界面"/>
</menu>
布局效果如下:
然后,在 MainActivity 中实例化 menu,代码如下:
package com.bignerdranch.android.jetpack3navigationuitest

import androidx.appcompat.app.AppCompatActivity
import android.os.Bundle
import android.view.Menu

class MainActivity : AppCompatActivity() {


    override fun onCreate(savedInstanceState: Bundle?) {


        super.onCreate(savedInstanceState)
        setContentView(R.layout.activity_main)
    }

    override fun onCreateOptionsMenu(menu: Menu?): Boolean {


        super.onCreateOptionsMenu(menu)
        menuInflater.inflate(R.menu.menu_settings, menu)
        return true
    }
}
运行后,可看到 menu,效果如下:
我们不需手动判断菜单项单击的效果,NavigationUI 库会自动替我们实现跳转逻辑,MainActivity 的代码如下:
package com.bignerdranch.android.jetpack3navigationuitest

import android.os.Bundle
import android.view.Menu
import android.view.MenuItem
import android.widget.Toast
import androidx.appcompat.app.AppCompatActivity
import androidx.navigation.NavController
import androidx.navigation.Navigation
import androidx.navigation.fragment.NavHostFragment
import androidx.navigation.ui.AppBarConfiguration
import androidx.navigation.ui.NavigationUI
import androidx.navigation.ui.NavigationUI.setupActionBarWithNavController


class MainActivity : AppCompatActivity() {


    private var appBarConfiguration: AppBarConfiguration? = null
    private var navController: NavController? = null

    override fun onCreate(savedInstanceState: Bundle?) {


        super.onCreate(savedInstanceState)
        setContentView(R.layout.activity_main)
        val navHostFragment = supportFragmentManager.findFragmentById(R.id.nav_host_fragment) as NavHostFragment
        navController = navHostFragment.navController
        navController!!.addOnDestinationChangedListener {

     _, _, _ ->
            Toast.makeText(this@MainActivity, "onDestinationChanged() called", Toast.LENGTH_SHORT).show()
        }
        //绑定当前的ActionBar,除此之外NavigationUI还能绑定Toolbar和CollapsingToolbarLayout
        //绑定后,系统会默认处理ActionBar左上角区域,为你添加返回按钮,将所切换到的Fragment在导航图里的name属性中的内容显示到Title
        appBarConfiguration = AppBarConfiguration.Builder(navController!!.graph).build()
        setupActionBarWithNavController(this, navController!!, appBarConfiguration!!)
    }

    // 加载菜单
    override fun onCreateOptionsMenu(menu: Menu?): Boolean {


        super.onCreateOptionsMenu(menu)
        menuInflater.inflate(R.menu.menu_settings, menu)
        return true
    }

    // ActionBar中的按钮被点击时,根据菜单中的Id,自动跳转到相应的页面
    override fun onOptionsItemSelected(item: MenuItem): Boolean {


        return NavigationUI.onNavDestinationSelected(item, navController!!) || super.onOptionsItemSelected(item);
    }

    // 左上角的返回按钮被点击时调用到
    override fun onSupportNavigateUp(): Boolean {


        return NavigationUI.navigateUp(navController!!, appBarConfiguration!!) || super.onSupportNavigateUp();
    }
}
因为上文已经在 res/menu/menu_settings.xml 中设置了 item 的 id 就是 SettingsFragment 的 id,并且通过 setupActionBarWithNavController(this, navController!!, appBarConfiguration!!) 将 AppBar 和 NavigationUI 绑定。
所以当点击 ActionBar 右上角的按钮时会跳转到 SettingsFragment,并弹出 Toast。
并且当在 SettingsFragment 点击 ActionBar 左上角的返回按钮时会跳转到 MainFragment。
运行后,效果如下:
接下来,需要在 SettingsFragment 也显示 ActionBar 右上角的按钮,并清除从 MainFragment 跳转过来时下拉已选的 menu,代码如下:
class SettingsFragment : Fragment() {


    override fun onCreateOptionsMenu(menu: Menu, inflater: MenuInflater) {


        menu.clear()
        super.onCreateOptionsMenu(menu, inflater)
    }
}
运行后,MainFragment 和 SettingsFragment 都有了 ActionBar 右上角的按钮了,效果如下:
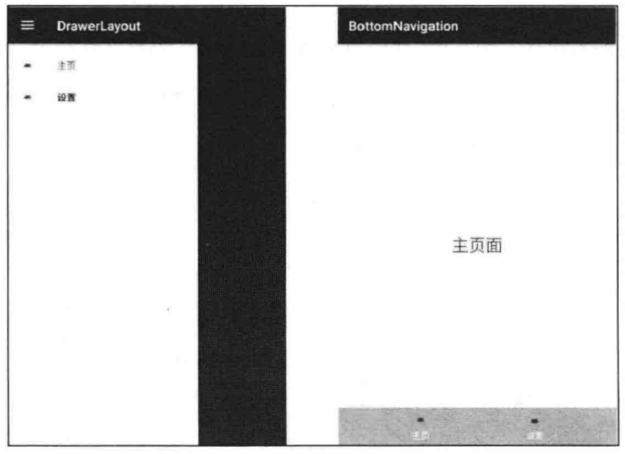
NavigationUI 除了可配合 AppBar 的 menu 菜单,还可配合 AppBar 的左侧抽屉菜单(DrawLayout + NavigationView),和底部菜单(BottomNavigationView),示例如下:
3.4 DeepLink 深层链接
通过 DeepLink,可利用 PendingIntent 或 一个真实的 URL 链接,直接跳转到 App 的某个页面(Activity 或 Fragment)。
- PendingIntent 方式:当收到通知栏的通知时,点击可跳转到该通知所在的页面
- URL 方式:当用手机浏览器时,可在网页放置 “在应用内打开” 的按钮,若已安装 App 则跳转到该 App,否则跳转到下载页面
首先,和上文相同,新建 jetpack3deeplinktest 项目,包含 MainFragment 和 SettingsFragment,项目构建后效果如下:
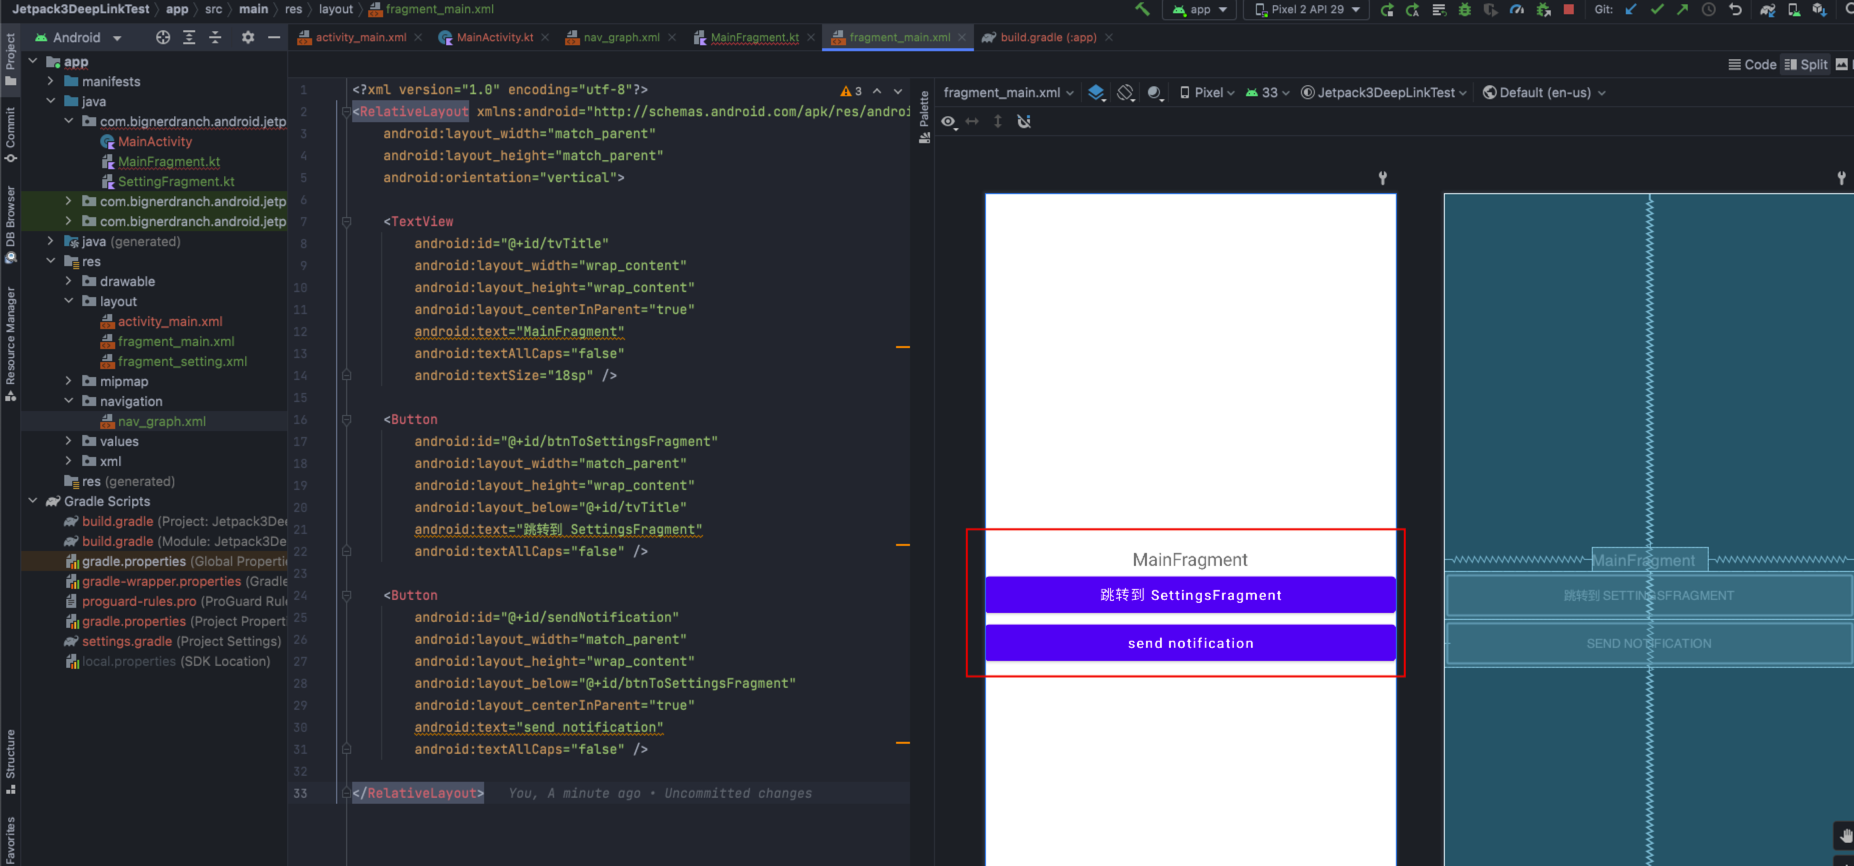
在 fragment_main.xml 中放置2个 Button,其布局如下:
<?xml version="1.0" encoding="utf-8"?>
<RelativeLayout
    xmlns:android="http://schemas.android.com/apk/res/android"
    android:layout_width="match_parent"
    android:layout_height="match_parent"
    android:orientation="vertical">

    <TextView
        android:id="@+id/tvTitle"
        android:layout_width="wrap_content"
        android:layout_height="wrap_content"
        android:layout_centerInParent="true"
        android:textAllCaps="false"
        android:textSize="18sp"
        android:text="MainFragment"/>

    <Button
        android:id="@+id/btnToSettingsFragment"
        android:layout_width="match_parent"
        android:layout_height="wrap_content"
        android:layout_below="@+id/tvTitle"
        android:text="跳转到 SettingsFragment"
        android:textAllCaps="false"/>

    <Button
        android:id="@+id/sendNotification"
        android:layout_width="match_parent"
        android:layout_height="wrap_content"
        android:layout_below="@+id/btnToSettingsFragment"
        android:textAllCaps="false"
        android:text="send notification"
        android:layout_centerInParent="true"/>

</RelativeLayout>
fragment_main.xm 的布局效果如下:
3.4.1 用 PendingIntent 的 DeepLink 方式,从通知栏的通知跳转到页面
首先,在 MainFragment 通过 sendNotification() 向通知栏发一条通知,并在 getPendingIntent() 函数内设置当点击通知栏的通知时跳转到指定的 App,代码如下:
package com.bignerdranch.android.jetpack3deeplinktest

import android.app.NotificationChannel
import android.app.NotificationManager
import android.app.PendingIntent
import android.os.Bundle
import android.view.LayoutInflater
import android.view.View
import android.view.ViewGroup
import android.widget.Button
import androidx.core.app.NotificationCompat
import androidx.core.app.NotificationManagerCompat
import androidx.fragment.app.Fragment
import androidx.navigation.Navigation

// TODO: Rename parameter arguments, choose names that match
// the fragment initialization parameters, e.g. ARG_ITEM_NUMBER
private const val ARG_PARAM1 = "param1"
private const val ARG_PARAM2 = "param2"

/**
 * A simple [Fragment] subclass.
 * Use the [MainFragment.newInstance] factory method to
 * create an instance of this fragment.
 */
class MainFragment : Fragment() {


    // TODO: Rename and change types of parameters
    private var param1: String? = null
    private var param2: String? = null

    override fun onCreate(savedInstanceState: Bundle?) {


        super.onCreate(savedInstanceState)
        arguments?.let {


            param1 = it.getString(ARG_PARAM1)
            param2 = it.getString(ARG_PARAM2)
        }
    }

    override fun onCreateView(inflater: LayoutInflater, container: ViewGroup?, savedInstanceState: Bundle?): View? {


        // Inflate the layout for this fragment
        val view = inflater.inflate(R.layout.fragment_main, container, false)
        view.findViewById<Button>(R.id.btnToSettingsFragment).setOnClickListener {


            val bundle = Bundle()
            bundle.putString("params", "from DeepLinkMainFragment")
            Navigation.findNavController(view).navigate(R.id.action_mainFragment_to_settingFragment, bundle)
        }
        view.findViewById<Button>(R.id.btnSendNotification).setOnClickListener {


            sendNotification(view)
        }
        return view
    }

    // 通过PendingIntent设置,当通知被点击后需要跳转到哪个destination,以及传递的参数
    private fun getPendingIntent(): PendingIntent? {


        if (activity != null) {


            val bundle = Bundle()
            bundle.putString("params", "ParamsFromPendingIntent_HelloMichael")
            return Navigation
                .findNavController(requireActivity(), R.id.btnSendNotification)
                .createDeepLink()
                .setGraph(R.navigation.nav_graph)
                .setDestination(R.id.settingFragment)
                .setArguments(bundle)
                .createPendingIntent()
        }
        return null
    }

    // 向通知栏发送一个通知
    private val CHANNEL_ID = "1"
    private val notificationId = 8
    private fun sendNotification(view: View) {


        if (activity == null) {


            return
        }
        val channel = NotificationChannel("1", "ChannelName", NotificationManager.IMPORTANCE_DEFAULT)
        channel.description = "description"
        requireActivity().getSystemService(NotificationManager::class.java).createNotificationChannel(channel)
        val builder: NotificationCompat.Builder = NotificationCompat.Builder(requireActivity(), CHANNEL_ID)
            .setSmallIcon(android.R.drawable.sym_def_app_icon)
            .setContentTitle("来自 jetpack3deeplinktest App的一条通知")
            .setContentText("Hello World! 支付宝到账一百万元")
            .setPriority(NotificationCompat.PRIORITY_DEFAULT)
            .setContentIntent(getPendingIntent())
            .setAutoCancel(true)
        val notificationManager = NotificationManagerCompat.from(requireActivity())
        notificationManager.notify(notificationId, builder.build())
    }

    companion object {


        /**
         * Use this factory method to create a new instance of
         * this fragment using the provided parameters.
         *
         * @param param1 Parameter 1.
         * @param param2 Parameter 2.
         * @return A new instance of fragment MainFragment.
         */
        // TODO: Rename and change types and number of parameters
        @JvmStatic
        fun newInstance(param1: String, param2: String) =
            MainFragment().apply {


                arguments = Bundle().apply {


                    putString(ARG_PARAM1, param1)
                    putString(ARG_PARAM2, param2)
                }
            }
    }
}
运行后,点击按钮即可在通知栏发通知,且点击通知栏的通知时即可通过 导航的 DeepLink 跳转到 SettingsFragment,效果如下:

3.4.2 用 URL 的 DeepLink 方式将网页用指定 App 打开并获得参数
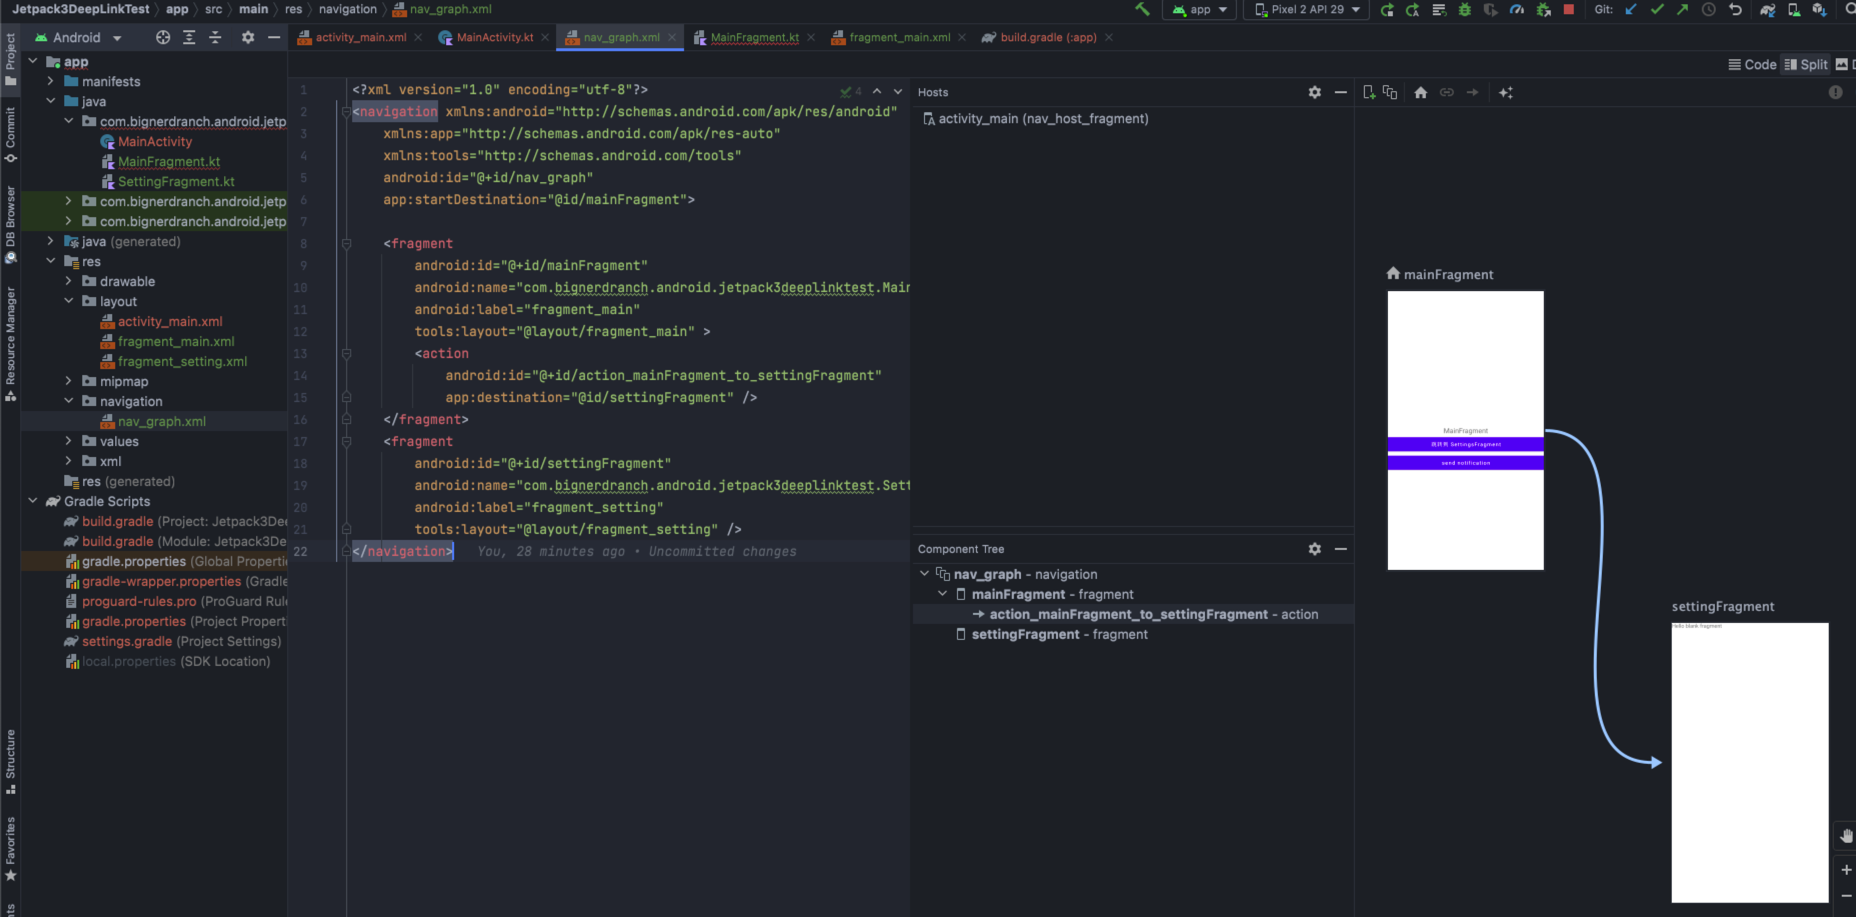
在 nav_graph.xml 中的 SettingFragment 添加 <deepLink/> 标签,nav_graph.xml 导航文件如下:
<?xml version="1.0" encoding="utf-8"?>
<navigation xmlns:android="http://schemas.android.com/apk/res/android"
    xmlns:app="http://schemas.android.com/apk/res-auto"
    xmlns:tools="http://schemas.android.com/tools"
    android:id="@+id/nav_graph"
    app:startDestination="@id/mainFragment">

    <fragment
        android:id="@+id/mainFragment"
        android:name="com.bignerdranch.android.jetpack3deeplinktest.MainFragment"
        android:label="fragment_main"
        tools:layout="@layout/fragment_main">
        <action
            android:id="@+id/action_mainFragment_to_settingFragment"
            app:destination="@id/settingFragment" />
    </fragment>
    <fragment
        android:id="@+id/settingFragment"
        android:name="com.bignerdranch.android.jetpack3deeplinktest.SettingFragment"
        android:label="fragment_setting"
        tools:layout="@layout/fragment_setting">
        <!--为 destination 添加 deepLink标签-->
        <deepLink app:uri="www.bilibili.com/{params}" />
    </fragment>
</navigation>
其次,在 AndroidManifest.xml 中,为 activity 设置 <nav-graph android:value="@navigation/nav_graph" />,使得当用户在Web页面访问指定额网站时,App 可监听到,AndroidManifest.xml 配置文件如下:
<?xml version="1.0" encoding="utf-8"?>
<manifest xmlns:android="http://schemas.android.com/apk/res/android"
    xmlns:tools="http://schemas.android.com/tools"
    package="com.bignerdranch.android.jetpack3deeplinktest">

    <application
        android:allowBackup="true"
        android:dataExtractionRules="@xml/data_extraction_rules"
        android:fullBackupContent="@xml/backup_rules"
        android:icon="@mipmap/ic_launcher"
        android:label="@string/app_name"
        android:roundIcon="@mipmap/ic_launcher_round"
        android:supportsRtl="true"
        android:theme="@style/Theme.Jetpack3DeepLinkTest"
        tools:targetApi="31">
        <activity
            android:name=".MainActivity"
            android:exported="true">
            <!--为 activity 设置 nav-graph 标签-->
            <nav-graph android:value="@navigation/nav_graph" />
            <intent-filter>
                <action android:name="android.intent.action.MAIN" />
                <category android:name="android.intent.category.LAUNCHER" />
            </intent-filter>
        </activity>
    </application>

</manifest>
运行后,在浏览器打开网站,或在终端通过 adb shell am start -a android.intent.action.VIEW -d "http://www.bilibili.com/hello" 即可在网页弹出如下 App 的链接,效果如下:

接下来,可在该 App 中获取 Bundle 对象的参数(即 URL 末尾的 {params} 参数),并做业务展示,设置 fragment_setting.xml 布局如下:
<?xml version="1.0" encoding="utf-8"?>
<RelativeLayout xmlns:android="http://schemas.android.com/apk/res/android"
    android:gravity="center"
    android:layout_width="match_parent"
    android:layout_height="match_parent">

    <TextView
        android:id="@+id/tvTitle"
        android:layout_width="wrap_content"
        android:layout_height="wrap_content"
        android:textAllCaps="false"
        android:textSize="18sp"
        android:visibility="gone"
        android:text="SettingsFragment"/>

    <TextView
        android:id="@+id/tvDesc"
        android:layout_width="wrap_content"
        android:layout_height="wrap_content"
        android:layout_below="@+id/tvTitle"
        android:textAllCaps="false"
        android:textSize="26sp"
        android:textColor="@android:color/holo_blue_dark"
        android:text=""/>

</RelativeLayout>
并在 SettingsFragment 的 onCreateView() 获取从 URL 传来的 {params} 参数,并展示在 TextView 上,代码如下:
package com.bignerdranch.android.jetpack3deeplinktest

import android.os.Bundle
import android.text.TextUtils
import androidx.fragment.app.Fragment
import android.view.LayoutInflater
import android.view.View
import android.view.ViewGroup
import android.widget.TextView

// TODO: Rename parameter arguments, choose names that match
// the fragment initialization parameters, e.g. ARG_ITEM_NUMBER
private const val ARG_PARAM1 = "param1"
private const val ARG_PARAM2 = "param2"

/**
 * A simple [Fragment] subclass.
 * Use the [SettingFragment.newInstance] factory method to
 * create an instance of this fragment.
 */
class SettingFragment : Fragment() {


    // TODO: Rename and change types of parameters
    private var param1: String? = null
    private var param2: String? = null

    override fun onCreate(savedInstanceState: Bundle?) {


        super.onCreate(savedInstanceState)
        arguments?.let {


            param1 = it.getString(ARG_PARAM1)
            param2 = it.getString(ARG_PARAM2)
        }
    }

    override fun onCreateView(inflater: LayoutInflater, container: ViewGroup?, savedInstanceState: Bundle?): View? {


        // Inflate the layout for this fragment
        val view =  inflater.inflate(R.layout.fragment_setting, container, false)
        val bundle = arguments
        if (bundle != null) {


            val params = bundle.getString("params")
            val tvDesc: TextView = view.findViewById<TextView>(R.id.tvDesc)
            if (!TextUtils.isEmpty(params)) {


                tvDesc.text = params
            }
        }
        return view
    }

    companion object {


        /**
         * Use this factory method to create a new instance of
         * this fragment using the provided parameters.
         *
         * @param param1 Parameter 1.
         * @param param2 Parameter 2.
         * @return A new instance of fragment SettingFragment.
         */
        // TODO: Rename and change types and number of parameters
        @JvmStatic
        fun newInstance(param1: String, param2: String) =
            SettingFragment().apply {


                arguments = Bundle().apply {


                    putString(ARG_PARAM1, param1)
                    putString(ARG_PARAM2, param2)
                }
            }
    }
}
运行后,当从网页输入 www.bilibili.com/hello 时,即可选择通过本 App 打开,并可获得 URL 传来的 params=hello 的参数,效果如下: