九、多媒体
9.1 通知
Android的通知会在手机上方显示通知图标, 下拉状态栏也可看到通知的详尽内容.
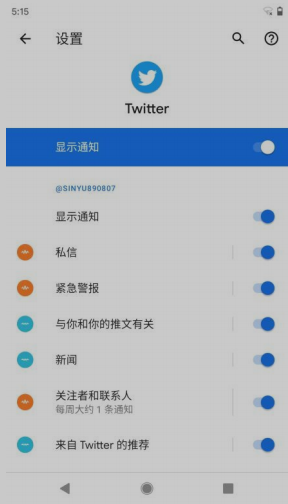
为了防止通知太多淹没用户, 各APP可设置通知渠道, 如 Twitter可设置下列通知渠道, 用户可在手机按需订阅
9.1.1 App 创建通知渠道的方式
val manager = getSystemService(Context.NOTIFICATION_SERVICE) as NotificationManager // 获取系统的通知服务
// 创建一个通知渠道
// 其中渠道ID取UUID即可
// 渠道名称是给APP用户看的需要中文且有可读性
// 通知等级有IMPORTANCE_HIGH、IMPORTANCE_DEFAULT、IMPORTANCE_LOW、IMPORTANCE_MIN等几种表示通知的重要程度
val channel = NotificationChannel(channelId, channelName, importance)
manager.createNotificationChannel(channel) // 将通知渠道和通知manager绑定起来
9.1.2 创建通知
val notification = NotificationCompat.Builder(context, channelId). // 此处channalID需和上文通知渠道
.setContentTitle("This is content title") // 通知的标题
.setContentText("This is content text") // 通知的内容
.setSmallIcon(R.drawable.small_icon) // 通知的小图标(显示在系统状态栏上)
.setLargeIcon(BitmapFactory.decodeResource(getResources(), R.drawable.large_icon)) // 通知的大图标(下拉系统栏时可见)
.build()

manager.notify(1, notification) // 显示通知, 第一个参数为通知id, 第二个参数为通知对象
下文以具体工程为例, 新建NotificationTest工程, 修改activity_main.xml如下
<LinearLayout xmlns:android="http://schemas.android.com/apk/res/android"
	android:orientation="vertical"
	android:layout_width="match_parent"
	android:layout_height="match_parent">
	<Button
	android:id="@+id/sendNotice"
	android:layout_width="wrap_content"
	android:layout_height="wrap_content"
	android:text="Send Notice" />
</LinearLayout>
业务代码如下
class MainActivity : AppCompatActivity() {
override fun onCreate(savedInstanceState: Bundle?) {
super.onCreate(savedInstanceState)
setContentView(R.layout.activity_main)
val manager = getSystemService(Context.NOTIFICATION_SERVICE) as NotificationManager
// 创建通知渠道的代码只在第一次执行的时候才会创建,当下次再执行创建代码时,系统会
// 检测到该通知渠道已经存在了,因此不会重复创建,也并不会影响运行效率。
val channel = NotificationChannel("normal", "Normal",NotificationManager.IMPORTANCE_DEFAULT)
manager.createNotificationChannel(channel)
sendNotice.setOnClickListener {
val notification = NotificationCompat.Builder(this, "normal")
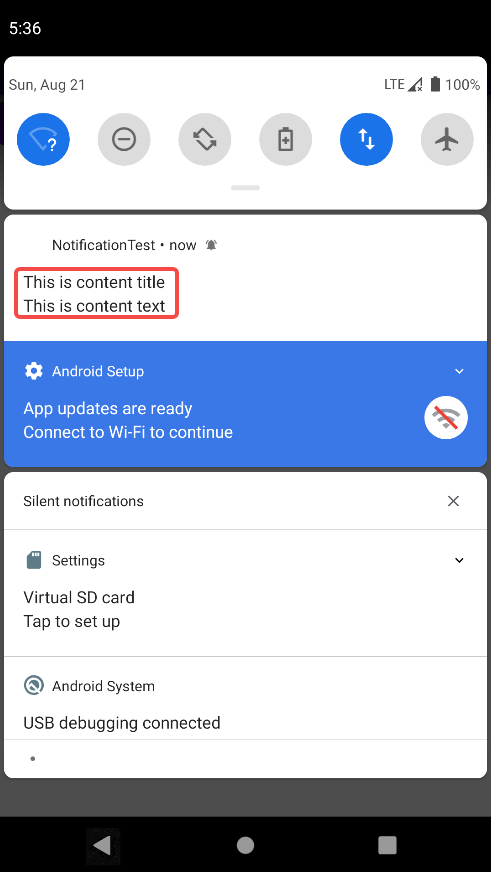
.setContentTitle("This is content title")
.setContentText("This is content text")
.setSmallIcon(R.drawable.small_icon)
.setLargeIcon(
BitmapFactory.decodeResource(resources,
R.drawable.large_icon))
.build()
manager.notify(1, notification)
}
}
}
点击按钮后, 下拉状态栏可见通知
为了在下拉的通知栏内, 点击通知, 来启动其他APP, 需用PendingIntent, 其用于在某合适的时机执行某动作, 可理解为延迟执行的Intent.
PendingIntent的用法同样很简单,它主要提供了几个静态方法用于获取PendingIntent的实例,可以根据需求来选择是使用getActivity()方法、getBroadcast()方法,还是getService()方法。
这几个方法所接收的参数都是相同的:
- 第一个参数依旧是Context,不用多做解释;
- 第二个参数一般用不到,传入0即可;
- 第三个参数是一个Intent对象,我们可以通过这个对象构建PendingIntent的“意图”;
- 第四个参数用于确定PendingIntent的行为,有FLAG_ONE_SHOT、FLAG_NO_CREATE、FLAG_CANCEL_CURRENT和FLAG_UPDATE_CURRENT这4种值可选,每种值的具体含义你可以查看文档,通常情况下这个参数传入0就可以了。
在此工程内, 我们新建一个NotificationActivity, 其布局如下
<RelativeLayout xmlns:android="http://schemas.android.com/apk/res/android"
    android:layout_width="match_parent"
    android:layout_height="match_parent" >
    <TextView
        android:layout_width="wrap_content"
        android:layout_height="wrap_content"
        android:layout_centerInParent="true"
        android:textSize="24sp"
        android:text="This is notification layout"
        />
</RelativeLayout>
修改MainActivity的逻辑如下
class MainActivity : AppCompatActivity() {


    override fun onCreate(savedInstanceState: Bundle?) {


        super.onCreate(savedInstanceState)
        setContentView(R.layout.activity_main)
        val manager = getSystemService(Context.NOTIFICATION_SERVICE) as NotificationManager
        // 创建通知渠道的代码只在第一次执行的时候才会创建,当下次再执行创建代码时,系统会
        // 检测到该通知渠道已经存在了,因此不会重复创建,也并不会影响运行效率。
        val channel = NotificationChannel("normal", "Normal",NotificationManager.IMPORTANCE_DEFAULT)
        manager.createNotificationChannel(channel)
        sendNotice.setOnClickListener {


            val intent = Intent(this, NotificationActivity::class.java)
            val pi = PendingIntent.getActivity(this, 0, intent, 0)
            val notification = NotificationCompat.Builder(this, "normal")
                .setContentTitle("This is content title")
                .setContentText("This is content text")
                .setSmallIcon(R.drawable.small_icon)
                .setLargeIcon(BitmapFactory.decodeResource(resources, R.drawable.large_icon))
                .setContentIntent(pi) // pi即会调用NotificationActivity
                .setAutoCancel(true) // 意为点击通知后, 使通知自动在列表消失; 也可通过manager.cancel(通知id)来手动取消
                .build()
            manager.notify(1, notification)
        }
    }
}
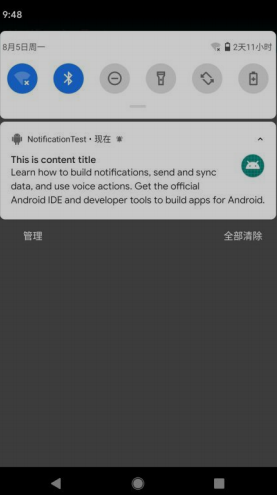
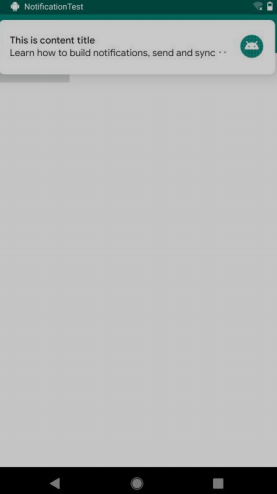
- 通知可设置样式
// 不折叠的长文字通知
val notification = NotificationCompat.Builder(this, "normal")
...
.setStyle(NotificationCompat.BigTextStyle().bigText("Learn how to build
notifications, send and sync data, and use voice actions. Get the official
Android IDE and developer tools to build apps for Android."))
.build()
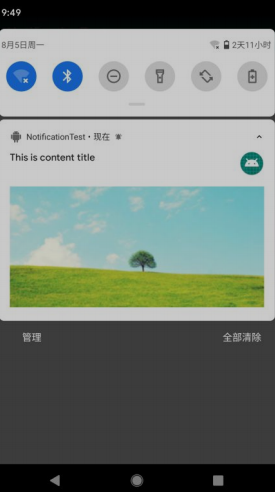
// 大图片通知
val notification = NotificationCompat.Builder(this, "normal")
...
.setStyle(NotificationCompat.BigPictureStyle().bigPicture(
BitmapFactory.decodeResource(resources, R.drawable.big_image)))
.build()
- 设置通知等级
class MainActivity : AppCompatActivity() {


	override fun onCreate(savedInstanceState: Bundle?) {


		val channel2 = NotificationChannel("important", "Important", NotificationManager.IMPORTANCE_HIGH), manager.createNotificationChannel(channel2)
	}
	sendNotice.setOnClickListener {


		val intent = Intent(this, NotificationActivity::class.java)
		val pi = PendingIntent.getActivity(this, 0, intent, 0)
		val notification = NotificationCompat.Builder(this, "important")
	}
}
高级别通知样式如下, 会在其他APP上方弹出, 需慎用
9.1.3 调用摄像头和相册
新建一个CameraAlbumTest项目, 布局如下
<LinearLayout xmlns:android="http://schemas.android.com/apk/res/android"
	android:orientation="vertical"
	android:layout_width="match_parent"
	android:layout_height="match_parent" >
	<Button
	android:id="@+id/takePhotoBtn"
	android:layout_width="match_parent"
	android:layout_height="wrap_content"
	android:text="Take Photo" />
	<ImageView
	android:id="@+id/imageView"
	android:layout_width="wrap_content"
	android:layout_height="wrap_content"
	android:layout_gravity="center_horizontal" />
</LinearLayout>
从摄像头拍照
package com.example.cameraalbumtest

import android.app.Activity
import android.content.Intent
import android.graphics.Bitmap
import android.graphics.BitmapFactory
import android.graphics.Matrix
import android.media.ExifInterface
import android.net.Uri
import android.os.Build
import androidx.appcompat.app.AppCompatActivity
import android.os.Bundle
import android.provider.MediaStore
import androidx.core.content.FileProvider
import kotlinx.android.synthetic.main.activity_main.*
import java.io.File

class MainActivity : AppCompatActivity() {


    val takePhoto = 1
    lateinit var imageUri: Uri
    lateinit var outputImage: File
    override fun onCreate(savedInstanceState: Bundle?) {


        super.onCreate(savedInstanceState)
        setContentView(R.layout.activity_main)
        takePhotoBtn.setOnClickListener {


            // 创建File对象,用于存储拍照后的图片
            // 其中externalCacheDir是SD卡中专门用于存放当前APP缓存数据的位置, 即是/sdcard/Android/data/<package name>/cache
            outputImage = File(externalCacheDir, "output_image.jpg")
            if (outputImage.exists()) {


                outputImage.delete()
            }
            outputImage.createNewFile()
            // file转为uri
            // Android的直接使用本地真实路径的Uri被认为是不安全的,会抛出一个FileUriExposedException异常。而FileProvider则是一种特殊的
            // ContentProvider,它使用了和ContentProvider类似的机制来对数据进行保护,可以选择性地将封装过的Uri共享给外部,从而提高了应用的安全性
            imageUri =  FileProvider.getUriForFile(this, "com.example.cameraalbumtest.fileprovider", outputImage)
            // 启动相机程序
            val intent = Intent("android.media.action.IMAGE_CAPTURE")
            intent.putExtra(MediaStore.EXTRA_OUTPUT, imageUri) // 拍好的照片会存在imageUri中
            startActivityForResult(intent, takePhoto)
        }
    }

    // 由于刚才我们是使用startActivityForResult()启动Activity的,因此拍完照后会有结果
    // 返回到onActivityResult()方法中。如果发现拍照成功,就可以调用BitmapFactory的
    // decodeStream()方法将output_image.jpg这张照片解析成Bitmap对象,然后把它设置到
    // ImageView中显示出来
    override fun onActivityResult(requestCode: Int, resultCode: Int, data: Intent?) {


        super.onActivityResult(requestCode, resultCode, data)
        when (requestCode) {


            takePhoto -> {


                if (resultCode == Activity.RESULT_OK) {


                    // 将拍摄的照片显示出来
                    val bitmap = BitmapFactory.decodeStream(contentResolver.openInputStream(imageUri))
                    imageView.setImageBitmap(rotateIfRequired(bitmap))
                }
            }
        }
    }
    private fun rotateIfRequired(bitmap: Bitmap): Bitmap {


        val exif = ExifInterface(outputImage.path)
        val orientation = exif.getAttributeInt(ExifInterface.TAG_ORIENTATION,
            ExifInterface.ORIENTATION_NORMAL)
        return when (orientation) {


            ExifInterface.ORIENTATION_ROTATE_90 -> rotateBitmap(bitmap, 90)
            ExifInterface.ORIENTATION_ROTATE_180 -> rotateBitmap(bitmap, 180)
            ExifInterface.ORIENTATION_ROTATE_270 -> rotateBitmap(bitmap, 270)
            else -> bitmap
        }
    }

    // 调用照相机程序去拍照有可能会在一些手机上发生照片旋转的情况。这是因为
    // 这些手机认为打开摄像头进行拍摄时手机就应该是横屏的,因此回到竖屏的情况下就会发生90度的旋转。
    // 为此,这里我们又加上了判断图片方向的代码,如果发现图片需要进行旋转,那么
    // 就先将图片旋转相应的角度,然后再显示到界面上
    private fun rotateBitmap(bitmap: Bitmap, degree: Int): Bitmap {


        val matrix = Matrix()
        matrix.postRotate(degree.toFloat())
        val rotatedBitmap = Bitmap.createBitmap(bitmap, 0, 0, bitmap.width, bitmap.height,
            matrix, true)
        bitmap.recycle() // 将不再需要的Bitmap对象回收
        return rotatedBitmap
    }
}
从相册读取
class MainActivity : AppCompatActivity() {


    ...
    val fromAlbum = 2
    override fun onCreate(savedInstanceState: Bundle?) {


        ...
        fromAlbumBtn.setOnClickListener {


            // 打开文件选择器
            val intent = Intent(Intent.ACTION_OPEN_DOCUMENT)
            intent.addCategory(Intent.CATEGORY_OPENABLE)
            // 指定只显示图片
            // intent.type = "image/*"
            startActivityForResult(intent, fromAlbum)
        }
    }
    override fun onActivityResult(requestCode: Int, resultCode: Int, data: Intent?) {


        super.onActivityResult(requestCode, resultCode, data)
        when (requestCode) {


                ...
                fromAlbum -> {


            if (resultCode == Activity.RESULT_OK && data != null) {


                data.data?.let {

     uri ->
                    // 将选择的图片显示
                    val bitmap = getBitmapFromUri(uri)
                    imageView.setImageBitmap(bitmap)
                }
            }
        }
        }
    }
    private fun getBitmapFromUri(uri: Uri) = contentResolver
        .openFileDescriptor(uri, "r")?.use {


            BitmapFactory.decodeFileDescriptor(it.fileDescriptor)
        }
    ...
}
9.2 播放多媒体文件
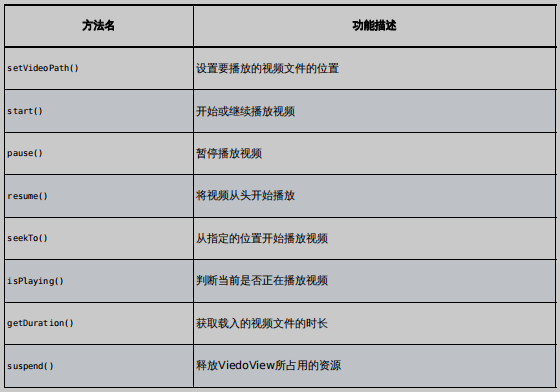
9.2.1 播放音频
通过MediaPlayer类实现, 其API如下

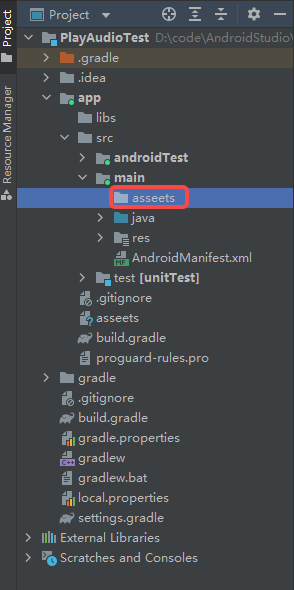
右击app/src/main→New→Directory,在弹出的对话框中输
入“assets”,目录就创建完成了, 如下图
布局如下
<LinearLayout xmlns:android="http://schemas.android.com/apk/res/android"
 android:orientation="vertical"
 android:layout_width="match_parent"
 android:layout_height="match_parent" >
 <Button
 android:id="@+id/play"
 android:layout_width="match_parent"
 android:layout_height="wrap_content"
 android:text="Play" />
 <Button
 android:id="@+id/pause"
 android:layout_width="match_parent"
 android:layout_height="wrap_content"
 android:text="Pause" />
 <Button
 android:id="@+id/stop"
 android:layout_width="match_parent"
 android:layout_height="wrap_content"
 android:text="Stop" />
</LinearLayout>
播放逻辑如下
class MainActivity : AppCompatActivity() {


    private val mediaPlayer = MediaPlayer()
    override fun onCreate(savedInstanceState: Bundle?) {


        super.onCreate(savedInstanceState)
        setContentView(R.layout.activity_main)
        initMediaPlayer()
        play.setOnClickListener {


            if (!mediaPlayer.isPlaying) {


                mediaPlayer.start() // 开始播放
            }
        }
        pause.setOnClickListener {


            if (mediaPlayer.isPlaying) {


                mediaPlayer.pause() // 暂停播放
            }
        }
        stop.setOnClickListener {


            if (mediaPlayer.isPlaying) {


                mediaPlayer.reset() // 停止播放
                initMediaPlayer()
            }
        }
    }
    private fun initMediaPlayer() {


        val assetManager = assets
        val fd = assetManager.openFd("music.mp3")
        mediaPlayer.setDataSource(fd.fileDescriptor, fd.startOffset, fd.length)
        mediaPlayer.prepare()
    }
    override fun onDestroy() {


        super.onDestroy()
        mediaPlayer.stop()
        mediaPlayer.release()
    }
9.2.2 播放视频
VideoView类
class MainActivity : AppCompatActivity() {


    override fun onCreate(savedInstanceState: Bundle?) {


        super.onCreate(savedInstanceState)
        setContentView(R.layout.activity_main)
        val uri = Uri.parse("android.resource://$packageName/${

      R.raw.video}")
        videoView.setVideoURI(uri)
        play.setOnClickListener {


            if (!videoView.isPlaying) {


                videoView.start() // 开始播放
            }
        }
        pause.setOnClickListener {


            if (videoView.isPlaying) {


                videoView.pause() // 暂停播放
            }
        }
        replay.setOnClickListener {


            if (videoView.isPlaying) {


                videoView.resume() // 重新播放
            }
        }
    }
    override fun onDestroy() {


        super.onDestroy()
        videoView.suspend()
    }
}