文章目录
基于XML管理bean
①创建Maven Module
②引入依赖
<dependencies>
    <!-- 基于Maven依赖传递性,导入spring-context依赖即可导入当前所需所有jar包 -->
    <dependency>
        <groupId>org.springframework</groupId>
        <artifactId>spring-context</artifactId>
        <version>5.3.1</version>
    </dependency>
    <!-- junit测试 -->
    <dependency>
        <groupId>junit</groupId>
        <artifactId>junit</artifactId>
        <version>4.12</version>
        <scope>test</scope>
    </dependency>
</dependencies>
③创建类HelloWorld
public class HelloWorld {


    public void sayHello(){


        System.out.println("helloworld");
    }
}
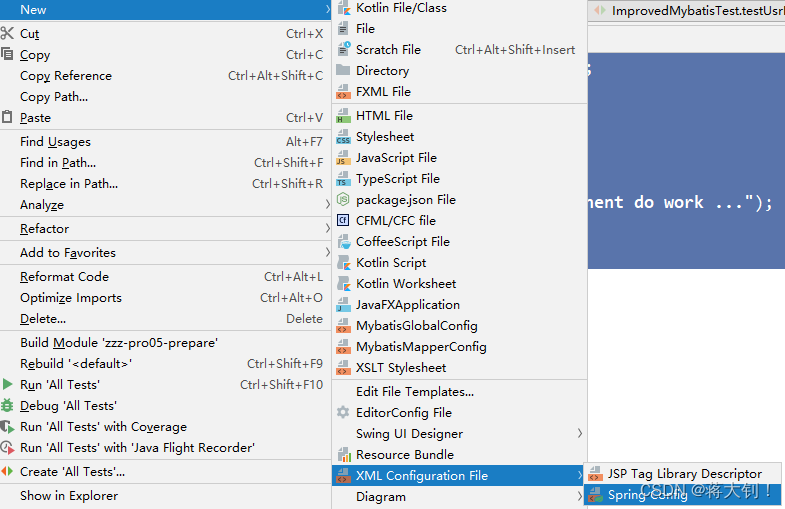
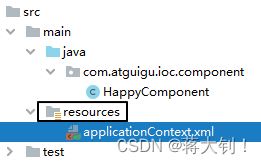
④创建Spring xml配置文件
⑤在Spring的配置文件中配置bean
<!--
	配置HelloWorld所对应的bean,即将HelloWorld的对象交给Spring的IOC容器管理
	通过bean标签配置IOC容器所管理的bean
	属性:
		id:设置bean的唯一标识
		class:设置bean所对应类型的全类名
-->
<bean id="helloworld" class="com.atguigu.spring.bean.HelloWorld"></bean>
⑥创建测试类测试
@Test
public void testHelloWorld(){


    ApplicationContext ac = newClassPathXmlApplicationContext("applicationContext.xml");
    HelloWorld helloworld = (HelloWorld) ac.getBean("helloworld");
    helloworld.sayHello();
}
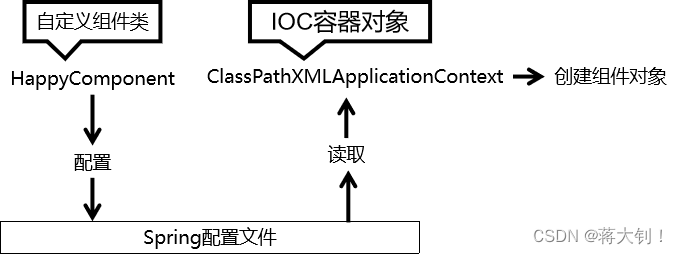
⑦思路
⑧注意
Spring 底层默认通过反射技术调用组件类的无参构造器来创建组件对象,这一点需要注意。如果在需要无参构造器时,没有无参构造器,则会抛出下面的异常:
org.springframework.beans.factory.BeanCreationException: Error creating bean with name
‘helloworld’ defined in class path resource [applicationContext.xml]: Instantiation of bean
failed; nested exception is org.springframework.beans.BeanInstantiationException: Failed
to instantiate [com.atguigu.spring.bean.HelloWorld]: No default constructor found; nested
exception is java.lang.NoSuchMethodException: com.atguigu.spring.bean.HelloWorld.
()
扫描二维码关注公众号,回复: 14846494 查看本文章
基于xml的自动装配
自动装配:
根据指定的策略,在IOC容器中匹配某一个bean,自动为指定的bean中所依赖的类类型或接口类型属性(字面量属性不行,因为这两个都是用ref,找到一个类型实现就行)赋值,不用property的ref
①场景模拟
创建类UserController
package com.jxz.controller;

import com.jxz.service.UserService;

public class UserController {


    private UserService userService;

    public UserService getUserService() {


        return userService;
    }

    public void setUserService(UserService userService) {


        this.userService = userService;
    }

    public void saveUser(){


        userService.saveUser();
    }
}
创建接口UserService
public interface UserService {


	void saveUser();
}
创建类UserServiceImpl实现接口UserService
package com.jxz.service.impl;

import com.jxz.dao.UserDao;
import com.jxz.service.UserService;

public class UserServiceImpl implements UserService {


    private UserDao userDao;

    public UserDao getUserDao() {


        return userDao;
    }

    public void setUserDao(UserDao userDao) {


        this.userDao = userDao;
    }

    public void saveUser(){


        userDao.saveUser();
    }
}
创建接口UserDao
public interface UserDao {


	void saveUser();
}
创建类UserDaoImpl实现接口UserDao
public class UserDaoImpl implements UserDao {


    @Override
    public void saveUser() {


        System.out.println("保存成功");
    }
}
②配置bean
朴素配置:userController和userService需要自己设置 <property name="" ref=""></property>
<?xml version="1.0" encoding="UTF-8"?>
<beans xmlns="http://www.springframework.org/schema/beans"
       xmlns:xsi="http://www.w3.org/2001/XMLSchema-instance"
       xsi:schemaLocation="http://www.springframework.org/schema/beans http://www.springframework.org/schema/beans/spring-beans.xsd">
    <bean id="userController" class="com.jxz.controller.UserController">
        <property name="userService" ref="userService"></property>
    </bean>
    <bean id="userService" class="com.jxz.service.impl.UserServiceImpl">
        <property name="userDao" ref="userDao"></property>
    </bean>
    <bean id="userDao" class="com.jxz.dao.impl.UserDaoImpl">

    </bean>
</beans>
自动装配:userController和userService不需要自己设置 <property name="" ref=""></property>
使用bean标签的autowire属性设置自动装配效果:
自动装配方式:byType
byType:根据类型匹配IOC容器中的某个兼容类型的bean,为bean的属性自动赋值
a>若在IOC中,没有任何一个兼容类型的bean能够为属性赋值,则该属性不装配,即值为默认值null
b>若在IOC中,有多个兼容类型的bean能够为属性赋值,则抛出异常NoUniqueBeanDefinitionException,但通常情况下也不会配置同一个类型的多个bean
总结:当使用byType实现自动匹配时,IOC容器中有且只有一个类型匹配的bean能够为其属性赋值(一个类型的bean不需要配置多次,如果要有多个bean的话,设置prototype)
<bean id="userController"class="com.atguigu.autowire.xml.controller.UserController" autowire="byType">
</bean>
<bean id="userService"class="com.atguigu.autowire.xml.service.impl.UserServiceImpl" autowire="byType">
</bean>
<bean id="userDao" class="com.atguigu.autowire.xml.dao.impl.UserDaoImpl"></bean>
自动装配方式:byName
byName:将要赋值的属性的属性名,作为bean的id在IOC容器中匹配相对应的bean进行赋值
<bean id="userController"class="com.atguigu.autowire.xml.controller.UserController" autowire="byName">
</bean>
<bean id="userService"class="com.atguigu.autowire.xml.service.impl.UserServiceImpl" autowire="byName">
</bean>
<bean id="userServiceImpl"class="com.atguigu.autowire.xml.service.impl.UserServiceImpl" autowire="byName">
</bean>
<bean id="userDao" class="com.atguigu.autowire.xml.dao.impl.UserDaoImpl">
</bean>
<bean id="userDaoImpl" class="com.atguigu.autowire.xml.dao.impl.UserDaoImpl">
</bean>
③测试
@Test
public void testAutoWireByXML(){


    ApplicationContext ac = new ClassPathXmlApplicationContext("autowire-xml.xml");
    UserController userController = ac.getBean(UserController.class);
    userController.saveUser();
}
基于注解管理bean
注解+扫描
①注解
和 XML 配置文件一样,注解本身并不能执行,注解本身仅仅只是做一个标记,具体的功能是框架检测到注解标记的位置,然后针对这个位置按照注解标记的功能来执行具体操作。
本质上:所有一切的操作都是Java代码来完成的,XML和注解只是告诉框架中的Java代码如何执行。
②扫描
Spring 为了知道程序员在哪些地方标记了什么注解,就需要通过扫描的方式,来进行检测。然后根据注解进行后续操作。
③新建Maven Module
<dependencies>
    <!-- 基于Maven依赖传递性,导入spring-context依赖即可导入当前所需所有jar包 -->
    <dependency>
        <groupId>org.springframework</groupId>
        <artifactId>spring-context</artifactId>
        <version>5.3.1</version>
    </dependency>
    <!-- junit测试 -->
    <dependency>
        <groupId>junit</groupId>
        <artifactId>junit</artifactId>
        <version>4.12</version>
        <scope>test</scope>
    </dependency>
</dependencies>
④创建Spring配置文件

⑤标识组件的常用注解
@Component:将类标识为普通组件
@Controller:将类标识为控制层组件
@Service:将类标识为业务层组件
@Repository:将类标识为持久层组件
问:以上四个注解有什么关系和区别?
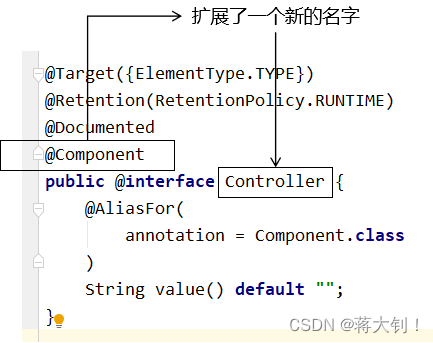
通过查看源码我们得知,@Controller、@Service、@Repository这三个注解只是在@Component注解的基础上起了三个新的名字。
对于Spring使用IOC容器管理这些组件来说没有区别。所以@Controller、@Service、@Repository这三个注解只是给开发人员看的,让我们能够便于分辨组件的作用。
注意:虽然它们本质上一样,但是为了代码的可读性,为了程序结构严谨我们肯定不能随便胡乱标记。
⑥创建组件
创建控制层组件
@Controller
public class UserController {


}
创建接口UserService
public interface UserService {


}
创建业务层组件UserServiceImpl
@Service
public class UserServiceImpl implements UserService {


}
创建接口UserDao
public interface UserDao {


}
创建持久层组件UserDaoImpl
@Repository
public class UserDaoImpl implements UserDao {


}
⑦扫描组件
情况一:最基本的扫描方式
<context:component-scan base-package="com.atguigu">
</context:component-scan>
情况二:指定要排除的组件(用得多)
<?xml version="1.0" encoding="UTF-8"?>
<beans xmlns="http://www.springframework.org/schema/beans"
       xmlns:xsi="http://www.w3.org/2001/XMLSchema-instance"
       xmlns:context="http://www.springframework.org/schema/context"
       xsi:schemaLocation="http://www.springframework.org/schema/beans http://www.springframework.org/schema/beans/spring-beans.xsd http://www.springframework.org/schema/context https://www.springframework.org/schema/context/spring-context.xsd">
<!--扫描组件-->
    <context:component-scan base-package="com.jxz.spring">
        <!-- context:exclude-filter标签:指定排除规则 -->
        <!--
            type:设置排除或包含的依据
            type="annotation",根据注解排除,expression中设置要排除的注解的全类名
            type="assignable",根据类型排除,expression中设置要排除的类型的全类名
        -->
<!--        <context:exclude-filter type="annotation" expression="org.springframework.stereotype.Controller"/>-->
        <context:exclude-filter type="assignable" expression="com.jxz.spring.controller.UserController"/>
    </context:component-scan>
</beans>
情况三:仅扫描指定组件
<context:component-scan base-package="com.atguigu" use-default-filters="false">
    <!-- context:include-filter标签:指定在原有扫描规则的基础上追加的规则 -->
    <!-- use-default-filters属性:取值false表示关闭默认扫描规则 -->
    <!-- 此时必须设置use-default-filters="false",因为默认规则即扫描指定包下所有类 -->
    <!--
        type:设置排除或包含的依据
        type="annotation",根据注解排除,expression中设置要排除的注解的全类名
        type="assignable",根据类型排除,expression中设置要排除的类型的全类名
     -->
    <context:include-filter type="annotation"expression="org.springframework.stereotype.Controller"/>
    <!--<context:include-filter type="assignable"expression="com.atguigu.controller.UserController"/>-->
</context:component-scan>
⑧测试
@Test
public void testAutowireByAnnotation(){


    ApplicationContext ac = new
        ClassPathXmlApplicationContext("applicationContext.xml");
    UserController userController = ac.getBean(UserController.class);
    System.out.println(userController);
    UserService userService = ac.getBean(UserService.class);
    System.out.println(userService);
    UserDao userDao = ac.getBean(UserDao.class);
    System.out.println(userDao);
}
⑨组件所对应的bean的id
在我们使用XML方式管理bean的时候,每个bean都有一个唯一标识,便于在其他地方引用。现在使用注解后,每个组件仍然应该有一个唯一标识。
默认情况:
类名首字母小写就是bean的id。例如:UserController类对应的bean的id就是userController。
自定义bean的id:
可通过标识组件的注解的value属性设置自定义的bean的id
@Service(“userService”)//默认为userServiceImpl
public class UserServiceImpl implementsUserService {}
基于@Autowired注解的自动装配
①场景模拟
参考基于xml的自动装配,需要在xml配置文件中需要使用autowire属性
在UserController中声明UserService对象
在UserServiceImpl中声明UserDao对象
②@Autowired注解
**在成员变量上直接标记@Autowired注解即可完成自动装配,不需要提供setXxx()方法。**以后我们在项目中的正式用法就是这样。
@Controller
public class UserController {


    @Autowired
    private UserService userService;
    public void saveUser(){


        userService.saveUser();
    }
}
public interface UserService {


    void saveUser();
}
@Service
public class UserServiceImpl implements UserService {


    @Autowired
    private UserDao userDao;
    @Override
    public void saveUser() {


        userDao.saveUser();
    }
}
public interface UserDao {


	void saveUser();
}
@Repository
public class UserDaoImpl implements UserDao {


    @Override
    public void saveUser() {


        System.out.println("保存成功");
    }
}
③@Autowired注解其他细节
@Autowired注解还可以标记在有参构造器和set方法上,完成自动装配
@Controller
public class UserController {


    private UserService userService;
    @Autowired
    public UserController(UserService userService){

     // 有参构造器
        this.userService = userService;
    }
    public void saveUser(){


        userService.saveUser();
    }
}
@Controller
public class UserController {


    private UserService userService;
    @Autowired
    public void setUserService(UserService userService){

     // set方法
        this.userService = userService;
    }
    public void saveUser(){


        userService.saveUser();
    }
}
④@Autowired工作流程
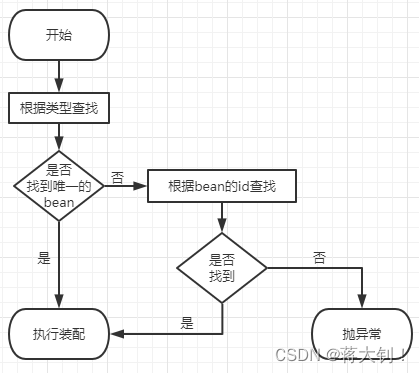
@Autowire 注解的原理
a) 默认通过 byType 的方式,在IOC容器中通过类型匹配某个bean为属性赋值,如果不存在类型匹配的话直接报NoSuchBeanDefinationException
b) 当有多个 bean 的类型能匹配到,其会转换为 byName 的方式,根据@Autowired标记位置成员变量的变量名作为bean的id进行匹配。
c) byType和byName都失效的时候,即byType有多个 bean 的类型能匹配到,但byName和其中任何一个类型相同的比较id都不一样,则报 noUniqueBeanDefinationException.
d) 要解决c),可以使用@Qualifier注解:根据@Qualifier注解中指定的名称作为bean的id进行匹配
当执行:
@Test
public void test3(){


  ClassPathXmlApplicationContext ioc = new ClassPathXmlApplicationContext("spring-ioc-annotation.xml");
  UserController userController = ioc.getBean(UserController.class);
  userController.saveUser();
}
其中userService成员变量进行扫描的时候
@Autowired
private UserService userService;
xml配置文件如下时,会找到两个bean,类别都为UserService,转换为byName方式,同时默认byName的id是userService,配置的bean的id却为userServiceAAA,id也不想等,因此报错noUniqueBeanDefinationException:
<context:component-scan base-package="com.jxz.spring"></context:component-scan> // 扫描所有包
<bean id="userServiceAAA" class="com.jxz.spring.service.impl.UserServiceImpl"></bean> // 配置UserServiceImpl类,实现接口UserService
@Qualifier 注解的使用
我们可以在指定的地方使用下面的注解,强行指定要匹配的id:
package com.jxz.spring.controller;

import com.jxz.spring.service.UserService;
import org.springframework.beans.factory.annotation.Autowired;
import org.springframework.beans.factory.annotation.Qualifier;
import org.springframework.stereotype.Controller;

@Controller("jxzController")
public class UserController {


    @Autowired
    @Qualifier("userServiceAAA")
    private UserService userService;

    public void saveUser(){


        userService.saveUser();
    }
}
NoSuchBeanDefinationException
当匹配不到相同类型的Bean完成自动装配的时候,会报 NoSuchBeanDefinationException 的错误,这是因为
@Autowire(required = true),必须完成自动装配,不然直接报错。当修改为
@Autowire(required = false)的时候,表示不是必须自动状态,找不到Bean则使用默认值,和之前使用XML自动装配的时候的情况一样。
比如:将依赖的UserDaoImpl注释掉,报NoSuchBeanDefinationException
package com.jxz.spring.dao.impl;

import com.jxz.spring.dao.UserDao;
import org.springframework.stereotype.Repository;

//@Repository
public class UserDaoImpl implements UserDao {


    @Override
    public void saveUser() {


        System.out.println("保存成功");
    }
}
在对应的调用方修改:
@Service
public class UserServiceImpl implements UserService {


    @Autowired(required = false)
    private UserDao userDao;
    public void saveUser(){


        userDao.saveUser();
    }
}
因为要用到private UserDao userDao,但是却不能完成自动装配,因此使用默认值null,于是 userDao.saveUser();报java.lang.NullPointerException