一.Notification
1. Notification 与 NotificationManager
1.1创建一个 NotificationManager
NotificationManager 类是一个通知管理器类,这个对象是由系统维护的服务,是以单例模式的方式获得,所一般并不直接实例化这个对象。在 Activity 中,可以使 用 Activity . getSystemService ( String )方法获取
NotificationManager 对象, Activity . getSystemService ( String )方法可以通过 Android 系统级服务的句柄,返回对应的对象。在这里需要返回 NotificationManager ,所以直接传递 Context . NOTIFICATION _ SERVICE 即可。
1.2使用 Builder 构造器来创建 Notification 对象
使用 NotificationCompat 类的 Builder 构造器来创建 Notification 对象,可以保证程序在所有的版本上都能正常工作。Android8.0新增了通知渠道这个概念,如果没有设置,则通知无法在Android8.0的机器上显示
2. NotificationChannel
通知渠道: Android 8.0引入了通知渠道,其允许您为要显示的每种通知类型创建用户可自定义的渠道。
2.1通知重要程度设置, NotificationManager 类中
| IMPORTANCE _ NONE | 关闭通知 |
| IMPORTANCE _ MIN | 开启通知,不会弹出,但没有提示音,状态栏中无显示 |
| IMPORTANCE _ LOW | 开启通知,不会弹出,不发出提示音,状态栏中显示 |
| IMPORTANCE _ DEFAULT | 开启通知,不会弹出,发出提示音,状态栏中显示 |
| IMPORTANCE _ HIGH | 开启通知,会弹出,发出提示音,状态栏中显示 |
    private NotificationManager manager;

    private Notification notification;


    @Override
    protected void onCreate(Bundle savedInstanceState) {
        super.onCreate(savedInstanceState);
        setContentView(R.layout.activity_main);

        manager = (NotificationManager) getSystemService(NOTIFICATION_SERVICE);

            if (Build.VERSION.SDK_INT >= Build.VERSION_CODES.O) {
                NotificationChannel channel = new NotificationChannel ("leo", "测试通知",
                        NotificationManager.IMPORTANCE_HIGH);
                manager.createNotificationChannel(channel);
            }


        notification  = new NotificationCompat.Builder(this, "leo")
                .setContentText("官方通知")
                .setContentText("世界那么大想去走走")
                .setSmallIcon(R.drawable.baseline_person_24)
                .build();

    }
其中NotificationChannel中有三个方法:id ,name , importance
id其实就是channelld中的leo
3.常见方法说明
| 1. setContentTitle ( String string ) | 设置标题 |
| 2. setContentText ( String string ) | 设置文本内容 |
| 3. setSmalllcon ( int icon ) | 设置小图标 |
| 4. setLargelcon ( Bitmap icon ) | 设置通知的大图标 |
| 5. setColor ( int argb ) | 设置小图标的颜色 |
| 6. setContentintent ( Pendingintent intent ) | 设置点击通知后的跳转意图 |
| 7. setAutoCancel ( boolean boolean ) | 设置点击通知后自动清除通知 |
| 8. setWhen ( long when ) | 设置通知被创建的时间 |
设置前三个就可以显示出通知需求了
4.注意点
Android 从5.0系统开始,对于通知栏图标的设计进行了修改。
现在 Google 要求,所有应用程序的通知栏图标,应该只使用 alpha 图层来进行绘制,而不应该包括 RGB 图层。
<Button
        android:text="发出通知"
        android:layout_width="wrap_content"
        android:layout_height="wrap_content"
        android:onClick="sendNotification" />

    <Button
        android:text="取消通知"
        android:onClick="cacelNotification"
        android:layout_width="wrap_content"
        android:layout_height="wrap_content"/>
public void sendNotification(View view) {
manager.notify(1,notification);
}
public void cacelNotification(View view){
}此时功能实现如图所示:
![]()
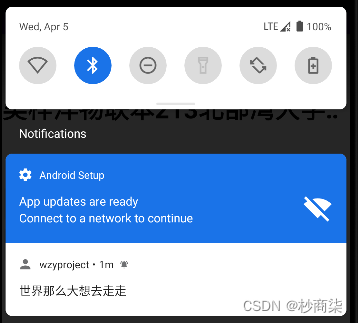
.setLargeIcon(BitmapFactory.decodeResource(getResources(),R.drawable.ceshi))设置通知大图标

4.1再此重建一个NotificationActivity.java类 实现跳转意图
package com.example.wzyproject;

import android.app.Activity;
import android.os.Bundle;
import android.support.annotation.Nullable;
import android.util.Log;

public class NotificationActivity  extends Activity {

    @Override
    protected void onCreate(@Nullable Bundle savedInstanceState) {
        super.onCreate(savedInstanceState);

        Log.e("leo","oncreat:进入NotificationActivity");
    }
}
 Intent intent = new Intent(this, NotificationActivity.class);
 PendingIntent pendingIntent = PendingIntent.getActivity(this, 0, intent, 0);


notification  = new NotificationCompat.Builder(this, "leo")
                .setContentText("官方通知")
                .setContentText("世界那么大想去走走")
                .setSmallIcon(R.drawable.baseline_person_24)

            .setLargeIcon(BitmapFactory.decodeResource(getResources(),R.drawable.ceshi))
                .setColor(Color.parseColor("#ff0000"))
                .setContentIntent(pendingIntent)
                .setAutoCancel(true)
                .build();
二.Toolbar控件
1.常用属性详解
android : layout _ width =" match _ parent "
android : layout _ height ="? attr / actionBarSize "
android : background ="#ffff00"
app : navigationlcon ="@ drawable / ic _ baseline _ arrow _ back _24"
app : title ="主标题"
app : title TextColor ="#ff0000"
app : titleMarginStart ="90dp"
app : subtitle ="子标题"
app : subtitle TextColor ="#00ffff"
app : logo ="@ mipmap / ic _ launcher "
2.功能实现效果
2.1app : navigationlcon
其他功能实现的展示
MainActivity.java中代码实现
public class MainActivity extends AppCompatActivity {

    @Override
    protected void onCreate(Bundle savedInstanceState) {
        super.onCreate(savedInstanceState);
        setContentView(R.layout.activity_main);


        Toolbar toolbar = findViewById(R.id.tb);
        toolbar.setNavigationOnClickListener(new View.OnClickListener() {
            @Override
            public void onClick(View v) {
                Log.e("leo", "onClick: toolbar被点击了");
            }
        });
    }
}
在activity_main.xml文件中
<androidx.appcompat.widget.Toolbar
        android:id="@+id/tb"
        android:background="#ff0000"
        app:navigationIcon="@drawable/baseline_sports_baseball_24"
        app:title="标题"
        app:titleTextColor="#ff00ff00"
        app:titleMarginStart="90dp"
        app:subtitle="子标题"
        app:logo="@mipmap/ic_launcher"
        app:subtitleTextColor="#00ffff"
        android:layout_width="match_parent"
        android:layout_height="?attr/actionBarSize"/>

运行效果在运行处可以看到:

2.2也可以在java中设置属性:
Toolbar toolbar2 = findViewById(R.id.tb2);

        toolbar2.setNavigationIcon(R.drawable.baseline_sports_baseball_24);
        toolbar2.setTitle("标题");
        toolbar2.setNavigationOnClickListener(new View.OnClickListener() {
            @Override
            public void onClick(View view) {
                Log.e("leo", "onClick: toolbar被点击了");
            }
        });
<androidx.appcompat.widget.Toolbar
android:id="@+id/tb2"
android:layout_marginTop="10dp"
android:background="#ff0000"
android:layout_width="match_parent"
android:layout_height="?attr/actionBarSize" />
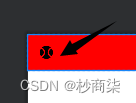
此时显示的效果如图


2.3使用TextView居中字体
    <androidx.appcompat.widget.Toolbar
        android:id="@+id/tb2"
        android:layout_marginTop="10dp"
        app:navigationIcon="@drawable/baseline_sports_baseball_24"
        android:background="#ff0000"
        android:layout_width="match_parent"
        android:layout_height="?attr/actionBarSize" >

        <TextView
            android:text="标题"
            android:layout_gravity="center"
            android:layout_width="wrap_content"
            android:layout_height="wrap_content"/>

    </androidx.appcompat.widget.Toolbar>
展示效果:
