

目录
Dubbo实战_整合Mybaits-plus配置
修改mapper工程pom文件
  <dependencies>
       <!-- 引入 pojo 工程-->
        <dependency>
            <groupId>com.tong</groupId>
            <artifactId>pojo</artifactId>
            <version>1.0-SNAPSHOT</version>
        </dependency>
        <!-- Mybatis plus 依赖 -->
        <dependency>
            <groupId>com.baomidou</groupId>
            <artifactId>mybatis-plus-bootstarter</artifactId>
        </dependency>
        <!--MySQL 数据库依赖 -->
        <dependency>
            <groupId>mysql</groupId>
            <artifactId>mysql-connector-java</artifactId>
        </dependency>
    </dependencies>
修改provider的POM文件
引入Mapper依赖
<dependency>
     <groupId>com.tong</groupId>
     <artifactId>mapper</artifactId>
     <version>1.0-SNAPSHOT</version>
</dependency>
配置provider
配置数据源
################ 配置MySQL数据源 ##############
spring.datasource.driver-class-name=com.mysql.jdbc.Driver
spring.datasource.url=jdbc:mysql://192.168.66.100:3306/txc_his?serverTimezone=UTC
spring.datasource.username=root
spring.datasource.password=123456
添加MapperScan注解
在 SpringBoot 启动类中添加 @MapperScan 注解,扫描 Mapper 文件 夹:
@SpringBootApplication
@MapperScan("com.itbaizhan.mapper")
public class Application {
    public static void main(String[] args) {
       SpringApplication.run(Application.class,args);
   }
}
Dubbo实战_创建添加用户接口
在user_api工程引入pojo工程
<dependency>
     <groupId>com.tong</groupId>
     <artifactId>pojo</artifactId>
     <version>1.0-SNAPSHOT</version>
</dependency>
在user_api项目中创建添加用户接口
public interface IAddUserService {
    /**
     * 添加用户
     * @param users
     */
    void addUser(User users);
}
引入user_api工程
<dependency>
    <groupId>com.tong</groupId>
    <artifactId>user_api</artifactId>
    <version>1.0-SNAPSHOT</version>
</dependency>
添加Dubbo配置
################ Dubbo 配置
####################
dubbo.application.name=myProvider
# 单机
dubbo.registry.address=zookeeper://192.168.66.100:2181
# zookeeper 集群
#dubbo.registry.address=zookeeper://192.168.233.130:2181?
backup=192.168.233.130:2182,192.168.233.130:2183
dubbo.registry.timeout=50000
dubbo.protocol.name=dubbo
dubbo.protocol.port=20880
dubbo.scan.basepackages=com.tong.provider.service
在provider中实现添加用户业务接口
/**
* 添加用户业务
*/
public class AddUserServiceImpl implements IAddUserService {
    @Autowired
    private UserMapper userMapper;
    @Override
    public int addUser(User users) {
        return  userMapper.insert(users);
   }
}
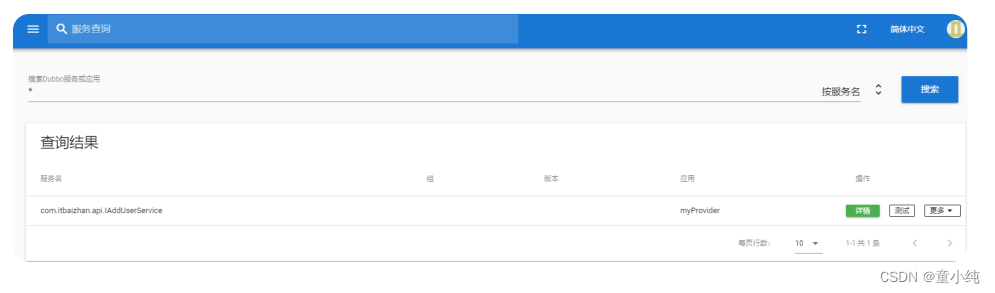
测试添加服务
Dubbo实战_查询用户业务接口
Dubbo实战_查询用户业务接口
public interface FindUserService {
    List<Users> findUserAll();
}
在 provider中实现查询用户业务接口
/**
* 查询用户业务层
*/
@Service
public class FindUserServiceImpl implements IFindUserService {
@Autowired
private UserMapper userMapper;
/**
* 查询用户
* @return
*/
@Override
public List<User> findUserAll() {
return userMapper.selectList(null);
}
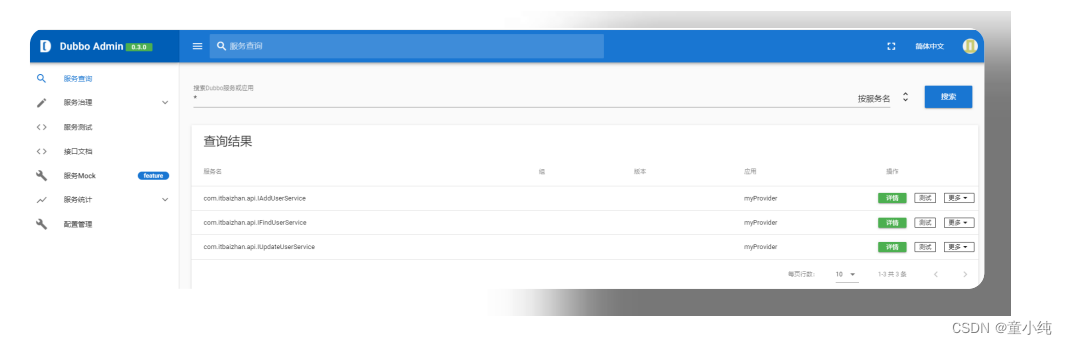
}测试服务

Dubbo实战_更新用户业务接口
在 user_api 项目中添加更新用户业务接口
public interface IUpdateUserService {
   Users preUpdateUsers(Integer userid);
   void updateUsers(Users users);
}
在 provider 中实现更新用户业务接口
/**
 * 更新用户业务
 */
@Service
public class UpdateUserServiceImpl implements IUpdateUserService {
   @Autowired
   private UserMapper userMapper;
   /**
     * 根据用户id更新用户名字
     * @param users
     * @return
     */
   @Override
   public Integer updateUsers(User users) {
       return   userMapper.updateById(users);
   }

}
测试服务
Dubbo实战_删除用户业务接口
在user_api项目中添加删除用户业务接口
public interface IDeleteUserService {
    /**
     * 根据用户id删除用户
     * @param userid
     */
    void deleteUsersById(Integer userid);
}
在provider中实现删除用户业务接口
@Service
public class DeleteUserServiceImpl implements IDeleteUserService {
    @Autowired
    private UserMapper userMapper;
    @Override
    public Integer deleteUsersById(Integer userid) {
        return userMapper.deleteById(userid);
   }
}
测试服务

Dubbo实战_集成Thymeleaf
修改user_consumer工程pom文件
<dependency>
    <groupId>org.springframework.boot</groupId>
    <artifactId>spring-boot-starter-thymeleaf</artifactId>
</dependency>
配置视图解析器
默认
spring-boot很多配置都有默认配置,比如默认页面映射路径为
classpath:/templates/*.html
同样静态文件路径为
classpath:/static/自定义
在application.properties(或者application.yml)中可以配置 thymeleaf模板解析器属性.就像使用springMVC的JSP解析器配置一样
#thymeleaf start
spring.thymeleaf.mode=HTML5
spring.thymeleaf.encoding=UTF-8
spring.thymeleaf.content-type=text/html
#开发时关闭缓存,不然没法看到实时页面
spring.thymeleaf.cache=false
#thymeleaf end
编写index.html首页
<!DOCTYPE html>
<html lang="en" xmlns:th="http://www.thymeleaf.org">
<link rel="shortcut icon" href="../resources/favicon.ico" th:href="@{/static/favicon.ico}"/>
<head>
<meta charset="UTF-8">
<title>首页</title>
</head>
<body>
<a href="/addUser">添加用户</a> <a href="/user/getUser">查询用户</a>
</body>
</html>
创建页面跳转 Controller
@Controller
public class PageController {
   /**
     * 完成页面跳转
     */
   @GetMapping("/{page}")
   public String showPage(@PathVariable String page){
       return page;
   }
}
Dubbo实战_用户添加业务消费者实现
编写adduser.html页面
<!DOCTYPE html>
<html lang="en" xmlns:th="http://www.thymeleaf.org">
<link rel="shortcut icon" href="../resources/favicon.ico"
th:href="@{/static/favicon.ico}"/>
<head>
    <meta charset="UTF-8">
    <title>添加用户</title>
</head>
<body>
<form>
   用户姓名:<input type="text" name="name"/><br/>
   用户年龄:<input type="text" name="age"/><br/>
    <input type="submit" value="OK"/>
</form>
</body>
</html>
编写用户添加接口
/**
* 处理用户操作控制器
*/
@Controller
@RequestMapping("/user")
public class UsersController {
    @Autowired
    private IUserService userService;
    /**
     * 处理添加用户请求
     */
    @RequestMapping("/addUser")
    public String addUser(User users){
        this.userService.addUser(users);
        return "redirect:/ok";
   }
}
编写用户接口
public interface IUserService {
    /**
     * 添加用户
     * @param users
     */
    void addUser(User users);
}
编写用户接口实现类
/**
* 用户操作业务层
*/
@Service
public class UserServiceImpl implements IUserService {
  // 用户添加接口
    @Reference
    private IAddUserService iAddUserService;

    // 添加用户
    @Override
    public void addUser(User users) {
        this.iAddUserService.addUser(users);
   }
}
编写返回页面ok.html
<!DOCTYPE html>
<html lang="en" xmlns:th="http://www.thymeleaf.org">
<link rel="shortcut icon" href="../resources/favicon.ico" th:href="@{/static/favicon.ico}"/>
<head>
    <meta charset="UTF-8">
    <title>成功页面</title>
</head>
<body>
   操作成功请<a href="/index">返回</a>
</body>
</html>
Dubbo实战_用户查询业务消费者实现
修改Consumer添加处理查询用户请求接口
public interface IUserService {
    /**
     * 添加用户
     * @param users
     */
    void addUser(User users);
    /**
     * 查询用户
     * @return
     */
    List<User> getUsersAll();
}
编写接口实现类型
@Reference
private IFindUserService iFindUserService;

/**
* 查询全部用户
* @return
*/
@Override
public List<User> getUsersAll() {
   return iFindUserService.findUserAll();
}
修改Consumer添加处理查询用户请求
    /**
     * 处理查询用户请求
     */
    @GetMapping("/getUser")
    public String getUser(Model model) {
        List<User> list = this.userService.getUsersAll();
        model.addAttribute("list", list);
        return "showUser";
   }
创建showUser 页面
<!DOCTYPE html>
<html lang="en"
xmlns:th="http://www.thymeleaf.org">
<link rel="shortcut icon"
href="../resources/favicon.ico"
      th:href="@{/static/favicon.ico}"/>
<head>
    <meta charset="UTF-8">
    <title>显示用户</title>
</head>
<body>
<table border="1" align="center">
    <tr>
        <th>用户 ID</th>
        <th>用户姓名</th>
        <th>用户年龄</th>
        <th>操作</th>
    </tr>
    <tr th:each="user:${list}">
        <td th:text="${user.id}"></td>
        <td th:text="${user.name}"></td>
        <td th:text="${user.age}"></td>
        <td>
            <a th:href="@{/user/preUpdateUser(userid=${user.id})}">修改用户
            </a>
            <a th:href="@{/user/deleteUser(userid=${user.id})}">删除用户</a>
        </td>
    </tr>
  </table>
</body>