环境:python3.7+TensorFlow
完整代码、模型及参数、详细文档见:手写数字识别完整代码+详细文档+模型参数
文章目录
1 概述
1.1 任务
手写数字识别任务的目的是完成手写数字到数字字符的转化,可以通过神经网络模型对手写数字图像进行特征提取和模式识别。
1.2 数据集
MNIST 是一个经典的手写数字数据集,是手写数字识别任务中最常用的数据集之一。数据集规模:包含 60000 个训练图像和 10000 个测试图像,每个图像都是 28x28 像素大小的灰度图像,即通道数为1。其重要性在于它可以帮助机器学习算法学习手写数字的特征,并进行手写数字识别。
1.3 解决方案
使用TensorFlow框架,其提供了 MNIST 数据集的 API,利用tf.keras搭建卷积神经网络架构,进行模型训练、保存、训练结果可视化,实现对手写数字图像进行特征提取和模式识别。
2 解决方案
import tensorflow as tf
from matplotlib import pyplot as plt
import numpy as np
import os
2.1 加载、查看训练集/测试集
tf.keras提供了MNIST数据集的API,可直接加载:
mnist = tf.keras.datasets.mnist
(x_train, y_train), (x_test, y_test) = mnist.load_data()
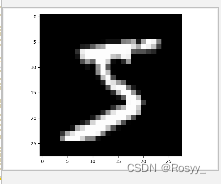
可视化训练集x_train的第一个元素,图片为灰度图,图像尺寸为28x28x1。
plt.imshow(x_train[0], cmap='gray')
plt.show()
查看训练集和测试集的形状:
# 查看训练集x, y的形状
print("x_train.shape:\n", x_train.shape)
print("y_train.shape:\n", y_train.shape)

# 查看测试集x,y的形状
print("x_test.shape:\n", x_test.shape)
print("y_test.shape:\n", y_test.shape)
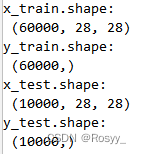
由于图片数据是单通道数,如x_train维度为[60000, 28, 28],但TensorFlow要求输入训练数据维数是4(重要),所以需要对数据做以下处理,并进行归一化操作。
#在TensorFlow中做卷积的时候需要把数据变成4维的格式
#4个维度:数据数量,图片高度,图片宽度,图片通道数
x_train = x_train.reshape(-1, 28, 28, 1)
x_test = x_test.reshape(-1, 28, 28, 1)

#数据归一化
x_train, x_test = x_train / 255.0, x_test / 255.0
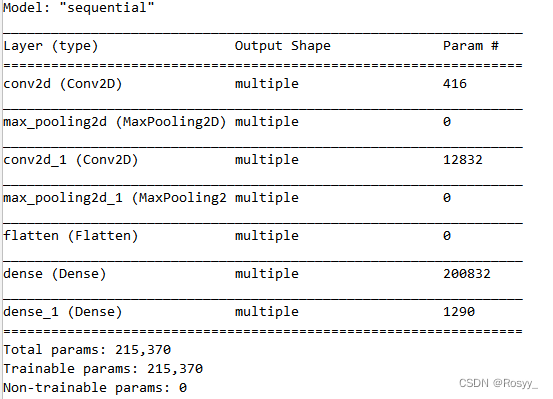
2.2 CNN网络结构设计
如果采用DNN,去掉如下结构的前两层即可。
| Conv1 | 卷积核:5x5x1x16 |
|---|---|
| Conv2 | 卷积核:5x5x16x32 |
| Flatten | |
| Dense1 | 神经元个数:128 |
| Dense2 | 神经元个数:10 |
#--------------------------二、CNN网络结构设计----------------------------------#
model = tf.keras.models.Sequential([
    tf.keras.layers.Conv2D(
        # input_shape=(28, 28, 1),  # 可省略
        kernel_size=5,
        filters=16, #卷积核大小:5*5*1,个数:16
        strides=1, #步长1
        padding="same", #填充:全0填充same/默认不适使用:valid
        activation="relu"  #激活函数:relu/sigmoid/...
        ),
    #输出:28*28*16

    tf.keras.layers.MaxPool2D(2,2), #池化
    # 输出:14*14*16

    tf.keras.layers.Conv2D(
        kernel_size=5,
        filters=32, #卷积核大小5*5*16 个数:32
        strides=1,
        padding="same",
        activation="relu"
    ),
    #输出:14*14*32

    tf.keras.layers.MaxPool2D(2, 2),
    #输出:7*7*32

    tf.keras.layers.Flatten(),  #展平
    tf.keras.layers.Dense(128, activation="relu"), #全连接层1:通常128,64个神经元 激活:relu
    tf.keras.layers.Dense(10, activation="softmax"), #全连接层2:神经元个数为最后输出维度 激活:softmax多分类
])
2.3 设置优化器、损失函数
优化器选择:Adam。
损失函数:交叉熵损失,用于分类。
#-------------------------------三、设置优化器、损失函数-----------------------------------#
model.compile(optimizer='adam', #优化器Adam
              loss=tf.keras.losses.SparseCategoricalCrossentropy(from_logits=False), #损失函数:交叉熵损失
              metrics=['sparse_categorical_accuracy']) #准确率:accuracy:y_/y均为数值;categorical_accuracy:y_/y都是独热码;sparse_categorical_accuracy:y_/y是数值+独热码
2.4 存取模型,断点续训
每训练一个epoch,保存一次模型参数。
tf.keras.callbacks.ModelCheckpoint()函数可以保存模型的权重和偏置,以及训练进度等信息,以便在中断训练后可以恢复到之前的模型状态继续进行训练,即断点续训。
参数含义:filepath 参数指定了保存模型配置的文件路径,save_weights_only 参数指定是否只保存模型权重,save_best_only 参数指定是否只保存最好的模型结果。默认情况下,该回调函数会在每个 epoch 后保存模型配置。
#-------------------------------四、Add:存取模型,断点续训-----------------------#
checkpoint_save_path = "./checkpoint/mnist.ckpt"
if os.path.exists(checkpoint_save_path + '.index'): #index:
    print('------------------------load the model----------------------------')
    model.load_weights(checkpoint_save_path) #加载模型

cp_callback = tf.keras.callbacks.ModelCheckpoint( #保存模型cp_callback
    filepath=checkpoint_save_path,
    save_weights_only=True, #只保存weight
    save_best_only=True #只保存最好的一次
)

#----------------------------五、训练模型-------------------------------#
history = model.fit(x_train, y_train, #训练集数据和标签
          batch_size=32, epochs=5, #批次大小、轮次
          validation_data=(x_test, y_test), #验证集数据
          validation_freq=1, #多少个epoch测试一次
          callbacks=[cp_callback] #已有模型!
          )

#------------------------------六、打印模型结构--------------------------------#
model.summary()

2.5 参数提取、保存
把模型中可训练参数保存至文件weights.txt。
model.trainable_variables 是一个列表,其中包含模型中可训练的变量。
#----------------------------七、参数提取、保存-------------------------------#
np.set_printoptions(threshold=np.inf) #设置输出格式,全部显示(threshold表示超过多少省略显示)
# print(model.trainable_variables)
file = open('./weights.txt', 'w') #设置weights保存路径
for v in model.trainable_variables:
    file.write(str(v.name) + '\n')
    file.write(str(v.shape) + '\n')
    file.write(str(v.numpy()) + '\n')
file.close()#
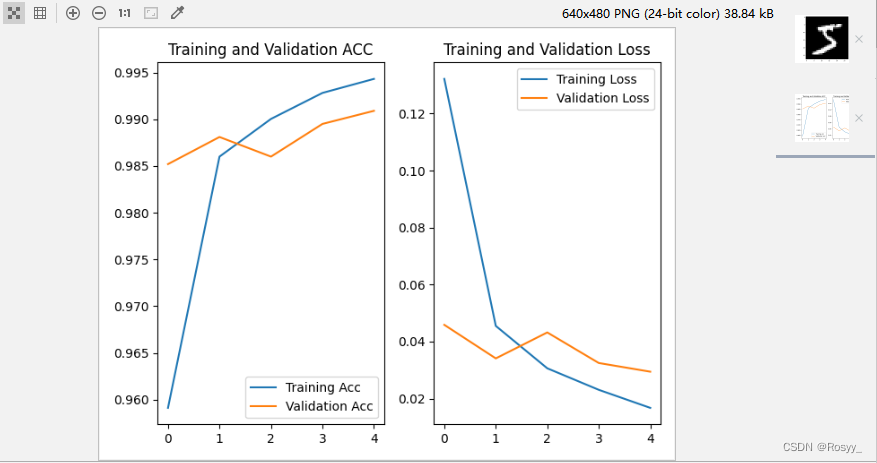
2.6 acc/loss可视化
#-----------------------------八、acc/loss可视化--------------------------------#
#训练集acc/loss
acc = history.history['sparse_categorical_accuracy']
loss = history.history['loss']
#测试集acc/loss
val_acc = history.history['val_sparse_categorical_accuracy']
val_loss = history.history['val_loss']

#acc曲线
plt.subplot(1,2,1)
plt.plot(acc, label='Training Acc')
plt.plot(val_acc, label='Validation Acc')
plt.title('Training and Validation ACC')
plt.legend()

#loss曲线
plt.subplot(1, 2, 2)
plt.plot(loss, label='Training Loss')
plt.plot(val_loss, label='Validation Loss')
plt.title('Training and Validation Loss')
plt.legend()
plt.show()
通过matplotlib库画出训练集和测试集的acc/loss曲线,如下图:
测试集:acc>0.98;loss<0.05。
3 总结
通过手写数字识别任务掌握了TensorFlow框架的使用,掌握了对于tf.keras API的使用,掌握如何通过tf.keras搭建起一个卷积神经网络模型,掌握了如何保存模型参数、如何设置断点续训,掌握了如何利用matplotlib库将训练和测试结果进行可视化。