

目录
SpringAOP_通知类型

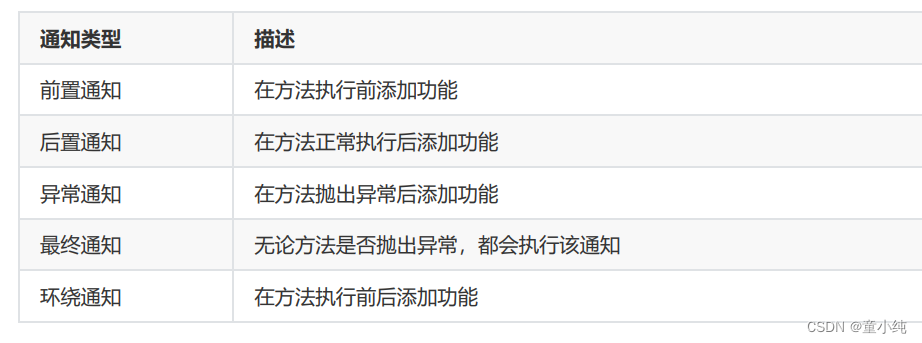
AOP有以下几种常用的通知类型:
1、编写通知方法
// 通知类
public class MyAspectAdvice {
    // 后置通知
    public void myAfterReturning(JoinPoint joinPoint) {
        System.out.println("切点方法名:" + joinPoint.getSignature().getName());
        System.out.println("目标对象:" + joinPoint.getTarget());
        System.out.println("打印日志" + joinPoint.getSignature().getName() + "方法被执行了!");
   }
    // 前置通知
    public void myBefore() {
        System.out.println("前置通知...");
   }
    // 异常通知
    public void myAfterThrowing(Exception ex) {
        System.out.println("异常通知...");
        System.err.println(ex.getMessage());
   }
    // 最终通知
    public void myAfter() {
        System.out.println("最终通知");
   }
    // 环绕通知
    public Object myAround(ProceedingJoinPoint proceedingJoinPoint) throws Throwable {
        System.out.println("环绕前");
        Object obj = proceedingJoinPoint.proceed(); // 执行方法
        System.out.println("环绕后");
        return obj;
   }
}
2、配置切面
<!-- 配置AOP -->
<aop:config>
    <!-- 配置切面 -->
    <aop:aspect ref="myAspectJAdvice">
        <!-- 配置切点 -->
        <aop:pointcut id="myPointcut" expression="execution(* com.tong.dao.UserDao.*(..))"/>
        <!-- 前置通知 -->
        <aop:before method="myBefore" pointcut-ref="myPointcut"></aop:before>
        <!-- 后置通知 -->
        <aop:after-returning method="myAfterReturning" pointcutref="myPointcut"/>
        <!-- 异常通知 -->
        <aop:after-throwing method="myAfterThrowing" pointcutref="myPointcut" throwing="ex"/>
        <!-- 最终通知 -->
        <aop:after method="myAfter" pointcut-ref="myPointcut"></aop:after>
        <!-- 环绕通知 -->
        <aop:around method="myAround" pointcut-ref="myPointcut"></aop:around>
    </aop:aspect>
</aop:config>
SpringAOP_切点表达式

使用AspectJ需要使用切点表达式配置切点位置,写法如下:
1、标准写法:访问修饰符 返回值 包名.类名.方法名(参数列表)
2、访问修饰符可以省略。
3、返回值使用 * 代表任意类型。
4、包名使用 * 表示任意包,多级包结构要写多个 * ,使用 *.. 表示任 意包结构
5、类名和方法名都可以用 * 实现通配。
6、参数列表
基本数据类型直接写类型
引用类型写 包名.类名
* 表示匹配一个任意类型参数
.. 表示匹配任意类型任意个数的参数
7、全通配: * *..*.*(..)
SpringAOP_多切面配置
我们可以为切点配置多个通知,形成多切面,比如希望dao层的每 个方法结束后都可以打印日志并发送邮件:
1、编写发送邮件的通知:
public class MyAspectJAdvice2 {
    // 后置通知
    public void myAfterReturning(JoinPoint joinPoint) {
        System.out.println("发送邮件");
   }
}
2、配置切面:
<!-- 通知对象 -->
<bean id="myAspectJAdvice" class="com.tong.advice.MyAspectAdvice"></bean>
<bean id="myAspectJAdvice2" class="com.tong.advice.MyAspectAdvice2"></bean>
<!-- 配置AOP -->
<aop:config>
    <!-- 配置切面 -->
    <aop:aspect ref="myAspectJAdvice">
        <!-- 配置切点 -->
        <aop:pointcut id="myPointcut" expression="execution(* *..*.*(..))"/>
        <!-- 后置通知 -->
        <aop:after-returning method="myAfterReturning" pointcutref="myPointcut"/>
    </aop:aspect>

    <aop:aspect ref="myAspectJAdvice2">
        <aop:pointcut id="myPointcut2" expression="execution(*com.tong.dao.UserDao.*(..))"/>
        <aop:after-returning method="myAfterReturning" pointcut-ref="myPointcut2"/>
    </aop:aspect>
</aop:config>
SpringAOP_注解配置AOP
Spring可以使用注解代替配置文件配置切面:
1、在xml中开启AOP注解支持
<!-- 开启注解配置Aop -->
<aop:aspectj-autoproxy></aop:aspectj-autoproxy>
2、在通知类上方加入注解 @Aspect
3、在通知方法上方加入注解
@Before/@AfterReturning/@AfterThrowing/@After/@Around@Aspect @Component public class MyAspectAdvice { // 后置通知 @AfterReturning("execution(* com.tong.dao.UserDao.*(..))") public void myAfterReturning(JoinPoint joinPoint) { System.out.println("切点方法名:" + joinPoint.getSignature().getName()); System.out.println("目标对象:" + joinPoint.getTarget()); System.out.println("打印日志" + joinPoint.getSignature().getName() + "方法被执行了!"); } // 前置通知 @Before("execution(* com.tong.dao.UserDao.*(..))") public void myBefore() { System.out.println("前置通知..."); } // 异常通知 @AfterThrowing(value = "execution(* com.tong.dao.UserDao.*(..))",throwing = "ex") public void myAfterThrowing(Exception ex) { System.out.println("异常通知..."); System.err.println(ex.getMessage()); } // 最终通知 @After("execution(* com.tong.dao.UserDao.*(..))") public void myAfter() { System.out.println("最终通知"); } // 环绕通知 @Around("execution(* com.tong.dao.UserDao.*(..))") public Object myAround(ProceedingJoinPoint proceedingJoinPoint) throws Throwable { System.out.println("环绕前"); Object obj = proceedingJoinPoint.proceed(); // 执行方法 System.out.println("环绕后"); return obj; } }
4、测试:
@Test
public void testAdd2(){
    ApplicationContext ac = new ClassPathXmlApplicationContext("bean1.xml");
    UserDao userDao = (UserDao) ac.getBean("userDao");
    userDao.update();
}
如何为一个类下的所有方法统一配置切点:
1、在通知类中添加方法配置切点
@Pointcut("execution(* com.tong.dao.UserDao.*(..))")
public void pointCut(){}
2、在通知方法上使用定义好的切点
@Before("pointCut()")
public void myBefore(JoinPoint joinPoint) {
    System.out.println("前置通知...");
}
@AfterReturning("pointCut()")
public void myAfterReturning(JoinPoint joinPoint) {
    System.out.println("后置通知...");
}
配置类如何代替xml中AOP注解支持?
在配置类上方添加@EnableAspectJAutoProxy即可
@Configuration
@ComponentScan("com.tong")
@EnableAspectJAutoProxy
public class SpringConfig {
}
SpringAOP_原生Spring实现AOP

除了AspectJ,Spring支持原生方式实现AOP。
1、引入依赖
<!-- AOP -->
<dependency>
    <groupId>org.springframework</groupId>
    <artifactId>spring-aop</artifactId>
    <version>5.3.13</version>
</dependency>
2、编写通知类
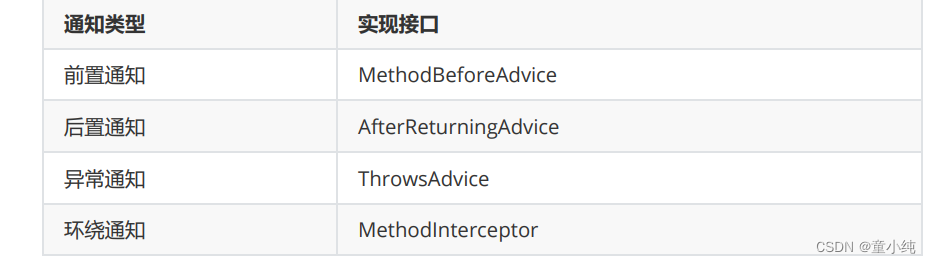
// Spring原生Aop的通知类
public class SpringAop implements MethodBeforeAdvice, AfterReturningAdvice,
ThrowsAdvice, MethodInterceptor {
    /**
     * 前置通知
     * @param method 目标方法
     * @param args 目标方法的参数列表
     * @param target 目标对象
     * @throws Throwable
     */
    @Override
    public void before(Method method, Object[] args, Object target) throws Throwable {
        System.out.println("前置通知");
     }
    /**
     * 后置通知
     * @param returnValue 目标方法的返回值
     * @param method 目标方法
     * @param args 目标方法的参数列表
     * @param target 目标对象
     * @throws Throwable
     */
    @Override
    public void afterReturning(Object returnValue, Method method, Object[] args, Object target) throws Throwable {
        System.out.println("后置通知");
   }
    /**
     * 环绕通知
     * @param invocation 目标方法
     * @return
     * @throws Throwable
     */
    @Override
    public Object invoke(MethodInvocation invocation) throws Throwable {
        System.out.println("环绕前");
        Object proceed = invocation.proceed();
        System.out.println("环绕后");
        return proceed;
   }
    /**
     * 异常通知
     * @param ex 异常对象
     */
    public void afterThrowing(Exception ex){
        System.out.println("发生异常了!");
    }
}
Spring原生方式实现AOP时,只支持四种通知类型:
3、编写配置类
<!-- 通知对象 -->
<bean id="springAop" class="com.tong.advice.SpringAop"></bean>
<!-- 配置代理对象 -->
<bean id="userDaoProxy" class="org.springframework.aop.framework.ProxyFactoryBean">
    <!-- 配置目标对象 -->
    <property name="target" ref="userDao"></property>
    <!-- 配置通知 -->
    <property name="interceptorNames">
        <list>
            <value>springAop</value>
        </list>
    </property>
    <!-- 代理对象的生成方式 true:使用CGLib false:使用原生JDK生成-->
    <property name="proxyTargetClass" value="true"></property>
</bean>
4、编写测试类
public class UserDaoTest2 {
    @Test
    public void testAdd(){
        ApplicationContext ac = new ClassPathXmlApplicationContext("bean2.xml");
        UserDao userDao = (UserDao) ac.getBean("userDaoProxy"); // 获取的是代理对象
        userDao.update();
   }
}
SpringAOP_SchemaBased实现AOP
SchemaBased(基础模式)配置方式是指使用Spring原生方式定义通 知,而使用AspectJ框架配置切面。
1、编写通知类
public class SpringAop implements MethodBeforeAdvice, AfterReturningAdvice,ThrowsAdvice, MethodInterceptor {
    /**
     * 前置通知
     * @param method 目标方法
     * @param args 目标方法的参数列表
     * @param target 目标对象
     * @throws Throwable
     */
    @Override
    public void before(Method method, Object[] args, Object target) throws Throwable {
        System.out.println("前置通知");
     }
    /**
     * 后置通知
     * @param returnValue 目标方法的返回值
     * @param method 目标方法
     * @param args 目标方法的参数列表
     * @param target 目标对象
     * @throws Throwable
     */
    @Override
    public void afterReturning(Object returnValue, Method method, Object[] args, Object target) throws Throwable {
        System.out.println("后置通知");
   }
    /**
     * 环绕通知
     * @param invocation 目标方法
     * @return
     * @throws Throwable
     */
    @Override
    public Object invoke(MethodInvocation invocation) throws Throwable {
        System.out.println("环绕前");
        Object proceed = invocation.proceed();
        System.out.println("环绕后");
        return proceed;
   }
    /**
     * 异常通知
     * @param ex 异常对象
     */
    public void afterThrowing(Exception ex){
        System.out.println("发生异常了!");
   }
}
2、配置切面
<!-- 通知对象 -->
<bean id="springAop2" class="com.tong.aop.SpringAop2"/>
<!-- 配置切面 -->
<aop:config>
    <!-- 配置切点-->
    <aop:pointcut id="myPointcut" expression="execution(* com.tong.dao.UserDao.*(..))"/>
    <!-- 配置切面:advice-ref:通知对象 pointcut-ref:切点 -->
    <aop:advisor advice-ref="springAop2" pointcut-ref="myPointcut"/>
</aop:config>
3、测试
@Test
public void t6(){
    ApplicationContext ac = new ClassPathXmlApplicationContext("aop3.xml");
    UserDao userDao = (UserDao) ac.getBean("userDao");
    userDao.add();
}
复习:
IOC_对象的创建方式

Spring会帮助我们创建bean,那么它底层是调用什么方法进行创建 的呢?
使用构造方法
Spring默认使用类的空参构造方法创建bean:
// 假如类没有空参构造方法,将无法完成bean的创建
public class StudentDaoImpl implements StudentDao{
    public StudentDaoImpl(int a){}
    @Override
    public Student findById(int id) {
        // 模拟根据id查询学生
        return new Student(1,"程序员","北京");
   }
}
使用工厂类的方法
Spring可以调用工厂类的方法创建bean:
1、创建工厂类,工厂类提供创建对象的方法:
public class StudentDaoFactory {
    public StudentDao getStudentDao(){
        return new StudentDaoImpl(1);
   }
}
2 在配置文件中配置创建bean的方式为工厂方式。
<!-- id:工厂对象的id,class:工厂类 -->
<bean id="studentDaoFactory" class="com.tong.dao.StudentDaoFactory"></bean>
<!-- id:bean对象的id,factory-bean:工厂对象 的id,factory-method:工厂方法 -->
<bean id="studentDao" factorybean="studentDaoFactory" factory-method="getStudentDao"></bean>
3 测试
使用工厂类的静态方法
Spring可以调用工厂类的静态方法创建bean:
1 创建工厂类,工厂提供创建对象的静态方法。
public class StudentDaoFactory2 {
    public static StudentDao getStudentDao2() {
        return new StudentDaoImpl();
   }
}
2 在配置文件中配置创建bean的方式为工厂静态方法。
<!-- id:bean的id class:工厂全类名 factory-method:工厂静态方法   -->
<bean id="studentDao" class="com.tong.dao.StudentDaoFactory2" factory-method="getStudentDao2"></bean>
3 测试
IOC_对象的创建策略
 Spring通过配置 中的 scope 属性设置对象的创建策略,共有五种创建策略
1、singleton:单例,默认策略。整个项目只会创建一个对象,通过中的 lazy-init 属性可以设置单例对象的创建时机:
lazy-init="false"(默认):立即创建,在容器启动时会创建配 置文件中的所有Bean对象。 lazy-init="true":延迟创建,第一次使用Bean对象时才会创 建。
配置单例策略:
<!--   <bean id="studentDao" class="com.tong.dao.StudentDaoImpl2" scope="singleton" lazy-init="true"> </bean>-->
<bean id="studentDao" class="com.tong.dao.StudentDaoImpl2" scope="singleton" lazy-init="false">
</bean>
测试单例策略:
// 为Bean对象的类添加构造方法
public StudentDaoImpl2(){
    System.out.println("创建 StudentDao!!!");
}
@Test
public void t2(){
    // 创建Spring容器
    ApplicationContext ac = new ClassPathXmlApplicationContext("bean1.xml");
    // 从容器获取对象
    StudentDao studentDao1 = (StudentDao)ac.getBean("studentDao");
    StudentDao studentDao2 = (StudentDao)ac.getBean("studentDao");
    StudentDao studentDao3 = (StudentDao)ac.getBean("studentDao");
    System.out.println(studentDao1.hashCode());
    System.out.println(studentDao2.hashCode());
    System.out.println(studentDao3.hashCode());
}
2、prototype:多例,每次从容器中获取时都会创建对象。
<!-- 配置多例策略 -->
<bean id="studentDao"  class="com.tong.dao.StudentDaoImpl2" scope="prototype"></bean>
3、request:每次请求创建一个对象,只在web环境有效。
4、session:每次会话创建一个对象,只在web环境有效。
5、gloabal-session:一次集群环境的会话创建一个对象,只在web 环境有效。
IOC_对象的销毁时机
对象的创建策略不同,销毁时机也不同:
singleton:对象随着容器的销毁而销毁。
prototype:使用JAVA垃圾回收机制销毁对象。
request:当处理请求结束,bean实例将被销毁。
session:当HTTP Session最终被废弃的时候,bean也会被销毁掉。
gloabal-session:集群环境下的session销毁,bean实例也将被销毁。
IOC_生命周期方法
Bean对象的生命周期包含创建——使用——销毁,Spring可以配置 Bean对象在创建和销毁时自动执行的方法:
1 定义生命周期方法
public class StudentDaoImpl2 implements StudentDao{
     // 创建时自动执行的方法
    public void init(){
        System.out.println("创建StudentDao!!!");
   }
    // 销毁时自动执行的方法
    public void destory(){
        System.out.println("销毁StudentDao!!!");
   }
}
2 配置生命周期方法
<!-- init-method:创建对象时执行的方法  destroy-method:销毁对象时执行的方法 -->
<bean id="studentDao" class="com.tong.dao.StudentDaoImpl2" scope="singleton"
      init-method="init" destroy-method="destory"></bean>
3 测试
@Test
public void t3(){
    // 创建Spring容器
    ClassPathXmlApplicationContext ac = new ClassPathXmlApplicationContext("bean1.xml");
    // 销毁Spring容器,ClassPathXmlApplicationContext才有销毁容器的方法
    ac.close();
}
IOC_获取Bean对象的方式

Spring有多种获取容器中对象的方式:
通过id/name获取
配置文件
<bean name="studentDao" class="com.tong.dao.StudentDaoImpl2"></bean>
<bean id="studentDao" class="com.tong.dao.StudentDaoImpl2"></bean>
获取对象
StudentDao studentDao = (StudentDao) ac.getBean("studentDao");通过类型获取
配置文件
<bean name="studentDao" class="com.tong.dao.StudentDaoImpl2"></bean>获取对象
StudentDao studentDao2 = ac.getBean(StudentDao.class);
通过类型+id/name获取
虽然使用类型获取不需要强转,但如果在容器中有一个接口的多个 实现类对象,则获取时会报错,此时需要使用类型+id/name获取
配置文件
<bean name="studentDao" class="com.tong.dao.StudentDaoImpl2"></bean>
<bean name="studentDao1" class="com.tong.dao.StudentDaoImpl"></bean>
获取对象
StudentDao studentDao2 = ac.getBean("studentDao",StudentDao.class);DI_什么是依赖注入

依赖注入(Dependency Injection,简称DI),它是Spring控制反 转思想的具体实现。 控制反转将对象的创建交给了Spring,但是对象中可能会依赖其他 对象。比如service类中要有dao类的属性,我们称service依赖于 dao。之前需要手动注入属性值,代码如下:
public interface StudentDao {
    Student findById(int id);
}
public class StudentDaoImpl implements StudentDao{
    @Override
    public Student findById(int id) {
        // 模拟根据id查询学生
        return new Student(1,"程序员","北京");
   }
}
public class StudentService {
  // service依赖dao,手动注入属性值,即手动维护依赖关系
    private StudentDao studentDao = new StudentDaoImpl();
    public Student findStudentById(int id){
        return studentDao.findById(id);
   }
}
此时,当StudentService的想要使用StudentDao的另一个实现类如 StudentDaoImpl2时,则需要修改Java源码,造成代码的可维护性 降低。 而使用Spring框架后,Spring管理Service对象与Dao对象,此时它 能够为Service对象注入依赖的Dao属性值。这就是Spring的依赖注 入。简单来说,控制反转是创建对象,依赖注入是为对象的属性赋 值。
DI_依赖注入方式
在之前开发中,可以通过setter方法或构造方法设置对象属性值:
// setter方法设置属性
StudentService studentService = new StudentService();
StudentDao studentDao = new StudentDao();
studentService.setStudentDao(studentDao);
// 构造方法设置属性
StudentDao studentDao = new StudentDao();
StudentService studentService = new StudentService(studentDao);
Spring可以通过调用setter方法或构造方法给属性赋值
Setter注入
被注入类编写属性的setter方法
public class StudentService {
    private StudentDao studentDao;
    public void setStudentDao(StudentDao studentDao) {
        this.studentDao = studentDao;
   }
}
配置文件中,给需要注入属性值的<bean> 中设置<property>
<bean id="studentDao" class="com.itbaizhan.dao.StudentDaoImpl"></bean>
<bean id="studentService" class="com.itbaizhan.service.StudentService">
    <!--依赖注入-->
    <!--name:对象的属性名 ref:容器中对象的id值-->
    <property name="studentDao" ref="studentDao"></property>
</bean>
测试是否注入成功
@Test
public void t2(){
    ApplicationContext ac = new ClassPathXmlApplicationContext("bean.xml");
    StudentService studentService = (StudentService) ac.getBean("studentService");
    System.out.println(studentService.findStudentById(1));
}
构造方法注入
被注入类编写有参的构造方法
public class StudentService {
    private StudentDao studentDao;
    public StudentService(StudentDao studentDao) {
        this.studentDao = studentDao;
   }
}
给需要注入属性值的<bean> 中设置<constructor-arg>
<bean id="studentDao" class="com.tong.dao.StudentDaoImpl"></bean>
<bean id="studentService" class="com.tong.service.StudentService">
    <!-- 依赖注入 -->
    <!-- name:对象的属性名 ref:配置文件中注入对象的id值 -->
    <constructor-arg name="studentDao" ref="studentDao"></constructor-arg>
</bean>
测试是否注入成功
@Test
public void t2(){
    ApplicationContext ac = new ClassPathXmlApplicationContext("bean.xml");
    StudentService studentService =(StudentService) ac.getBean("studentService");
  System.out.println(studentService.findStudentById(1));
}