文章目录
SHELL中microPython命令行
SHELL中基于microPython的控制代码
Tips:一般采用Thonny进行控制,可参考博文:
如果是采用其他串口软件进行控制,采用的波特率是115200。
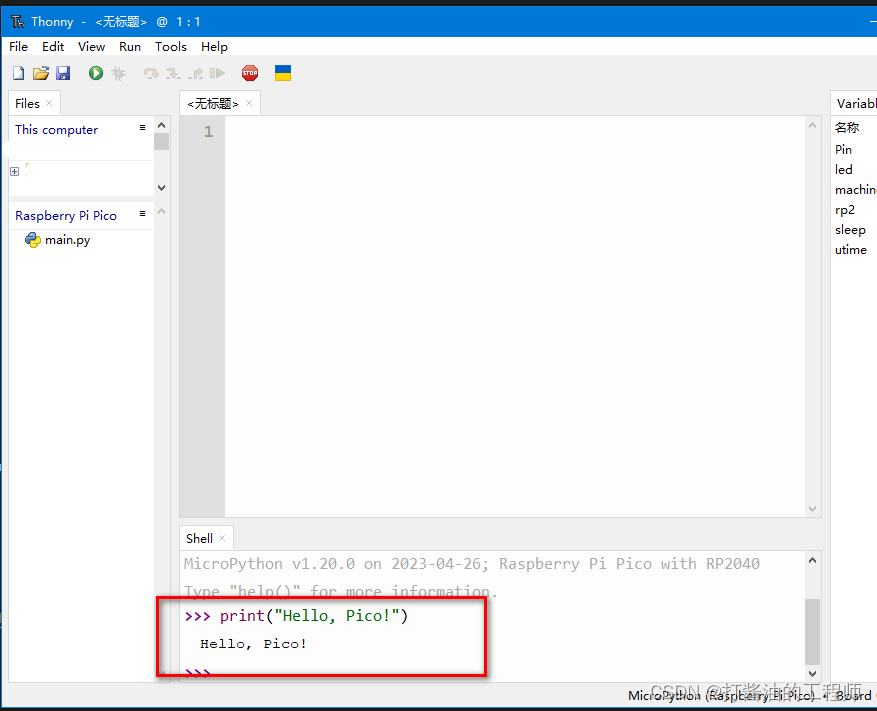
Hello Pico 代码
在 Shell 中输入以下命令,Pico 会显示
Hello, Pico!
print("Hello, Pico!")
SHELL中简单点灯代码
在 Shell 中输入以下命令
from machine import Pin #导入Pin控制库
led = Pin(25, Pin.OUT) #初始化led
led.value(1) # 亮灯
led.value(0) # 灭灯
SHELL中循环亮灯代码
Pico 将执行三次亮灯灭灯循环,最后输出 Loop End
from machine import Pin
import utime
LED=Pin(25,Pin.OUT)
v = 1
while v < 4:
    LED(1)
    utime.sleep(1)
    LED(0)
    utime.sleep(1)
    v += 1

    LED(1)
    utime.sleep(1)
    LED(0)
    utime.sleep(1)
    v += 1

    LED(1)
    utime.sleep(1)
    LED(0)
    utime.sleep(1)
    v += 1

    print('LED closed!') # 输出结束语句
基于pico sdk开发环境搭建及点灯代码
必备开发工具
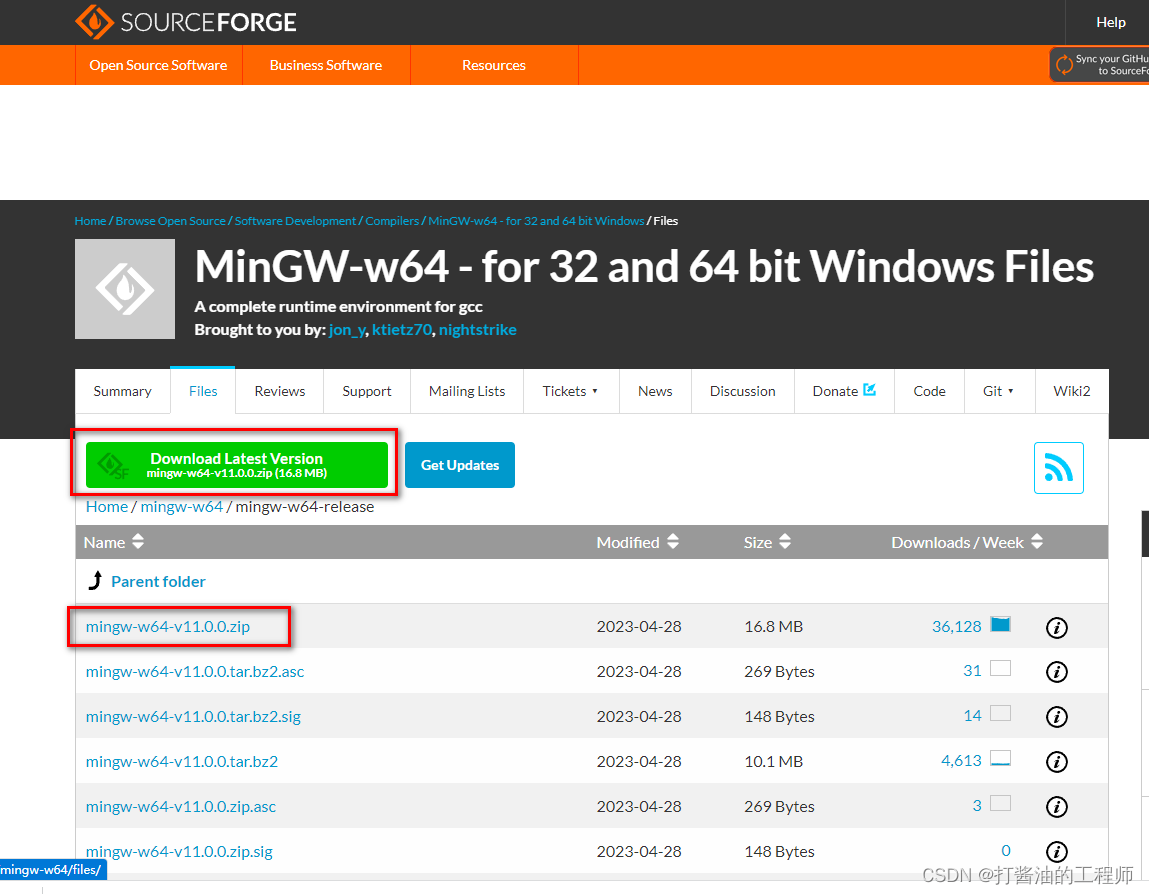
Mingw-w64:著名C/C++编译器GCC
下载地址:https://sourceforge.net/projects/mingw-w64/files/mingw-w64/mingw-w64-release/
mingw-w64-v11.0.0.zip需要在本地编译。
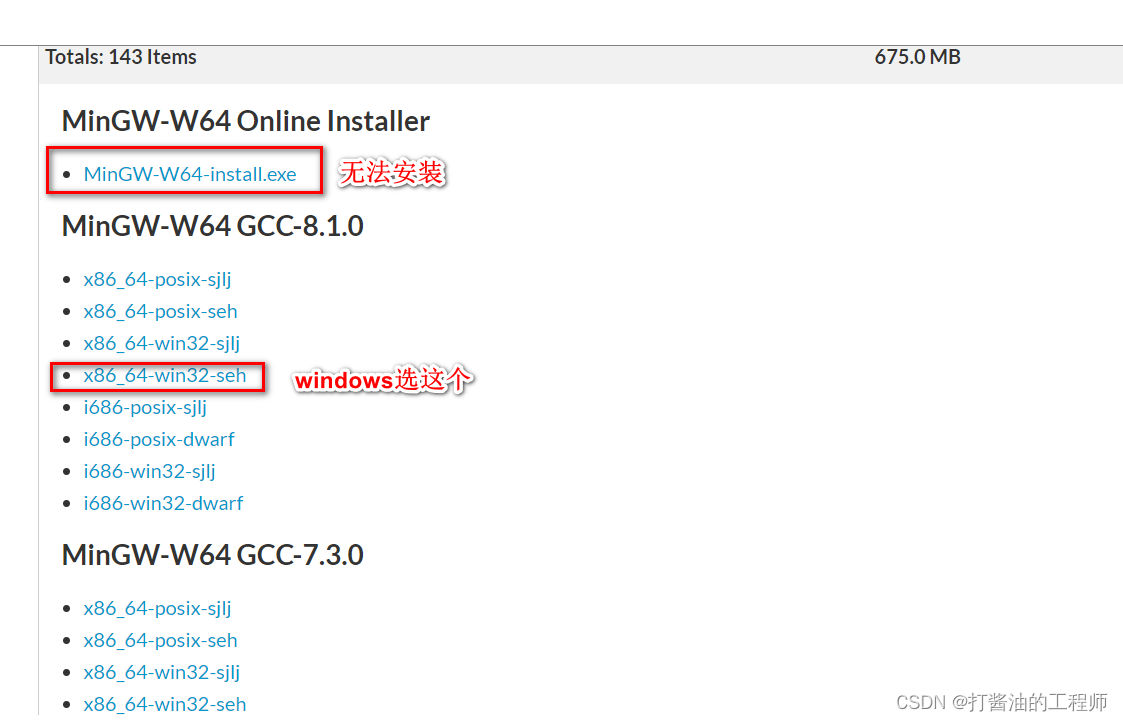
往下拉,编译好的版本选:x86_64-win32-seh,
下载:x86_64-8.1.0-release-win32-seh-rt_v6-rev0.7z
解压后将bin目录加入系统path即可。
测试命令:mingw32-make -v
正确安装返回值:
GNU Make 4.2.1
Built for x86_64-w64-mingw32
Copyright (C) 1988-2016 Free Software Foundation, Inc.
License GPLv3+: GNU GPL version 3 or later <http://gnu.org/licenses/gpl.html>
This is free software: you are free to change and redistribute it.
There is NO WARRANTY, to the extent permitted by law.
arm-none-eabi:交叉编译工具
下载地址:https://developer.arm.com/downloads/-/arm-gnu-toolchain-downloads
可选择:arm-gnu-toolchain-12.2.MPACBTI-Rel1-mingw-w64-i686-arm-none-eabi.exe
安装:安装时选择将bin路径加入系统path。
测试命令:arm-none-eabi-gcc -v
正确安装返回值:
Using built-in specs.
COLLECT_GCC=arm-none-eabi-gcc
COLLECT_LTO_WRAPPER=g:/arm-gnu-toolchain/12.2\ mpacbti-rel1/bin/../libexec/gcc/arm-none-eabi/12.2.1/lto-wrapper.exe
Target: arm-none-eabi
Configured with: /data/jenkins/workspace/GNU-toolchain/arm-12-mpacbti/src/gcc/configure --target=arm-none-eabi --prefix=/data/jenkins/workspace/GNU-toolchain/arm-12-mpacbti/build-mingw-arm-none-eabi/install --with-gmp=/data/jenkins/workspace/GNU-toolchain/arm-12-mpacbti/build-mingw-arm-none-eabi/host-tools --with-mpfr=/data/jenkins/workspace/GNU-toolchain/arm-12-mpacbti/build-mingw-arm-none-eabi/host-tools --with-mpc=/data/jenkins/workspace/GNU-toolchain/arm-12-mpacbti/build-mingw-arm-none-eabi/host-tools --with-isl=/data/jenkins/workspace/GNU-toolchain/arm-12-mpacbti/build-mingw-arm-none-eabi/host-tools --disable-shared --disable-nls --disable-threads --disable-tls --enable-checking=release --enable-languages=c,c++,fortran --with-newlib --with-gnu-as --with-gnu-ld --with-sysroot=/data/jenkins/workspace/GNU-toolchain/arm-12-mpacbti/build-mingw-arm-none-eabi/install/arm-none-eabi --with-multilib-list=aprofile,rmprofile --with-libiconv-prefix=/data/jenkins/workspace/GNU-toolchain/arm-12-mpacbti/build-mingw-arm-none-eabi/host-tools --host=i686-w64-mingw32 --with-pkgversion='Arm GNU Toolchain 12.2.MPACBTI-Rel1 (Build arm-12-mpacbti.34)' --with-bugurl=https://bugs.linaro.org/
Thread model: single
Supported LTO compression algorithms: zlib
gcc version 12.2.1 20230214 (Arm GNU Toolchain 12.2.MPACBTI-Rel1 (Build arm-12-mpacbti.34))
Git:开源的分布式版本控制系统
测试命令:git --version
正确安装返回值:
git version 2.23.0.windows.1
cmake:生成makefile
下载地址:https://cmake.org/download/
安装:cmake-3.26.4-windows-x86_64,将bin路径加入系统path。
测试命令:cmake -h
正确安装返回值:
Usage

  cmake [options] <path-to-source>
  cmake [options] <path-to-existing-build>
  cmake [options] -S <path-to-source> -B <path-to-build>

Specify a source directory to (re-)generate a build system for it in the
current working directory.  Specify an existing build directory to
re-generate its build system.

Options
  -S <path-to-source>          = Explicitly specify a source directory.
  -B <path-to-build>           = Explicitly specify a build directory.
  -C <initial-cache>           = Pre-load a script to populate the cache.
  -D <var>[:<type>]=<value>    = Create or update a cmake cache entry.
  -U <globbing_expr>           = Remove matching entries from CMake cache.
  -G <generator-name>          = Specify a build system generator.
  -T <toolset-name>            = Specify toolset name if supported by
                                 generator.
  -A <platform-name>           = Specify platform name if supported by
                                 generator.
python:需要3.7.0以上。
安装及设置环境变量
git必要的仓库
必备库:pico-sdk和pico-examples
执行命令:
  cd G:\bsp\RP2040
  git clone -b master https://github.com/raspberrypi/pico-sdk.git
  cd pico-sdk/
  git submodule update --init
  cd ..
  git clone -b master https://github.com/raspberrypi/pico-examples.git
建议clone到本地的模板生成库(介绍可参考官方文档):
git clone https://github.com/raspberrypi/pico-project-generator.git
编译准备
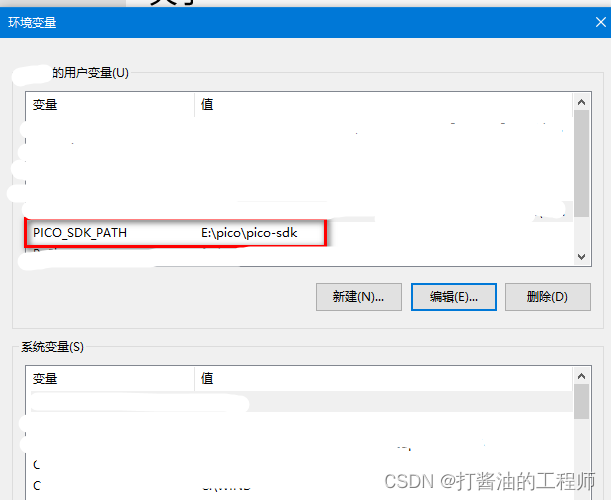
首先添加pico环境变量:
将pico-sdk的根目录路径添加到新建PICO_SDK_PATH中,如:
设置工具链路径,例如:
PICO_TOOLCHAIN_PATH=F:\dev\GNU Tools Arm Embedded\9 2019-q4-major\bin
执行CMD,并将当前目录变更为进入pico-examples根目录,并在其中新建build子文件夹。
cd pico-examples
mkdir build
cd build
进入build文件夹:
在当前目录下执行:
cmake -G "MinGW Makefiles" ..
执行结果为:
Using PICO_SDK_PATH from environment ('G:\bsp\RP2040\pico-sdk')
PICO_SDK_PATH is G:/bsp/RP2040/pico-sdk
Defaulting PICO_PLATFORM to rp2040 since not specified.
Defaulting PICO platform compiler to pico_arm_gcc since not specified.
-- Defaulting build type to 'Release' since not specified.
PICO compiler is pico_arm_gcc
-- The C compiler identification is GNU 12.2.1
-- The CXX compiler identification is GNU 12.2.1
-- The ASM compiler identification is GNU
-- Found assembler: G:/arm-gnu-toolchain/12.2 mpacbti-rel1/bin/arm-none-eabi-gcc.exe
-- Detecting C compiler ABI info
-- Detecting C compiler ABI info - done
-- Check for working C compiler: G:/arm-gnu-toolchain/12.2 mpacbti-rel1/bin/arm-none-eabi-gcc.exe - skipped
-- Detecting C compile features
-- Detecting C compile features - done
-- Detecting CXX compiler ABI info
-- Detecting CXX compiler ABI info - done
-- Check for working CXX compiler: G:/arm-gnu-toolchain/12.2 mpacbti-rel1/bin/arm-none-eabi-g++.exe - skipped
-- Detecting CXX compile features
-- Detecting CXX compile features - done
Build type is Release
Defaulting PICO target board to pico since not specified.
Using board configuration from G:/bsp/RP2040/pico-sdk/src/boards/include/boards/pico.h
-- Found Python3: D:/ProgramData/Anaconda3/python.exe (found version "3.9.7") found components: Interpreter
TinyUSB available at G:/bsp/RP2040/pico-sdk/lib/tinyusb/src/portable/raspberrypi/rp2040; enabling build support for USB.
BTstack available at G:/bsp/RP2040/pico-sdk/lib/btstack
lwIP available at G:/bsp/RP2040/pico-sdk/lib/lwip
mbedtls available at G:/bsp/RP2040/pico-sdk/lib/mbedtls
Skipping TinyUSB dual examples, as TinyUSB hw/mcu/raspberry_pi/Pico-PIO-USB submodule unavailable
-- Configuring done (9.2s)
-- Generating done (4.2s)
-- Build files have been written to: G:/bsp/RP2040/pico-examples/build
正式编译
默认情况下,SDK将构建针对Raspberry Pi Pico的二进制文件。如果您正在构建一个二进制的不同
board你需要通过 -DPICO_BOARD=board其中board是board的名称。例如,如果你正在建造一个Pico W
您应该传递-DPICO_BOARD=pico_w以及有关您的无线网络的信息
-DWIFI_SSID=“Your Network” -DWIFI_PASSWORD=“Your Password”.
CMake现在为pico-examples树准备了一个构建区。从这里开始,可以键入make来构建所有示例
应用程序。然而,由于我们正在构建blink,我们现在只会通过将directory更改为blink,在键入make之前,请先查看并进入目录。
提示
用-j4调用make将并行运行四个make作业以加快速度。Raspberry Pi 4有4个内核,所以-j4是Raspberry Pi 4的合理的数量。
cd blink
mingw32-make -j 8
或
make -j 8
-j 4 -j 8的表示用4个或8个线程编译,加快编译速度,可选参数。
如果在build根目录下,则执行全部release编译。
编译显示:
E:\pico\pico-examples\build>mingw32-make -j8
Scanning dependencies of target bs2_default
[  0%] Performing build step for 'ELF2UF2Build'
[  0%] Performing build step for 'PioasmBuild'
[  0%] Built target bs2_default
[  0%] Built target bs2_default_padded_checksummed_asm
Consolidate compiler generated dependencies of target elf2uf2
Consolidate compiler generated dependencies of target pioasm
[100%] Built target elf2uf2
[100%] Built target pioasm
[  0%] No install step for 'ELF2UF2Build'
[  0%] No install step for 'PioasmBuild'
[  0%] Completed 'ELF2UF2Build'
[  0%] Completed 'PioasmBuild'
[  0%] Built target ELF2UF2Build
[  0%] Built target PioasmBuild
编译完成:
Scanning dependencies of target pio_ws2812
Scanning dependencies of target adc_dma_capture
Scanning dependencies of target pio_ir_loopback
Consolidate compiler generated dependencies of target pio_st7789_lcd
Consolidate compiler generated dependencies of target pio_uart_rx_intr
Consolidate compiler generated dependencies of target pio_ws2812_parallel
Consolidate compiler generated dependencies of target pio_uart_tx
Consolidate compiler generated dependencies of target pio_uart_rx
Consolidate compiler generated dependencies of target pio_ws2812
Consolidate compiler generated dependencies of target pio_ir_loopback
Consolidate compiler generated dependencies of target adc_dma_capture
[ 93%] Built target pio_uart_rx_intr
[ 94%] Built target pio_uart_tx
[ 95%] Built target pio_st7789_lcd
[ 96%] Built target pio_ws2812_parallel
[ 97%] Built target pio_uart_rx
[ 98%] Built target pio_ws2812
[ 99%] Built target pio_ir_loopback
[100%] Built target adc_dma_capture
以blink(点灯例程)为例,生成文件结构如下:
名称	大小	修改日期
CMakeFiles/		2023/6/27 14:15:24
elf2uf2/		2023/6/27 11:23:21
blink.bin	8.6 kB	2023/6/27 11:26:22
blink.dis	158 kB	2023/6/27 11:26:22
blink.elf	30.4 kB	2023/6/27 11:26:21
blink.elf.map	155 kB	2023/6/27 11:26:21
blink.hex	24.2 kB	2023/6/27 11:26:22
blink.uf2	17.5 kB	2023/6/27 11:26:22
cmake_install.cmake	1.2 kB	2023/6/27 11:23:46
Makefile	73.3 kB	2023/6/27 11:23:46
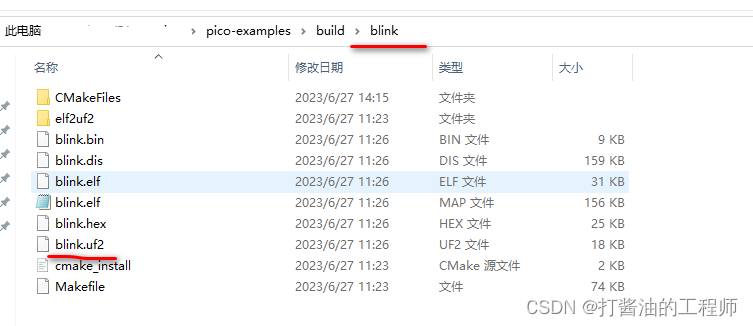
•blink.Elf,由调试器使用
•blink.uf2,可以拖放到RP2040 USB大容量存储设备上运行
点灯测试
按住BOOT键后上电,电脑弹出虚拟U盘,将.uf2文件拖拽或发送至树莓pico的虚拟U盘中,自动重启并运行下载后的程序。
Tips:查看gcc涉及到的所有include文件目录
以F:\dev\mingw-w64\bin下的gcc.exe作为编译器为例(已加入系统path),
要查看gcc涉及到的所有include文件目录的命令为:
gcc.exe -v -E -x c++ -
E:\pico\pico-examples\build>gcc.exe -v -E -x c++ -
Using built-in specs.
COLLECT_GCC=gcc.exe
Target: x86_64-w64-mingw32
Configured with: ../../../src/gcc-8.1.0/configure --host=x86_64-w64-mingw32 --build=x86_64-w64-mingw32 --target=x86_64-w64-mingw32 --prefix=/mingw64 --with-sysroot=/c/mingw810/x86_64-810-win32-seh-rt_v6-rev0/mingw64 --enable-shared --enable-static --disable-multilib --enable-languages=c,c++,fortran,lto --enable-libstdcxx-time=yes --enable-threads=win32 --enable-libgomp --enable-libatomic --enable-lto --enable-graphite --enable-checking=release --enable-fully-dynamic-string --enable-version-specific-runtime-libs --disable-libstdcxx-pch --disable-libstdcxx-debug --enable-bootstrap --disable-rpath --disable-win32-registry --disable-nls --disable-werror --disable-symvers --with-gnu-as --with-gnu-ld --with-arch=nocona --with-tune=core2 --with-libiconv --with-system-zlib --with-gmp=/c/mingw810/prerequisites/x86_64-w64-mingw32-static --with-mpfr=/c/mingw810/prerequisites/x86_64-w64-mingw32-static --with-mpc=/c/mingw810/prerequisites/x86_64-w64-mingw32-static --with-isl=/c/mingw810/prerequisites/x86_64-w64-mingw32-static --with-pkgversion='x86_64-win32-seh-rev0, Built by MinGW-W64 project' --with-bugurl=https://sourceforge.net/projects/mingw-w64 CFLAGS='-O2 -pipe -fno-ident -I/c/mingw810/x86_64-810-win32-seh-rt_v6-rev0/mingw64/opt/include -I/c/mingw810/prerequisites/x86_64-zlib-static/include -I/c/mingw810/prerequisites/x86_64-w64-mingw32-static/include' CXXFLAGS='-O2 -pipe -fno-ident -I/c/mingw810/x86_64-810-win32-seh-rt_v6-rev0/mingw64/opt/include -I/c/mingw810/prerequisites/x86_64-zlib-static/include -I/c/mingw810/prerequisites/x86_64-w64-mingw32-static/include' CPPFLAGS=' -I/c/mingw810/x86_64-810-win32-seh-rt_v6-rev0/mingw64/opt/include -I/c/mingw810/prerequisites/x86_64-zlib-static/include -I/c/mingw810/prerequisites/x86_64-w64-mingw32-static/include' LDFLAGS='-pipe -fno-ident -L/c/mingw810/x86_64-810-win32-seh-rt_v6-rev0/mingw64/opt/lib -L/c/mingw810/prerequisites/x86_64-zlib-static/lib -L/c/mingw810/prerequisites/x86_64-w64-mingw32-static/lib '
Thread model: win32
gcc version 8.1.0 (x86_64-win32-seh-rev0, Built by MinGW-W64 project)
COLLECT_GCC_OPTIONS='-v' '-E' '-mtune=core2' '-march=nocona'
 F:/dev/mingw-w64/bin/../libexec/gcc/x86_64-w64-mingw32/8.1.0/cc1plus.exe -E -quiet -v -iprefix F:/dev/mingw-w64/bin/../lib/gcc/x86_64-w64-mingw32/8.1.0/ -U_REENTRANT - -mtune=core2 -march=nocona
ignoring duplicate directory "F:/dev/mingw-w64/lib/gcc/../../lib/gcc/x86_64-w64-mingw32/8.1.0/include/c++"
ignoring duplicate directory "F:/dev/mingw-w64/lib/gcc/../../lib/gcc/x86_64-w64-mingw32/8.1.0/include/c++/x86_64-w64-mingw32"
ignoring duplicate directory "F:/dev/mingw-w64/lib/gcc/../../lib/gcc/x86_64-w64-mingw32/8.1.0/include/c++/backward"
ignoring duplicate directory "F:/dev/mingw-w64/lib/gcc/../../lib/gcc/x86_64-w64-mingw32/8.1.0/include"
ignoring nonexistent directory "C:/mingw810/x86_64-810-win32-seh-rt_v6-rev0/mingw64C:/msys64/mingw64/lib/gcc/x86_64-w64-mingw32/8.1.0/../../../../include"
ignoring duplicate directory "F:/dev/mingw-w64/lib/gcc/../../lib/gcc/x86_64-w64-mingw32/8.1.0/include-fixed"
ignoring duplicate directory "F:/dev/mingw-w64/lib/gcc/../../lib/gcc/x86_64-w64-mingw32/8.1.0/../../../../x86_64-w64-mingw32/include"
ignoring nonexistent directory "C:/mingw810/x86_64-810-win32-seh-rt_v6-rev0/mingw64/mingw/include"
#include "..." search starts here:
#include <...> search starts here:
 F:/dev/mingw-w64/bin/../lib/gcc/x86_64-w64-mingw32/8.1.0/include/c++
 F:/dev/mingw-w64/bin/../lib/gcc/x86_64-w64-mingw32/8.1.0/include/c++/x86_64-w64-mingw32
 F:/dev/mingw-w64/bin/../lib/gcc/x86_64-w64-mingw32/8.1.0/include/c++/backward
 F:/dev/mingw-w64/bin/../lib/gcc/x86_64-w64-mingw32/8.1.0/include
 F:/dev/mingw-w64/bin/../lib/gcc/x86_64-w64-mingw32/8.1.0/include-fixed
 F:/dev/mingw-w64/bin/../lib/gcc/x86_64-w64-mingw32/8.1.0/../../../../x86_64-w64-mingw32/include
End of search list.
Tips:SHELL中查看micropython版本及pico类型
Pi Pico 还是 PICO W?
我在哪个硬件上运行?
用MicroPython编写的软件没有直接的方法可以通过查看硬件来发现它是在Raspberry Pi Pico还是Pico W上运行。然而,你可以通过查看网络功能是否包含在你的特定MicroPython固件中来间接判断:
import network
if hasattr(network, "WLAN"):
   print("the board has WLAN capabilities")
else:
    print("the board hasn't WLAN!")
通过打印输出是否有wlan功能来判断!
还可以采用sys模块,检查MicroPython固件版本,以检查它是为Raspberry Pi Pico还是Pico W编译的:
>>> import sys
>>> sys.implementation
(name='micropython', version=(1, 20, 0), _machine='Raspberry Pi Pico with RP2040', _mpy=4358)