目录
前言
写程序的时候或遇到电脑中一些问题,有时候会去下载专门的软件去远程协助。但是我想用程序自己去实现远程控制桌面的功能。原以为网上到处都是,结果找了好几天,要么文章杂乱无序,要么都要结合微信等等。
于是我只能在众多代码中百里挑一选取自己需要的那一小部分,然后不断地拼凑,不断地理解大神的代码,最终做出这么一个远程控制桌面功能。我热泪盈眶地望着写好的代码,中间好几次拼不对或遇到bug导致程序无数次崩溃,差点就想放弃了......
以下是参考网站的名单:
1.全网最全免费内网穿透映射工具教程:https://www.bilibili.com/video/BV1Ja4y1J7Fj?
2.配套博客地址:https://www.it235.com/实用工具/内网穿透/pierce.html
一、实现思路
1. 你和对方建立一个Socket链接(协议是tcp/ip这种有状态协议)
2. 对方系统会在这个socket链接上实时给你发送目前他截屏到的图像和系统状态数据
3. 你收到数据,程序解析出相对的命令和发送来的图像
4. 通过这个命令来达到本机还原操作和控制效果(包括图象,鼠标和键盘等等)
5. 然后重复流程2,循环反复
二、功能实现
1.下载所用到的第三方库
如何下载慢或报错超时后面加上镜像地址 -i https://pypi.douban.com/simple/
例如:pip install numpy==1.21.2 -i https://pypi.douban.com/simple/
pip install numpy==1.21.2
pip install pywin32==302
pip install Pillow==8.4.0
pip install mouse==0.7.1
pip install keyboard==0.13.5
pip install opencv-python==4.5.3.56
2.代码实现
全代码在本文末尾相关资源中
控制端control.py主运行函数
def main():

    lenb = soc.recv(5)
    imtype, le = struct.unpack(">BI", lenb)
    imb = b''

    while le > BUF_SIZE:
        t = soc.recv(BUF_SIZE)
        imb += t
        le -= len(t)
    while le > 0:
        t = soc.recv(le)
        imb += t
        le -= len(t)

    data = np.frombuffer(imb, dtype=np.uint8)
    img = cv2.imdecode(data, cv2.IMREAD_COLOR)
    h, w, _ = img.shape
    fix_height, fix_width = h, w
    imsh = cv2.cvtColor(img, cv2.COLOR_BGR2RGBA)
    imi = Image.fromarray(imsh)
    imgTK = ImageTk.PhotoImage(image=imi)
    cv = tkinter.Canvas(show_canvas, width=w, height=h, bg="white")
    cv.focus_set()
    bind_events(cv, soc)
    cv.pack()
    cv.create_image(0, 0, anchor=tkinter.NW, image=imgTK)
    h = int(h * scale)
    w = int(w * scale)
    while True:
        if is_scale:
            h = int(fix_height * scale)
            w = int(fix_width * scale)
            cv.config(width=w, height=h)
            is_scale = False
        try:
            lenb = soc.recv(5)
            imtype, le = struct.unpack(">BI", lenb)
            imb = b''
            while le > 0:
                t = soc.recv(le)
                imb += t
                le -= len(t)
            data = np.frombuffer(imb, dtype=np.uint8)
            ims = cv2.imdecode(data, cv2.IMREAD_COLOR)
            if imtype == 1:
                img = ims
            else:
                img = img + ims
            imt = cv2.resize(img, (w, h))
            imsh = cv2.cvtColor(imt, cv2.COLOR_RGB2RGBA)
            imi = Image.fromarray(imsh)
            imgTK.paste(imi)
        except:
            show_canvas = None
            show_screen()
            return
被控制端controlled.py主运行函数
def main(conn):

    def Op(key, op, ox, oy):
        # print(key, op, ox, oy)
        if key == 1:
            if op == 100:
                # 左键按下
                mouse.move(ox, oy)
                mouse.press(button=mouse.LEFT)
            elif op == 117:
                # 左键弹起
                x, y = mouse.get_position()
                if ox != x or oy != y:
                    if not mouse.is_pressed():
                        mouse.press(button=mouse.LEFT)
                    mouse.move(ox, oy)
                mouse.release(button=mouse.LEFT)
        elif key == 2:
            # 滚轮事件
            if op == 0:
                # 向上
                mouse.move(ox, oy)
                mouse.wheel(delta=-1)
            else:
                # 向下
                mouse.move(ox, oy)
                mouse.wheel(delta=1)
        elif key == 3:
            # 鼠标右键
            if op == 100:
                # 右键按下
                mouse.move(ox, oy)
                mouse.press(button=mouse.RIGHT)
            elif op == 117:
                # 右键弹起
                mouse.move(ox, oy)
                mouse.release(button=mouse.RIGHT)
        else:
            k = OFFICIAL_VIRTUAL_KEYS.get(key)
            if k is not None:
                if op == 100:
                    keyboard.press(k)
                elif op == 117:
                    keyboard.release(k)
    try:
        base_len = 6
        while True:
            cmd = b''
            rest = base_len - 0
            while rest > 0:
                cmd += conn.recv(rest)
                rest -= len(cmd)
            key = cmd[0]
            op = cmd[1]
            x = struct.unpack('>H', cmd[2:4])[0]
            y = struct.unpack('>H', cmd[4:6])[0]
            Op(key, op, x, y)
    except:
        return
config.py
# 网络配置
PORT = 80  # 固定端口号

# 其他配置
IMQUALITY = 50
OFFICIAL_VIRTUAL_KEYS = {
    0x08: 'backspace',
    0x09: 'tab',
    0x0c: 'clear',
    0x0d: 'enter',
    0x10: 'shift',
    0x11: 'ctrl',
    0x12: 'alt',
    0x1b: 'esc',
    0x21: 'page up',
    0x22: 'page down',
    0x23: 'end',
    0x24: 'home',
    0x25: 'left',
    0x30: '0',
    0x31: '1',
    0x32: '2',
    0x33: '3',
    0x34: '4',
    0x35: '5',
    0x36: '6',
    0x37: '7',
    0x38: '8',
    0x39: '9',
    0x41: 'a',
    0x42: 'b',
    0x43: 'c',
    0x44: 'd',
    0x45: 'e',
    0x46: 'f',
    0x47: 'g',
    0x48: 'h',
    0x49: 'i',
    0x4a: 'j',
    0x4b: 'k',
    0x4c: 'l',
    0x4d: 'm',
    0x4e: 'n',
    0x4f: 'o',
    0x50: 'p',
    0x51: 'q',
    0x52: 'r',
    0x53: 's',
    0x54: 't',
    0x55: 'u',
    0x56: 'v',
    0x57: 'w',
    0x58: 'x',
    0x59: 'y',
    0x5a: 'z',
    0x60: '0',
    0x61: '1',
    0x62: '2',
    0x63: '3',
    0x64: '4',
    0x65: '5',
    0x66: '6',
    0x67: '7',
    0x68: '8',
    0x69: '9',
    0x6a: '*',
    0x6b: '=',
    0x6d: '-',
    0x6f: '/',
    0x70: 'f1',
    0x71: 'f2',
    0x72: 'f3',
    0x73: 'f4',
    0x74: 'f5',
    0x75: 'f6',
    0x76: 'f7',
    0x77: 'f8',
    0x78: 'f9',
    0x79: 'f10',
    0x7a: 'f11',
    0x7b: 'f12',
    0x7c: 'f13',
    0xbb: '+',
    0xbc: ',',
    0xbd: '-',
    0xbe: '.',
    0xba: ';',
    0xde: '\'',
    0xdb: '[',
    0xdd: ']',
    0xbf: '/',
    0xc0: '`',
    0xdc: '\\',
}
三、实现跨网段控制
1. 有公网服务器的可以自己搭建服务器,这里就不细讲了
2. 内网穿透教程在文章开头参考网站的名单下
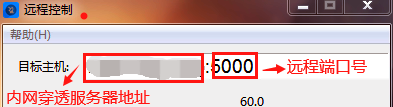
3. 图片教程如下,我示范用的是Ngrok内网穿透(有些内网穿透可能用起来会比较卡):
被控制端运行效果如下:

注:第一幅图上的内网服务器地址是指内网穿透的服务器地址(截图时打错了)
控制端运行效果如下:
四、结语
这次的Python实现远程控制桌面功能其实很早就想写了,国庆之后的几天就已经开始打稿了,但迫于前段时间事务繁多,一直没能写完,只能在周六周天茶余饭饱之际写文章。之后会不定期更新一些博客,分享自己的程序和经验。
至此,终于完成了远程控制桌面功能!
另外,如果在使用这个代码的过程中有遇到什么问题,也欢迎向我反馈。
感谢大家的支持和观看,看到这儿的朋友要是喜欢的话就点个关注呗^_^,你们的支持是我更新的最大动力!
感谢粉丝shtsyfb提出的宝贵意见 !