with tf.Session() as sess:
    croped = tf.image.resize_image_with_crop_or_pad(img_data, 1000, 1000)
    padded = tf.image.resize_image_with_crop_or_pad(img_data, 3000, 3000)
    plt.imshow(croped.eval())
    plt.show()
    plt.imshow(padded.eval())
    plt.show()
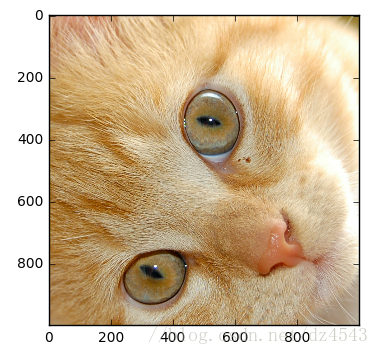 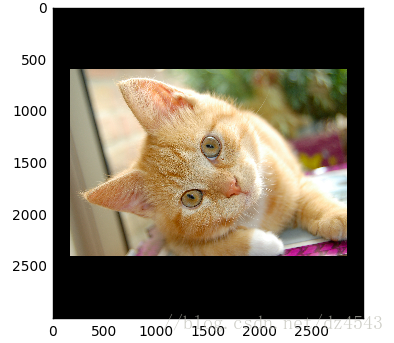
通过nearest_neighbortf.image.resize_image_with_crop_or_pad 函数调整图像大小。其第一个参数为原始图像,后面俩个参数是调整后的目标图像大小。如果调整的图像小于原始图像,就会裁剪,如果调整的图像大于原始图像,就会填充0为背景。 |
with tf.Session() as sess:
# 将图片的亮度-0.5。
#adjusted = tf.image.adjust_brightness(img_data, -0.5)
# 将图片的亮度-0.5
#adjusted = tf.image.adjust_brightness(img_data, 0.5)
# 在[-max_delta, max_delta)的范围随机调整图片的亮度。
adjusted = tf.image.random_brightness(img_data, max_delta=0.5)
# 将图片的对比度-5
#adjusted = tf.image.adjust_contrast(img_data, -5)
# 将图片的对比度+5
#adjusted = tf.image.adjust_contrast(img_data, 5)
# 在[lower, upper]的范围随机调整图的对比度。
#adjusted = tf.image.random_contrast(img_data, lower, upper)
plt.imshow(adjusted.eval())
plt.show()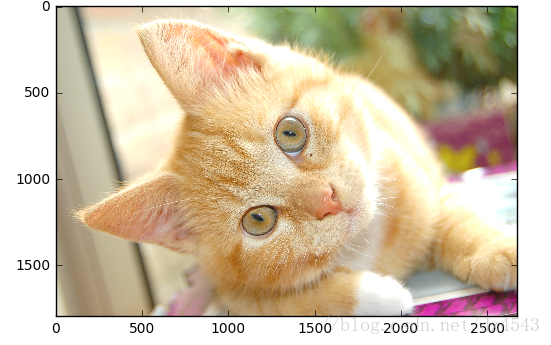 上面程序分别介绍了调整图像亮度与对比度 8 添加色相饱和度with tf.Session() as sess:
adjusted = tf.image.adjust_hue(img_data, 0.1)
#adjusted = tf.image.adjust_hue(img_data, 0.3)
#adjusted = tf.image.adjust_hue(img_data, 0.6)
#adjusted = tf.image.adjust_hue(img_data, 0.9)
# 在[-max_delta, max_delta]的范围随机调整图片的色相。max_delta的取值在[0, 0.5]之间。
#adjusted = tf.image.random_hue(image, max_delta)
# 将图片的饱和度-5。
#adjusted = tf.image.adjust_saturation(img_data, -5)
# 将图片的饱和度+5。
#adjusted = tf.image.adjust_saturation(img_data, 5)
# 在[lower, upper]的范围随机调整图的饱和度。
#adjusted = tf.image.random_saturation(img_data, lower, upper)
plt.imshow(adjusted.eval())
plt.show()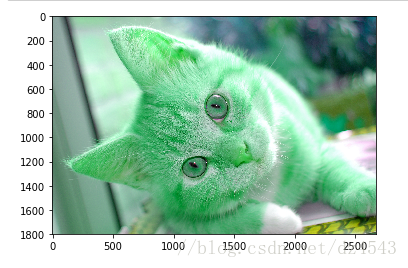
9 添加标注框with tf.Session() as sess:
boxes = tf.constant([[[0.05, 0.05, 0.9, 0.7], [0.35, 0.47, 0.5, 0.56]]])
begin, size, bbox_for_draw = tf.image.sample_distorted_bounding_box(
tf.shape(img_data), bounding_boxes=boxes)
batched = tf.expand_dims(tf.image.convert_image_dtype(img_data, tf.float32), 0)
image_with_box = tf.image.draw_bounding_boxes(batched, bbox_for_draw)
distorted_image = tf.slice(img_data, begin, size)
plt.imshow(distorted_image.eval())
plt.show()在图像处理中,图像中需要关注的物体通常会被标注框圈出来,tensorflow通过tf.image.draw_bounding_boxes函数在图像中添加标注框。 1 需要进行图片数据的float转换 2 如果不是一个batch,是一个图片的话需要手动加一个维度 3 box = [[[]]] 4 最后显示需要转换回去 需要知道原本图片的维度数据利用 print(sess.run(img_data).shape)得出
|
|