Activiti7工作流
一、工作流介绍
1.1 概念
工作流(Workflow),就是通过计算机对业务流程自动化执行管理。它主要解决的是“使在多个参与者之间按照某种预定义的规则自动进行传递文档、信息或任务的过程,从而实现某个预期的业务目标,或者促使此目标的实现”。
案例: 出差费用报销
目标: 公司把出差费用转账到自己的账户中.
参与人: 申请人、部门主管、总经理、财务
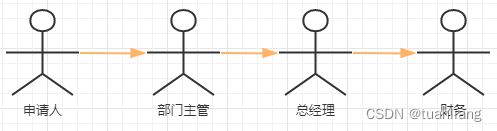
传递文件/执行任务

什么是工作流系统?
一个软件系统中具有工作流的功能,我们把它称为工作流系统。
1.2 适用行业
消费品行业,制造业,电信服务业,银证险等金融服务业,物流服务业,物业服务业,物业管理,大中型进出口贸易公司,政府事业机构,研究院所及教育服务业等,特别是大的跨国企业和集团公司。
1.3 应用领域
企业: 采购流程、合同审核流程
客户: 客户电话投诉处理流程
生活中: 住房贷款审批流程、办理身份证、办理准生手续
行政: 出差审批、报销流程、请假审批、用车流程、会议室申请
银行业: 信贷审批、信用卡发卡审批
人事: 员工培训、绩效考核、职位变动
1.4 传统实现方式
我们可以思考下,如果需要实现【出差费用报销】工作流程,代码应该如何实现?
1.需要在发起申请的时候选择每个阶段由哪个人员进行审批(数据库需要记录)
2.我们需要在数据库中设计一个状态的字段【主管审批0,总经理审批1,财务审批2】,主管审批通过之后把状态修改为总经理审批.(硬编码的方式)
3.当流程处于主管审批时,只有角色为主管的用户才能看到这条审核数据.
通过上面的描述,同学们会发现,我们要实现这个流程控制,我们需要大量的代码才能完成.【工作量大】
而且如果流程发生改变的情况下,我们编写的代码也需要进行调整【不灵活】
1.5 什么是工作流引擎
是一种按照预定义规则【需要符合BPMN规范】进行部署,将业务和节点的流程进行分离【特定形式进行关联】,
实现节点的自动流转的工作流框架.
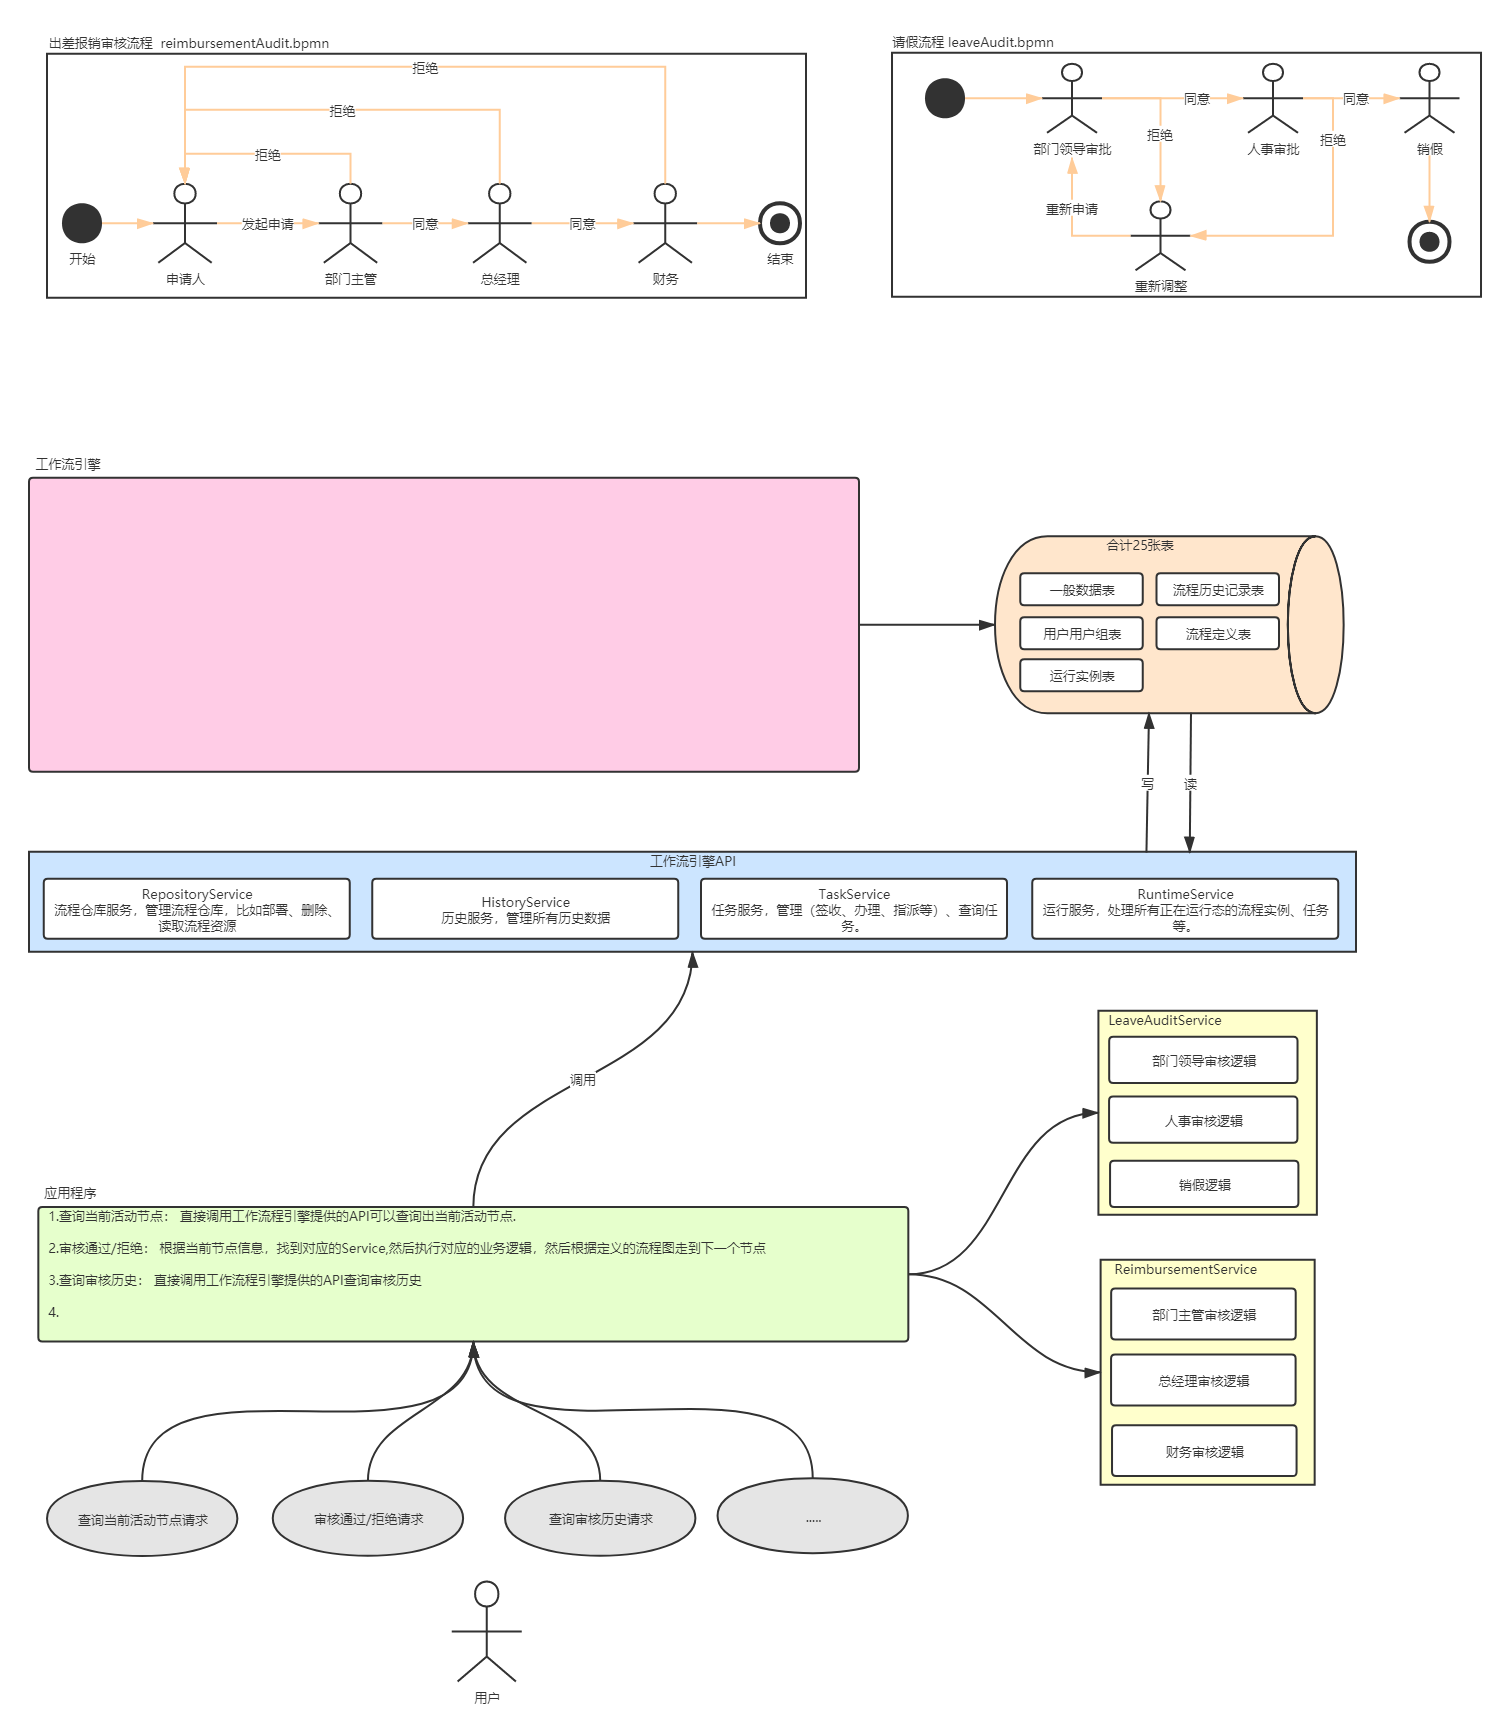
1.需要将预定于的流程文件BPMN部署到工作流引擎中,会把节点,路径信息存储到数据库中.
2.工作流引擎提供了大量的API对流程进行查询处理,细节都是对应用程序屏蔽的,大大提供开发效率
3.业务逻辑的处理和流程的流转是分离的,是通过BusinessKey进行关联的.
二、什么是Activiti7?
2.1 概述
- Alfresco 软件在 2010 年 5 月 17 日宣布 Activiti 业务流程管理(BPM)开源项目的正式启动, 其
首席架构师由业务流程管理 BPM 的专家 Tom Baeyens 担任, Tom Baeyens 就是原来 jbpm 的架构师,
而 jbpm 是一个非常有名的工作流引擎,当然 activiti 也是一个工作流引擎。 - Activiti 是一个工作流引擎, activiti 可以将业务系统中复杂的业务流程抽取出来,使用专门的
建模语言(BPMN2.0)进行定义,业务系统按照预先定义的流程进行执行,实现了业务系统的业务
流程由 activiti 进行管理,减少业务系统由于流程变更进行系统升级改造的工作量,从而提高系统的
健壮性,同时也减少了系统开发维护成本。
官方网站: ·https://www.activiti.org·
2.2 Activiti7内部核心机制
- 1️⃣业务流程图要规范化,需要遵守一套标准。
- 2️⃣业务流程图本质上就是一个XML文件,而XML可以存放所要的数据。
- 3️⃣读取业务流程图的过程就是解析XML文件的过程。
- 4️⃣读取一个业务流程图的结点就相当于解析一个XML的结点,进一步将数据插入到MySQL表中,形成一条记录。
- 5️⃣将一个业务流程图的所有节点都读取并存入到MySQL表中。
- 6️⃣后面只要读取MySQL表中的记录就相当于读取业务流程图的一个节点。
- 7️⃣业务流程的推进,后面就转换为读取表中的数据,并且处理数据,结束的时候这一行数据就可以删除了。
2.3 BPMN
-
BPMN(Business Process Model And Notation),业务流程模型和符号,是由BPMI(Business Process Management Initiative)开发的一套的业务流程建模符号,使用BPMN提供的符号可以创建业务流程。2004年5月发布了BPMN1.0规范。BPMI于2005年9月并入OMG(The Object Management Group,对象管理组织)组织。OMG于2011年1月发布BPMN2.0的最终版本。
-
Activit就是使用BPMN2.0进行流程建模、流程执行管理,它包括很多的建模符号。
-
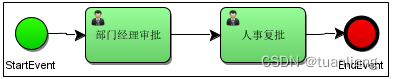
一个BPMN的例子:
- 当事人填写请假单,启动流程后把请假单ID绑定到流程中;
- 部门经理对请假单进行审核;
- 然后人事经理进行复核并进行备案;
- 最后请假流程结束。
思考: 我们看到的是一张图片(png),但是应用程序如何知道下一个节点应该流向到哪里呢?拿到需要去解析png文件吗?
-
BPMN其实是用XML表示业务流程的,上面的.bpmn文件使用文本编辑器打开:
<?xml version="1.0" encoding="UTF-8" standalone="yes"?>
<definitions xmlns="http://www.omg.org/spec/BPMN/20100524/MODEL" xmlns:activiti="http://activiti.org/bpmn" xmlns:bpmndi="http://www.omg.org/spec/BPMN/20100524/DI" xmlns:omgdc="http://www.omg.org/spec/DD/20100524/DC" xmlns:omgdi="http://www.omg.org/spec/DD/20100524/DI" xmlns:tns="http://www.activiti.org/test" xmlns:xsd="http://www.w3.org/2001/XMLSchema" xmlns:xsi="http://www.w3.org/2001/XMLSchema-instance" expressionLanguage="http://www.w3.org/1999/XPath" id="m1620716847764" name="" targetNamespace="http://www.activiti.org/test" typeLanguage="http://www.w3.org/2001/XMLSchema">
  <process id="leave" isClosed="false" isExecutable="true" processType="None">
    <startEvent id="_2" name="StartEvent"/>
    <userTask activiti:candidateUsers="lisi,wangwu" activiti:exclusive="true" id="_4" name="部门经理审批"/>
    <userTask activiti:assignee="rose" activiti:exclusive="true" id="_6" name="人事复批"/>
    <endEvent id="_7" name="EndEvent"/>
    <sequenceFlow id="_12" sourceRef="_6" targetRef="_7"/>
    <sequenceFlow id="_13" sourceRef="_2" targetRef="_4"/>
    <sequenceFlow id="_14" sourceRef="_4" targetRef="_6"/>
  </process>
  <bpmndi:BPMNDiagram documentation="background=#FFFFFF;count=1;horizontalcount=1;orientation=0;width=842.4;height=1195.2;imageableWidth=832.4;imageableHeight=1185.2;imageableX=5.0;imageableY=5.0" id="Diagram-_1" name="New Diagram">
    <bpmndi:BPMNPlane bpmnElement="leave">
      <bpmndi:BPMNShape bpmnElement="_2" id="Shape-_2">
        <omgdc:Bounds height="32.0" width="32.0" x="175.0" y="185.0"/>
        <bpmndi:BPMNLabel>
          <omgdc:Bounds height="32.0" width="32.0" x="0.0" y="0.0"/>
        </bpmndi:BPMNLabel>
      </bpmndi:BPMNShape>
      <bpmndi:BPMNShape bpmnElement="_4" id="Shape-_4">
        <omgdc:Bounds height="55.0" width="85.0" x="245.0" y="175.0"/>
        <bpmndi:BPMNLabel>
          <omgdc:Bounds height="55.0" width="85.0" x="0.0" y="0.0"/>
        </bpmndi:BPMNLabel>
      </bpmndi:BPMNShape>
      <bpmndi:BPMNShape bpmnElement="_6" id="Shape-_6">
        <omgdc:Bounds height="55.0" width="85.0" x="380.0" y="175.0"/>
        <bpmndi:BPMNLabel>
          <omgdc:Bounds height="55.0" width="85.0" x="0.0" y="0.0"/>
        </bpmndi:BPMNLabel>
      </bpmndi:BPMNShape>
      <bpmndi:BPMNShape bpmnElement="_7" id="Shape-_7">
        <omgdc:Bounds height="32.0" width="32.0" x="505.0" y="185.0"/>
        <bpmndi:BPMNLabel>
          <omgdc:Bounds height="32.0" width="32.0" x="0.0" y="0.0"/>
        </bpmndi:BPMNLabel>
      </bpmndi:BPMNShape>
      <bpmndi:BPMNEdge bpmnElement="_13" id="BPMNEdge__13" sourceElement="_2" targetElement="_4">
        <omgdi:waypoint x="207.0" y="201.0"/>
        <omgdi:waypoint x="245.0" y="202.5"/>
        <bpmndi:BPMNLabel>
          <omgdc:Bounds height="0.0" width="0.0" x="0.0" y="0.0"/>
        </bpmndi:BPMNLabel>
      </bpmndi:BPMNEdge>
      <bpmndi:BPMNEdge bpmnElement="_12" id="BPMNEdge__12" sourceElement="_6" targetElement="_7">
        <omgdi:waypoint x="465.0" y="202.5"/>
        <omgdi:waypoint x="505.0" y="201.0"/>
        <bpmndi:BPMNLabel>
          <omgdc:Bounds height="0.0" width="0.0" x="0.0" y="0.0"/>
        </bpmndi:BPMNLabel>
      </bpmndi:BPMNEdge>
      <bpmndi:BPMNEdge bpmnElement="_14" id="BPMNEdge__14" sourceElement="_4" targetElement="_6">
        <omgdi:waypoint x="330.0" y="202.5"/>
        <omgdi:waypoint x="380.0" y="202.5"/>
        <bpmndi:BPMNLabel>
          <omgdc:Bounds height="0.0" width="0.0" x="0.0" y="0.0"/>
        </bpmndi:BPMNLabel>
      </bpmndi:BPMNEdge>
    </bpmndi:BPMNPlane>
  </bpmndi:BPMNDiagram>
</definitions>
2.4 Activiti如何使用
2.4.1 整合Activiti
- Activiti是一个工作流引擎,业务系统使用Activiti来对系统的业务流程进行自动化管理,为了方便业务系统访问(操作)Activiti的接口或功能,通常将Activiti和业务系统的环境集成在一起。
2.4.2 业务流程建模
- 使用Activiti流程建模工具(Activity-designer)定义业务流程(.bpmn文件)。
- .bpmn文件就是业务流程定义文件,通过xml定义业务流程。
- 如果使用其他公司开发的工作引擎一般都提供了可视化的建模工具(Process Designer)用于生成流程定义文件,建模工具操作直观,一般都支持图形化拖拽方式、多窗口的用户界面、丰富的过程图形元素、过程元素拷贝、粘贴、删除等功能。
2.4.3 部署业务流程
- 向Activiti部署业务流程定义(.bpmn文件)。
- 使用Activiti提供的API向Activiti中部署.bpmn文件(一般情况下还需要一起部署业务流程的图片.png)。
2.4.4 启动流程实例
- 启动一个流程实例表示开始一次业务流程的运行,比如员工请假流程部署完成,如果张三要请假就可以启动一个流程实例,如果李四要请假也需要启动一个流程实例,两个流程的执行互不影响,就好比定义一个Java类,实例化两个Java对象一样,部署的流程就好比Java类,启动一个流程实例就好比new一个Java对象。
2.4.5 查询待办任务
- 因为现在系统的业务流程已经交给Activiti管理,通过Activiti就可以查询当前流程执行到哪里了,当前用户需要办理什么任务了,这些Activiti帮我们管理了,而不像传统方式中需要我们在SQL语句中的WHERE条件中指定当前查询的状态值是多少。
2.4.6 处理待办任务
- 用户查询待办任务后,就可以办理某个任务,如果这任务办理完成还需要其他用户办理,比如采购单创建后由部门经理审核,这个过程也是由Activiti帮我们完成了,不需要我们在代码中硬编码指定下一个任务办理人了
2.4.7 结束流程
- 当任务办理完成没有下一个任务/结点了,这个流程实例就完成了。
三、Activiti7环境
3.1 开发环境
Jdk1.8或以上版本
Mysql 5及以上的版本
Tomcat8.5
IDEA
Activiti 7.0.0.SR1
3.2 安装Activiti流程设计器
3.2.2 本地安装
-
从IDEA官网下载
actiBPM.jar包,下载地址:https://plugins.jetbrains.com/plugin/7429-actibpm/versions -
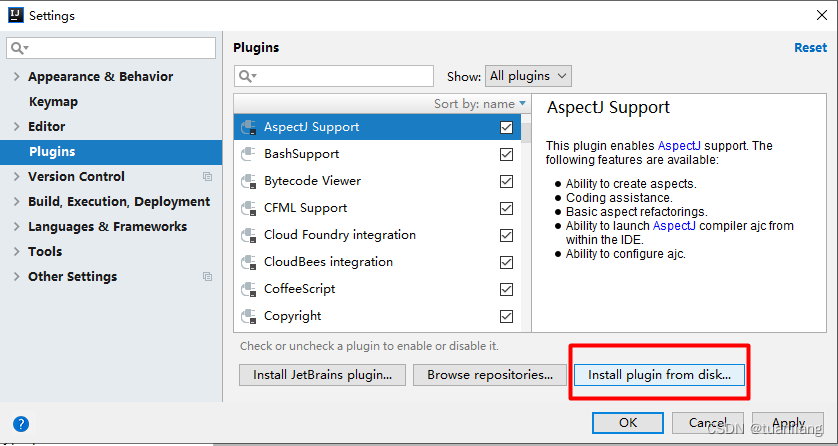
从本地安装actiBPM

点击
Install plugin from disk后选择下载好的actiBPM.jar,然后重启IDEA即可.
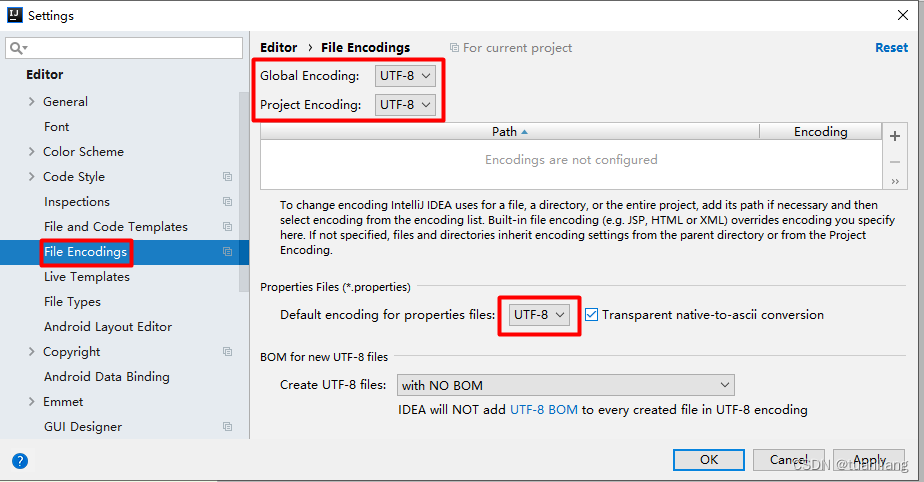
3.3 解决actiBPM中文乱码
- 在IDEA中将File–>Settings–>Editor–>File Encodings修改为UTF-8
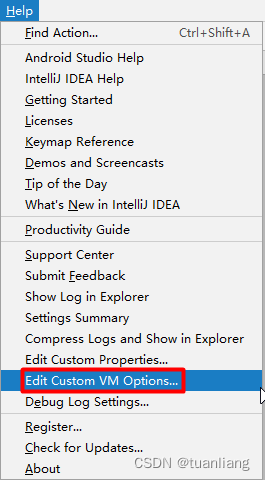
- 在IDEA的Help–>Edit Custom VM Options中末尾添加
-Dfile.encoding=UTF-8
-
在IDEA的安装目录的bin目录下将idea.exe.vmoptions和idea64.exe.vmoptions两个文件末尾添加
-Dfile.encoding=UTF-8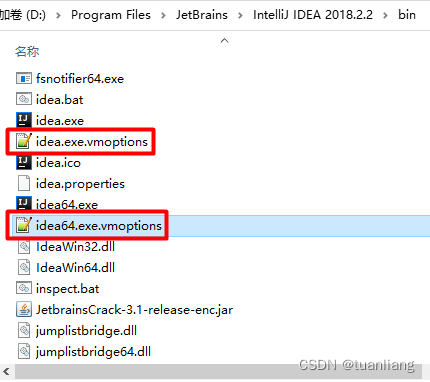
-
重启IDEA即可。
3.4 Activiti支持的数据库
-
Activiti的运行需要数据库的支撑,支持如下:
- h2
- MySQL
- Oracle
- Db2
- postgres
- mssql
-
在Navicat工具中创建
activiti的数据库,用于后续的实验.
四、集成Activiti7
4.1 创建Maven项目
- 通过IDEA创建Maven的Java工程。
4.2 添加Maven依赖
在Java工程中加入ProcessEngine所需要的jar包,包括:
- activiti-engine-7.0.0.GA.jar
- activiti依赖的jar包:mybatis、slf4j、log4j等
- activiti依赖的spring的jar包
- 数据库驱动
- 第三方数据库连接池dbcp
- 单元测试junit
pom.xml文件
    <properties>
        <slf4j.version>1.6.6</slf4j.version>
        <log4j.version>1.2.12</log4j.version>
        <activiti.version>7.0.0.SR1</activiti.version>
    </properties>
    <dependencies>
        <!-- activiti引擎 -->
        <dependency>
            <groupId>org.activiti</groupId>
            <artifactId>activiti-engine</artifactId>
            <version>${activiti.version}</version>
        </dependency>
        <!-- 整合Spring -->
        <dependency>
            <groupId>org.activiti</groupId>
            <artifactId>activiti-spring</artifactId>
            <version>${activiti.version}</version>
        </dependency>
        <!-- bpmn 模型处理 -->
        <dependency>
            <groupId>org.activiti</groupId>
            <artifactId>activiti-bpmn-model</artifactId>
            <version>${activiti.version}</version>
        </dependency>
        <!-- bpmn 转换 -->
        <dependency>
            <groupId>org.activiti</groupId>
            <artifactId>activiti-bpmn-converter</artifactId>
            <version>${activiti.version}</version>
        </dependency>
        <!-- bpmn json数据转换 -->
        <dependency>
            <groupId>org.activiti</groupId>
            <artifactId>activiti-json-converter</artifactId>
            <version>${activiti.version}</version>
        </dependency>
        <!-- bpmn 布局 -->
        <dependency>
            <groupId>org.activiti</groupId>
            <artifactId>activiti-bpmn-layout</artifactId>
            <version>${activiti.version}</version>
        </dependency>
        <!-- mysql驱动 -->
        <dependency>
            <groupId>mysql</groupId>
            <artifactId>mysql-connector-java</artifactId>
            <version>5.1.40</version>
        </dependency>
        <!-- mybatis -->
        <dependency>
            <groupId>org.mybatis</groupId>
            <artifactId>mybatis</artifactId>
            <version>3.4.5</version>
        </dependency>
        <!-- 链接池 -->
        <dependency>
            <groupId>commons-dbcp</groupId>
            <artifactId>commons-dbcp</artifactId>
            <version>1.4</version>
        </dependency>
        <!-- 单元测试 -->
        <dependency>
            <groupId>junit</groupId>
            <artifactId>junit</artifactId>
            <version>4.12</version>
        </dependency>
        <!-- log start -->
        <dependency>
            <groupId>log4j</groupId>
            <artifactId>log4j</artifactId>
            <version>${log4j.version}</version>
        </dependency>
        <dependency>
            <groupId>org.slf4j</groupId>
            <artifactId>slf4j-api</artifactId>
            <version>${slf4j.version}</version>
        </dependency>
        <dependency>
            <groupId>org.slf4j</groupId>
            <artifactId>slf4j-log4j12</artifactId>
            <version>${slf4j.version}</version>
        </dependency>
        <!-- log end -->
        <dependency>
            <groupId>commons-io</groupId>
            <artifactId>commons-io</artifactId>
            <version>2.6</version>
        </dependency>
        <!--数据库连接池-->
        <dependency>
            <groupId>com.alibaba</groupId>
            <artifactId>druid</artifactId>
            <version>1.2.4</version>
        </dependency>
    </dependencies>
4.3 添加log4j日志配置
我们使用log4j日志包,可以对日志进行配置,在resources下创建log4j.properties,内容如下:
# Set root category priority to INFO and its only appender to CONSOLE.
#log4j.rootCategory=INFO, CONSOLE debug info warn error fatal
log4j.rootCategory=debug, CONSOLE, LOGFILE
# Set the enterprise logger category to FATAL and its only appender to CONSOLE.
log4j.logger.org.apache.axis.enterprise=FATAL, CONSOLE
# CONSOLE is set to be a ConsoleAppender using a PatternLayout.
log4j.appender.CONSOLE=org.apache.log4j.ConsoleAppender
log4j.appender.CONSOLE.layout=org.apache.log4j.PatternLayout
log4j.appender.CONSOLE.layout.ConversionPattern=%d{ISO8601} %-6r[%15.15t] %-5p %30.30c %x - %m\n
# LOGFILE is set to be a File appender using a PatternLayout.
log4j.appender.LOGFILE=org.apache.log4j.FileAppender
log4j.appender.LOGFILE.File=./activiti.log
log4j.appender.LOGFILE.Append=true
log4j.appender.LOGFILE.layout=org.apache.log4j.PatternLayout
log4j.appender.LOGFILE.layout.ConversionPattern=%d{ISO8601} %-6r[%15.15t] %-5p %30.30c %x - %m\n
4.4 添加核心配置文件
- 需要在
resource目录中添加配置文件activiti.cfg.xml,内容如下:
<?xml version="1.0" encoding="UTF-8"?>
<beans xmlns="http://www.springframework.org/schema/beans"
       xmlns:xsi="http://www.w3.org/2001/XMLSchema-instance"
       xmlns:context="http://www.springframework.org/schema/context"
       xmlns:tx="http://www.springframework.org/schema/tx"
       xsi:schemaLocation="http://www.springframework.org/schema/beans
                    http://www.springframework.org/schema/beans/spring-beans.xsd
http://www.springframework.org/schema/contex
http://www.springframework.org/schema/context/spring-context.xsd
http://www.springframework.org/schema/tx
http://www.springframework.org/schema/tx/spring-tx.xsd">
</beans>
- 需要在配置文件中配置如下信息
- 数据库连接池
- Activiti单独运行的ProcessEngine配置
<?xml version="1.0" encoding="UTF-8"?>
<beans xmlns="http://www.springframework.org/schema/beans"
       xmlns:xsi="http://www.w3.org/2001/XMLSchema-instance"
       xmlns:context="http://www.springframework.org/schema/context"
       xmlns:tx="http://www.springframework.org/schema/tx"
       xsi:schemaLocation="http://www.springframework.org/schema/beans
                    http://www.springframework.org/schema/beans/spring-beans.xsd
http://www.springframework.org/schema/contex
http://www.springframework.org/schema/context/spring-context.xsd
http://www.springframework.org/schema/tx
http://www.springframework.org/schema/tx/spring-tx.xsd">
    <!--数据库连接池-->
    <bean id="dataSource" class="com.alibaba.druid.pool.DruidDataSource">
        <property name="driverClassName" value="com.mysql.jdbc.Driver" />
        <property name="url" value="jdbc:mysql:///activiti" />
        <property name="username" value="root" />
        <property name="password" value="admin" />
    </bean>
    <!-- 默认id对应的值 为processEngineConfiguration -->
    <bean id="processEngineConfiguration" class="org.activiti.engine.impl.cfg.StandaloneProcessEngineConfiguration">
        <property name="dataSource" ref="dataSource"/>
        <!--
            activiti数据库表处理策略
                false(默认值):检查数据库的版本和依赖库的版本,如果不匹配就抛出异常
                true:构建流程引擎时,执行检查,如果需要就执行更新。如果表不存在,就创建。
                create-drop:构建流程引擎时创建数据库报表,关闭流程引擎时就删除这些表。
                drop-create:先删除表再创建表。
                create:构建流程引擎时创建数据库表,关闭流程引擎时不删除这些表
        -->
        <property name="databaseSchemaUpdate" value="true"/>
    </bean>
</beans>
4.5 测试
- 创建一个测试类,调用activiti的工具类,生成acitivti需要的数据库表。代码如下:
package cn.wolfcode.demo;

import org.activiti.engine.ProcessEngine;
import org.activiti.engine.ProcessEngines;
import org.junit.Test;

public class _01TestInit {


    @Test
    public void testInit(){


        ProcessEngine processEngine = ProcessEngines.getDefaultProcessEngine();
        System.out.println(processEngine);
    }
}
4.6 数据库表的命名规则
- 此时我们查看数据库,发现25张表,结果如下所示:
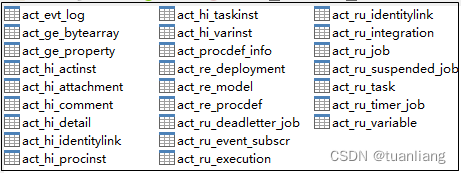
Activiti的表都是以ACT_开头。第二部分是表示表的用途的两个字母标识。用途也和服务的API对应。
ACT_RE_*:'RE’表示Repository。这个前缀的表包含了流程定义和流程静态资源(图片、规则等等)。ACT_RU_*:'RU’表示Runtime。这些运行时的表,包含流程实例,任务、变量,异步任务等运行中的数据。Activiti只在流程实例执行过程中保存这些数据,在流程结束时就会删除这些记录。这些运行时表可以一直很小并且速度很快。ACT_HI_*:'HI’表示History。这些表包含历史数据,比如历史流程实例,变量,任务等等。ACT_GE_*:'GE’表示General。通用数据,用于不同场景下。
五、流程引擎API
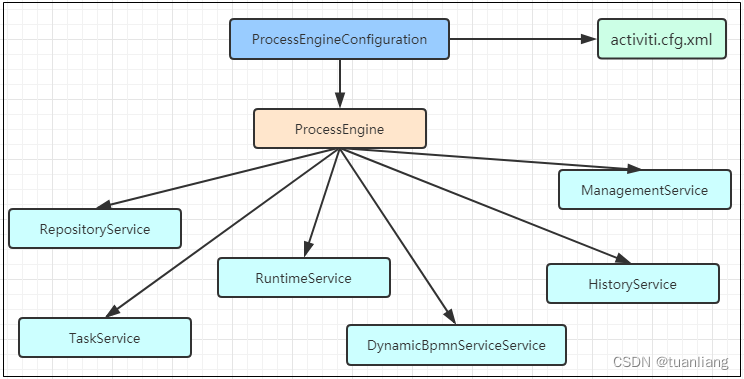
ProcessEngine processEngine = ProcessEngines.getDefaultProcessEngine();
这行代码默认是读取resource目录下的activiti.cfg.xml文件,这个文件本质上就是spring的配置文件,加载之后会读取配置文件中id名为processEngineConfiguration的bean,通过这个配置对象可以获取到流程引擎对象ProcessEngine
5.1 Service总览
| Service接口 | 说明 |
|---|---|
| RepositoryService | Activiti的资源管理接口 |
| RuntimeService | Activiti的流程运行管理接口 |
| TaskService | Activiti的任务管理接口 |
| HistoryService | Activiti的历史管理接口 |
| ManagementService | Activiti的引擎管理接口 |
-
RepositoryService,是Activiti的资源管理接口,提供了管理和控制流程发布包和流程定义的操作。使用工作流建模工具设计的业务流程图需要使用此Service将流程定义文件的内容部署到计算机中。
-
RuntimeService,是Activiti的流程运行管理接口,可以从这个接口中获取很多关于流程执行相关的信息。
-
TaskService,是Activiti的任务管理接口,可以从这个接口中获取任务的信息。
-
HistoryService,是Activiti的历史管理类,可以查询历史信息,执行流程时,引擎会包含很多数据(根据配置),比如流程实例启动时间,任务的参与者,完成任务的时间,每个流程实例的执行路径,等等。
-
ManagementService,是Activiti的引擎管理接口,提供了对Activiti流程引擎的管理和维护功能,这些功能不在工作流驱动的应用程序中使用,主要用于Activiti系统的日常维护。