前提
在window上已经安装maven并且在eclipse中配置好了maven,如果没有配置,参考文章 windows上安装maven及eclipse中配置maven
一、创建一个包含jmeter脚本的maven项目
1.打开eclipse,左上角文件 -> 新建 -> 其他 -> Maven -> Maven Project -> 下一步
2.选择Use default Workspace location,下一步
3.选择maven-archetype-quickstart,下一步

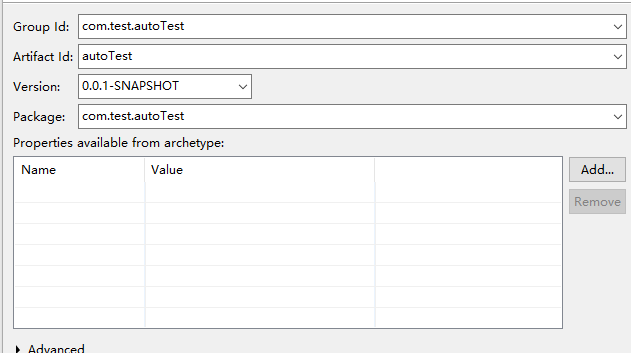
4.填入Group Id、Artifact Id、Version、Package,并点击完成
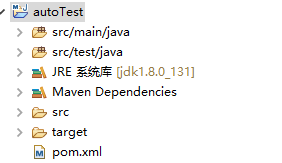
构建成功的项目目录如下
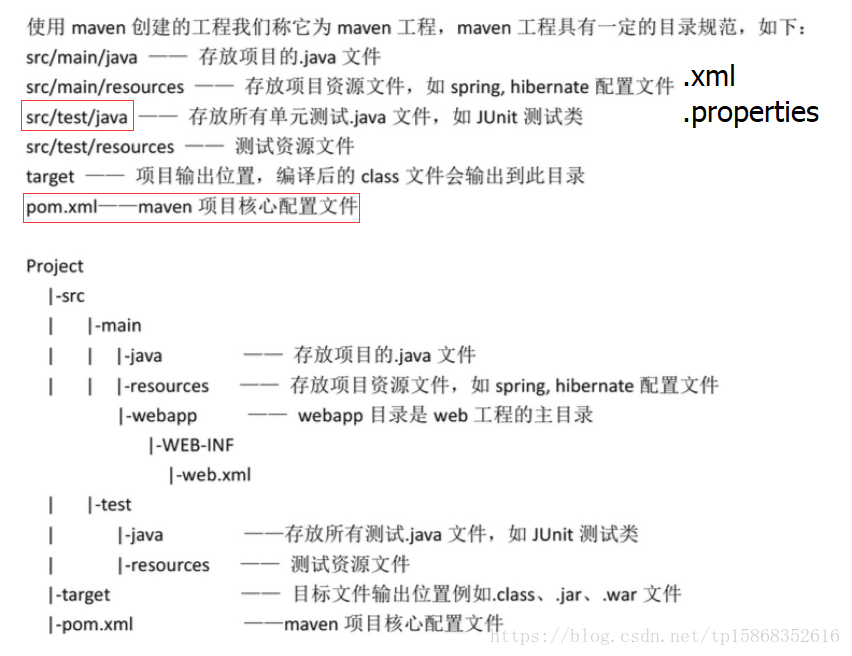
二、maven默认的文件存放结构
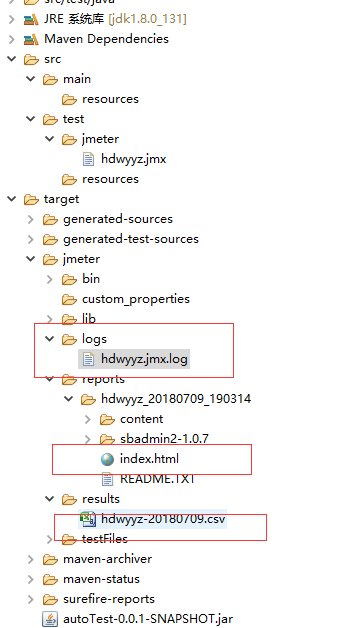
我们在src/test文件目录下创建一个jmeter文件夹,把jmeter脚本都放在该目录下面

三、配置pom.xml文件
这里选取的是最新的jmeter-maven-plugin插件版本<project xmlns="http://maven.apache.org/POM/4.0.0" xmlns:xsi="http://www.w3.org/2001/XMLSchema-instance"
  xsi:schemaLocation="http://maven.apache.org/POM/4.0.0 http://maven.apache.org/xsd/maven-4.0.0.xsd">
  <modelVersion>4.0.0</modelVersion>

  <groupId>com.test.autoTest</groupId>
  <artifactId>autoTest</artifactId>
  <version>0.0.1-SNAPSHOT</version>
  <packaging>jar</packaging>

  <name>autoTest</name>
  <url>http://maven.apache.org</url>

  <properties>
    <project.build.sourceEncoding>UTF-8</project.build.sourceEncoding>
  </properties>

  <dependencies>
    <dependency>
      <groupId>junit</groupId>
      <artifactId>junit</artifactId>
      <version>3.8.1</version>
      <scope>test</scope>
    </dependency>
  </dependencies>

   <build>
            <plugins>
                <plugin>
                    <groupId>com.lazerycode.jmeter</groupId>
                    <artifactId>jmeter-maven-plugin</artifactId>
                    <version>2.7.0</version>
                    <executions>
                        <execution>
                            <id>jmeter-tests</id>
                            <phase>verify</phase>
                            <goals>
                                <goal>jmeter</goal>
                            </goals>
                        </execution>
                    </executions>
                    <configuration>
              <!--选取要执行的脚本-->

                        <testFilesIncluded>
                            <jMeterTestFile>hdwyyz.jmx</jMeterTestFile>
                        </testFilesIncluded>
                        <!--报告文件尾部输出时间 -->
                        <appendResultsTimestamp>true</appendResultsTimestamp>
                    </configuration>
                </plugin>
            </plugins>
            <defaultGoal>compile</defaultGoal>
  </build>
</project>
四、运行项目
右键pom.xml,运行方式maven build,配置maven build
Goals:verify ,点击运行,jmeter-maven-plugin插件会自动引入jmeter类库
运行成功后在控制台显示

在target文件夹下会自动生成很多文件
在jmeter/logs、jmeter/reports和jmeter/results下会显示具体的结果
五、遇到的问题及解决方案
1.在编译maven项目时出现[ERROR] No compiler is provided in this environment. Perhaps you are running on a JRE rather than a JDK?
解决:不需要修改maven中conf文件夹下的settings.xml
关于Maven项目build时出现No compiler is provided in this environment的处理
2.在编译maven项目时出现“No goals have been specified for this build”
解决:在pom.xml文件<build>标签后面加上<defaultGoal>compile</defaultGoal>即可
六、引用
jmeter-maven-plugin试用手记
maven+jmeter+jenkins集成
jmeter-maven-plugin使用,以及jmeter与Jenkins集成
高级配置之 -- 选择测试脚本