消息中间件的定义:
没有标准定义,一般认为,采用消息传送机制/消息队列 的中间件技术,进行数据交流,用在分布式系统的集成
为什么要用消息中间件?
解决分布式系统之间消息的传递。
电商场景:用户下单减库存,调用物流系统,系统扩充后服务化和业务拆分。系统交互,一般用RPC(远程过程调用)。如果系统扩充到有几十个接口,消息中间件来解决问题。
和RPC有何区别?
使用区分标准:1、系统之间的依赖程度 2、量(业务量,数据量,访问量)
消息中间件有些什么使用场景?
1、 异步处理
用户注册(50ms),还需发送邮件(50ms)和手机信息(50ms)
串行(150ms)用户注册—》发送邮件----》发送手机信息
并行(100ms):用户注册—》发送邮件|----》发送手机信息
消息中间件(56ms):用户注册(50ms)—》(6ms)消息中间件《-----发送邮件《-----发送手机信息
2、 应用的解耦
订单系统---》库存系统(强耦合)
消息中间件:订单系统---》消息中间件《----库存系统(解耦)
3、 流量的削峰
用户请求-----》秒杀应用
应用的前端加入消息队列
用户请求-----》消息队列《----秒杀应用
4、 日志处理
错误日志---》消息队列《----日志处理
用户行为日志--》消息队列(kafka)《-----日志的存储或流式处理
5、纯粹的消息通信
常见消息中间件比较
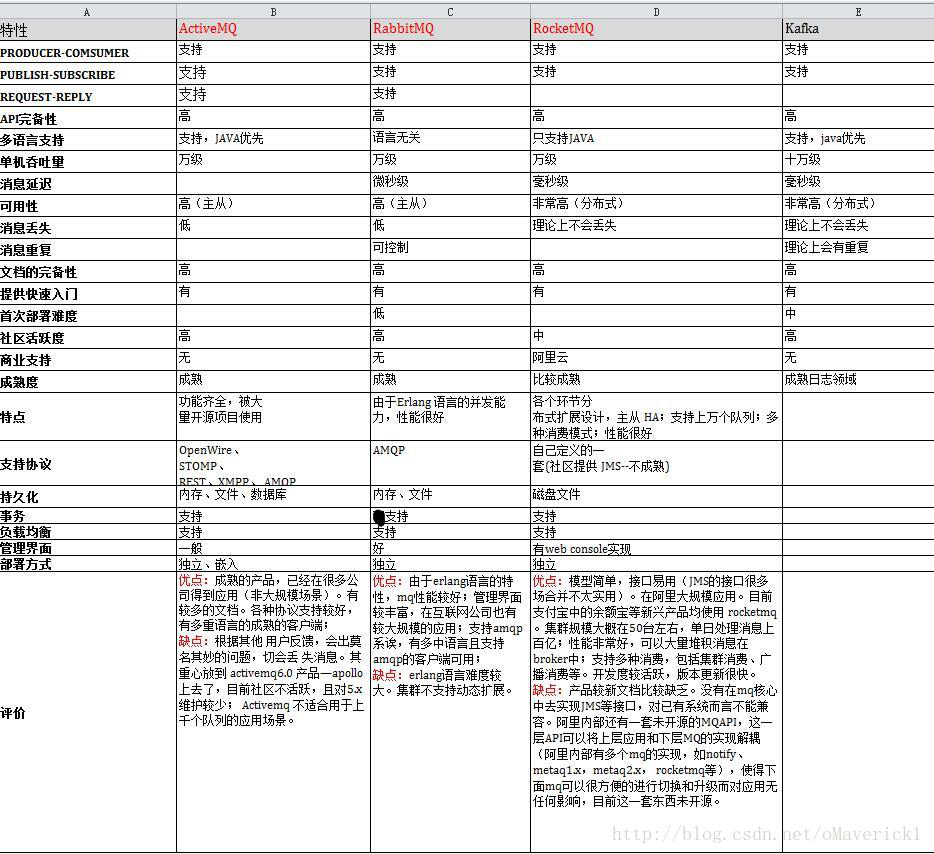
kafka和RabbitMQ的比较
1、 RabbitMq比kafka成熟,在可用性上,稳定性上,可靠性上,RabbitMq超过kafka
2、 Kafka设计的初衷就是处理日志的,可以看做是一个日志系统,针对性很强,所以它并没有具备一个成熟MQ应该具备的特性
3、 Kafka的性能(吞吐量、tps)比RabbitMq要强
一、JMS与ActiveMQ
什么是JMS规范
本质是API,Java平台消息中间件的规范,java应用程序之间进行消息交换。并且通过提供标准的产生、发送、接收消息的接口简化企业应用的开发。
JMS对象模型包含如下几个要素:
1)连接工厂:创建一个JMs连接
2)JMS连接:客户端和服务器之间的一个连接。
3)JMS会话:客户和服务器会话的状态,建立在连接之上的
4)JMS目的:消息队列
5)JMS生产者:消息的生成
6)JMS消费者:接收消息
7)Broker:消息中间件的实例(ActiveMq)
JMS规范中的点对点模式:
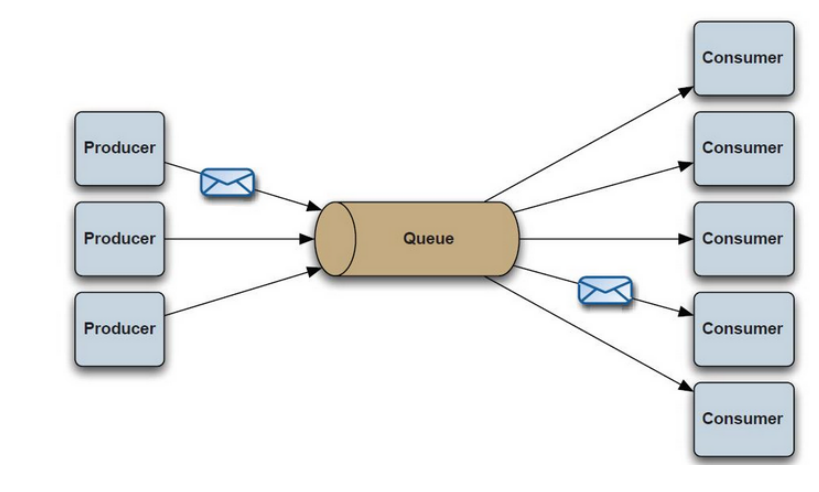
特点:有队列,生产者的一个消息只发送给一个消费(接受)者(即使有多个接受者监听队列),消费者是要向队列应答成功
JMS规范中的主题模式(发布订阅):
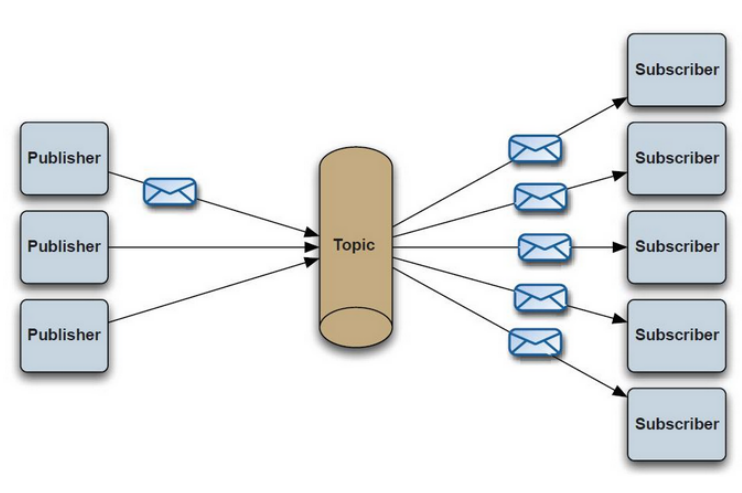
特点:发布到Topic的消息会被当前主题所有的订阅者消费(接受)
Request-Response模式
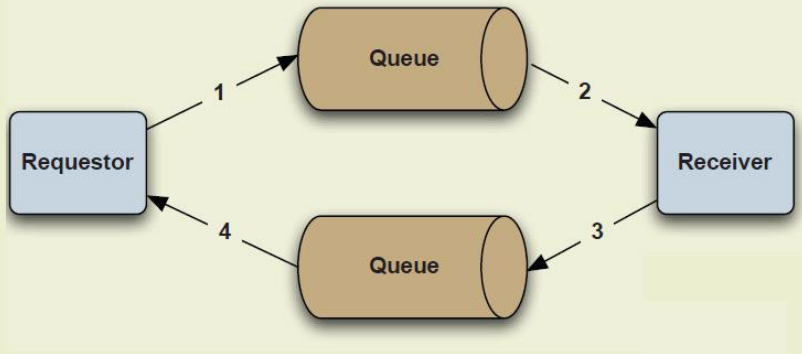
在前面的两种模式中都是一方负责发送消息而另外一方负责处理。而我们实际中的很多应用相当于一种一应一答的过程,需要双方都能给对方发送消息。于是请求-应答的这种通信方式也很重要。它也应用的很普遍。
请求-应答方式并不是JMS规范系统默认提供的一种通信方式
JMS规范中的消息类型
TextMessage
MapMessage
ObjectMessage
BytesMessage
StreamMessage
实现代码
原生客户端的代码
/**原生的生产者*/
public class JmsProducer {
    //默认连接用户名
    private static final String USERNAME = ActiveMQConnection.DEFAULT_USER;
    //默认连接密码
    private static final String PASSWORD = ActiveMQConnection.DEFAULT_PASSWORD;
    //默认连接地址
    private static final String BROKEURL = ActiveMQConnection.DEFAULT_BROKER_URL;
    //发送的消息数量
    private static final int SENDNUM = 10;

    public static void main(String[] args) {
        ConnectionFactory connectionFactory;
        Connection connection = null;
        Session session;
        Destination destination;
        MessageProducer messageProducer;

        connectionFactory = new ActiveMQConnectionFactory(USERNAME,PASSWORD,BROKEURL);

        try {
            connection = connectionFactory.createConnection();
            connection.start();
            /* createSession参数取值
            * 1、为true表示启用事务
            * 2、消息的确认模式
            * AUTO_ACKNOWLEDGE  自动签收
            * CLIENT_ACKNOWLEDGE 客户端自行调用acknowledge方法签收
            * DUPS_OK_ACKNOWLEDGE 不是必须签收,消费可能会重复发送
            * 在第二次重新传送消息的时候,消息头的JmsDelivered会被置为true表示当前消息已经传送过一次,客户端需要进行消息的重复处理控制。
            * */
            session = connection.createSession(true,Session.AUTO_ACKNOWLEDGE);
            destination = session.createQueue("HelloWAM");
            messageProducer = session.createProducer(destination);
            for(int i=0;i<SENDNUM;i++){
                String msg = "发送消息"+i+" "+System.currentTimeMillis();
                TextMessage message = session.createTextMessage(msg);
                System.out.println("发送消息:"+msg);
                messageProducer.send(message);
            }
            session.commit();
        } catch (JMSException e) {
            e.printStackTrace();
        }finally {
            if(connection!=null){
                try {
                    connection.close();
                } catch (JMSException e) {
                    e.printStackTrace();
                }
            }
        }
    }
}
/*原生的消费者*/
public class JmsConsumer {
private static final String USERNAME = ActiveMQConnection.DEFAULT_USER;//默认连接用户名
private static final String PASSWORD = ActiveMQConnection.DEFAULT_PASSWORD;//默认连接密码
private static final String BROKEURL = ActiveMQConnection.DEFAULT_BROKER_URL;//默认连接地址
public static void main(String[] args) {
ConnectionFactory connectionFactory;//连接工厂
Connection connection = null;//连接
Session session;//会话 接受或者发送消息的线程
Destination destination;//消息的目的地
MessageConsumer messageConsumer;//消息的消费者
//实例化连接工厂
connectionFactory = new ActiveMQConnectionFactory(JmsConsumer.USERNAME,JmsConsumer.PASSWORD, JmsConsumer.BROKEURL);
try {
//通过连接工厂获取连接
connection = connectionFactory.createConnection();
//启动连接
connection.start();
//创建session
session = connection.createSession(false, Session.AUTO_ACKNOWLEDGE);
//创建一个连接HelloWorld的消息队列
destination = session.createQueue("HelloWAM");
//创建消息消费者
messageConsumer = session.createConsumer(destination);
//读取消息
System.out.println("启动了");
while(true){
TextMessage textMessage = (TextMessage)messageConsumer.receive(10000);
if(textMessage != null){
System.out.println("Accept msg : "+textMessage.getText());
}else{
break;
}
}
System.out.println("结束了");
} catch (JMSException e) {
e.printStackTrace();
}
}
}整合spring的代码
1)Spring的配置文件中要增加命名空间
xmlns:amq="http://activemq.apache.org/schema/core"
xmlns:jms=http://www.springframework.org/schema/jms

http://www.springframework.org/schema/jms
http://www.springframework.org/schema/jms/spring-jms-4.0.xsd
http://activemq.apache.org/schema/core
http://activemq.apache.org/schema/core/activemq-core-5.8.0.xsd"
2)引入
	<!-- ActiveMQ 连接工厂 -->
    <amq:connectionFactory id="amqConnectionFactory"
             brokerURL="tcp://127.0.0.1:61616" userName="admin" password="admin" />

	<!-- Spring Caching连接工厂 -->
	<!-- Spring用于管理真正的ConnectionFactory的ConnectionFactory -->
    <bean id="connectionFactory"
          class="org.springframework.jms.connection.CachingConnectionFactory">
        <property name="targetConnectionFactory" ref="amqConnectionFactory"></property>
        <property name="sessionCacheSize" value="100"></property>
    </bean>

	<!-- Spring JmsTemplate 的消息生产者 start-->
	<!-- 定义JmsTemplate的Queue类型 -->
    <bean id="jmsQueueTemplate" class="org.springframework.jms.core.JmsTemplate">
        <constructor-arg ref="connectionFactory"></constructor-arg>
        <!-- 队列模式-->
        <property name="pubSubDomain" value="false"></property>
    </bean>
    	<!-- 定义JmsTemplate的Topic类型 -->
    <bean id="jmsTopicTemplate" class="org.springframework.jms.core.JmsTemplate">
        <constructor-arg ref="connectionFactory"></constructor-arg>
        <!-- 发布订阅模式-->
        <property name="pubSubDomain" value="true"></property>
    </bean>

	<!-- 定义Queue监听器 -->
	<jms:listener-container destination-type="queue" container-type="default"
							connection-factory="connectionFactory" acknowledge="auto">
		<jms:listener destination="test.queue" ref="queueReceiver1"></jms:listener>
		<jms:listener destination="test.queue" ref="queueReceiver2"></jms:listener>
	</jms:listener-container>
	<!-- 定义Topic监听器 -->
	<jms:listener-container destination-type="topic" container-type="default"
							connection-factory="connectionFactory" acknowledge="auto">
		<jms:listener destination="test.topic" ref="topicReceiver1"></jms:listener>
		<jms:listener destination="test.topic" ref="topicReceiver2"></jms:listener>
	</jms:listener-container>

	<!--接收消费者应答的监听器-->
    <jms:listener-container destination-type="queue" container-type="default"
                            connection-factory="connectionFactory" acknowledge="auto">
        <jms:listener destination="tempqueue" ref="getResponse"></jms:listener>
    </jms:listener-container>
3)发送类-点对点队列模式(包含应答)
/**
 * 点对点队列发送模式
 * @author Administrator
 */
@Controller
public class QueueSendController {

	@Autowired
	@Qualifier("jmsQueueTemplate")
	private JmsTemplate jmsTemplate;
	@Autowired
	private GetResponse getResponse;


	@ResponseBody
	@RequestMapping("tosendQueueMsg")
	public String tosendQueueMsg(ModelMap modelMap,String msg,String queueName){
		queueName="test.queue";
		if (msg!=null&&queueName!=null) {
			jmsTemplate.send(queueName,new MessageCreator() {
				@Override
				public Message createMessage(Session session) throws JMSException {
					Message message = session.createTextMessage(msg);

					//配置消费者应答相关内容
					Destination tempDest = session.createTemporaryQueue();
					MessageConsumer responseConsumer = session.createConsumer(tempDest);
					responseConsumer.setMessageListener(getResponse);
					message.setJMSReplyTo(tempDest);
					//消费者应答的id,发送出的消息和应答消息进行匹配
					String uid = System.currentTimeMillis()+"";
					message.setJMSCorrelationID(uid);
					System.out.println("JMSCorrelationID="+uid);
					return message;
				}
			});
			modelMap.put(CommonInfoUtil.JSONMSG, CommonInfoUtil.SUCCESS);
		}else {
			modelMap.put(CommonInfoUtil.JSONMSG, CommonInfoUtil.PARAMERROR);
		}

		return JsonUtil.toJson(modelMap);
	}

}
4)应答响应类
@Component
public class GetResponse implements MessageListener {

    public void onMessage(Message message) {
        try {
            String textMsg = ((TextMessage)message).getText();
            System.out.println("GetResponse accept response : "+textMsg);
        } catch (JMSException e) {
            e.printStackTrace();
        }
    }
}
5)接受类-点对点队列模式
/**
 * 队列消费者1
 * @author Administrator
 *
 */
@Component
public class QueueReceiver1 implements MessageListener {

	@Autowired
	@Qualifier("jmsQueueTemplate")
	private JmsTemplate jmsTemplate;

	@Override
	public void onMessage(Message message) {
		try {
			String textMsg = ((TextMessage)message).getText();
			System.out.println("QueueReceiver1 accept msg : "+textMsg);

			//应答
			System.out.println("message.getJMSReplyTo()="+message.getJMSReplyTo());
			System.out.println("message.getJMSCorrelationID()="+message.getJMSCorrelationID());
			jmsTemplate.send(message.getJMSReplyTo(), new MessageCreator() {
	            public Message createMessage(Session session) throws JMSException {
	                Message msg = session.createTextMessage("QueueReceiver1 accept msg"+textMsg);
	                return msg;
	            }
	        });
		} catch (JMSException e) {
			// TODO Auto-generated catch block
			e.printStackTrace();
		}
	}

}
/**
* 队列消费者2
* @author Administrator
*
*/
@Component
public class QueueReceiver2 implements MessageListener {
@Override
public void onMessage(Message message) {
try {
String textMsg = ((TextMessage)message).getText();
System.out.println("QueueReceiver2 accept msg : "+textMsg);
} catch (JMSException e) {
// TODO Auto-generated catch block
e.printStackTrace();
}
}
}6)发送类-主题订阅发送模式
/**
 * 主题订阅发送模式
 * @author Administrator
 */
@Controller
public class TopicSenderController {

	@Autowired
	@Qualifier("jmsTopicTemplate")
	private JmsTemplate jmsTemplate;

	@ResponseBody
	@RequestMapping("tosendQTopicMsg")
	public String tosendQTopicMsg(ModelMap modelMap,String msg,String queueName){
		queueName="test.topic";
		if (msg!=null&&queueName!=null) {
			jmsTemplate.send(queueName,new MessageCreator() {
				@Override
				public Message createMessage(Session session) throws JMSException {
					Message message = session.createTextMessage(msg);
					return message;
				}
			});
			modelMap.put(CommonInfoUtil.JSONMSG, CommonInfoUtil.SUCCESS);
		}else {
			modelMap.put(CommonInfoUtil.JSONMSG, CommonInfoUtil.PARAMERROR);
		}
		return JsonUtil.toJson(modelMap);
	}

}
7)接受类-主题订阅模式
/**
 * 主题订阅消费者1
 * @author Administrator
 *
 */
@Component
public class TopicReceiver1  implements MessageListener{

	public void onMessage(Message message) {
		try {
			String textMsg = ((TextMessage)message).getText();
			System.out.println("TopicReceiver1 accept msg : "+textMsg);
		} catch (JMSException e) {
			e.printStackTrace();
		}
	}

}
/**
* 主题订阅消费者2
* @author Administrator
*
*/
@Component
public class TopicReceiver2 implements MessageListener{
public void onMessage(Message message) {
try {
String textMsg = ((TextMessage)message).getText();
System.out.println("TopicReceiver2 accept msg : "+textMsg);
} catch (JMSException e) {
e.printStackTrace();
}
}
}二、AMQP与RabbitMQ
Advanced Message Queuing Protocol,一个提供统一消息服务的应用层标准高级消息队列协议是一个标准协议,支持不同语言和不同的产品
生产者
消息的创建者,发送到amqp的消息中间件
消费者
连接到amqp的消息中间件,订阅到队列上,进行消息的消费。分为持续订阅(basicConsumer)和单条订阅(basicGet)
消息
包括有效载荷和标签。有效载荷就是要传输的数据。标签描述有效载荷的属性,rabbitmq用标签来决定谁获得当前消息。消费者只能拿到有效载荷。
信道
虚拟的连接,建立在真实的tcp连接之上的。信道的创建没有限制的。
交换器、队列、绑定、路由键
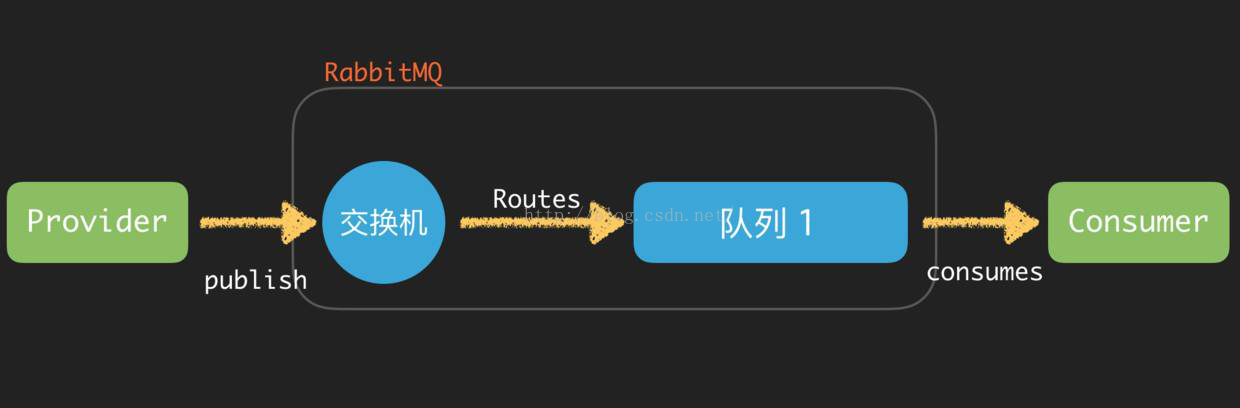
队列通过路由键(routing key,某种确定的规则)绑定到交换器,生产者把消息发送到了交换器,交换器根据绑定的路由键将消息路由到特定的队列,订阅了队列的消费者进行接收。
如果消息达到无人订阅的队列会怎么办?
消息会一直在队列中等待,rabbitmq会默认队列是无限长度的。
多个消费者订阅到同一队列怎么办?
消息会轮询的方式发送给消费者,每个消息只会发送给一个消费者
消息路由到了不存在的队列怎么办?
会忽略,当消息不存在,消息丢失了。
消息的确认机制
消费者收到的每一条消息都必须进行确认。
(分为自动确认和消费者自行确认)
消费者在声明队列时,指定autoAck参数,true自动确认,false时rabbitmq会等到消费者显示的发回一个ack信号才会删除消息。
autoAck=false,有足够时间让消费者处理消息,直到消费者显示调用basicAck为止。Rabbitmq中消息分为了两部分:1、等待投递的消息;2、已经投递,但是还没有收到ack信号的。如果消费者断连了,服务器会把消息重新入队,投递给下一个消费者。
未ack的消息是没有超时时间的,
如何明确拒绝消息?
1、消费者断连,2、消费者使用reject命令(requeue=true,重新分发消息,false移除消息),3、nack命令(RabbitMQ才有的批量的拒绝)
创建队列,
(生产/消费)declareQueue。消费者订阅了队列,不能再声明队列了。
相关参数(exclusive 队列为应用程序私有,auto-delete 最后一个消费者取消订阅时,队列会自动删除,durable 队列持久化)
检测队列是否存在
Declare 时的passive参数
交换器
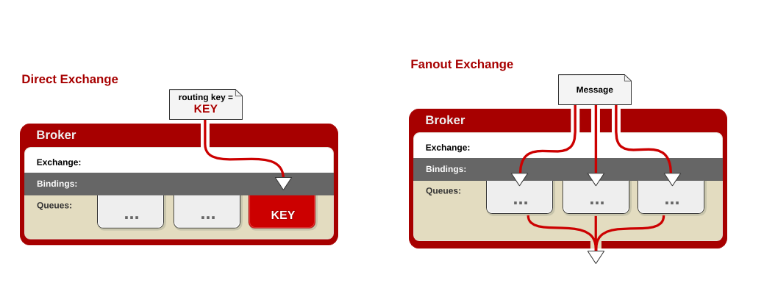
direct,fanout,topic,headers
direct: 路由键完全匹配时,消息投放到对应队列。Amqp实现都必须有一个direct交换器(默认交换器),名称为空白字符。队列不声明交换器,会自动绑定到默认交换器,队列的名称作为路由键。
Fanout:可以理解为广播
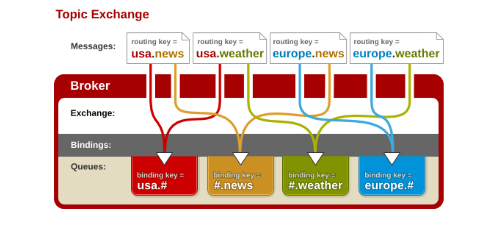
Topic:主题,使来自不同源头的消息到达同一个队列
Headers: 匹配消息头,其余与direct一样,实用性不大
日志处理场景:
1、 有交换器(topic)log_exchange,日志级别有 error,info,warning,应用模块有 user,order,email,路由键的规则是 日志级别+“.”+应用模块名(例如info.user)
2、 发送邮件失败,报告一个email的error,basicPublic(message,’log-exchange’,’error.email’)
队列的绑定:queueBind(“email-error-queue”,’log-exchange’,’error.email’)
要监听email所有的日志怎么办?
queueBind(“email-log-queue”,’log-exchange’,’*.email’)
监听所有模块所有级别日志?
queuebind(“all-log-queue”,’log-exchange’,’#’)
“.”会把路由键分为好几个标识符,“*”匹配一个标识符,“#”匹配一个或者多个(xxx.yyy.zzzz 可以: xxx.*. zzzz , xxx.# , #.zzzz)。
虚拟主机
Vhost,真实rabbitmq服务器上的mini型虚拟的mq服务器。有自己的权限机制。Vhost提供了一个逻辑上的分离,可以区分客户端,避免队列和交换器的名称冲突。RabbitMq包含了一个缺省的vhost :“/”,用户名guest,口令 guest(guest用户只能在本机访问)。
消息持久化
1、 队列是必须持久化
2、 交换器也必须是持久化
3、 消息的投递模式必须(int型) 2
以上条件全部满足,消息才能持久化
问题:性能(下降10倍)
AMQP和JMS区别:
|
|
JMS |
AMQP |
| 定义 |
Java api |
协议 |
| Model |
P2P Pub/Sub |
Direct Fanout Topic headers |
| 支持消息类型 |
5种 |
Byte[] 自行消息序列化,Json化 |
| 综合评价 |
Java系统,模型满足要求,跨平台较差 |
协议,天然跨平台,跨语言 |
RabbitMq在Windows下安装和运行
1、下载Erlang: http://www.erlang.org/downloads/19.2
2、下载Windows版RabbitMq:
http://www.rabbitmq.com/releases/rabbitmq-server/v3.6.6/rabbitmq-server-3.6.6.exe
3、安装并配置环境变量:
ERLANG_HOME C:\Program Files\erl8.2
path下添加 %ERLANG_HOME%\bin
RABBITMQ_BASE C:\Program Files\RabbitMQ Server\rabbitmq_server-3.6.6
path下添加 %RABBITMQ_BASE%\sbin;%RABBITMQ_BASE%\ebin
4、在开始菜单中启动服务
5、在安装目录的sbin下运行rabbitmqctl.bat status
客户端Jar包和源码包下载地址:
http://repo1.maven.org/maven2/com/rabbitmq/amqp-client/5.0.0/amqp-client-5.0.0.jar http://repo1.maven.org/maven2/com/rabbitmq/amqp-client/5.0.0/amqp-client-5.0.0-sources.jar
还需要slf4j-api-1.6.1.jar
如果是Maven工程加入:
<dependency>
  <groupId>com.rabbitmq</groupId>
  <artifactId>amqp-client</artifactId>
  <version>5.0.0</version>
</dependency>
注意:5系列的版本最好使用JDK8及以上, 低于JDK8可以使用4.x(具体的版本号到Maven的中央仓库查)的版本
实践代码
/**
 * direct交换器生产者
 * @author Administrator
 *
 */
public class DirectProducer {

	/**交换器名称*/
	private final static String EXCHANGE_NAME = "direct_logs";

	public static void main(String[] args) throws IOException{
			try {
				ConnectionFactory factory = new ConnectionFactory();
		        factory.setHost("127.0.0.1");
				/**连接到本机可以省略 guest用户只能在本机上使用
		        factory.setUsername(..);
		        factory.setPort();
		        factory.setVirtualHost();*/
				/**新建连接*/
				Connection connection = factory.newConnection();
				/**创建信道*/
				Channel channel = connection.createChannel();
				/**声明direct交换器*/
		        channel.exchangeDeclare(EXCHANGE_NAME, BuiltinExchangeType.DIRECT);
		        /**路由键数组*/
		        String[] routingKeys = {"error","info","warning"};
		        for(int i=0;i<3;i++){
		            String routingKey = routingKeys[i];
		            String message = "Hello world_"+(i+1);
			        /**发送消息                   (交换器 ,路由键 ,BasicProperties=null,  内容)*/
		            channel.basicPublish(EXCHANGE_NAME,routingKey,null,message.getBytes());
		            System.out.println("Sent "+routingKey+":"+message);
		        }
		        /**关闭信道和连接*/
		        channel.close();
		        connection.close();
			} catch (TimeoutException e) {
				// TODO Auto-generated catch block
				e.printStackTrace();
			}

	   }
}
/**
* fanout交换器生产者
* @author Administrator
*
*/
public class FanoutProducer {
/**交换器名称*/
private final static String EXCHANGE_NAME = "fanout_logs";
public static void main(String[] args) throws IOException{
try {
ConnectionFactory factory = new ConnectionFactory();
factory.setHost("127.0.0.1");
/**新建连接*/
Connection connection = factory.newConnection();
/**创建信道*/
Channel channel = connection.createChannel();
/**声明fanout交换器*/
channel.exchangeDeclare(EXCHANGE_NAME, BuiltinExchangeType.FANOUT);
/**路由键数组*/
String[] routingKeys = {"error","info","warning"};
for(int i=0;i<3;i++){
String routingKey = routingKeys[i];
String message = "Hello world_"+(i+1);
/**发送消息 (交换器 ,路由键 ,BasicProperties=null, 内容)*/
channel.basicPublish(EXCHANGE_NAME,routingKey,null,message.getBytes());
System.out.println("Sent "+routingKey+":"+message);
}
/**关闭信道和连接*/
channel.close();
connection.close();
} catch (TimeoutException e) {
// TODO Auto-generated catch block
e.printStackTrace();
}
}
}/***
* 消费者 接受所有消息
* @author Administrator
*
*/
public class ConsumerAll {
/**交换器名称*/
//private final static String EXCHANGE_NAME = "direct_logs";
private final static String EXCHANGE_NAME = "fanout_logs";
public static void main(String[] args) throws IOException{
try {
ConnectionFactory factory = new ConnectionFactory();
factory.setHost("127.0.0.1");
/**新建连接*/
Connection connection = factory.newConnection();
/**创建信道*/
Channel channel = connection.createChannel();
/**声明direct交换器*/
//channel.exchangeDeclare(EXCHANGE_NAME, BuiltinExchangeType.DIRECT);
/**声明fanout交换器*/
channel.exchangeDeclare(EXCHANGE_NAME, BuiltinExchangeType.FANOUT);
/**声明随机队列*/
String queueName = channel.queueDeclare().getQueue();
/**路由键数组*/
String[] routingKeys = {"error","info","warning"};
/**一个队列绑定多个路由键*/
for(String routingKey:routingKeys){
/**队列绑定交换器和路由键*/
channel.queueBind(queueName,EXCHANGE_NAME,routingKey);
}
System.out.println("Waiting message.......");
/**创建Consumer消息监听器*/
Consumer callbackConsumer=new DefaultConsumer(channel){
@Override
public void handleDelivery(String consumerTag,Envelope envelope,
BasicProperties properties,byte[] body) throws IOException {
String message=new String(body,"UTF-8");
System.out.println("Accept:"+envelope.getRoutingKey()+":"+message);
}
};
/**信道启用监听器 队列名称 ,是否自动确认,callback监听器 */
channel.basicConsume(queueName,true,callbackConsumer);
} catch (TimeoutException e) {
// TODO Auto-generated catch block
e.printStackTrace();
}
}
}/***
* 消费者 接受erroe消息
* @author Administrator
*
*/
public class ConsumerError {
/**交换器名称*/
//private final static String EXCHANGE_NAME = "direct_logs";
private final static String EXCHANGE_NAME = "fanout_logs";
public static void main(String[] args) throws IOException{
try {
ConnectionFactory factory = new ConnectionFactory();
factory.setHost("127.0.0.1");
/**新建连接*/
Connection connection = factory.newConnection();
/**创建信道*/
Channel channel = connection.createChannel();
/**声明direct交换器*/
//channel.exchangeDeclare(EXCHANGE_NAME, BuiltinExchangeType.DIRECT);
/**声明fanout交换器*/
channel.exchangeDeclare(EXCHANGE_NAME, BuiltinExchangeType.FANOUT);
/**声明随机队列*/
String queueName = channel.queueDeclare().getQueue();
/**路由键*/
String routingKey = "error";
/**队列绑定交换器和路由键*/
channel.queueBind(queueName,EXCHANGE_NAME,routingKey);
System.out.println("Waiting message.......");
/**创建Consumer消息监听器*/
Consumer callbackConsumer=new DefaultConsumer(channel){
@Override
public void handleDelivery(String consumerTag,Envelope envelope,
BasicProperties properties,byte[] body) throws IOException {
String message=new String(body,"UTF-8");
System.out.println("Accept:"+envelope.getRoutingKey()+":"+message);
}
};
/**信道启用监听器 队列名称 ,是否自动确认,callback监听器 */
channel.basicConsume(queueName,true,callbackConsumer);
} catch (TimeoutException e) {
// TODO Auto-generated catch block
e.printStackTrace();
}
}
}实践代码 消费者确认
/**
 * 消费者确认模式
 * @author Administrator
 *
 */
public class ConsumerConfirmProducer {

	/**交换器名称*/
	private final static String EXCHANGE_NAME = "direct_confirm";
	/**路由键*/
	private final static String RoutingKey="error";

	public static void main(String[] args) throws IOException{
			try {
				ConnectionFactory factory = new ConnectionFactory();
		        factory.setHost("127.0.0.1");
				/**新建连接*/
				Connection connection = factory.newConnection();
				/**创建信道*/
				Channel channel = connection.createChannel();
				/**声明direct交换器*/
		        channel.exchangeDeclare(EXCHANGE_NAME, BuiltinExchangeType.DIRECT);

		        for(int i=0;i<10;i++){
		            String message = "Hello world_"+(i+1);
			        /**发送消息*/
		            channel.basicPublish(EXCHANGE_NAME,RoutingKey,null,message.getBytes());
		            System.out.println("Sent "+RoutingKey+":"+message);
		        }
		        /**关闭信道和连接*/
		        channel.close();
		        connection.close();
			} catch (TimeoutException e) {
				// TODO Auto-generated catch block
				e.printStackTrace();
			}

	   }
}
/***
* 消费者自己响应
* @author Administrator
*
*/
public class ClientConsumerAck {
/**交换器名称*/
private final static String EXCHANGE_NAME = "direct_confirm";
public static void main(String[] args) throws IOException{
try {
ConnectionFactory factory = new ConnectionFactory();
factory.setHost("127.0.0.1");
/**新建连接*/
Connection connection = factory.newConnection();
/**创建信道*/
Channel channel = connection.createChannel();
/**声明direct交换器*/
channel.exchangeDeclare(EXCHANGE_NAME, BuiltinExchangeType.DIRECT);
/**队列名称*/
String queueName = "consumer_confirm";
/**声明队列 名称,持久化,私有化,自动删除,arguments */
channel.queueDeclare(queueName, false, false, false, null);
/**路由键*/
String routingKey = "error";
/**队列绑定交换器和路由键*/
channel.queueBind(queueName,EXCHANGE_NAME,routingKey);
System.out.println("Waiting message.......");
/**创建Consumer消息监听器*/
Consumer callbackConsumer=new DefaultConsumer(channel){
@Override
public void handleDelivery(String consumerTag,Envelope envelope,
BasicProperties properties,byte[] body) throws IOException {
String message=new String(body,"UTF-8");
System.out.println("Accept:"+envelope.getRoutingKey()+":"+message);
/**手动消息确认 deliveryTag标志符, multiple 是否批量回复*/
this.getChannel().basicAck(envelope.getDeliveryTag(), false);
}
};
/**信道启用监听器 队列名称 ,是否自动确认 false,callback监听器 */
channel.basicConsume(queueName,false,callbackConsumer);
} catch (TimeoutException e) {
// TODO Auto-generated catch block
e.printStackTrace();
}
}
}/**
* 消费者响应缓慢
* @author Administrator
*
*/
public class ClientConsumerSlowAck {
/**交换器名称*/
private final static String EXCHANGE_NAME = "direct_confirm";
public static void main(String[] args) throws IOException{
try {
ConnectionFactory factory = new ConnectionFactory();
factory.setHost("127.0.0.1");
/**新建连接*/
Connection connection = factory.newConnection();
/**创建信道*/
Channel channel = connection.createChannel();
/**声明direct交换器*/
channel.exchangeDeclare(EXCHANGE_NAME, BuiltinExchangeType.DIRECT);
/**队列名称*/
String queueName = "consumer_confirm";
/**声明队列 名称,持久化,私有化,自动删除,arguments */
channel.queueDeclare(queueName, false, false, false, null);
/**路由键*/
String routingKey = "error";
/**队列绑定交换器和路由键*/
channel.queueBind(queueName,EXCHANGE_NAME,routingKey);
System.out.println("Waiting message.......");
/**创建Consumer消息监听器*/
Consumer callbackConsumer=new DefaultConsumer(channel){
@Override
public void handleDelivery(String consumerTag,Envelope envelope,
BasicProperties properties,byte[] body) throws IOException {
/**接收前休眠25秒*/
try {
Thread.sleep(25000);
} catch (InterruptedException e) {
// TODO Auto-generated catch block
e.printStackTrace();
}
String message=new String(body,"UTF-8");
System.out.println("Accept:"+envelope.getRoutingKey()+":"+message);
/**手动消息确认注释 deliveryTag标志符, multiple 是否批量回复*/
//this.getChannel().basicAck(envelope.getDeliveryTag(), false);
}
};
/**信道启用监听器 队列名称 ,是否自动确认 false,callback监听器 */
channel.basicConsume(queueName,false,callbackConsumer);
} catch (TimeoutException e) {
// TODO Auto-generated catch block
e.printStackTrace();
}
}
}/**
* 消费者拒绝
* @author Administrator
*
*/
public class ClientConsumerReject {
/**交换器名称*/
private final static String EXCHANGE_NAME = "direct_confirm";
public static void main(String[] args) throws IOException{
try {
ConnectionFactory factory = new ConnectionFactory();
factory.setHost("127.0.0.1");
/**新建连接*/
Connection connection = factory.newConnection();
/**创建信道*/
Channel channel = connection.createChannel();
/**声明direct交换器*/
channel.exchangeDeclare(EXCHANGE_NAME, BuiltinExchangeType.DIRECT);
/**队列名称*/
String queueName = "consumer_confirm";
/**声明队列 名称,持久化,私有化,自动删除,arguments */
channel.queueDeclare(queueName, false, false, false, null);
/**路由键*/
String routingKey = "error";
/**队列绑定交换器和路由键*/
channel.queueBind(queueName,EXCHANGE_NAME,routingKey);
System.out.println("Waiting message.......");
/**创建Consumer消息监听器*/
Consumer callbackConsumer=new DefaultConsumer(channel){
@Override
public void handleDelivery(String consumerTag,Envelope envelope,
BasicProperties properties,byte[] body) throws IOException {
/**手动消息确认 deliveryTag标志符, requeue 是否重发到队列*/
this.getChannel().basicReject(envelope.getDeliveryTag(),true);
System.out.println("Reject:"+envelope.getRoutingKey()+":"+new String(body,"UTF-8"));
}
};
/**信道启用监听器 队列名称 ,是否自动确认 false,callback监听器 */
channel.basicConsume(queueName,false,callbackConsumer);
} catch (TimeoutException e) {
// TODO Auto-generated catch block
e.printStackTrace();
}
}
}同步和异步、监听器的使用
/***
 * 发送方确认  同步模式  生产者
 * @author Administrator
 *
 */
public class ProducerConfirm {
    private final static String EXCHANGE_NAME = "producer_confirm";
    private final static String ROUTE_KEY = "error";

    public static void main(String[] args) throws IOException, TimeoutException,
            InterruptedException {
        /**
         * 创建连接连接到MabbitMQ
         */
        ConnectionFactory factory = new ConnectionFactory();
        /**设置MabbitMQ所在主机ip或者主机名*/
        factory.setHost("127.0.0.1");
        /**创建一个连接*/
        Connection connection = factory.newConnection();
       /**创建一个信道*/
        Channel channel = connection.createChannel();
        /**将信道设置为发送方确认*/
        channel.confirmSelect();
        for(int i=0;i<2;i++){
            String msg = "Hello "+(i+1);
            channel.basicPublish(EXCHANGE_NAME,ROUTE_KEY,null,msg.getBytes());
            /**阻塞    等待确认*/
            if (channel.waitForConfirms()){
                System.out.println(ROUTE_KEY+":"+msg);
            }
        }
        /**关闭频道和连接*/
        channel.close();
        connection.close();
    }

}
/***
 * 发送方确认  异步模式  生产者
 */
public class ProducerConfirmAsync {

    private final static String EXCHANGE_NAME = "producer_confirm";

    public static void main(String[] args) throws IOException, TimeoutException,
            InterruptedException {
        /**
         * 创建连接连接到MabbitMQ
         */
        ConnectionFactory factory = new ConnectionFactory();
        /** 设置MabbitMQ所在主机ip或者主机名*/
        factory.setHost("127.0.0.1");
        /** 创建一个连接*/
        Connection connection = factory.newConnection();

        /**创建一个信道*/
        Channel channel = connection.createChannel();
        /** 监听器*/
        channel.exchangeDeclare(EXCHANGE_NAME, BuiltinExchangeType.DIRECT);

        /**将信道设置为发送方确认*/
        channel.confirmSelect();

        /**连接被关闭时触发
        connection.addShutdownListener();*/
        /**信道被关闭时触发
        channel.addShutdownListener();*/
        /**确认监听(消息成功投递时触发)      deliveryTag代表了(channel)唯一的投递  multiple:false*/
        channel.addConfirmListener(new ConfirmListener() {
            public void handleAck(long deliveryTag, boolean multiple)
                    throws IOException {
                System.out.println("Ack deliveryTag="+deliveryTag
                        +"multiple:"+multiple);
            }
            /**内部错误时*/
            public void handleNack(long deliveryTag, boolean multiple)
                    throws IOException {
                System.out.println("Ack deliveryTag="+deliveryTag
                        +"multiple:"+multiple);
            }
        });
        /** 返回监听(消息投递失败时触发)*/
        channel.addReturnListener(new ReturnListener() {
            public void handleReturn(int replyCode, String replyText,
                                     String exchange, String routingKey,
                                     AMQP.BasicProperties properties, byte[] body)
                    throws IOException {
                String msg = new String(body);
                System.out.println("replyText:"+replyText);
                System.out.println("exchange:"+exchange);
                System.out.println("routingKey:"+routingKey);
                System.out.println("msg:"+msg);
            }
        });
        /**标志位 mandatory参数
     	为true,投递消息时无法找到一个合适的队列   消息返回给生产者
    	为false 丢弃消息(缺省) */
        boolean mandatory=true;
        String[] severities={"error","info","warning"};
        for(int i=0;i<3;i++){
            String severity = severities[i%3];
            // 发送的消息
            String message = "Hello World_"+(i+1)+("_"+System.currentTimeMillis());
            channel.basicPublish(EXCHANGE_NAME, severity, mandatory,null, message.getBytes());
            //channel.basicPublish(EXCHANGE_NAME,ROUTE_KEY,null,msg.getBytes());
            System.out.println("----------------------------------------------------");
            System.out.println(" Sent Message: [" + severity +"]:'"+ message + "'");
            Thread.sleep(200);
        }

        // 关闭频道和连接
        channel.close();
        connection.close();
    }


}
/***
 * 发送方确认  消费者
 * @author Administrator
 *
 */
public class ProducerConfirmConsumer {

	   private static final String EXCHANGE_NAME = "producer_confirm";

	    public static void main(String[] argv) throws IOException, TimeoutException {
	        ConnectionFactory factory = new ConnectionFactory();
	        factory.setHost("127.0.0.1");
	        /**打开连接和创建频道,与发送端一样*/
	        Connection connection = factory.newConnection();
	        final Channel channel = connection.createChannel();

	        channel.exchangeDeclare(EXCHANGE_NAME, BuiltinExchangeType.DIRECT);

	        String queueName = "producer_confirm";
	        channel.queueDeclare(queueName,false,false,
	                false,null);
	        /**只关注error级别的日志*/
	        String severity="error";
	        channel.queueBind(queueName, EXCHANGE_NAME, severity);

	        System.out.println(" [*] Waiting for messages......");

	        /**创建队列消费者*/
	        final Consumer consumerB = new DefaultConsumer(channel) {
	            @Override
	            public void handleDelivery(String consumerTag, Envelope envelope, AMQP.BasicProperties properties, byte[] body) throws IOException {
	                String message = new String(body, "UTF-8");
	                System.out.println( "Received ["+ envelope.getRoutingKey() + "] "+message);
	            }
	        };
	        channel.basicConsume(queueName, true, consumerB);
	    }
}
与Spring集成
1)Spring的配置文件中要增加命名空间
xmlns:rabbit="http://www.springframework.org/schema/rabbit"

http://www.springframework.org/schema/rabbit
http://www.springframework.org/schema/rabbit/spring-rabbit-2.0.xsd
2)其他配置
   <!-- rabbitMQ配置 -->
	<bean id="rabbitConnectionFactory"
        class="org.springframework.amqp.rabbit.connection.CachingConnectionFactory">
        <constructor-arg value="127.0.0.1"/>
        <property name="username" value="guest"/>
        <property name="password" value="guest"/>
        <property name="channelCacheSize" value="8"/>
        <property name="port" value="5672"></property>
    </bean>

    <!--Spring的rabbitmq admin-->
    <rabbit:admin connection-factory="rabbitConnectionFactory"/>

    <!-- 生产者配置 -->
    <!--生产者创建队列  不使用的队列   持久化durable=false -->
    <rabbit:queue name="p_create_queue" durable="false"/>

    <!--fanout交换器-->
    <rabbit:fanout-exchange name="fanout-exchange"
        xmlns="http://www.springframework.org/schema/rabbit" durable="false">
        <!-- 绑定队列 -->
        <rabbit:bindings>
            <rabbit:binding queue="p_create_queue"></rabbit:binding>
        </rabbit:bindings>
    </rabbit:fanout-exchange>

    <!--topic交换器-->
    <rabbit:topic-exchange name="topic-exchange"
    	 xmlns="http://www.springframework.org/schema/rabbit" durable="false">
    </rabbit:topic-exchange>

	<!-- rabbitTemplate 消息模板类 -->
    <bean id="rabbitTemplate" class="org.springframework.amqp.rabbit.core.RabbitTemplate">
        <constructor-arg ref="rabbitConnectionFactory"></constructor-arg>
    </bean>


    <!-- 消费者配置 -->
    <!-- fanout交换器 begin-->
    <!-- 消费者定义队列 -->
	<rabbit:queue name="h1_queue" durable="false"/>
	<rabbit:queue name="h2_queue" durable="false"/>
	<rabbit:queue name="h3_queue" durable="false"/>
	<!-- 把需要数据的队列与交换器绑定一起 -->
	<rabbit:fanout-exchange name="fanout-exchange" xmlns="http://www.springframework.org/schema/rabbit" durable="false">
		<rabbit:bindings>
			<rabbit:binding queue="h1_queue"></rabbit:binding>
			<rabbit:binding queue="h2_queue"></rabbit:binding>
			<rabbit:binding queue="h3_queue"></rabbit:binding>
		</rabbit:bindings>
	</rabbit:fanout-exchange>
    <!-- fanout交换器 end-->

    <!-- topic交换器 begin-->
    <!-- 定义队列 -->
    <rabbit:queue name="all_log_queue" durable="false"/>
    <rabbit:queue name="email_all_queue" durable="false"/>
    <rabbit:queue name="email_error_queue" durable="false"/>
    <rabbit:queue name="all_error_queue" durable="false"/>
    <!--队列通过路由键与交换器绑定一起 -->
    <rabbit:topic-exchange name="topic-exchange" xmlns="http://www.springframework.org/schema/rabbit" durable="false">
        <rabbit:bindings>
            <rabbit:binding queue="all_log_queue" pattern="#"></rabbit:binding>
            <rabbit:binding queue="email_all_queue" pattern="*.email"></rabbit:binding>
            <rabbit:binding queue="email_error_queue"  pattern="error.email"></rabbit:binding>
            <rabbit:binding queue="all_error_queue"  pattern="error.*"></rabbit:binding>
        </rabbit:bindings>
    </rabbit:topic-exchange>
    <!-- topic交换器 end-->

    <!--fanout消费者定义-->
    <bean id="h1_Consumer" class="com.xjt.astudy.rabbitmq.spring.H1_Service"></bean>
    <bean id="h2_Consumer" class="com.xjt.astudy.rabbitmq.spring.H2_Service"></bean>
    <bean id="h3_Consumer" class="com.xjt.astudy.rabbitmq.spring.H3_Service"></bean>

    <!--监听容器    消费者监听队列-->
    <rabbit:listener-container connection-factory="rabbitConnectionFactory">
        <rabbit:listener ref="h1_Consumer" queues="h1_queue" method="onMessage" />
        <rabbit:listener ref="h2_Consumer" queues="h2_queue" method="onMessage" />
        <rabbit:listener ref="h3_Consumer" queues="h3_queue" method="onMessage" />
        <rabbit:listener ref="allLogTopicService" queues="all_log_queue" method="onMessage" />
        <rabbit:listener ref="emailAllTopicService" queues="email_all_queue" method="onMessage" />
        <rabbit:listener ref="emailErrorTopicService" queues="email_error_queue" method="onMessage" />
        <rabbit:listener ref="allErrorTopicService" queues="all_error_queue" method="onMessage" />
    </rabbit:listener-container>
3)fanout消费者
/**
 * fanout消费者 H1
 */
public class H1_Service implements MessageListener{

    public void onMessage(Message message) {
    	System.out.println("H1_Service Get message:"+new String(message.getBody()));
    }
}
/**
* fanout消费者 H2
*/
public class H2_Service implements MessageListener{
public void onMessage(Message message) {
System.out.println("H2_Service Get message:"+new String(message.getBody()));
}
}/**
* fanout消费者 H3
*/
public class H3_Service implements MessageListener{
public void onMessage(Message message) {
System.out.println("H3_Service Get message:"+new String(message.getBody()));
}
}4)Topic消费者
/**
 * Topic消费者 AllError
 */
@Component
public class AllErrorTopicService implements MessageListener{

    public void onMessage(Message message) {
    	System.out.println("AllErrorTopicService Get message:"+new String(message.getBody()));
    }
}
/**
* Topic消费者 AllLog
*/
@Component
public class AllLogTopicService implements MessageListener{
public void onMessage(Message message) {
System.out.println("AllLogTopicService Get message:"+new String(message.getBody()));
}
}/**
* Topic消费者 EmailAll
*/
@Component
public class EmailAllTopicService implements MessageListener{
public void onMessage(Message message) {
System.out.println("EmailAllTopicService Get message:"+new String(message.getBody()));
}
}/**
* Topic消费者 EmailError
*/
@Component
public class EmailErrorTopicService implements MessageListener{
public void onMessage(Message message) {
System.out.println("EmailErrorTopicService Get message:"+new String(message.getBody()));
}
}5)生产者 消费发送控制层
/**
 * RabbitMqController
 */
@Controller
public class RabbitMqController {

    @Autowired
    private RabbitTemplate rabbitTemplate;

    /**
     * 发送信息到fanout交换器上
     * @param message
     * @return
     */
    @ResponseBody
    @RequestMapping("fanoutSender")
    public String fanoutSender(ModelMap modelMap,String message){
        try {
            for(int i=0;i<3;i++){
                String str = "Fanout,the message_"+i+" is : "+message;
                System.out.println("**************************Send Message:["+str+"]");
                /**模版发送消息                  交换器 ,路由键,消息*/
                rabbitTemplate.send("fanout-exchange","",new Message(str.getBytes(),new MessageProperties()));

            }
            modelMap.put(CommonInfoUtil.JSONMSG, CommonInfoUtil.SUCCESS);
        } catch (Exception e) {
            e.printStackTrace();
            modelMap.put(CommonInfoUtil.JSONMSG, CommonInfoUtil.PARAMERROR);
        }
        return JsonUtil.toJson(modelMap);
    }

    /**
     * 发送信息到topic交换器上
     * @param message
     * @return
     */
    @ResponseBody
    @RequestMapping("topicSender")
    public String topicSender(ModelMap modelMap,String message){
        try {
            String[] routeKeys={"error","info","warning"};
            String[] modules={"email","order","user"};
            for(int i=0;i<routeKeys.length;i++){
                for(int j=0;j<modules.length;j++){
                    String routeKey = routeKeys[i]+"."+modules[j];
                    String str = "the message is [rk:"+routeKey+"]["+message+"]";
                    /**模版发送消息                  交换器 ,路由键,消息*/
                    rabbitTemplate.send("topic-exchange",routeKey,new Message(str.getBytes(),new MessageProperties()));
                }
            }
            modelMap.put(CommonInfoUtil.JSONMSG, CommonInfoUtil.SUCCESS);
        } catch (Exception e) {
        	e.printStackTrace();
            modelMap.put(CommonInfoUtil.JSONMSG, CommonInfoUtil.PARAMERROR);
        }
        return  JsonUtil.toJson(modelMap);
    }

}
异步处理
场景:
用户注册,写入数据库成功以后,发送邮件和短信。
串行模式 ************spend time : 251ms
并行模式 ************spend time : 153ms
消息队列模式:************spend time : 66ms
应用解耦
场景:
用户下订单买商品,下单成功了,扣库存。有库存直接扣,没有库存或低于某个阀值,看下单成功,但要通知其他系统(采购系统)进行调货。
RPC实现:库存系统失败,订单系统也无法成功,订单系统和库存系统耦合了。
使用消息中间件进行解耦:写有一个扣减消息,保证消息的必须处理。
三个问题需要解决:
1. 订单发送给MQ的消息必须要被MQ服务器接收到。(事务、发送者确认)
2. MQ服务器拿到了消息后,消息被正常处理以前必须保持住。(持久化)
3. 某个库存服出了异常,消息要能够被其他的库存服务处理。(消费者确认,消息监听类要实现ChannelAwareMessageLListener)
如果订单系统一定要知道库存系统是否成功怎么办?库存系统和订单系统之间建一个消息通道,库存系统去通知订单系统。
    <!-- rabbitMQ连接工厂配置 -->
	<bean id="rabbitConnectionFactory"
        class="org.springframework.amqp.rabbit.connection.CachingConnectionFactory">
        <constructor-arg value="127.0.0.1"/>
        <property name="username" value="guest"/>
        <property name="password" value="guest"/>
        <property name="channelCacheSize" value="8"/>
        <property name="port" value="5672"></property>
        <!--发布者确认开启 -->
        <property name="publisherConfirms" value="true"></property>
    </bean>

    <!--Spring的rabbitmq admin-->
    <rabbit:admin connection-factory="rabbitConnectionFactory"/>

    <!-- 创建rabbitTemplate 消息模板类 -->
 	<bean id="rabbitTemplate" class="org.springframework.amqp.rabbit.core.RabbitTemplate">
		<constructor-arg ref="rabbitConnectionFactory"></constructor-arg>
		<!-- 消息确认回调 -->
		<property name="confirmCallback" ref="confirmCallback"/>
		<property name="returnCallback" ref="returnCallback"/>
		<!-- mandatory必须设置true,return callback才生效 -->
		<property name="mandatory" value="false"/>
	</bean>

	<!-- 队列持久化 durable=ture -->
	<rabbit:queue name="depot_queue" durable="true"/>
	<!-- 交换器持久化 -->
	<rabbit:direct-exchange name="depot-amount-exchange"
          xmlns="http://www.springframework.org/schema/rabbit" durable="true">
		<rabbit:bindings>
			<rabbit:binding queue="depot_queue" key="amount.depot" ></rabbit:binding>
		</rabbit:bindings>
	</rabbit:direct-exchange>

		<!-- 消费监听  手动确认 acknowledge="manual"-->
    <rabbit:listener-container connection-factory="rabbitConnectionFactory" acknowledge="manual">
    	<!--                      监听队列                  监听实现类                 onMessage方法 -->
        <rabbit:listener queues="depot_queue" ref="processDepot" method="onMessage" />
    </rabbit:listener-container>
/**
* goods类
*/
public class GoodTransferVo implements Serializable {
private String goodsId;
private int changeAmount;
private boolean inOrOut;
public String getGoodsId() {
return goodsId;
}
public void setGoodsId(String goodsId) {
this.goodsId = goodsId;
}
public int getChangeAmount() {
return changeAmount;
}
public void setChangeAmount(int changeAmount) {
this.changeAmount = changeAmount;
}
public boolean isInOrOut() {
return inOrOut;
}
public void setInOrOut(boolean inOrOut) {
this.inOrOut = inOrOut;
}
}/**
* 消息确认回调
* @author Administrator
*
*/
@Service
public class ConfirmCallback implements RabbitTemplate.ConfirmCallback {
@Override
public void confirm(CorrelationData correlationData, boolean ack, String cause) {
if (ack) {
System.out.println("消息确认发送给mq成功");
} else {
//处理失败的消息
System.out.println("消息发送给mq失败,考虑重发:"+cause);
}
}
}/**
* 消息返回回调
*/
@Service
public class ReturnCallback implements RabbitTemplate.ReturnCallback {
@Override
public void returnedMessage(Message message, int replyCode,String replyText, String exchange,
String routingKey) {
System.out.println("Returned replyText:"+replyText);
System.out.println("Returned exchange:"+exchange);
System.out.println("Returned routingKey:"+routingKey);
String msgJson = new String(message.getBody());
System.out.println("Returned Message:"+msgJson);
/**也需要考虑重发机制*/
}
}/**
* 消息生产者
* @author Administrator
*
*/
@Controller
public class MqMode {
/**路由键*/
private final static String DEPOT_RK = "amount.depot";
/**交换器*/
private final static String DEPOT_EXCHANGE = "depot-amount-exchange";
@Autowired
private RabbitTemplate rabbitTemplate;
@ResponseBody
@RequestMapping("processDepot")
public String processDepot(ModelMap modelMap,String goodsId, Integer amount) {
if (goodsId!=null&&amount!=null) {
GoodTransferVo goodTransferVo = new GoodTransferVo();
goodTransferVo.setGoodsId(goodsId);
goodTransferVo.setChangeAmount(amount);
goodTransferVo.setInOrOut(false);
String goods = JsonUtil.toJson(goodTransferVo);
MessageProperties messageProperties = new MessageProperties();
/**消息持久化*/
messageProperties.setDeliveryMode(MessageDeliveryMode.PERSISTENT);
/**发送持久化的消息*/
rabbitTemplate.send(DEPOT_EXCHANGE, DEPOT_RK,new Message(goods.getBytes(), messageProperties));
modelMap.put(CommonInfoUtil.JSONMSG, CommonInfoUtil.SUCCESS);
}else {
modelMap.put(CommonInfoUtil.JSONMSG, CommonInfoUtil.PARAMERROR);
}
return JsonUtil.toJson(modelMap);
}
}/**
* 消费者
*/
@Service
public class ProcessDepot implements ChannelAwareMessageListener {
@Override
public void onMessage(Message message, Channel channel) throws Exception {
try {
String msg = new String(message.getBody());
System.out.println(">>>>>>>>>>>>>>接收到消息:"+msg);
GoodTransferVo goodTransferVo = JsonUtil.fromJson(msg,GoodTransferVo.class);
try {
/**处理业务*/
processGoods(goodTransferVo);
/**确认返回ack*/
channel.basicAck(message.getMessageProperties().getDeliveryTag(), false);
System.out.println(">>>>>>>>>>>>>>库存处理完成,应答Mq服务");
} catch (Exception e) {
/**拒绝消息*/
System.err.println(e.getMessage());
channel.basicNack(message.getMessageProperties().getDeliveryTag(), false,true);
System.err.println(">>>>>>>>>>>>>>库存处理失败,拒绝消息,要求Mq重新派发");
throw e;
}
} catch (Exception e) {
System.err.println(e.getMessage());
}
}
//处理业务
private void processGoods(GoodTransferVo goodTransferVo){
if(goodTransferVo.isInOrOut()){
inDepot(goodTransferVo.getGoodsId(),goodTransferVo.getChangeAmount());
}else{
outDepot(goodTransferVo.getGoodsId(),goodTransferVo.getChangeAmount());
}
}
//增加库存
public void inDepot(String goodsId,int addAmout){
System.out.println("增加库存");
}
//减少库存
public void outDepot(String goodsId,int reduceAmout){
System.out.println("减少库存");
}
}SpringBoot整合RabbitMQ
在Linux下(以CentOS7为例)安装RabbitMQ
1、wget https://packages.erlang-solutions.com/erlang-solutions-1.0-1.noarch.rpm
2、rpm -Uvh erlang-solutions-1.0-1.noarch.rpm
3、yum install epel-release
4、yum install erlang
5、wget http://www.rabbitmq.com/releases/rabbitmq-server/v3.6.6/rabbitmq-server-3.6.6-1.el7.noarch.rpm
6、yum install rabbitmq-server-3.6.6-1.el7.noarch.rpm
安装完成后 1、service rabbitmq-server start 2、service rabbitmq-server
Rabbitmq常用端口
1、client端通信端口: 5672
2、管理端口 : 15672
3、server间内部通信端口: 25672
如端口出现不能访问,使用形如以下命令开启: firewall-cmd --add-port=15672/tcp --permanent
运行rabbitmqctl status出现Error: unable to connect to node rabbit@controller: nodedown之类问题考虑如下几种解决办法:
1、重启服务 service rabbitmq-server stop service rabbitmq-server start
2、检查/var/lib/rabbitmq中是否存在.erlang.cookie,没有则新建一个,里面随便输入一段字符串
3、重新安装服务
4、百度或者Google一下
日志一般放在:
/var/log/rabbitmq/[email protected]
/var/log/rabbitmq/[email protected]
管理虚拟主机
rabbitmqctl add_vhost [vhost_name]
rabbitmqctl list_vhosts
启动和关闭rabbitmq
rabbitmq-server会启动Erlang节点和Rabbitmq应用
rabbitmqctl stop会关闭Erlang节点和Rabbitmq应用
rabbitmqctl stop_app关闭Rabbitmq应用
rabbitmqctl start_app启动Rabbitmq应用
Rabbitmq配置文件放在 /etc/rabbitmq 下,名为rabbitmq.config,没有且需要使用则可以自己新建一个。
用户管理
rabbitmqctl add_user [username] [pwd]
rabbitmqctl delete_user [username]
用户权限控制
rabbitmqctl set_permissions [-p <vhostpath>] <user> <conf> <write> <read>
查看队列
rabbitmqctl list_queues
查看交换器
rabbitmqctl list_exchanges
查看绑定
rabbitmqctl list_bindings
RabbitMq的Web控制台
运行rabbitmq-plugins enable rabbitmq_management
重启RabbitMq 在浏览中打开http://localhost:15672
RabbitMq集群
內建集群的设计目标:
客户端在节点崩溃的情况下可以运行,线性扩展来扩充消息的吞吐量
可以保证消息的万无一失吗?
当一个节点崩溃了以后,节点所有队列上的消息都会丢失。默认不会将队列的消息在集群中复制。(冗余)
集群中的队列
在集群中不会复制,其他节点只会保存队列所处的节点和元数据,消息的传递给队列的所有者节点。
集群中的交换器
会进行复制。本质就是一个类似于hashmap的映射表。
集群中的节点
两种:内存节点,磁盘节点。单机情况下,一定是个磁盘节点。集群里面,要求每个集群必须有至少以一个磁盘节点,出于高可用考虑,建议配两个。
本机集群(不建议安装,有条件应在多个服务器上安装):
RABBITMQ_NODE_PORT=5672 RABBITMQ_NODENAME=rabbit rabbitmq-server -detached
RABBITMQ_NODE_PORT=5673 RABBITMQ_NODENAME=rabbit_1 rabbitmq-server -detached
RABBITMQ_NODE_PORT=5674 RABBITMQ_NODENAME=rabbit_2 rabbitmq-server -detached
rabbitmqctl -n rabbit_1@centosvm stop_app
rabbitmqctl -n rabbit_1@centosvm reset
rabbitmqctl -n rabbit_1@centosvm join_cluster rabbit@centosvm
rabbitmqctl -n rabbit_1@centosvm start_app
rabbitmqctl cluster_status
rabbitmqctl -n rabbit_2@centosvm stop_app
rabbitmqctl -n rabbit_2@centosvm reset
rabbitmqctl -n rabbit_2@centosvm join_cluster rabbit@centosvm --ram (内存节点)
rabbitmqctl -n rabbit_2@centosvm start_app
rabbitmqctl cluster_status
从外部要访问虚拟机中的mq记得在防火墙中打开端口
firewall-cmd --add-port=5673/tcp --permanent
firewall-cmd --add-port=5674/tcp --permanent
rabbitmqctl add_user mq mq
rabbitmqctl set_permissions mq ".*" ".*" ".*"
rabbitmqctl set_user_tags mq administrator
rabbitmq-plugins -n rabbit_1@centosvm enable rabbitmq_management
多机下的集群
1、 修改 /etc/hosts
192.168.1.1 node1
192.168.1.2 node2
192.168.1.3 node3
2、Erlang Cookie 文件:
/var/lib/rabbitmq/.erlang.cookie。将 node1 的该文件复制到 node2、node3,由于这个文件权限是 400,所以需要先修改 node2、node3 中的该文件权限为 777,然后将 node1 中的该文件拷贝到 node2、node3,最后将权限和所属用户/组修改回来。
3、运行各节点
4、在node2、node3上分别运行
[root@node2 ~]# rabbitmqctl stop_app
[root@node2 ~]./rabbitmqctl reset
[root@node2 ~]# rabbitmqctl join_cluster rabbit@node1
[root@node2 ~]# rabbitmqctl start_app
内存节点则是rabbitmqctl join_cluster rabbit@node1 –ram
移除集群中的节点
[root@node2 ~]# rabbitmqctl stop_app
[root@node2 ~]./rabbitmqctl reset
[root@node2 ~]# rabbitmqctl start_app
镜像队列
什么是镜像队列
如果RabbitMQ集群是由多个broker节点构成的,那么从服务的整体可用性上来讲,该集群对于单点失效是有弹性的,但是同时也需要注意:尽管exchange和binding能够在单点失效问题上幸免于难,但是queue和其上持有的message却不行,这是因为queue及其内容仅仅存储于单个节点之上,所以一个节点的失效表现为其对应的queue不可用。
引入RabbitMQ的镜像队列机制,将queue镜像到cluster中其他的节点之上。在该实现下,如果集群中的一个节点失效了,queue能自动地切换到镜像中的另一个节点以保证服务的可用性。在通常的用法中,针对每一个镜像队列都包含一个master和多个slave,分别对应于不同的节点。slave会准确地按照master执行命令的顺序进行命令执行,故slave与master上维护的状态应该是相同的。除了publish外所有动作都只会向master发送,然后由master将命令执行的结果广播给slave们,故看似从镜像队列中的消费操作实际上是在master上执行的。
RabbitMQ的镜像队列同时支持publisher confirm和事务两种机制。在事务机制中,只有当前事务在全部镜像queue中执行之后,客户端才会收到Tx.CommitOk的消息。同样的,在publisher confirm机制中,向publisher进行当前message确认的前提是该message被全部镜像所接受了。
镜像队列的使用
添加policy
Rabbitmqctl set_policy Name Pattern Definition
Name:策略的名字
Pattern:队列匹配模式(正则表达式)
Definition:镜像的定义:ha-mode,ha-params,ha-sycn-mode
ha-mode: all/exactly/nodes
ha-params: n表示几个节点上复制/节点名称
ha-sycn-mode:automatic manual
对队列名称以“queue_”队列进行镜像,只在两个节点上完成复制
Rabbitmqctl set_policy ha_queue_two “^queue_” ‘{“ha-mode”:”exactly”,”ha-params”:2,”ha-sycn-mode“:“atuomatic”}’
在代码中也要进行编写
使用HAProxy(以下步骤仅供参考)
作用:将RabbitMQ请求均匀分发到集群上、负载均衡、心跳检测
安装配置:
1.下载最新haproxy安装包,官网:http://www.haproxy.org
2.上传到linux的haproxy用户根目录下,并解压:
tar -zxvf haproxy-1.5.8.tar.gz
创建目录/home/haproxy/haproxy
3.安装
cd haproxy-1.5.8
make TARGET=linux26 ARCH=x86_64 PREFIX=/home/haproxy/haproxy #将haproxy安装到/home/haproxy/haproxy ,TARGET是指定内核版本
make install PREFIX=/home/haproxy/haproxy
进入/home/haproxy/haproxy 目录,创建/home/haproxy/haproxy/conf目录,复制配置examples
cp /home/haproxy/haproxy-1.5.8/examples/haproxy.cfg /home/haproxy/haproxy/conf/
4、配置修改(以haproxy rabbitmq 配置为关键字搜索)
互联网时代的消息中间件
消息发送一致性
Void busi{
//业务操作
//写库
//发送消息
}
业务成功,消息发送也要成功
业务失败,消息不应该发送
消息的重复
1、 让处理消息的服务具有幂等性
Update a set zz = 12; (幂等性)
Update a set zz = zz+12;(无幂等性)
2、 db或者缓存保存消息的处理状况,消息id作为唯一性索引
消息中间件与RPC的关系
两者并不是水火不容的关系,两者可以很好的进行融合,结合起来使用。rpc客户端调用rpc服务,或者rpc服务返回处理结果,就完全可以通过消息中间件进行。
使用消息中间件做rpc有何好处:自动将消息路由到合适的地方,通过消息中间件可以在rpc服务集群中做到负载均衡,甚至当rpc服务中某台服务挂了,可以做到自动重发。
消息的数据量不能太大。