逻辑卷的管理
概述:
物理分区:  用来制作物理卷
物理卷:    pv  用来组成物理卷组 ;包含整数个 pe(物理拓展)
物理卷组 :  vg  用来制作逻辑卷
逻辑卷:    lvm 它的作用是实现硬盘的无限分区与扩容
1.逻辑卷的创建
(1).创建物理分区
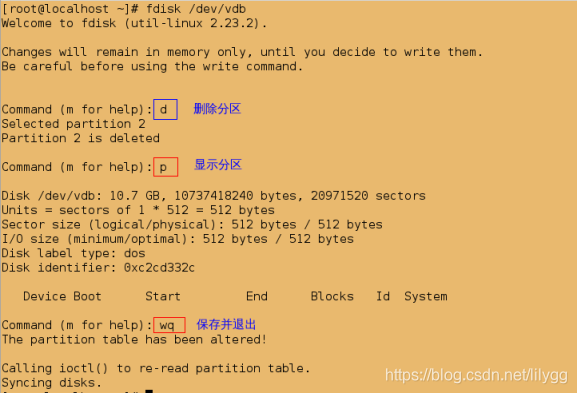
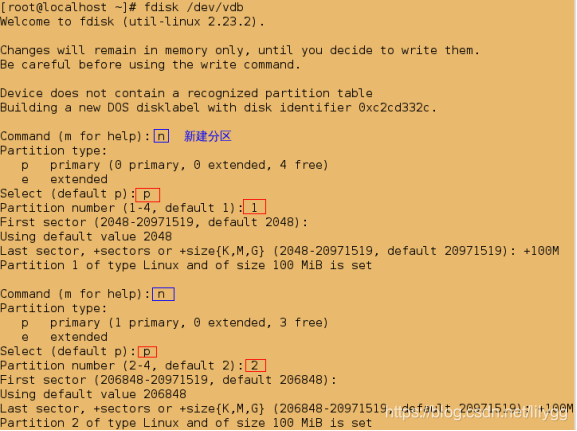
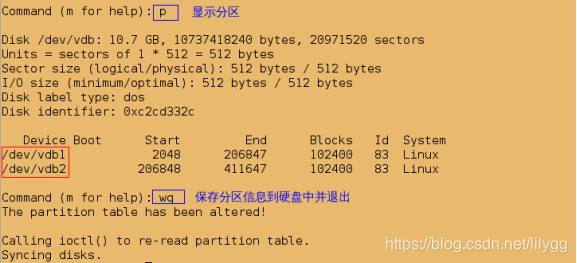
##1.新建分区
[root@localhost ~]# fdisk /dev/vdb
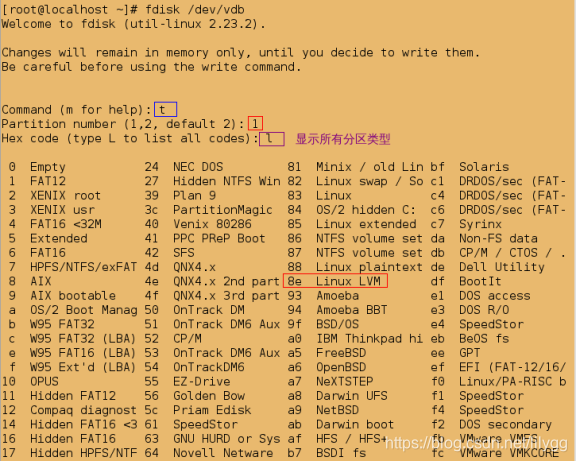
##2.更改分区类型为LVM
[root@localhost ~]# fdisk /dev/vdb
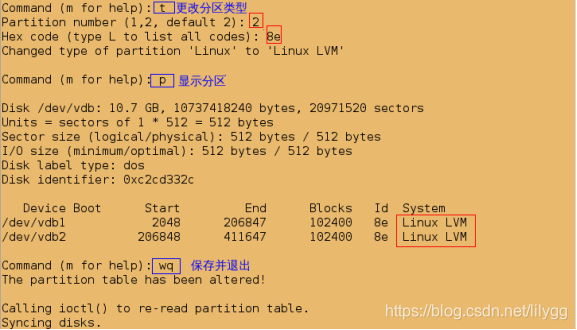
##同步分区表
[root@localhost ~]# partprobe
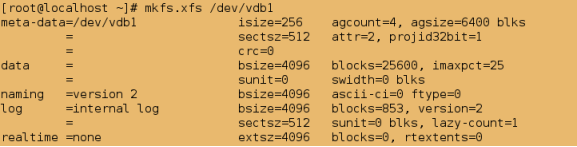
##3.格式化为xfs类型
[root@localhost ~]# mkfs.xfs /dev/vdb1
##4.建立载点
[root@localhost ~]# mkdir /weixindata
##5.挂载
[root@localhost ~]# mount /dev/vdb1 /weixindata/
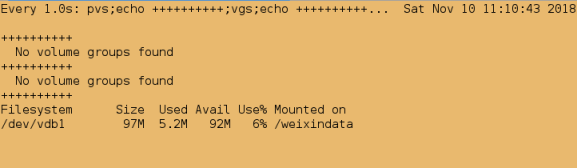
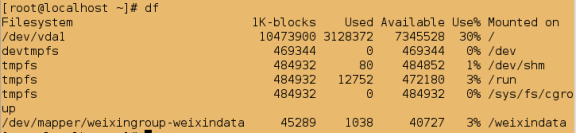
[root@localhost ~]# df

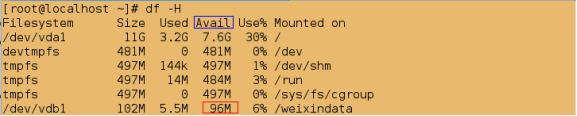
##查看挂载设备的大小
[root@localhost ~]# df -H
监控:
##查看物理卷
[root@localhost ~]# pvs
##查看物理卷组
[root@localhost ~]# vgs
  No volume groups found
##查看逻辑卷
[root@localhost ~]# lvs
  No volume groups found
[root@localhost ~]# pvs;vgs;lvs
  No volume groups found
  No volume groups found
[root@localhost ~]# pvs;echo ++++++++++;vgs;echo ++++++++++;lvs;echo ++++++++++;df -h /weixindata
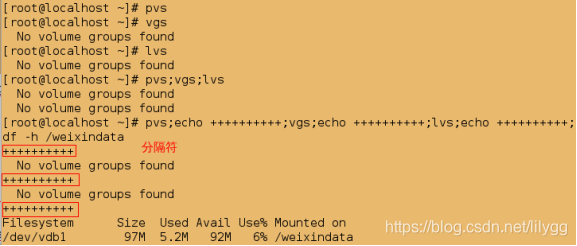
##监控
[root@localhost ~]# watch -n 1 'pvs;echo ++++++++++;vgs;echo ++++++++++;lvs;echo ++++++++++;df -h /weixindata'
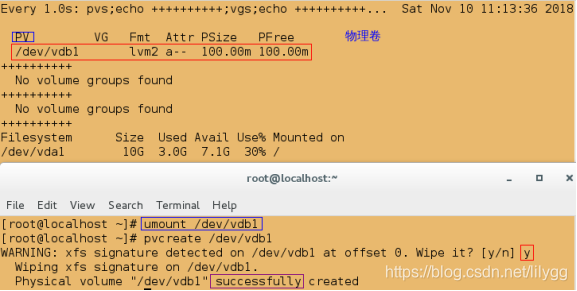
##必须先卸载设备,才能创建物理卷
[root@localhost ~]# pvcreate /dev/vdb1
  Can't open /dev/vdb1 exclusively.  Mounted filesystem?
[root@localhost ~]# umount /dev/vdb1
(2).创建物理卷;将物理分区处理成物理卷
[root@localhost ~]# pvcreate /dev/vdb1
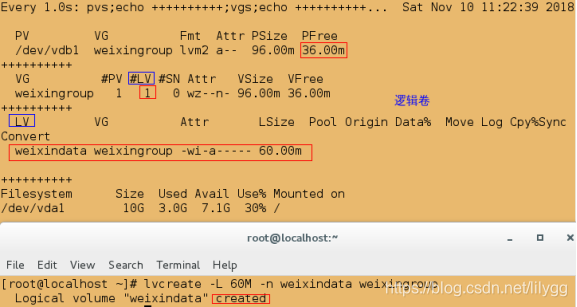
(3).创建物理卷组;将物理卷做成物理卷组
[root@l[root@localhost ~]# vgcreate weixingroup /dev/vdb1

(4).创建逻辑卷;将物理卷组(weixingroup) 划分为逻辑卷(weixindata)-L指定大小
[root@localhost ~]# lvcreate -L 60M -n weixindata weixingroup
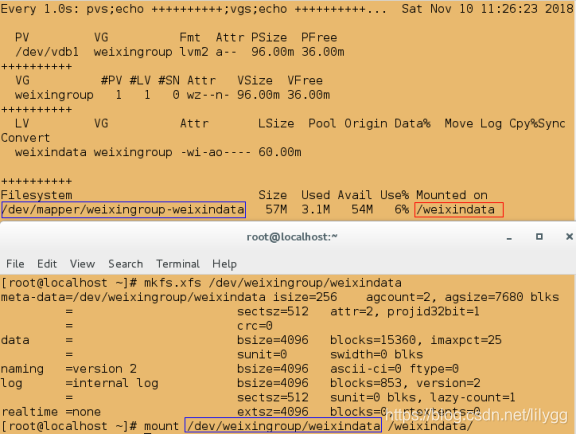
(5).挂载逻辑卷设备
##1.格式化逻辑卷设备
[root@localhost ~]# mkfs.xfs /dev/weixingroup/weixindata
##2.挂载逻辑卷设备
[root@localhost ~]# mount /dev/weixingroup/weixindata /weixindata/
@@发现显示的挂载设备与逻辑卷名字有写不同;但实际上它们都是dm-0的快捷方式,即表示的是同一个设备
[root@localhost ~]# ll /dev/mapper/weixingroup-weixindata
lrwxrwxrwx. 1 root root 7 Nov 10 11:25 /dev/mapper/weixingroup-weixindata -> ../dm-0
[root@localhost ~]# ll /dev/weixingroup/weixindata
lrwxrwxrwx. 1 root root 7 Nov 10 11:25 /dev/weixingroup/weixindata -> ../dm-0

2.逻辑卷的管理
(1).设备的扩容与缩容
监控:
[root@localhost ~]# watch -n 1 "pvs;echo ++++++++++;vgs;echo ++++++++++;lvs;echo ++++++++++;df -h /weixindata"
xfs类型:
xfs类型的设备只能扩容不能缩容!!!
1)VG容量够时
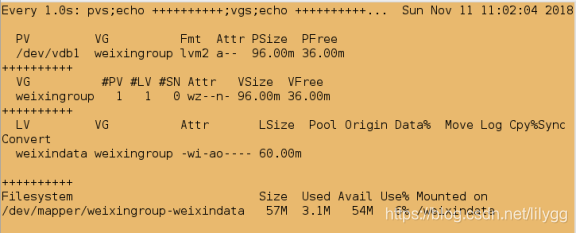
直接扩大逻辑卷设备,再扩展系统文件即可
##1.扩大逻辑卷设备;-L指定大小,将逻辑卷扩大到80M
[root@localhost ~]# lvextend -L 80M /dev/weixingroup/weixindata

##2.扩展文件系统
[root@localhost ~]# xfs_growfs /dev/weixingroup/weixindata
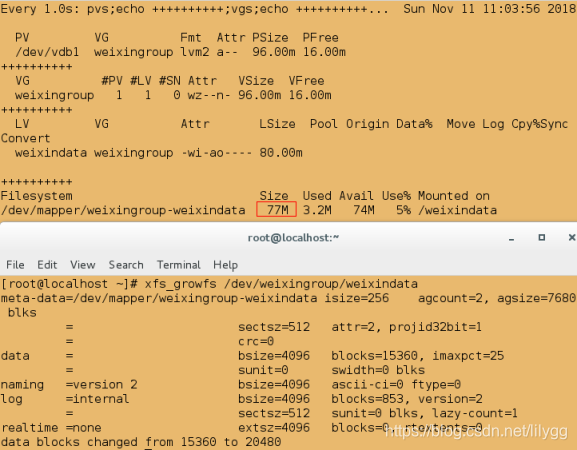
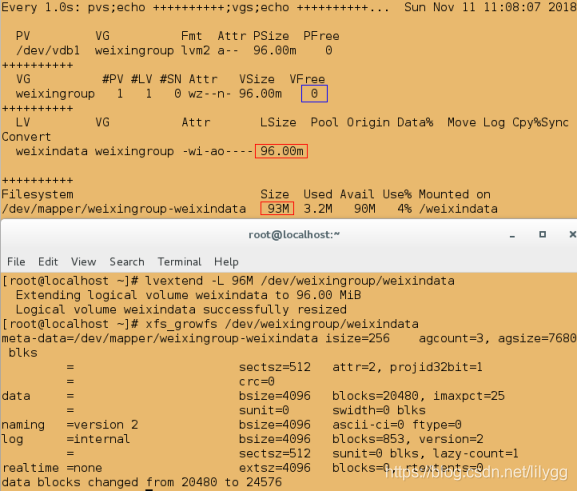
由于VG容量只有96M,所以不能实现扩容到比96M还大
##扩大逻辑卷设备
[root@localhost ~]# lvextend -L 96M /dev/weixingroup/weixindata
##扩展文件系统
[root@localhost ~]# xfs_growfs /dev/weixingroup/weixindata
##将逻辑卷设备扩大到97M
[root@localhost ~]# lvextend -L 97M /dev/weixingroup/weixindata

2)VG容量不够时
首先需要先添加物理分区,再创建物理卷,然后将新创建物理卷加入到原有的物理卷组中,最后扩大逻辑卷和文件系统
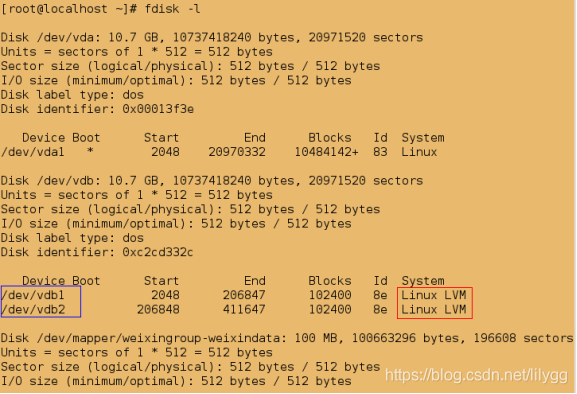
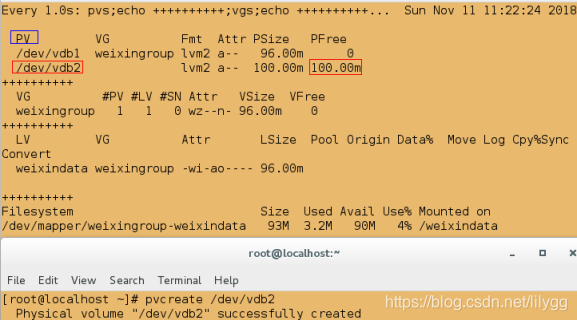
##1.添加物理分区
由于我这里一开始便添加了两个物理分区/dev/vdb1和/dev/vdb2,故可以无需再添加设备
[root@localhost ~]# fdisk -l
##2.创建物理卷
[root@localhost ~]# pvcreate /dev/vdb2
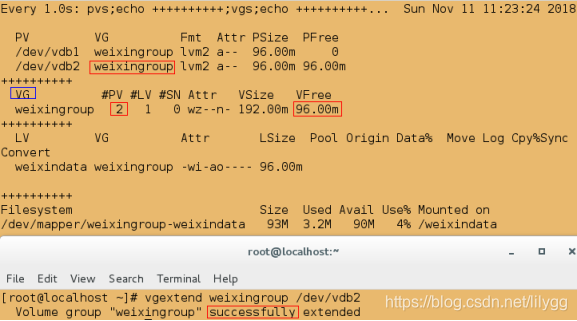
##3.将刚创建的物理卷添加到已有的物理卷组wexingroup中
[root@localhost ~]# vgextend weixingroup /dev/vdb2
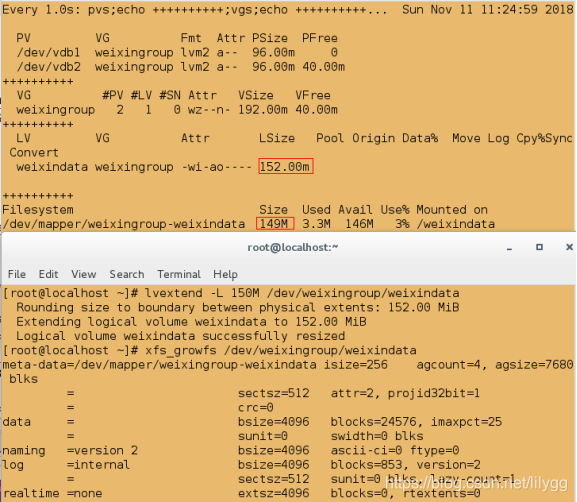
##4.扩大逻辑卷设备
[root@localhost ~]# lvextend -L 150M /dev/weixingroup/weixindata
##5.扩展文件系统
[root@localhost ~]# xfs_growfs /dev/weixingroup/weixindata
ext4类型:
ext4类型的设备不仅可以扩容还可以缩容!!!
1)设备的扩容
##1.卸载
[root@localhost ~]# umount /weixindata/
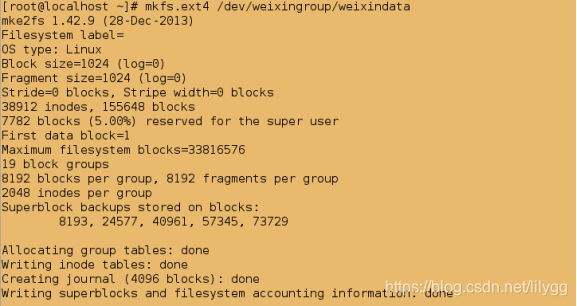
##2.格式化为ext4类型
[root@localhost ~]# mkfs.ext4 /dev/weixingroup/weixindata
##扩容时为热拉伸,即可以直接对挂载设备进行拉伸
[root@localhost ~]# mount /dev/weixingroup/weixindata /weixindata/
##4.扩大逻辑卷设备
[root@localhost ~]# lvextend -L 170M /dev/weixingroup/weixindata
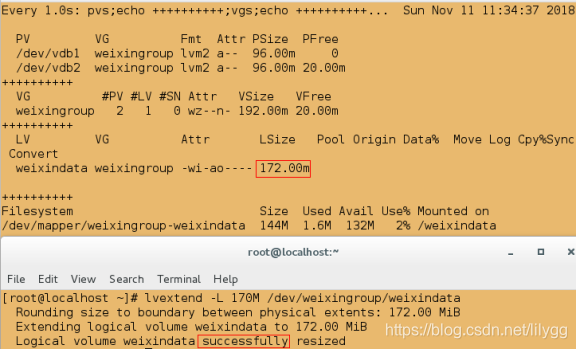
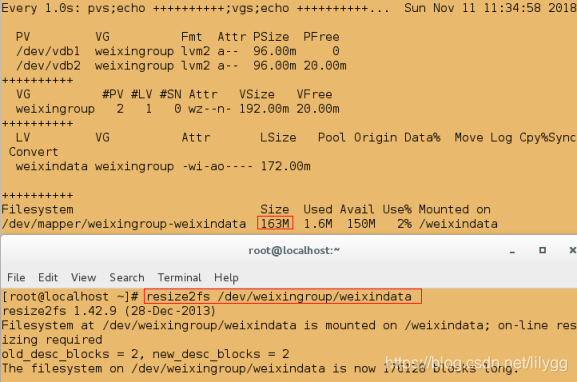
##5.扩展文件系统(注意:与xfs类型有所不同)
[root@localhost ~]# resize2fs /dev/weixingroup/weixindata
2)设备的缩容
必须先卸载设备才能缩容,并且必须先缩小文件系统(软件)再缩小逻辑卷设备(硬件)!!!
##1.卸载
[root@localhost ~]# umount /weixindata/
##2.扫描文件系统
[root@localhost ~]# e2fsck -f /dev/weixingroup/weixindata

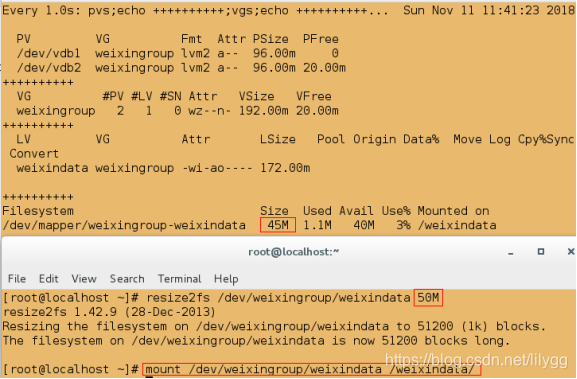
##3.缩小文件系统
[root@localhost ~]# resize2fs /dev/weixingroup/weixindata 50M
##4.挂载
[root@localhost ~]# mount /dev/weixingroup/weixindata /weixindata/
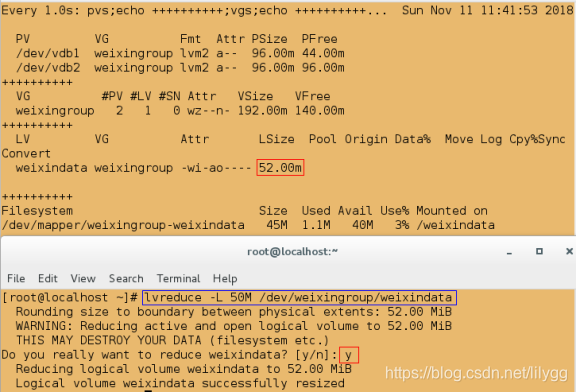
##5.缩小逻辑卷设备
[root@localhost ~]# lvreduce -L 50M /dev/weixingroup/weixindata
(2).物理卷的取出
此操作不区分文件系统类型,即不管是xfs类型还是ext4类型,均按照以下操作将物理卷取出
如果设备上有存储数据,那么要想取出物理卷,必须先将设备上的数据迁移到空闲的设备上!!!
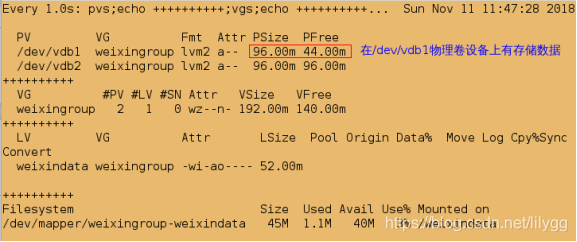
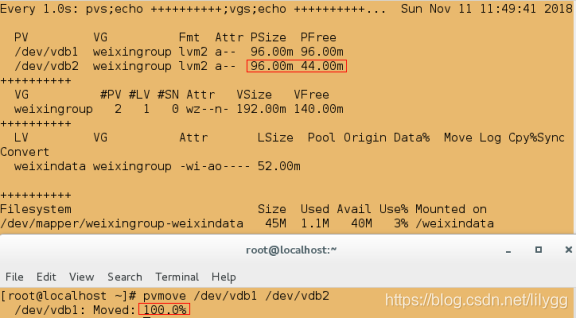
##1.数据的迁移;将/dev/vdb1设备上的数据迁移到/dev/vdb2设备中(如果设备上没有存储数据,就不用执行此操作)
[root@localhost ~]# pvmove /dev/vdb1 /dev/vdb2
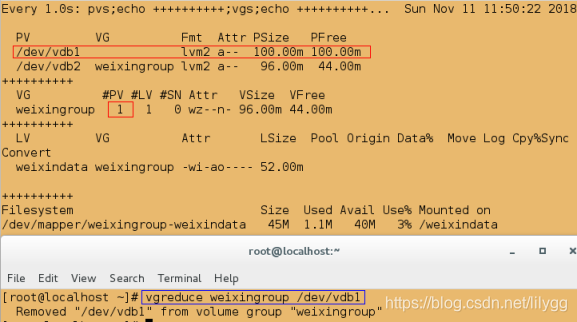
##2.取出物理卷组
[root@localhost ~]# vgreduce weixingroup /dev/vdb1
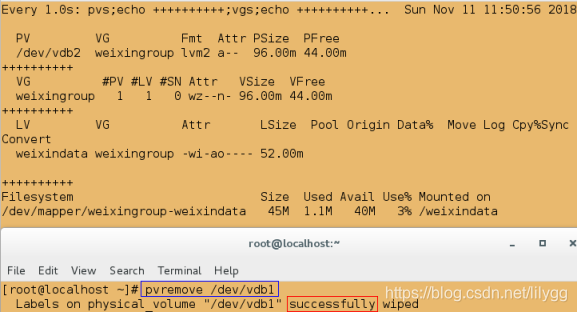
##3.取出物理卷
[root@localhost ~]# pvremove /dev/vdb1
(3).如何指pe的大小
所谓pe是指:
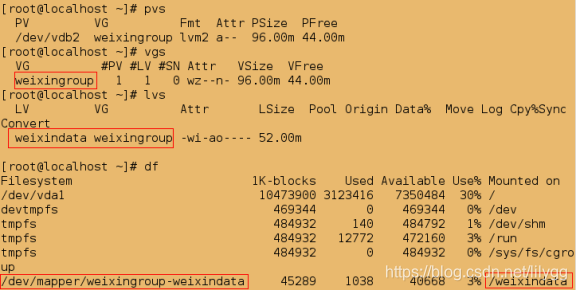
[root@localhost ~]# pvs
  PV         VG          Fmt  Attr PSize  PFree
  /dev/vdb2  weixingroup lvm2 a--  96.00m 44.00m
[root@localhost ~]# vgs
  VG          #PV #LV #SN Attr   VSize  VFree
  weixingroup   1   1   0 wz--n- 96.00m 44.00m
[root@localhost ~]# lvs
  LV         VG          Attr       LSize  Pool Origin Data%  Move Log Cpy%Sync Convert
  weixindata weixingroup -wi-ao---- 52.00m
[root@localhost ~]# df
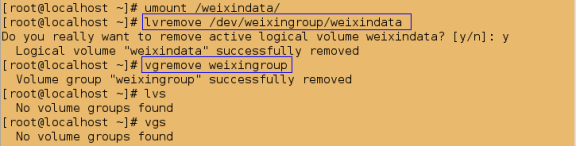
[root@localhost ~]# umount /weixindata/
[root@localhost ~]# lvremove /dev/weixingroup/weixindata
[root@localhost ~]# vgremove weixingroup
[root@localhost ~]# lvs
  No volume groups found
[root@localhost ~]# vgs
  No volume groups found
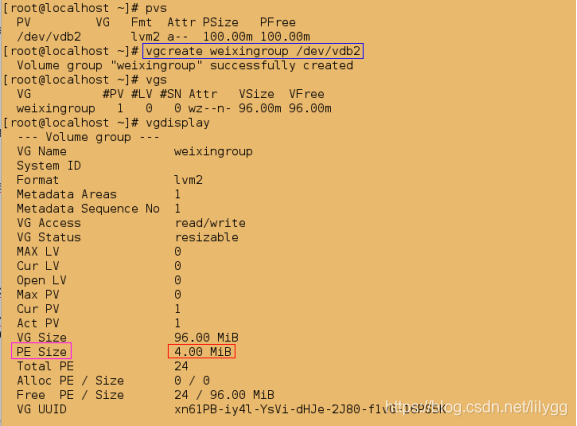
@1.默认创建的物理卷中一个pe的大小为4MIB
[root@localhost ~]# pvs
  PV         VG   Fmt  Attr PSize   PFree
  /dev/vdb2       lvm2 a--  100.00m 100.00m
[root@localhost ~]# vgcreate weixingroup /dev/vdb2
[root@localhost ~]# vgs
  VG          #PV #LV #SN Attr   VSize  VFree
  weixingroup   1   0   0 wz--n- 96.00m 96.00m
[root@localhost ~]# vgdisplay
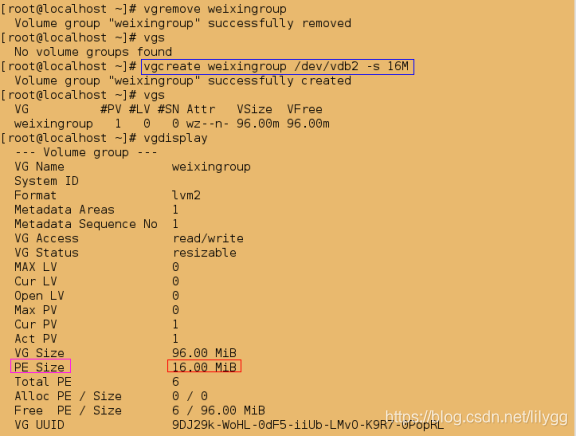
@2.自行指定pe的大小
[root@localhost ~]# vgremove weixingroup
[root@localhost ~]# vgs
  No volume groups found
[root@localhost ~]# vgcreate weixingroup /dev/vdb2 -s 16M
[root@localhost ~]# vgs
  VG          #PV #LV #SN Attr   VSize  VFree
  weixingroup   1   0   0 wz--n- 96.00m 96.00m
[root@localhost ~]# vgdisplay
3.逻辑卷(lvm)的快照的制作
制作快照的意义:
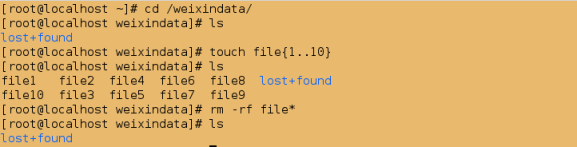
@1.没有创建快照时,如果误删了文件,那么文件将无法恢复!
[root@localhost ~]# df
[root@localhost ~]# cd /weixindata/
[root@localhost weixindata]# ls
lost+found
[root@localhost weixindata]# touch file{1..10}
[root@localhost weixindata]# ls
file1   file2  file4  file6  file8  lost+found
file10  file3  file5  file7  file9
[root@localhost weixindata]# rm -rf file*
[root@localhost weixindata]# ls
lost+found
##创建文件
[root@localhost weixindata]# touch file{1..10}
[root@localhost weixindata]# ls
file1   file2  file4  file6  file8  lost+found
file10  file3  file5  file7  file9

@2.创建了快照,如果误删文件,是可以恢复的
##制作快照;-L指定大小,-n指定快照名(名字任意),-s指定逻辑卷设备(照的对象,相当于母盘)
[root@localhost ~]# lvcreate -L 10M -n weixindata_backup -s /dev/weixingroup/weixindata

##挂载;直接挂载快照即可,因为快照与对象是相同的设备
[root@localhost ~]# mount /dev/weixingroup/weixindata_backup /weixindata/
[root@localhost ~]# df
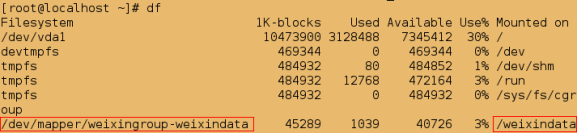
[root@localhost ~]# cd /weixindata/
[root@localhost weixindata]# ls
file1   file2  file4  file6  file8  lost+found
file10  file3  file5  file7  file9
模拟删除文件:
[root@localhost weixindata]# rm -rf file*
[root@localhost weixindata]# ls
lost+found

解决方案:
##1.卸载
[root@localhost weixindata]# cd
[root@localhost ~]# umount /weixindata/
##2.删除旧的快照
[root@localhost ~]# lvremove /dev/weixingroup/weixindata_backup

##3.重新制作快照
[root@localhost ~]# lvcreate -L 10M -n weixindata_backup -s /dev/weixingroup/weixindata

##4.挂载
[root@localhost ~]# mount /dev/weixingroup/weixindata_backup /weixindata/
[root@localhost ~]# df
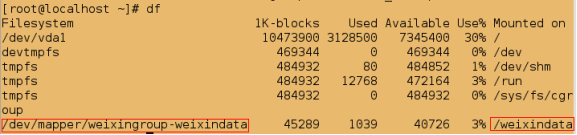
##发现此时文件被恢复
[root@localhost ~]# cd /weixindata/
[root@localhost weixindata]# ls
file1   file2  file4  file6  file8  lost+found
file10  file3  file5  file7  file9

注意:如果制作快照失败,很可能是设备容量不够,那么需要先设备扩容,然后再制作快照
4.常见问题及解决方案
(1).当逻辑卷(lvm)正在使用时将设备删了,vgs查看物理卷组时报错,如何解决?
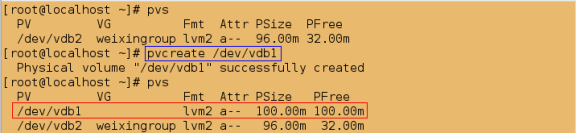
##查看物理卷
[root@localhost ~]# pvs
  PV         VG          Fmt  Attr PSize  PFree
  /dev/vdb2  weixingroup lvm2 a--  96.00m 32.00m
##创建物理卷
[root@localhost ~]# pvcreate /dev/vdb1
  Physical volume "/dev/vdb1" successfully created
##查看物理卷
[root@localhost ~]# pvs
  PV         VG          Fmt  Attr PSize   PFree
  /dev/vdb1              lvm2 a--  100.00m 100.00m
  /dev/vdb2  weixingroup lvm2 a--   96.00m  32.00m
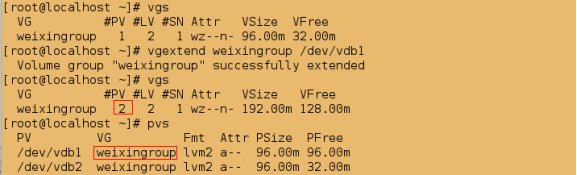
##查看物理卷组
[root@localhost ~]# vgs
  VG          #PV #LV #SN Attr   VSize  VFree
  weixingroup   1   2   1 wz--n- 96.00m 32.00m
##将物理卷加入到原有的wexingroup物理卷组中
[root@localhost ~]# vgextend weixingroup /dev/vdb1
  Volume group "weixingroup" successfully extended
##查看物理卷组
[root@localhost ~]# vgs
  VG          #PV #LV #SN Attr   VSize   VFree
  weixingroup   2   2   1 wz--n- 192.00m 128.00m
##查看物理卷
[root@localhost ~]# pvs
  PV         VG          Fmt  Attr PSize  PFree
  /dev/vdb1  weixingroup lvm2 a--  96.00m 96.00m
  /dev/vdb2  weixingroup lvm2 a--  96.00m 32.00m
@1.模拟删除系统正在使用的设备
[root@localhost ~]# fdisk /dev/vdb

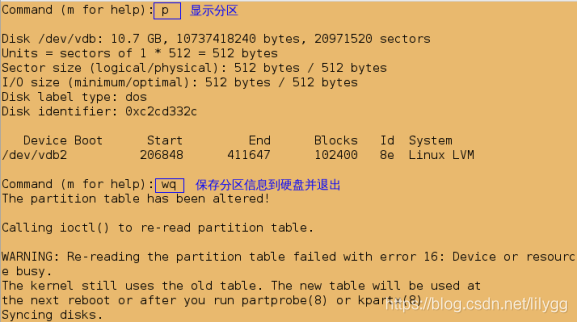
[root@localhost ~]# partprobe
[root@localhost ~]# vgs

@2.解决方案:
[root@localhost ~]# vgreduce --removemissing weixingroup

测试:
[root@localhost ~]# vgs

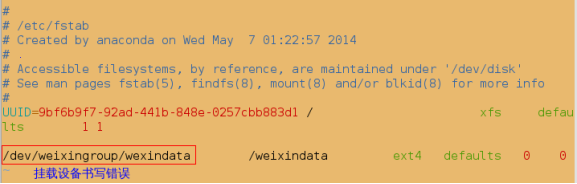
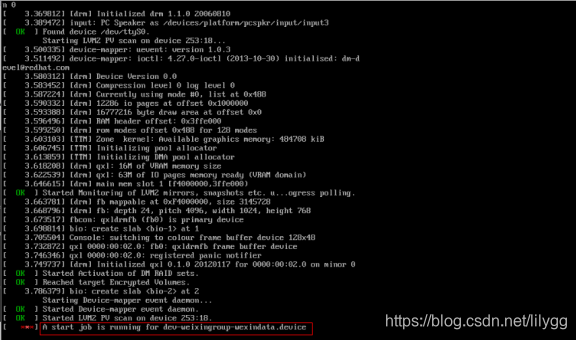
2.若开机自启文件内容编写错误,系统重启后,发现无法开启。该如何解决呢?
@1.模拟实验环境:
[root@localhost ~]# vim /etc/fstab
[root@localhost ~]# reboot
##显示虚拟机;发现如下报错
[kiosk@foundation34 ~]$ rht-vmctl view server
@2.解决方案
等待片刻会出现如下界面:
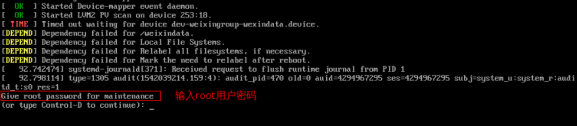
#1.输入root用户密码后,得到一个shell环境:

#2.编写开机自启文件,更正文件内容
#3.直接reboot重启即可

此时发现系统恢复正常

5.如何彻底删除物理分区?
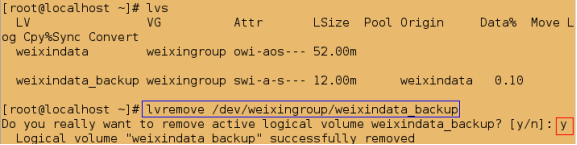
##查看逻辑卷
[root@localhost ~]# lvs
  LV                VG          Attr       LSize  Pool Origin     Data%  Move Log Cpy%Sync Convert
  weixindata        weixingroup owi-aos--- 52.00m
  weixindata_backup weixingroup swi-a-s--- 12.00m      weixindata   0.10
##1.删除快照
[root@localhost ~]# lvremove /dev/weixingroup/weixindata_backup
[root@localhost ~]# df

##2.卸载
[root@localhost ~]# umount /weixindata
##3.删除逻辑卷
[root@localhost ~]# lvremove /dev/weixingroup/weixindata
##删除逻辑卷的自动挂载;否则下次再开机时,系统起不来,因为没有了挂载设备
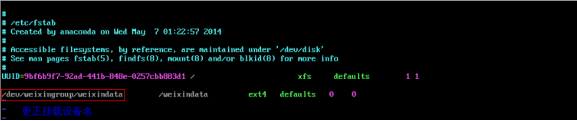
[root@localhost ~]# vim /etc/fstab
############
删除:/dev/weixingroup/weixindata /weixindata ext4 defaults 0 0
[root@localhost ~]# vgs
VG #PV #LV #SN Attr VSize VFree
weixingroup 1 0 0 wz--n- 96.00m 96.00m
##4.删除物理卷组
[root@localhost ~]# vgremove weixingroup
  Volume group "weixingroup" successfully removed
[root@localhost ~]# vgs
  No volume groups found

[root@localhost ~]# pvs
  PV         VG   Fmt  Attr PSize   PFree
  /dev/vdb2       lvm2 a--  100.00m 100.00m
##5.删除物理分区
[root@localhost ~]# pvremove /dev/vdb2
  Labels on physical volume "/dev/vdb2" successfully wiped
[root@localhost ~]# pvs

##6.删除分区设备
[root@localhost ~]# fdisk /dev/vdb