版权声明:本文为博主原创文章,未经博主允许不得转载,定位 Android & Java 知识点 https://blog.csdn.net/qq_36232611/article/details/84542418
小程序页面跳转传参
根目录下的 app.json 文件
页面文件的路径、窗口表现、设置网络超时时间、设置多 tab
{
  "pages": [
    "pages/index/index",
    "pages/logs/index"
  ],
  "window": {
    "navigationBarTitleText": "Demo"
  },
  "tabBar": {
    "list": [{
      "pagePath": "pages/index/index",
      "text": "首页"
    }, {
      "pagePath": "pages/logs/logs",
      "text": "日志"
    }]
  },
  "networkTimeout": {
    "request": 10000,
    "downloadFile": 10000
  },
  "debug": true,
  "navigateToMiniProgramAppIdList": [
    "wxe5f52902cf4de896"
  ]
}
  "navigateToMiniProgramAppIdList": [
    "wxe5f52902cf4de896"
  ]

wx.navigateToMiniProgram({
  appId: '',
  path: 'pages/index/index?id=1',
  success(res) {
    // 打开成功
  }
})
this指的是当前的对象
that指的是一个临时的变量
登录流程
- 调用微信API wx.login() -> code
- 得到的code传给后端
https://api.weixin.qq.com/sns/jscode2session
用户唯一标识(openid)传给前端并保存
获取code, 请求微信小程序官方接口:
https://api.weixin.qq.com/sns/jscode2session?appid=APPID&secret=SECRET&js_code=JSCODE&grant_type=authorization_code
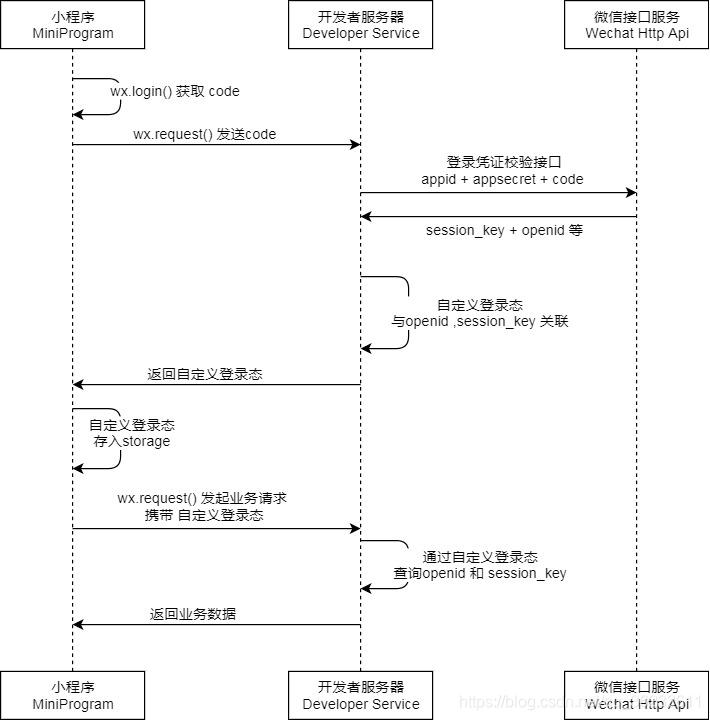
小程序调用wx.login() 获取 登录凭证code ,并回传到开发者服务器
调用接口wx.login() 获取临时登录凭证(code)
开发者服务器以code换取 用户唯一标识openid 和 会话密钥session_key
//app.js
App({
  onLaunch: function() {
    wx.login({
      success: function(res) {
        if (res.code) {
          //发起网络请求
          wx.request({
            url: 'https://test.com/onLogin',
            data: {
              code: res.code
            }
          })
        } else {
          console.log('登录失败!' + res.errMsg)
        }
      }
    });
  }
})
下拉菜单
<view class='nav_centent_arr' wx:if="{{nav_centent.length}}">
  <view style="height:408rpx">
    <block wx:for="{{nav_centent}}" wx:key="index">
      <view class='nav_centent'>{{item}}</view>
    </block>
  </view>
</view>
click_nav: function (e) {
    if (index == e.currentTarget.dataset.index && this.data.nav_centent != null){
      index = e.currentTarget.dataset.index;
      this.setData({
        nav_centent: null,
        shownavindex: null,
      })
    } else if (this.data.nav_centent == null) {
      console.log(11)
      index = e.currentTarget.dataset.index;
      this.setData({
        shownavindex: index,
        nav_centent: nav_centent_list[Number(index)]
      })
    } else {
      console.log(22)
      index = e.currentTarget.dataset.index;
      this.setData({
        shownavindex: index,
        nav_centent: nav_centent_list[Number(index)]
      })
    }
  }
nav_title:['1','2','3','4'],
    shownavindex: null,
    nav_centent: null
radioChange 是单选框选中事件
radio 是点击事件,用于获取点击的该组件的id
// 获取该组件的id
  radio:function(e){
    this.setData({
      guige_key02: e.currentTarget.dataset.id
    })
    console.log(e.currentTarget.dataset.id)
  },
  // 发货地址选择,获取用户选择的单选框的值
  radioChange: function (e) {
    this.setData({
      arr_guige02: e.detail.value
    })
    console.log(e.detail.value)
  },
<checkbox-group bindchange="checkboxChange">
  <label class="checkbox" wx:for="{{items}}">
    <checkbox value="{{item.name}}" checked="{{item.checked}}"/>{{item.value}}
  </label>
  </checkbox-group>
Page({
  data: {
    items: [
      { name: 'USA', value: '美国' },
      { name: 'CHN', value: '中国', checked: 'true' },
      { name: 'BRA', value: '巴西' },
      { name: 'JPN', value: '日本' },
      { name: 'ENG', value: '英国' },
      { name: 'TUR', value: '法国' },
    ]
  },
  checkboxChange: function (e) {
    console.log('checkbox发生change事件,携带value值为:', e.detail.value)
  }
})
实现画布自适应各种手机尺寸
解决的问题:
画布,动画等js里面的操作,默认是px而不是rpx, 无法根据手机屏幕自适应
获取节点的rpx -> px单位
  <view id='canvas-container' style='width:200rpx;height:100rpx;'>
      wx.createSelectorQuery().select('#canvas-container').boundingClientRect(function (rect) {
      var width = rect.width/2   // 节点的宽度
    }).exec()
    wx.getSystemInfo({
      success: function(res) {
        myCanvasWidth = res.windowWidth - 56
        myCanvasHeight = res.windowHeight - 200
      },
    })
    this.setData({
      canvasWidth: myCanvasWidth,
      canvasHeight: myCanvasHeight
    })
  <canvas class='canvas' style='width:{{canvasWidth}}px; height:{{canvasHeight}}px'  disable-scroll='true'>
  </canvas>
Page({
 data: {
     id:''
  },
 onLoad: function (options){
    var that = this;
    that.setData({
       id: options.id
    })
    console.log(that.data.id)
  }
})