极光推送生产环境测试需要打包为adhot或者用testflight

在收到远程推送的消息的时候,有以下三种情况需要考虑:
1. 程序在后台运行
2. 程序未运行
3. 程序运行在前台
原则上,应用在收到推送消息时,badge的值是由后台来控制的,但是,目前的大多数公司后端都不会实现这一功能。幸运的是,JPush服务器已经帮我们做了。
我们在JPush后台发布消息时,在可选设置中,设置badge的值为:+1,就可以让app端badge的值自动加1,这样,我们在app端用代码修改badge的值的时候,都需要同时用[APService setBadge:badgeNumber]修改Push后台记录的badge值,这样下次app收到推送消息时,显示的badge才是正确的。
如果要求对于程序在前台运行时,收到的通知也做处理,这时,我们可以将收到的远程推送通知,转换为本地推送通知,同时修改badge值,就可以了。
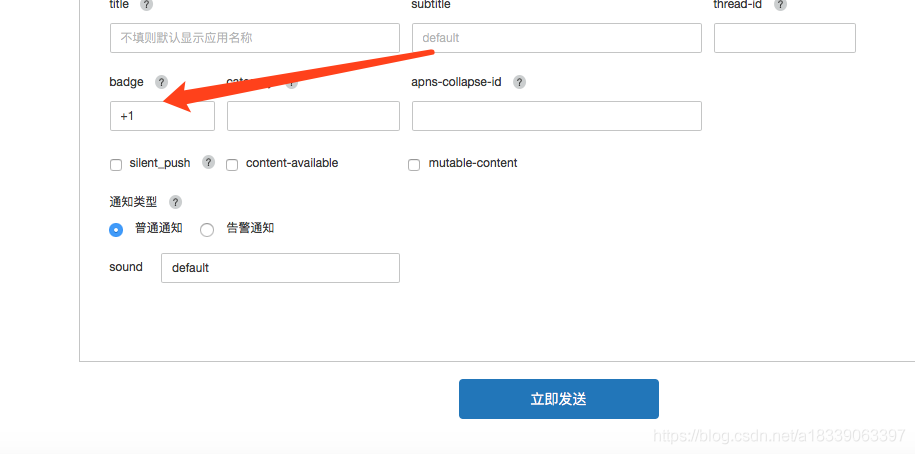
设置为+1app图标上的数值就会自动加一,当我们读完消息以后再给极光的后台设置badge的数值 [JPUSHService setBadge:@“读完消息以后给极光后台设置的数值”];
·收到消息以后跳到指定的页面
// iOS 10 Support
- (void)jpushNotificationCenter:(UNUserNotificationCenter *)center didReceiveNotificationResponse:(UNNotificationResponse *)response withCompletionHandler:(void (^)())completionHandler {
NSInteger currentNumber = [UIApplication sharedApplication].applicationIconBadgeNumber;
if (currentNumber > 0) {
currentNumber--;
}
[UIApplication sharedApplication].applicationIconBadgeNumber = currentNumber;
[JPUSHService setBadge:currentNumber];
// //你的逻辑
//
// if ([UIApplication sharedApplication].applicationIconBadgeNumber != 0) {
// //最后把Iconbadge归0
// [UIApplication sharedApplication].applicationIconBadgeNumber = 0;
//
// [JPUSHService setBadge:0];
// }
NSDictionary * userInfo = response.notification.request.content.userInfo;
if([response.notification.request.trigger isKindOfClass:[UNPushNotificationTrigger class]]) {
[JPUSHService handleRemoteNotification:userInfo];
}
//completionHandler(); // 系统要求执行这个方法
if ([UIApplication sharedApplication].applicationState == UIApplicationStateActive) {//这是在前台
NSLog(@"nihaoo");
}else{
NSMutableDictionary *pushDic = [[NSMutableDictionary alloc]init];
NSDictionary *dic= userInfo [@"aps"];
[pushDic setValue:[userInfo objectForKey:@"_j_msgid"] forKey:@"_j_msgid"];
[pushDic setValue:userInfo [@"order_number"] forKey:@"order_number"];
[pushDic setValue:dic[@"alert"] forKey:@"alert"];
[pushDic setValue:dic[@"badge"] forKey:@"badge"];
[pushDic setValue:dic[@"sound"] forKey:@"sound"];
[pushDic setValue:userInfo[@"name"] forKey:@"name"];
completionHandler(UIBackgroundFetchResultNewData);
[self goToMssageViewControllerWith:pushDic];
}
}
- (UIViewController*)topViewController{
return [self topViewControllerWithRootViewController:self.window.rootViewController];
}
- (UIViewController*)topViewControllerWithRootViewController:(UIViewController*)rootViewController{
if ([rootViewController isKindOfClass:[UITabBarController class]]) {
UITabBarController *tabBarController = (UITabBarController *)rootViewController;
return [self topViewControllerWithRootViewController:tabBarController.selectedViewController];
} else if ([rootViewController isKindOfClass:[UINavigationController class]]) {
UINavigationController* navigationController = (UINavigationController*)rootViewController;
return [self topViewControllerWithRootViewController:navigationController.visibleViewController];
} else if (rootViewController.presentedViewController) {
UIViewController* presentedViewController = rootViewController.presentedViewController;
return [self topViewControllerWithRootViewController:presentedViewController];
} else {
return rootViewController;
}
}
指定的页面
#import "WtPushTestController.h"
@interface WtPushTestController ()
@end
@implementation WtPushTestController
- (void)viewDidLoad {
[super viewDidLoad];
self.view.backgroundColor = [UIColor whiteColor];
NSDictionary *dict = [kUserDefault objectForKey:@"msgDic"];
UILabel *label = [[UILabel alloc]init];
label.text = dict[@"name"];
[self.view addSubview:label];
label.center = self.view.center;
[label sizeToFit];
}
-(void)viewWillAppear:(BOOL)animated{
[super viewWillAppear:YES];
NSUserDefaults*pushJudge = [NSUserDefaults standardUserDefaults];
if([[pushJudge objectForKey:@"push"]isEqualToString:@"push"]) {
self.navigationItem.leftBarButtonItem = [[UIBarButtonItem alloc]initWithImage:[UIImage imageNamed:@"zh3"] style:UIBarButtonItemStylePlain target:self action:@selector(rebackToRootViewAction)];
}else{
self.navigationItem.leftBarButtonItem=nil;
}
}
- (void)rebackToRootViewAction {
NSUserDefaults * pushJudge = [NSUserDefaults standardUserDefaults];
[pushJudge setObject:@""forKey:@"push"];
[pushJudge setObject:@""forKey:@"msgDic"];
[pushJudge synchronize];
[self dismissViewControllerAnimated:YES completion:nil];
}
如果我们希望点击状态栏的推送,点击那个消失那个其它的还保留在ios11上可以这样去做
//你的逻辑
if ([UIApplication sharedApplication].applicationIconBadgeNumber != 0) {
//最后把Iconbadge归-1
[UIApplication sharedApplication].applicationIconBadgeNumber = -1;
//[JPUSHService setBadge:0];
}

