上篇文章RabbitMQ基础入门学习了rabbitMQ一些基础的api,当然spring也在原生代码的基础上做了更多的封装,这篇文章就基于spring-rabbit,学习一下spring的实现。
引入jar:
<dependency>
<groupId>org.springframework.amqp</groupId>
<artifactId>spring-rabbit</artifactId>
<version>1.5.0.RELEASE</version>
</dependency>
上篇文章没有测试到Topic exchange,下面就使用Topic exchange做测试。
1.基于springframework.amqp.rabbit java写法。
 1 import org.springframework.amqp.core.BindingBuilder;
 2 import org.springframework.amqp.core.Queue;
 3 import org.springframework.amqp.core.TopicExchange;
 4 import org.springframework.amqp.rabbit.annotation.RabbitListener;
 5 import org.springframework.amqp.rabbit.connection.CachingConnectionFactory;
 6 import org.springframework.amqp.rabbit.core.RabbitAdmin;
 7 import org.springframework.amqp.rabbit.core.RabbitTemplate;
 8 import org.springframework.amqp.rabbit.listener.SimpleMessageListenerContainer;
 9 import org.springframework.amqp.rabbit.listener.adapter.MessageListenerAdapter;
10
11 @RabbitListener(queues = "hello")
12 public class Tut1Java {
13
14     public static void main(final String... args) throws Exception {
15
16         CachingConnectionFactory cf = new CachingConnectionFactory();
17         cf.setAddresses("192.168.1.7:5672");
18         cf.setUsername("admin");
19         cf.setPassword("admin");
20
21         // set up the queue, exchange, binding on the broker
22         RabbitAdmin admin = new RabbitAdmin(cf);
23         Queue queue = new Queue("myQueue");
24         admin.declareQueue(queue);
25         TopicExchange exchange = new TopicExchange("myExchange");
26         admin.declareExchange(exchange);
27         admin.declareBinding(BindingBuilder.bind(queue).to(exchange).with("foo.*"));
28
29         // set up the listener and container
30         SimpleMessageListenerContainer container = new SimpleMessageListenerContainer(cf);
31         Object listener = new Object() {
32             // 接受到消息时,会执行此方法
33             public void handleMessage(String foo) {
34                 System.out.println("Tut1Java " + foo);
35             }
36         };
37         MessageListenerAdapter adapter = new MessageListenerAdapter(listener);
38         container.setMessageListener(adapter);
39         container.setQueueNames("myQueue");
40         container.start();
41
42         // send something
43         RabbitTemplate template = new RabbitTemplate(cf);
44         // 只有routingKey符合foo.*规则的才会被接受处理
45         template.convertAndSend("myExchange", "foo.bar", "Hello, world!");
46         container.stop();
47     }
48 }
整块代码可以简单的实现了发送接收消息,主要分为四个部分。
16~19行 初始化一个CachingConnectionFactory,其实底层也是原生的ConnectionFactory。
22~27行 主要是设置queue和exchange,并把它们按照"foo.*"的路由规则绑定起来。
new Queue("myQueue"),创建一个本地持久话名字叫myQueue的队列。
declareQueue(queue),声明一个队列。
new TopicExchange("myExchange"),创建一个topic exchange,看名字也知道exchange类型是topic,我们只要传递参数就好了。当然也会有FanoutExchange、DirectExchange、HeadersExchange。
BindingBuilder.bind(queue).to(exchange).with("foo.*"),将queue绑定到exchange上,并以"foo.*"作为他们之间的路由规则。
30~40行 主要是通过SimpleMessageListenerContainer去监听消息,并且可以设置特定类的方法去执行处理接受到的消息。
Object listener = new Object() {
    // 接受到消息时,会执行此方法
    public void handleMessage(String foo) {
        System.out.println("Tut1Java " + foo    );
    }
    public void handleMessage2(String foo) {
        System.out.println("Tut1Java2 " + foo);
    }
};
 MessageListenerAdapter adapter = new MessageListenerAdapter(listener);
 adapter.setDefaultListenerMethod("handleMessage2");
 container.setMessageListener(adapter);
如果消息监听写成上面这样,那么将执行handleMessage2(String foo) 。
43~46行 利用RabbitTemplate发送消息,三个参数依次为exchange、routingKey和发送的消息,
首先exchange名称要和admin声明的一致,routingKey要符合当前topic exchange的路由规则,否则消息不会发送到当前队列中。
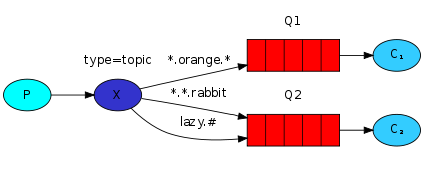
再看一下topic exchange的模型:
最后运行一下,可以发现消息被顺利打印出来了。
2.基于spring配置写法
<?xml version="1.0" encoding="UTF-8"?>
<beans xmlns="http://www.springframework.org/schema/beans" xmlns:xsi="http://www.w3.org/2001/XMLSchema-instance"
    xmlns:mvc="http://www.springframework.org/schema/mvc" xmlns:context="http://www.springframework.org/schema/context"
    xmlns:aop="http://www.springframework.org/schema/aop"
    xmlns:rabbit="http://www.springframework.org/schema/rabbit"
    xsi:schemaLocation="http://www.springframework.org/schema/beans http://www.springframework.org/schema/beans/spring-beans.xsd
        http://www.springframework.org/schema/context http://www.springframework.org/schema/context/spring-context.xsd
        http://www.springframework.org/schema/rabbit http://www.springframework.org/schema/rabbit/spring-rabbit-1.0.xsd
        http://www.springframework.org/schema/mvc http://www.springframework.org/schema/mvc/spring-mvc.xsd http://www.springframework.org/schema/aop http://www.springframework.org/schema/aop/spring-aop-3.1.xsd">

<rabbit:connection-factory id="connectionFactory" username="admin" password="admin" host="192.168.1.7" port="5672" virtual-host="/" />

<rabbit:template id="amqpTemplate" connection-factory="connectionFactory"
    exchange="myExchange" routing-key="foo.bar"/>

<rabbit:admin connection-factory="connectionFactory" />

<rabbit:queue name="myQueue" />

<rabbit:topic-exchange name="myExchange">
    <rabbit:bindings>
        <rabbit:binding queue="myQueue" pattern="foo.*" />
    </rabbit:bindings>
</rabbit:topic-exchange>

<rabbit:listener-container connection-factory="connectionFactory">
    <rabbit:listener ref="foo" method="listen" queue-names="myQueue" />
</rabbit:listener-container>

<bean id="foo" class="rabbitMQ.springAMQP.Foo" />

</beans>
在context.xml中可以看到很多熟悉的rabbitMQ的对象,这种写法只不过从上面new出来的对象,改为使用spring的xml去声明各种bean对象。
import org.springframework.amqp.rabbit.core.RabbitTemplate;
import org.springframework.context.support.AbstractApplicationContext;
import org.springframework.context.support.ClassPathXmlApplicationContext;

public class Tut1Spring {

    public static void main(final String... args) throws Exception {

        AbstractApplicationContext ctx =
            new ClassPathXmlApplicationContext("spring/context.xml");
        RabbitTemplate template = ctx.getBean(RabbitTemplate.class);
        template.convertAndSend("Tut1Spring " + "Hello, world!");
        Thread.sleep(1000);
        ctx.destroy();
    }
}
public class Foo {

    public void listen(String foo) {
        System.out.println("Foo=" + foo);
    }
}
Foo为处理接受并处理消息的类,在xml中也指定了执行的方法为listen。
最后运行一下,可以发现消息被顺利打印出来了。
其实无论是哪种方式的实现,内部本质还是基于最原生的api,我们只要理解最基础的部分,这些理解起来还是比较容易的。