前言
现在来正式进行完整项目的开发—
说是完整项目可能不是很恰当,因为这个部分只算是平台系统的一部分,只负责文件存储,不过这部分使用的技术基本已经涵盖了全部技术栈,用完整也是可以的。
参考有:
【gradle】idea+gradle 多模块项目创建教程入门例子
spring mvc中applicationContext.xml与spring-mvc.xml的关系
关于组件化开发使用 gradle统一配置版本,依赖
请使用多模块项目开始整合。
spring 及 spring mvc的整合
添加依赖
web模块中必须添加spring框架的依赖,
build.gradle如下:
plugins {
    id 'java'
    id 'war'
}

group 'net.w2p'
version '1.0-SNAPSHOT'


def springVersion = "5.1.4.RELEASE"
def springDataJpaVersion ="2.1.2.RELEASE"

dependencies {
    compile project(":FileServerApi")

    //【http相关api】
    providedCompile(
            "javax.servlet:javax.servlet-api:3.1.0",
            "javax.servlet.jsp:jsp-api:2.2",
            "javax.servlet.jsp.jstl:javax.servlet.jsp.jstl-api:1.2.1"
    )
    compile(
            'taglibs:standard:1.1.2',
            'jstl:jstl:1.2'
    )

    //【spring 框架】
    compile(
            "org.springframework:spring-webmvc:$springVersion",
            "org.springframework:spring-context-support:$springVersion",
            "org.springframework:spring-web:$springVersion",
            "org.springframework.data:spring-data-jpa:$springDataJpaVersion"
    )

    testCompile(
            "org.springframework:spring-test:$springVersion"
    )

    //【mybatis】
    compile(
            'org.mybatis:mybatis:3.4.6',
            'org.mybatis:mybatis-spring:1.3.2'
    )


    //【apache commons】
    compile(
    'commons-lang:commons-lang:2.6',
    'commons-logging:commons-logging:1.2',
    'commons-io:commons-io:2.5',
    'commons-fileupload:commons-fileupload:1.3.2',
    'commons-codec:commons-codec:1.10',
    'commons-beanutils:commons-beanutils:1.9.3',
    'commons-httpclient:commons-httpclient:3.1',
    'org.apache.httpcomponents:fluent-hc:4.3.6',
    'org.apache.httpcomponents:httpclient:4.5.3',
    'org.apache.httpcomponents:httpclient-cache:4.5.3',
    'org.apache.httpcomponents:httpcore:4.4.8',
    'org.apache.httpcomponents:httpmime:4.5.3',
    'org.apache.curator:curator-framework:4.0.1',
    'org.jfree:jfreechart:1.0.19',
    'org.apache.velocity:velocity:1.7',
    'org.apache.poi:poi:3.16'
    )


    testCompile group: 'junit', name: 'junit', version: '4.11'
    testCompile group: 'junit', name: 'junit', version: '4.12'

}
设置web.xml,配置application.xml以及spring-mvc.xml
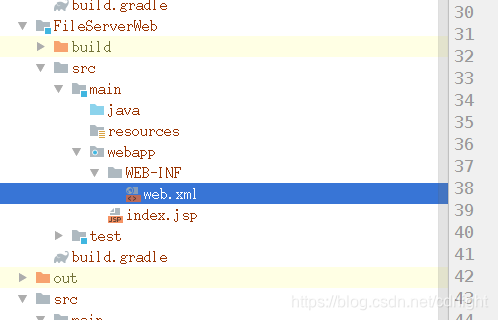
注意,我新建的web模块没有web.xml,请在webapp目录下面新建WEB-INF/web.xml文件:
内容如下:
<?xml version="1.0" encoding="UTF-8"?>
<web-app xmlns="http://xmlns.jcp.org/xml/ns/javaee"
         xmlns:xsi="http://www.w3.org/2001/XMLSchema-instance"
         xsi:schemaLocation="http://xmlns.jcp.org/xml/ns/javaee http://xmlns.jcp.org/xml/ns/javaee/web-app_3_1.xsd"
         version="3.1">


    <!--注意,spring项目可以用dispatcherServlet也可以用contextLoaderListener,
 两者区别在:https://blog.csdn.net/cdnight/article/details/82658355,建议不要同时使用,
 https://www.cnblogs.com/weknow619/p/6341395.html
 https://blog.csdn.net/chaijunkun/article/details/6925889
 https://blog.csdn.net/chaozhi_guo/article/details/51287745?utm_source=blogxgwz5
 否则很可能导致重复初始化实例的异常执行情况。

 参考:http://blog.csdn.net/zjw10wei321/article/details/40145241
tomcat在加载的时候会先加载listner,然后再加载servlet。
ContextLoaderListener加载的时候会实例化加载了比如DAO、service等Bean的spring context;
DispatcherContext加载的时候会以ContextLoaderListener加载的spring context容器作为parent context容器,
这个spring context里边主要定义的bean一般是和spring mvc相关的controller、页面跳转等;
其中ContextLoaderListener的使用方法如下:
http://blog.csdn.net/zjw10wei321/article/details/40145241
其中DispatcherContext的使用方法如下:
http://blog.jobbole.com/30133/
 2018-11-04:补充,根据需要,contextLoaderListener主要负责初始化程序的dao service 等,由于需要在listener里面捕获web context就必须
 要先初始化一个context,那么只能配置两个context了,分别是父子context。
 -->

    <context-param>
        <param-name>contextConfigLocation</param-name>
        <!--<param-value>classpath*:applicationContext-*.xml,/WEB-INF/applicationContext.xml,/WEB-INF/classes/applicationContext-*.xml</param-value>-->
        <param-value>classpath:applicationContext.xml</param-value>
    </context-param>

    <listener>
        <listener-class>org.springframework.web.context.ContextLoaderListener</listener-class>
    </listener>


    <!--注意,spring项目可以用dispatcherServlet也可以用contextLoaderListener,
    两者区别在:https://blog.csdn.net/cdnight/article/details/82658355,建议不要同时使用,
    https://www.cnblogs.com/weknow619/p/6341395.html
    https://blog.csdn.net/chaijunkun/article/details/6925889
    https://blog.csdn.net/chaozhi_guo/article/details/51287745?utm_source=blogxgwz5
    否则很可能导致重复初始化实例的异常执行情况。

    参考:http://blog.csdn.net/zjw10wei321/article/details/40145241
tomcat在加载的时候会先加载listner,然后再加载servlet。
ContextLoaderListener加载的时候会实例化加载了比如DAO、service等Bean的spring context;
DispatcherContext加载的时候会以ContextLoaderListener加载的spring context容器作为parent context容器,
这个spring context里边主要定义的bean一般是和spring mvc相关的controller、页面跳转等;
其中ContextLoaderListener的使用方法如下:
http://blog.csdn.net/zjw10wei321/article/details/40145241
其中DispatcherContext的使用方法如下:
http://blog.jobbole.com/30133/
    2018-11-04:补充,根据需要,contextLoaderListener主要负责初始化程序的dao service 等,由于需要在listener里面捕获web context就必须
    要先初始化一个context,那么只能配置两个context了,分别是父子context。
    -->
    <servlet>
        <servlet-name>dispatcher</servlet-name>
        <servlet-class>org.springframework.web.servlet.DispatcherServlet</servlet-class>
        <init-param>
            <param-name>contextConfigLocation</param-name>
            <!--<param-value>-->
            <!--classpath*:config/spring/spring-mvc.xml-->
            <!--/WEB-INF/applicationContext.xml,-->
            <!--/WEB-INF/spring/spring-*.xml</param-value>-->
            <param-value>
                classpath:spring-mvc.xml</param-value>
        </init-param>
        <load-on-startup>1</load-on-startup>
        <async-supported>true</async-supported>
    </servlet>


    <servlet-mapping>
        <servlet-name>dispatcher</servlet-name>
        <url-pattern>*.do</url-pattern>
    </servlet-mapping>


</web-app>
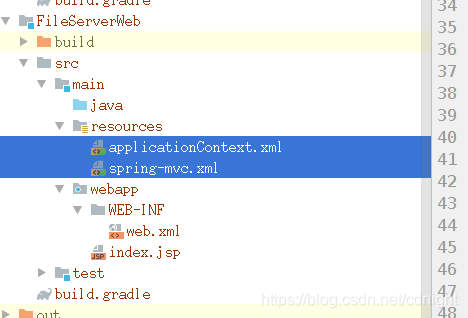
然后添加applicationContext.xml以及spring-mvc.xml都在resource文件目录下:
applicationContext.xml内容:
<?xml version="1.0" encoding="UTF-8"?>
<beans xmlns="http://www.springframework.org/schema/beans"
       xmlns:context="http://www.springframework.org/schema/context"
       xmlns:p="http://www.springframework.org/schema/p"
       xmlns:aop="http://www.springframework.org/schema/aop"
       xmlns:tx="http://www.springframework.org/schema/tx"
       xmlns:xsi="http://www.w3.org/2001/XMLSchema-instance"
       xmlns:mvc="http://www.springframework.org/schema/mvc"
       xmlns:task="http://www.springframework.org/schema/task"
       xsi:schemaLocation="http://www.springframework.org/schema/beans http://www.springframework.org/schema/beans/spring-beans-4.0.xsd
    http://www.springframework.org/schema/context http://www.springframework.org/schema/context/spring-context-4.0.xsd
    http://www.springframework.org/schema/aop http://www.springframework.org/schema/aop/spring-aop-4.0.xsd http://www.springframework.org/schema/tx http://www.springframework.org/schema/tx/spring-tx-4.0.xsd
    http://www.springframework.org/schema/util http://www.springframework.org/schema/util/spring-util-4.0.xsd
    http://www.springframework.org/schema/mvc http://www.springframework.org/schema/mvc/spring-mvc-4.1.xsd
 http://www.springframework.org/schema/task http://www.springframework.org/schema/task/spring-task-4.0.xsd"

>
    <!--注意,该上下文配置文件只用于 contextLoaderListener,是程序基本上下文,作为父context被其他上下文引用-->
    <!--分工:整个Web应用程序需要共享的一些组件,比如DAO,数据库的ConnectionFactory等,mybatis,等等-->


</beans>
spring-mvc.xml内容:
<?xml version="1.0" encoding="UTF-8"?>
<beans xmlns="http://www.springframework.org/schema/beans"
       xmlns:context="http://www.springframework.org/schema/context"
       xmlns:p="http://www.springframework.org/schema/p"
       xmlns:aop="http://www.springframework.org/schema/aop"
       xmlns:tx="http://www.springframework.org/schema/tx"
       xmlns:xsi="http://www.w3.org/2001/XMLSchema-instance"
       xmlns:mvc="http://www.springframework.org/schema/mvc"
       xmlns:task="http://www.springframework.org/schema/task"
       xsi:schemaLocation="http://www.springframework.org/schema/beans http://www.springframework.org/schema/beans/spring-beans-4.0.xsd
    http://www.springframework.org/schema/context http://www.springframework.org/schema/context/spring-context-4.0.xsd
    http://www.springframework.org/schema/aop http://www.springframework.org/schema/aop/spring-aop-4.0.xsd http://www.springframework.org/schema/tx http://www.springframework.org/schema/tx/spring-tx-4.0.xsd
    http://www.springframework.org/schema/util http://www.springframework.org/schema/util/spring-util-4.0.xsd
    http://www.springframework.org/schema/mvc http://www.springframework.org/schema/mvc/spring-mvc-4.1.xsd
 http://www.springframework.org/schema/task http://www.springframework.org/schema/task/spring-task-4.0.xsd"

>
    <!--注意,该上下文配置文件只用于 dispatch servlet,是web前端上下文,作为子context将继承父context [app-context.xml]-->
    <!--分工:DispatcherServlet创建的ApplicationContext主要用于和该Servlet相关的一些组件,比如Controller、ViewResovler等。-->


    <!--注意,mvc 上下文中扫描托管的bean,文件夹不能与app 上下文的有重合部分!否则会出现两个上下文同时初始化一份自己的bean对象的情况-->
    <context:component-scan base-package="net.w2p.FileServerWeb.controller"/>


    <!-- configure the InternalResourceViewResolver 配置引擎及模板所在目录,模板的后缀
    话说我个人感觉 jsp很好用,如果苛求更好的模板体验,应该直接用vuejs或其他前端框架的,别为难后台模板了。-->
    <bean class="org.springframework.web.servlet.view.InternalResourceViewResolver"
          id="internalResourceViewResolver">
        <!-- 前缀 -->
        <property name="prefix" value="/WEB-INF/views/" />
        <!-- 后缀 -->
        <property name="suffix" value=".jsp" />
    </bean>
    <!--控制器路由,view层配置 end-->


</beans>
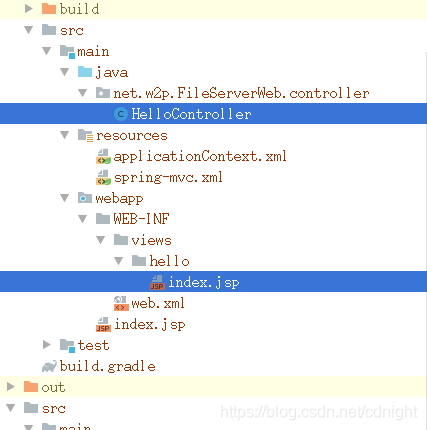
注意,spring mvc.xml里面设置了spring框架要扫描一个包,叫做net.w2p.FileServerWeb.controller,这是用来做控制器的,而模板引擎用的是原生的jsp,就放在/WEB-INF/views下面
新建一个测试用的控制器以及对应的视图文件。
如下图:
控制器内容:
package net.w2p.FileServerWeb.controller;


import org.springframework.beans.factory.annotation.Autowired;
import org.springframework.stereotype.Controller;
import org.springframework.web.bind.annotation.RequestMapping;
import org.springframework.web.servlet.ModelAndView;

import javax.servlet.http.HttpServletRequest;
import java.io.File;
import java.util.List;


@Controller("/hello")
@RequestMapping("/hello")
public class HelloController {

    @RequestMapping("/index")

    public ModelAndView hello(HttpServletRequest request){

        ModelAndView mav = new ModelAndView("hello/index");
        mav.addObject("messages", "你好吗");
        request.setAttribute("obj", "你好吗");

        try {


        }
        catch (Exception ed){
            ed.printStackTrace();
        }
        System.out.println("---end--");

        return mav;
    }
}
视图文件内容:
<%@ page contentType="text/html;charset=UTF-8" language="java" %>
<html>
<head>
    <title>测试</title>
</head>
<body>

你好吗?
</body>
</html>
好了,最简单的多模块,spring mvc项目配置完毕,现在来运行看看:


部署成功,运行成功。
这个已经算是好运了,一般情况光是配置spring mvc都可能出几个问题的。
spring整合使用xxl-conf且多环境切换
好了,到了第一个难点了
这部分内容难在:
1、项目中如何区分test,ppe,product三种环境,如何切换环境?
2、使用xxl-conf获取到的配置值如何传到spring中,spring直接托管使用了xxl-conf配置信息的bean,例如:druid数据库池等等。