版权声明:本文为博主半颗心脏一心一血敲出来的原创作品,未经博主允许不得转载,多谢支持。 https://blog.csdn.net/xh870189248/article/details/85126364
-
本系列博客学习由非官方人员 半颗心脏 潜心所力所写,仅仅做个人技术交流分享,不做任何商业用途。如有不对之处,请留言,本人及时更改。
文章目录
一、前言;
- 2018年也就只剩下十天了,今年的收获还是满满的,去年仅仅做了个硬件的
MQTT服务器,那今年做了esp8266连接阿里云物联网、京东微联、苏宁智能等,感觉不错!信心杠杠的!!说白了,还是围绕着这个芯片再走,感觉自己能力没有得到很大的提升!明年在硬件领域做esp32的语音功能控制,不再多写esp8266的博文了啦! - 今年最大的收获就是可以开发微信小程序以及服务器了,前几天在琢磨这个
oauth2.0协议,终于弄懂了原理!而且还用TP5框架搭好了私有云对接天猫精灵云AliGenie,实现不用硬件直连阿里云物联网也可以被天猫精灵控制,哈哈!! - 因为天猫精灵云服务器对接需要这个自己云服务器集成
oauth2.0服务器端,那么必须要学这个协议的!! 注意是集成oauth2.0服务器端协议!!
二、认识oauth2.0协议;
- 我开始也是蒙着一头雾水去学这个协议,百度啊搜狗啊,爱奇艺、优酷网址搜索视频学习,东筹西集,终于跑通了!也就认识理解了!大家不懂的玩意,还是要多琢磨几天,就懂了!还是应了那句话“天道酬勤”!!
- 这协议其实已经广泛被应用了,在我们使用一些网站登录经常遇到,比如下面的迅捷画图网站:
- 在代码逻辑过程是:迅捷画图网站会提交一则消息到腾讯QQ授权中心网站的认证中心,如果已经在腾讯QQ网站后台注册了,就是展示给用户一个登录界面,当用户操作输入密码或者其他方式登录使得登录成功,则腾讯QQ授权中心网站就会携带当前用户的信息返回给迅捷画图网站!这样就可以实现 迅捷画图网站不知道当前QQ用户登录的账号和密码,也可以获取当前QQ用户的信息,实现登录! 这就是
oauth2.0的强大之处!
- 在代码逻辑过程是:迅捷画图网站会提交一则消息到腾讯QQ授权中心网站的认证中心,如果已经在腾讯QQ网站后台注册了,就是展示给用户一个登录界面,当用户操作输入密码或者其他方式登录使得登录成功,则腾讯QQ授权中心网站就会携带当前用户的信息返回给迅捷画图网站!这样就可以实现 迅捷画图网站不知道当前QQ用户登录的账号和密码,也可以获取当前QQ用户的信息,实现登录! 这就是

- 上面是简书网站和腾讯QQ授权中心网站之间的通讯!那么迅捷画图网站就是客户端,而腾讯QQ授权中心网站就是
oauth2.0服务器端!换个说法,天猫精灵云服务器就是客户端,我们的服务器就是oauth2.0服务器端 - 所以,我们就要如何做一个
oauth2.0服务器端,这篇文章先不讲解天猫精灵的协议!下篇会讲述哈!记得关注我就好了!
三、认识授权过程;
- 对于
oauth2.0来说,有四种授权方式,但是天猫精灵的授权方式是授权码方式,据说这个授权方式也是最为完整和严密的授权方式,但是我们只能用这个授权方式,那么我们也就理解这个好了:
- 授权码模式(authorization code)
- 简化模式(implicit)
- 密码模式(resource owner password credentials)
- 客户端模式(client credentials)
- 为了更好地记录下整个流程,我这里自己画个图大家理解下!

- 需要注意的地方:
- ①:第一步:在私有云服务器已经注册了一个第三方的客户端的信息(名字 + 密钥),第一步天猫精灵服务器会以
oauth2.0标准协议携带这个名字向我们的服务器发起授权请求! - ②:第二步:这时候,就是我们服务器要做给用户展示是否授权了,如果授权成功,就把这个
授权码+当前的用户信息保存在数据库!,并且把授权码回复给天猫精灵服务器!! - ③:第三步:上步骤拿到这个授权码是有有效时间的,就像我们买了的中了奖的彩票一样,不去兑换就会过期无法兑换现金!而这个有效时间是我们私有服务器设置的,默认是30秒!所以,天猫精灵服务器会在30秒内请求我们提供的接口来获取唯一票据凭证
access_token! - ④:第四步:当我们私有服务器校验这个是在有效时间内请求的话,就会以
oauth2.0标准协议发送分配一个唯一票据凭证access_token!给天猫精灵服务器,这时候,天猫精灵每次来发现、控制和查询设备都会携带这个access_token前来操作! - 当然,这个
access_token也是有有效时间的,天猫精灵服务器推荐为 2天内!
- ①:第一步:在私有云服务器已经注册了一个第三方的客户端的信息(名字 + 密钥),第一步天猫精灵服务器会以
四、开始集成代码;
-
首先我们从官方提供
oauth2.0的集成仓库下载代码:https://github.com/bshaffer/oauth2-server-php !尤其注意,这个最新的代码仓库在php 7.0版本环境成功,否则会出现没必要的错误!我已经深深踩坑了! -
我们仅仅需要
oauth2-server-php/src/Oauth2里面的所有文件即可,其他的都是一些测试代码和说明文档!
4.1 数据库初始化;
- 仓库的代码示范是基于
mysql的,这种关系型入门数据库,挺合适的!我们要在我们的项目数据库创建七个表,复制下面的内容,在mysql中创建数据库和表,一个一个添加:
CREATE TABLE oauth_clients (
       client_id VARCHAR(80) NOT NULL,
       client_secret VARCHAR(80),
       redirect_uri VARCHAR(2000),
       grant_types VARCHAR(80),
       scope VARCHAR(4000),
       user_id VARCHAR(80),
       PRIMARY KEY(client_id)
);

CREATE TABLE oauth_access_tokens (
      access_token VARCHAR(40) NOT NULL,
      client_id VARCHAR(80) NOT NULL,
      user_id VARCHAR(80),
      expires TIMESTAMP NOT NULL,
      scope VARCHAR(4000),
      PRIMARY KEY (access_token)
);

CREATE TABLE oauth_authorization_codes (
      authorization_code VARCHAR(40) NOT NULL,
      client_id VARCHAR(80) NOT NULL,
      user_id VARCHAR(80),
      redirect_uri VARCHAR(2000),
      expires TIMESTAMP NOT NULL,
      scope VARCHAR(4000),
      id_token VARCHAR(1000),
      PRIMARY KEY (authorization_code)
);

CREATE TABLE oauth_refresh_tokens (
        refresh_token VARCHAR(40) NOT NULL,
        client_id VARCHAR(80) NOT NULL,
        user_id VARCHAR(80),
        expires TIMESTAMP NOT NULL,
        scope VARCHAR(4000),
        PRIMARY KEY (refresh_token)
);

CREATE TABLE oauth_users (
        username VARCHAR(80),
        password VARCHAR(80),
        first_name VARCHAR(80),
        last_name VARCHAR(80),
        email VARCHAR(80),
        email_verified BOOLEAN,
        scope VARCHAR(4000),
        PRIMARY KEY (username)
);

CREATE TABLE oauth_scopes (
        scope VARCHAR(80) NOT NULL,
        is_default BOOLEAN,
        PRIMARY KEY (scope)
);

CREATE TABLE oauth_jwt (
        client_id VARCHAR(80) NOT NULL,
        subject VARCHAR(80),
        public_key VARCHAR(2000) NOT NULL
);
- 成功创建之后如图:

- 我们创建一个第三方应用的名字和密钥,也是后面我们天猫精灵所需要的,也即是在表
oauth_clients中插入一个记录,注意redirect_uri的数值必须为固定,grant_types的数值我在官网文档看到是一定要插入的,不然会报错!!client_id–>xuhongclient_secret-->xuhongyss123456redirect_uri-->https://open.bot.tmall.com/oauth/callbackgrant_types-->authorization_code
mysql语句:
INSERT INTO oauth_clients (client_id, client_secret, redirect_uri , grant_types ) VALUES ("xuhong", "xuhongyss123456", "https://open.bot.tmall.com/oauth/callback", "authorization_code");
4.2 我们新建一个给予授权码的代码对外文件AligenieAuthorize.php
- 目的让客户端拿着
clientId按照oauth2.0标准协议请求这个文件,拿到授权码! - 文件中有一个
H5界面界面,展示用户是否授权?
<?php
/**
 * Created by PhpStorm.
 * User: XuHong
 * Date: 2018/12/20
 * Time: 16:00
 */

require_once('OAuth2/Autoloader.php');
global $server;

//根据您的数据库配置而定
$dsn = 'mysql:dbname=db_oauth;host=localhost';
$username = "root";
$password = "root";

\OAuth2\Autoloader::register();
//oauth操作数据库开始
$storage = new \OAuth2\Storage\Pdo(array('dsn' => $dsn, 'username' => $username, 'password' => $password));

// Pass a storage object or array of storage objects to the OAuth2 server class
$server = new \OAuth2\Server($storage);

// Add the "Client Credentials" grant type (it is the simplest of the grant types)
$server->addGrantType(new \OAuth2\GrantType\ClientCredentials($storage));

// Add the "Authorization Code" grant type (this is where the oauth magic happens)
$server->addGrantType(new \OAuth2\GrantType\AuthorizationCode($storage));

\OAuth2\Autoloader::register();

// $dsn is the Data Source Name for your database, for exmaple "mysql:dbname=my_oauth2_db;host=localhost"
$storage = new \OAuth2\Storage\Pdo(array('dsn' => $dsn, 'username' => $username, 'password' => $password));
// var_dump($storage);

// Pass a storage object or array of storage objects to the OAuth2 server class
$server = new \OAuth2\Server($storage);

// Add the "Client Credentials" grant type (it is the simplest of the grant types)
$server->addGrantType(new \OAuth2\GrantType\ClientCredentials($storage));

// Add the "Authorization Code" grant type (this is where the oauth magic happens)
$server->addGrantType(new \OAuth2\GrantType\AuthorizationCode($storage));

$request = \OAuth2\Request::createFromGlobals();
$response = new \OAuth2\Response();

// 校验请求是否 oauth2.0 请求以及是否 clientId 是否已经注册在数据库
if (!$server->validateAuthorizeRequest($request, $response)) {
    $response->send();
    die;
}
// display an authorization form
if (empty($_POST)) {
    exit('
        <form method="post">
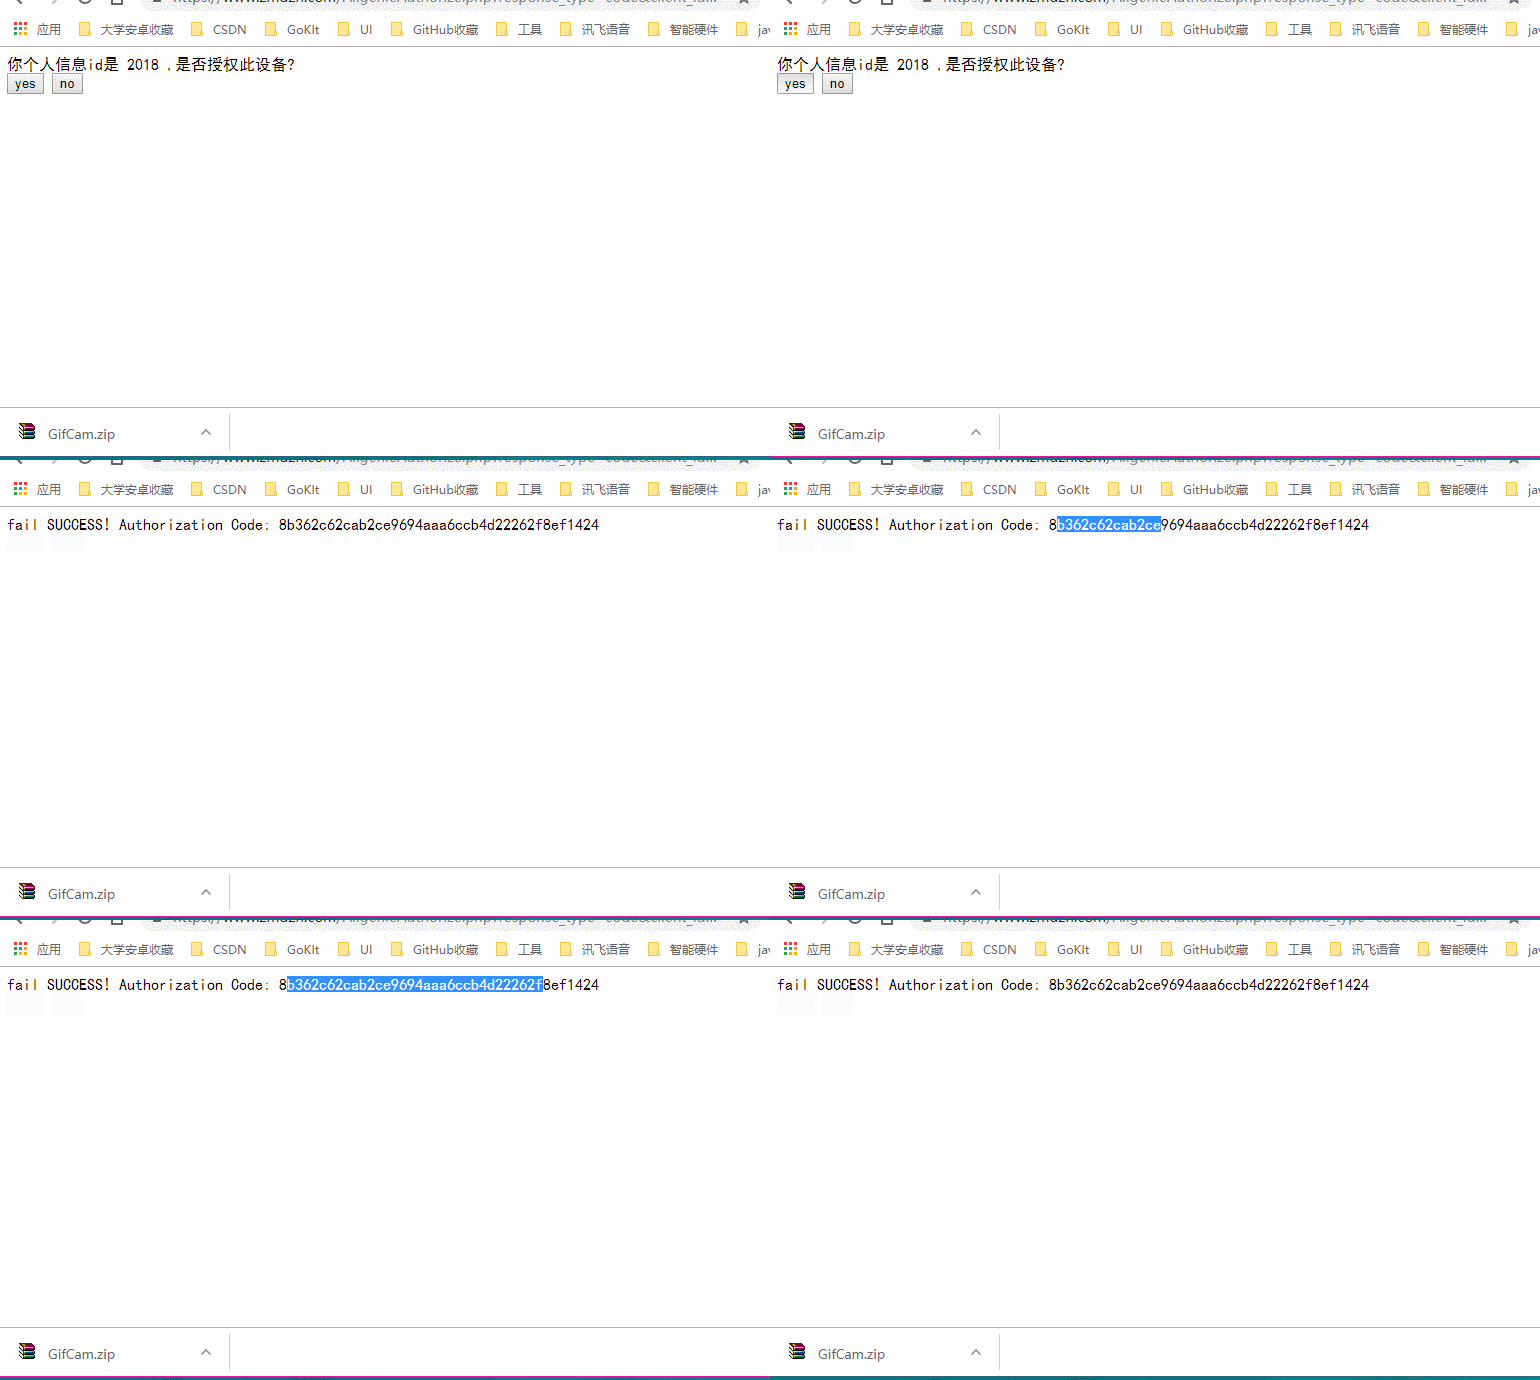
          <label>你个人信息id是 2018 ,是否授权此设备?</label><br />
          <input type="submit" name="authorized" value="yes">
          <input type="submit" name="authorized" value="no">
        </form>');
} else {
    echo 'fail ';
}

// print the authorization code if the user has authorized your client
$is_authorized = ($_POST['authorized'] === 'yes');
$server->handleAuthorizeRequest($request, $response, $is_authorized, 2018);
if ($is_authorized) {
    // this is only here so that you get to see your code in the cURL request. Otherwise, we'd redirect back to the client
    $code = substr($response->getHttpHeader('Location'), strpos($response->getHttpHeader('Location'), 'code=') + 5, 40);
    exit("SUCCESS! Authorization Code: $code");
}

//不管用户是否点击允许授权,都要发送给客户端
$response->send();
4.3 我们新建一个给予access_oken的代码对外文件AligenieToken.php
- 如果上面客户端成功拿到授权码,在有效时间内就会来这文件请求拿
accessToken。
$dsn = 'mysql:dbname=db_oauth;host=localhost';
$username = "root";
$password = "root";

\OAuth2\Autoloader::register();
$storage = new \OAuth2\Storage\Pdo(array('dsn' => $dsn, 'username' => $username, 'password' => $password));

$server = new \OAuth2\Server($storage, array(
    'refresh_token_lifetime' => 2419200,
    'access_lifetime' => 3600,// 3600 / 60 / 60 = 1 小时有效时间的 accesstoken
));

// Add the "Client Credentials" grant type (it is the simplest of the grant types)
$server->addGrantType(new \OAuth2\GrantType\ClientCredentials($storage));

// Add the "Authorization Code" grant type (this is where the oauth magic happens)
$server->addGrantType(new \OAuth2\GrantType\AuthorizationCode($storage));
$server->handleTokenRequest(\OAuth2\Request::createFromGlobals())->send();
4.3 我们新建一个给客户端拿着access_oken请求资源的对外文件getResource.php;
//资源控制器的建立和测试
require_once('OAuth2/Autoloader.php');

global $server;
$dsn = 'mysql:dbname=www_zmdzn_com;host=localhost';
$username = "www_zmdzn_com";
$password = "root";


\OAuth2\Autoloader::register();

// $dsn is the Data Source Name for your database, for exmaple "mysql:dbname=my_oauth2_db;host=localhost"
$storage = new \OAuth2\Storage\Pdo(array('dsn' => $dsn, 'username' => $username, 'password' => $password));


// Pass a storage object or array of storage objects to the OAuth2 server class
$server = new \OAuth2\Server($storage);

// Add the "Client Credentials" grant type (it is the simplest of the grant types)
$server->addGrantType(new \OAuth2\GrantType\ClientCredentials($storage));

// Add the "Authorization Code" grant type (this is where the oauth magic happens)
$server->addGrantType(new \OAuth2\GrantType\AuthorizationCode($storage));

if (!$server->verifyResourceRequest(\OAuth2\Request::createFromGlobals())) {
    $server->getResponse()->send();
    die;
}

$token = $server->getAccessTokenData(\OAuth2\Request::createFromGlobals());

//如果通过校对,则打印该 token对应的用户
echo json_encode(array('success' => true, 'message' => 'the token is right and your user_id is ' . $token['user_id']));

//do your things
五、测试代码;
- 第一步:我们先
oauth2.0协议向服务器请求授权码,下面的域名根据您的情况而定!看请求参数有指定response_type为code,而client_id就是我们在数据库插入的那个数值,后面那个state其然就是加密方式什么的。我也不太清楚!
https://www.domain.com/AligenieAuthorize.php?response_type=code&client_id=xuhong&state=0.125544
- 不出意外,出现如下界面?先询问用户是否授权,然后得到一串字符,就是授权码!

- 第二步:上一步,我们已经成功拿到了授权码,此刻我们以
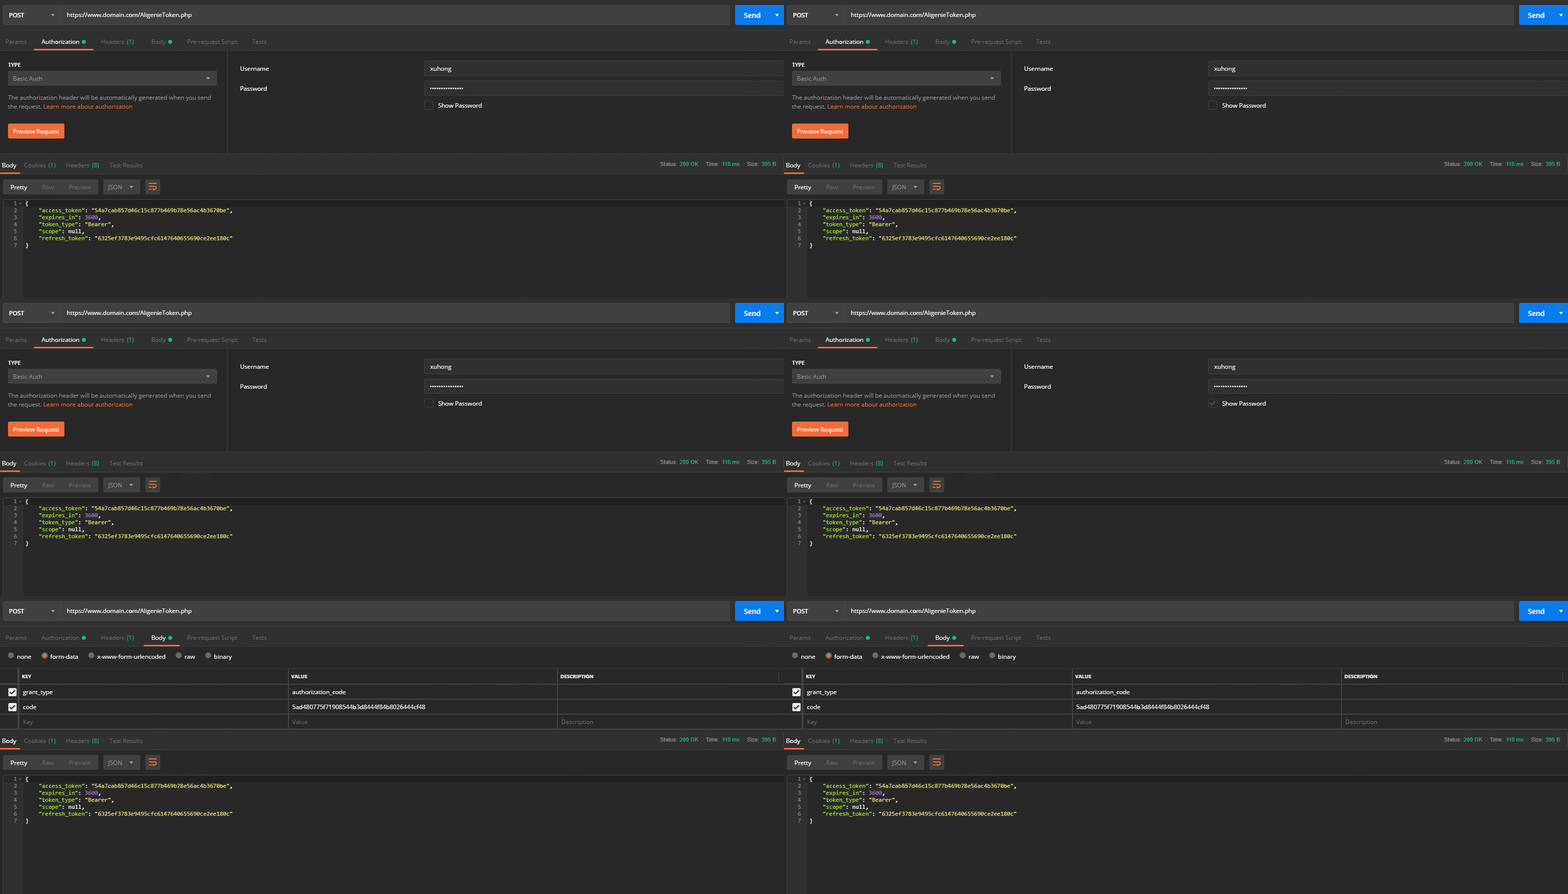
oauth2.0协议拿着这个授权码去请求access_token,下面是我在postMan工具模拟的,注意要在Authorization这一栏的Basic Oauth填入我们的数据库的那个记录的信息。之后在body里面填入我们的授权方式grant_type为authorization_code,而code就是上面拿到的那个授权码! 成功之后,会得到以下数据:
{
    "access_token": "54a7cab857d46c15c877b469b78e56ac4b3670be",
    "expires_in": 3600,
    "token_type": "Bearer",
    "scope": null,
    "refresh_token": "6325ef3783e9495cfc6147640655690ce2ee180c"
}

- 第三步:上一步我们已经拿到了
access_token,这步我们就拿这个access_token去拿资源啦!
https://www.domain.com/getResource.php?access_token=54a7cab857d46c15c877b469b78e56ac4b3670be

六、注意事项;
- 整个过程中,我们都发现到最后都是拿这个
access_token,这个信息是至关重要的,后面的天猫精灵都是拿着这个来请求控制或者查询设备的! - 还要强调一点,环境一定要
php7.0版本或以上,这个新版的仓库代码兼容不了旧版的,我已经尝试了一天了! - 大家有什么问题,欢迎留言!
- 本代码工程下载(包括oauth2.0库):https://download.csdn.net/download/xh870189248/10866543