一、Sersync
1、sersync是基于Inotify开发的,类似于Inotify-tools的工具
2、sersync可以记录下被监听目录中发生变化的(包括增加、删除、修改)具体某一个文件或某一个目录的名字,然后使用rsync同步的时候,只同步发生变化的这个文件或者这个目录。
二、Rsync+Inotify-tools与Rsync+sersync区别
1、Rsync+Inotify-tools
(1):Inotify-tools只能记录下被监听的目录发生了变化(包括增加、删除、修改),并没有把具体是哪个文件或者哪个目录发生了变化记录下来;
(2):rsync在同步的时候,并不知道具体是哪个文件或者哪个目录发生了变化,每次都是对整个目录进行同步,当数据量很大时,整个目录同步非常耗时(rsync要对整个目录遍历查找对比文件),因此,效率很低。
2、Rsync+sersync
(1):sersync可以记录下被监听目录中发生变化的(包括增加、删除、修改)具体某一个文件或某一个目录的名字;
(2):rsync在同步的时候,只同步发生变化的这个文件或者这个目录(每次发生变化的数据相对整个同步目录数据来说是很小的,rsync在遍历查找比对文件时,速度很快),因此,效率很高。
小结:当同步的目录数据量不大时,建议使用Rsync+Inotify-tools;当数据量很大(几百G甚至1T以上)、文件很多时,建议使用Rsync+sersync。
三、实验环境
推送端:web01 192.168.231.142 sersync+rsync
接收端:web02 192.168.231.143 rsync
防火墙和selinux已关闭
[root@web01 ~]# cat /etc/redhat-release
CentOS release 6.10 (Final)
四、部署Sersync+Rsync
4.1 部署rsync服务端和客户端
可参考https://blog.csdn.net/yuanfangPOET/article/details/84567970
4.2 部署sersync服务
1.下载安装包
[root@web01 tools]# wget http://down.whsir.com/downloads/sersync2.5.4_64bit_binary_stable_final.tar.gz解压
[root@web01 tools]# tar xf sersync2.5.4_64bit_binary_stable_final.tar.gz
GNU-Linux-x86
2.为方便管理,进行如下操作
[root@web01 tools]# mkdir -p /usr/local/sersync/{conf,bin,log}把sersync相关配置文件复制到创建的目录中
[root@web01 GNU-Linux-x86]# cp confxml.xml /usr/local/sersync/conf/

[root@web01 GNU-Linux-x86]# cp sersync2 /usr/local/sersync/bin/
3.修改配置文件
[root@web01 ~]# vim /usr/local/sersync/conf/confxml.xml

<?xml version="1.0" encoding="ISO-8859-1"?>

<head version="2.5">

    <host hostip="localhost" port="8008"></host>

    <debug start="false"/>

<fileSystem xfs="false"/>

#表示排除同步的数据,等价于 --exclude 功能,表示排除

    <filter start="false">

        <exclude expression="(.*)\.svn"></exclude>

        <exclude expression="(.*)\.gz"></exclude>

        <exclude expression="^info/*"></exclude>

        <exclude expression="^static/*"></exclude>

</filter>

 # 监控的事件,默认监控的是delete/close_write/moved_from/moved_to

    <inotify>

        <delete start="true"/>

        <createFolder start="true"/>

        <createFile start="false"/>

        <closeWrite start="true"/>

        <moveFrom start="true"/>

        <moveTo start="true"/>

        <attrib start="false"/>

        <modify start="false"/>

    </inotify>

# rsync命令的配置段

<sersync>

#同步的目录或文件

        <localpath watch="/zhang">

# 目标地址和rsync daemon的模块名,所以远程要以daemon模式运行好rsync

            <remote ip="192.168.231.143" name="backup1"/>

            <!--<remote ip="192.168.8.39" name="tongbu"/>-->

            <!--<remote ip="192.168.8.40" name="tongbu"/>-->

       </localpath>

        <rsync>

            <commonParams params="-artuz"/>

#rsync认证用户和相应的密码文件路径

            <auth start="true" users="rsync_backup" passwordfile="/etc/rsync.password"/>

#远程目标服务器的端口不是默认端口时使用

            <userDefinedPort start="false" port="873"/><!-- port=874 -->

            <timeout start="false" time="100"/><!-- timeout=100 -->

            <ssh start="false"/>

        </rsync>

        <failLog path="/tmp/rsync_fail_log.sh" timeToExecute="60"/><!--default every 60mins execute once-->

        <crontab start="false" schedule="600"><!--600mins-->

            <crontabfilter start="false">

                <exclude expression="*.php"></exclude>

                <exclude expression="info/*"></exclude>

            </crontabfilter>

        </crontab>

        <plugin start="false" name="command"/>

    </sersync>

#下面就是插件的设置

    <plugin name="command">

        <param prefix="/bin/sh" suffix="" ignoreError="true"/>  <!--prefix /opt/tongbu/mmm.sh suffix-->

        <filter start="false">

            <include expression="(.*)\.php"/>

            <include expression="(.*)\.sh"/>

</filter>

    </plugin>


    <plugin name="socket">

        <localpath watch="/opt/tongbu">

            <deshost ip="192.168.138.20" port="8009"/>

        </localpath>

    </plugin>

    <plugin name="refreshCDN">

        <localpath watch="/data0/htdocs/cms.xoyo.com/site/">

            <cdninfo domainname="ccms.chinacache.com" port="80" username="xxxx" passwd="xxxx"/>

            <sendurl base="http://pic.xoyo.com/cms"/>

            <regexurl regex="false" match="cms.xoyo.com/site([/a-zA-Z0-9]*).xoyo.com/images"/>

        </localpath>

    </plugin>

</head>
4.赋予权限
[root@web01 bin]# chmod +x sersync2 5.sersync软件帮助
[root@web01 bin]# pwd
/usr/local/sersync/bin
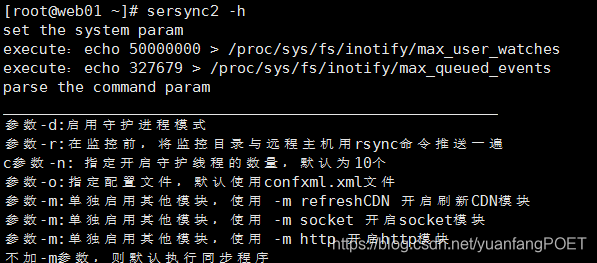
[root@web01 bin]# ./sersync2 -h

set the system param

execute:echo 50000000 > /proc/sys/fs/inotify/max_user_watches

execute:echo 327679 > /proc/sys/fs/inotify/max_queued_events

parse the command param

_______________________________________________________

参数-d:启用守护进程模式

参数-r:在监控前,将监控目录与远程主机用rsync命令推送一遍

参数-n: 指定开启守护线程的数量,默认为10个

参数-o:指定配置文件,默认使用confxml.xml文件

参数-m:单独启用其他模块,使用 -m refreshCDN 开启刷新CDN模块

参数-m:单独启用其他模块,使用 -m socket 开启socket模块

参数-m:单独启用其他模块,使用 -m http 开启http模块

不加-m参数,则默认执行同步程序

________________________________________________________________
6.在程序的bin目录下启动
[root@web01 bin]# ./sersync2 -dro /usr/local/sersync/conf/confxml.xml

set the system param

execute:echo 50000000 > /proc/sys/fs/inotify/max_user_watches

execute:echo 327679 > /proc/sys/fs/inotify/max_queued_events

parse the command param

option: -d run as a daemon

option: -r rsync all the local files to the remote servers before the sersync work

option: -o config xml name:  /usr/local/sersync/conf/confxml.xml

daemon thread num: 10

parse xml config file

host ip : localhost host port: 8008

daemon start,sersync run behind the console

use rsync password-file :

user is rsync_backup

passwordfile is /etc/rsync.password

config xml parse success

please set /etc/rsyncd.conf max connections=0 Manually

sersync working thread 12  = 1(primary thread) + 1(fail retry thread) + 10(daemon sub threads)

Max threads numbers is: 22 = 12(Thread pool nums) + 10(Sub threads)

please according your cpu ,use -n param to adjust the cpu rate

------------------------------------------

rsync the directory recursivly to the remote servers once

working please wait...

execute command: cd /zhang && rsync -artuz -R --delete ./ [email protected]::backup1 --password-file=/etc/rsync.password >/dev/null 2>&1

run the sersync:

watch path is: /zhang
也可以将/usr/local/sersync/bin/程序的bin目录添加到PATH中,sersync命令可以直接使用
[root@web01 ~]# vim /etc/profile
![]()
7.测试:
在web01同步目录/zhang下端创建文件会同步到web02备份目录中
[root@web01 zhang]# touch 1.txt

[root@web02 test1]# pwd

/backup/test1

[root@web02 test1]# ls

1.txt