修改mybatis-generator源码(一) 增加分页功能
使用原生的mybatis-generator jar包生成的mybatis mapper.xml文件是没有分页功能的,这造成了一定的不方便,所以我在GitHub下载了源码,研究了一下后,发现增加MySQL的分页功能并不困难。
附上原版 mybatis-generator-core-1.3.6.jar 下载链接:提取码: y4kn
附上增加分页功能后的版本: mybatis-generator-core-1.4.0-mysql-page.jar 下载链接:提取码: qj7n
下面是修改源码的全过程,包括 下载源码、查找需要修改的类、修改过程、打包、运行
一.下载源码
使用 IDEA 从 mybatis的GitHub官网下载generator项目源码:https://github.com/mybatis/generator.git
1.打开idea,选择从GitHub创建项目:
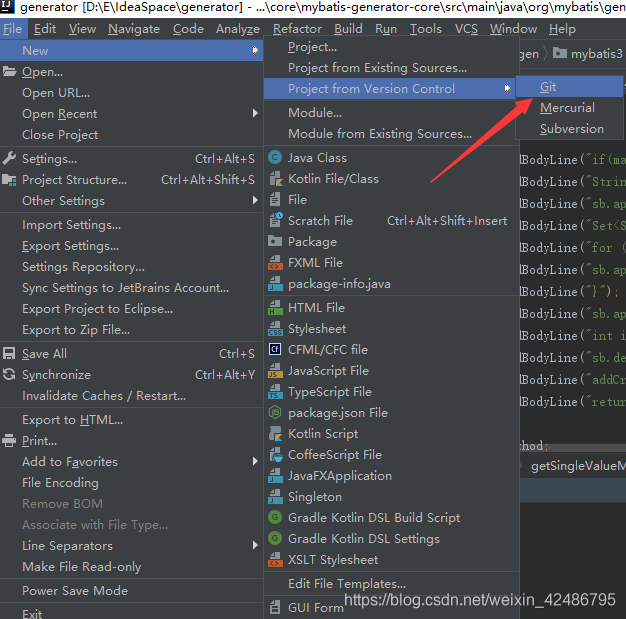
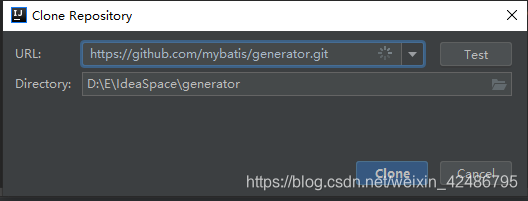
2.填写url:https://github.com/mybatis/generator.git,选择项目创建后的位置,点击 clone
3.创建完成后,点击项目的 core 目录,这里面是该项目的核心代码,里面的目录结构如下:
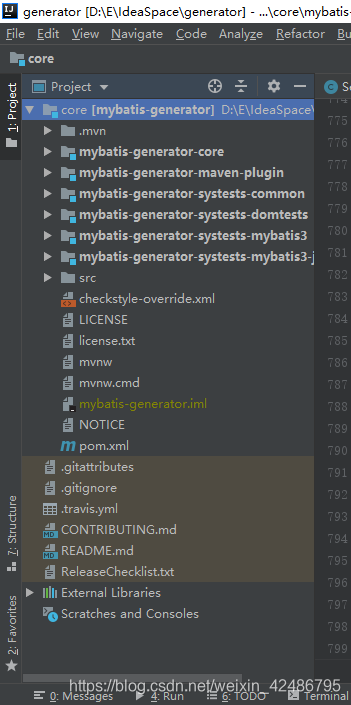
4. 其中,mybatis-generator-core目录 是该项目的源码,相当于一个独立的项目,我们要修改的代码就在这里面。
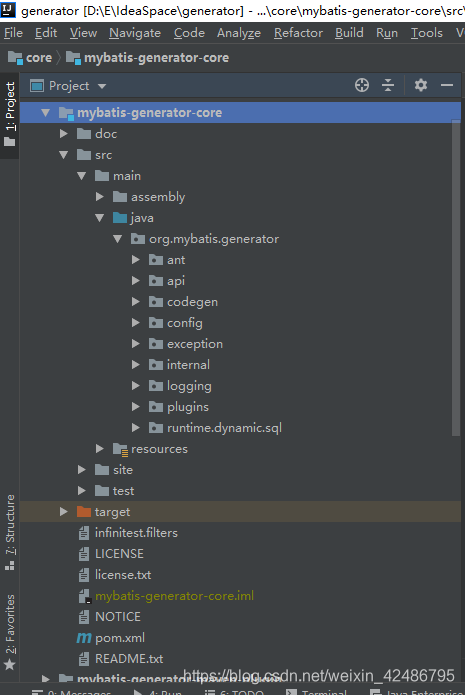
展开目录,结构如下,其中 Java 目录下的就是Java源码了。
5.1 接下来我们看看,原本的generator程序自动生成的文件,分析一下该如何修改,才能实现MySQL分页功能。
(第5步都是在分析generator生成的文件,判断我们应该怎么加入代码实现分页功能,不涉及修改源码,如不想看请跳过。)
<select id="selectByExample" parameterType="com.model.UserExample" resultMap="BaseResultMap">
    select
    <if test="distinct">
      distinct
    </if>
    'false' as QUERYID,
    <include refid="Base_Column_List" />
    from user
    <if test="_parameter != null">
      <include refid="Example_Where_Clause" />
    </if>
    <if test="orderByClause != null">
      order by ${orderByClause}
    </if>
  </select>
上图是自动生成的mapper文件中的一段程序,作用是动态生成 通过实例查询 的SQL语句。
distinct 是 example类中的一个属性,将其值设为true,sql语句则加上distinct关键字,去掉重复行。
<include refid="Base_Column_List" />是引用一段sql语句
_parameter 表示 example 中要查询的东西
orderByClause 表示 排序
通过以上分析我们很容易看出,只要在最后加上 limit m,n ,这样生成的SQL语句就能实现查询从m条开始,查询n条的功能了,分页也就不是难事。
5.2 我们增加代码,如下
<select id="selectByExample" parameterType="com.model.UserExample" resultMap="BaseResultMap">
    select
    <if test="distinct">
      distinct
    </if>
    'false' as QUERYID,
    <include refid="Base_Column_List" />
    from user
    <if test="_parameter != null">
      <include refid="Example_Where_Clause" />
    </if>
    <if test="orderByClause != null">
      order by ${orderByClause}
    </if>
    <if test="startRow >= 0 and pageRows > 0">
      limit ${startRow},${pageRows}
    </if>
  </select>
我们增加了两个变量:startRow、pageRows。分别表示从第几号开始查询 ,查询多少条记录(也就是每页的记录数)。
5.3 显然,这两个变量应该的 example 类中的属性,所以我们还应该修改 example 类
以下是原本自动生成的example类 的属性
public class UserExample {
    protected String orderByClause;

    protected boolean distinct;

    protected List<Criteria> oredCriteria;

	......
}
修改后:
public class UserExample {
    protected String orderByClause;

    protected boolean distinct;

    protected int startRow;		//别忘了增加 getter 和 setter方法

    protected int pageRows;

    protected List<Criteria> oredCriteria;

	......
}
5.4 修改了两处地方后,其实如今的mapper已经具备了分页功能,在调用mapper接口 的 selectByExample(example)方法时,
只需在此之前 set example对象的startRow属性和pageRows属性
示例:
		UserExample example = new UserExample();
		example.setStartRow(5);	//MySQL中的索引是从0开始的,所以 5 表示从第6条记录开始
		example.setPageRows(6);	//查询6条记录

		List<User> users = UserMapper.selectByExample(example);
通过以上方式修改generator生成的mapper.xml 以及examp文件,就可以实现分页功能,非常简单。
但是如果mapper文件太多,人工修改起来就十分麻烦,所以接下来我们直接修改generator源码,让generator每次生成的文件都自己带上分页功能。
6. 通过上一步的分析,我们知道,增加分页功能只需在两个文件中增加几行代码即可,所以我们要找到generator中生成这两个文件 的源码,增加生成规则
6.1 展开 mybatis-generator-core > java目录,我们发现了其中存在一个ExampleGenerator类,顾名思义,就是example类生成器,那么这个类肯定就是我们要找的类。
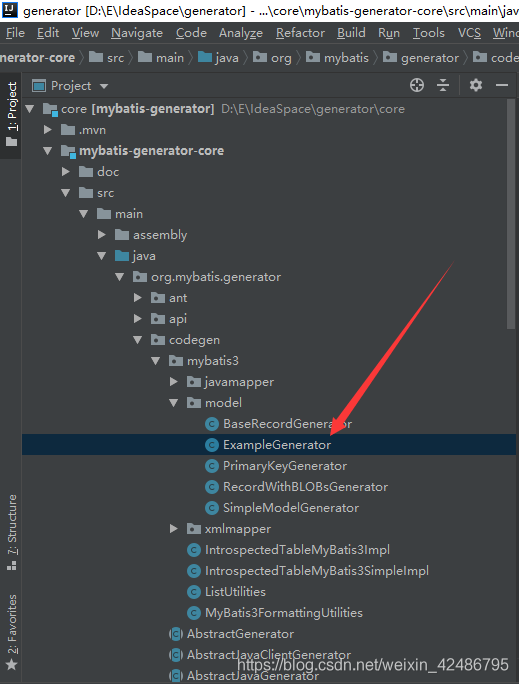
6.2 打开该类,我们可以看到很多熟悉的字符串,也就是example类中的属性。
按ctr+f,搜索 orderByClause,然后定位到如下代码:
// add field, getter, setter for orderby clause
        Field field = new Field("orderByClause", FullyQualifiedJavaType.getStringInstance()); //$NON-NLS-1$
        field.setVisibility(JavaVisibility.PROTECTED);
        commentGenerator.addFieldComment(field, introspectedTable);
        topLevelClass.addField(field);

        method = new Method("setOrderByClause"); //$NON-NLS-1$
        method.setVisibility(JavaVisibility.PUBLIC);
        method.addParameter(new Parameter(FullyQualifiedJavaType
                .getStringInstance(), "orderByClause")); //$NON-NLS-1$
        method.addBodyLine("this.orderByClause = orderByClause;"); //$NON-NLS-1$
        commentGenerator.addGeneralMethodComment(method, introspectedTable);
        topLevelClass.addMethod(method);

        method = new Method("getOrderByClause"); //$NON-NLS-1$
        method.setVisibility(JavaVisibility.PUBLIC);
        method.setReturnType(FullyQualifiedJavaType.getStringInstance());
        method.addBodyLine("return orderByClause;"); //$NON-NLS-1$
        commentGenerator.addGeneralMethodComment(method, introspectedTable);
        topLevelClass.addMethod(method);
又搜 distinct,定位如下代码:
 // add field, getter, setter for distinct
        field = new Field("distinct", FullyQualifiedJavaType.getBooleanPrimitiveInstance()); //$NON-NLS-1$
        field.setVisibility(JavaVisibility.PROTECTED);
        commentGenerator.addFieldComment(field, introspectedTable);
        topLevelClass.addField(field);

        method = new Method("setDistinct"); //$NON-NLS-1$
        method.setVisibility(JavaVisibility.PUBLIC);
        method.addParameter(new Parameter(FullyQualifiedJavaType
                .getBooleanPrimitiveInstance(), "distinct")); //$NON-NLS-1$
        method.addBodyLine("this.distinct = distinct;"); //$NON-NLS-1$
        commentGenerator.addGeneralMethodComment(method, introspectedTable);
        topLevelClass.addMethod(method);

        method = new Method("isDistinct"); //$NON-NLS-1$
        method.setVisibility(JavaVisibility.PUBLIC);
        method.setReturnType(FullyQualifiedJavaType
                .getBooleanPrimitiveInstance());
        method.addBodyLine("return distinct;"); //$NON-NLS-1$
        commentGenerator.addGeneralMethodComment(method, introspectedTable);
        topLevelClass.addMethod(method);
只要一眼,便可以看出这两段代码格式几乎一模一样,而且在源文件中是紧挨着的。
仔细观察不难发现,这段代码的意义就是生成一个属性,以及该属性的setter和getter方法。
所以我们只需要按照这个模板,增加生成startRow、pageRows两个属性的代码即可。
6.3 在源文件中 上一段代码之后,添加如下代码:
// add field, getter, setter for startRow
        field = new Field("startRow", FullyQualifiedJavaType.getIntInstance()); //$NON-NLS-1$
        field.setVisibility(JavaVisibility.PROTECTED);
        commentGenerator.addFieldComment(field, introspectedTable);
        topLevelClass.addField(field);

        method = new Method("setStartRow"); //$NON-NLS-1$
        method.setVisibility(JavaVisibility.PUBLIC);
        method.addParameter(new Parameter(FullyQualifiedJavaType.getIntInstance(), "startRow")); //$NON-NLS-1$
        method.addBodyLine("this.startRow = startRow;"); //$NON-NLS-1$
        commentGenerator.addGeneralMethodComment(method, introspectedTable);
        topLevelClass.addMethod(method);

        method = new Method("getStartRow"); //$NON-NLS-1$
        method.setVisibility(JavaVisibility.PUBLIC);
        method.setReturnType(FullyQualifiedJavaType.getIntInstance());
        method.addBodyLine("return startRow;"); //$NON-NLS-1$
        commentGenerator.addGeneralMethodComment(method, introspectedTable);
        topLevelClass.addMethod(method);

        // add field, getter, setter for endRow
        field = new Field("pageRows", FullyQualifiedJavaType.getIntInstance()); //$NON-NLS-1$
        field.setVisibility(JavaVisibility.PROTECTED);
        commentGenerator.addFieldComment(field, introspectedTable);
        topLevelClass.addField(field);

        method = new Method("setPageRows"); //$NON-NLS-1$
        method.setVisibility(JavaVisibility.PUBLIC);
        method.addParameter(new Parameter(FullyQualifiedJavaType.getIntInstance(), "pageRows")); //$NON-NLS-1$
        method.addBodyLine("this.pageRows = pageRows;"); //$NON-NLS-1$
        commentGenerator.addGeneralMethodComment(method, introspectedTable);
        topLevelClass.addMethod(method);

        method = new Method("getPageRows"); //$NON-NLS-1$
        method.setVisibility(JavaVisibility.PUBLIC);
        method.setReturnType(FullyQualifiedJavaType.getIntInstance());
        method.addBodyLine("return pageRows;"); //$NON-NLS-1$
        commentGenerator.addGeneralMethodComment(method, introspectedTable);
        topLevelClass.addMethod(method);
好了,现在生成generator程序生成的example文件中,已经有了startRow,pageRows;两个属性。
加下来修改生成 mapper.xml文件的 类
6.3 找到如下位置
顾名思义,这个文件夹下的类,就是与生成xml文件相关的了。
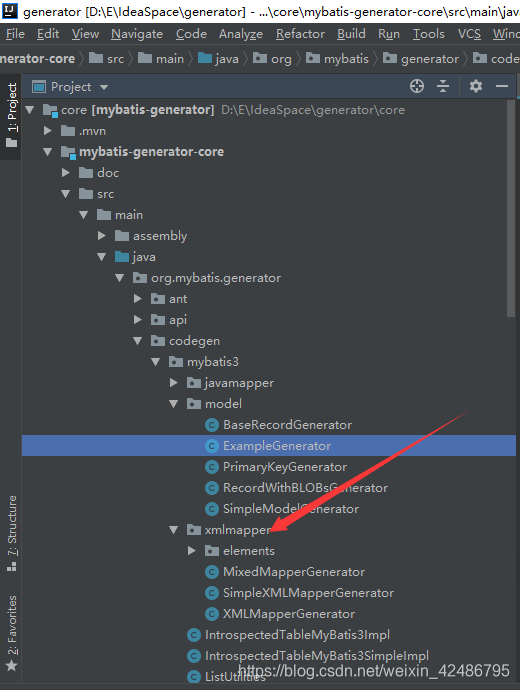
因为我们仅仅要修改 mapper.xml 文件中的 select 元素,所以我们要修改的类应该在elements文件夹下;
打开elements文件夹,我们发现一大堆类,而且个个名字一长串,瞬间懵逼…
不要急,我们仔细一看就会发现,每个类都有前缀,而其中就有我们要找的select:
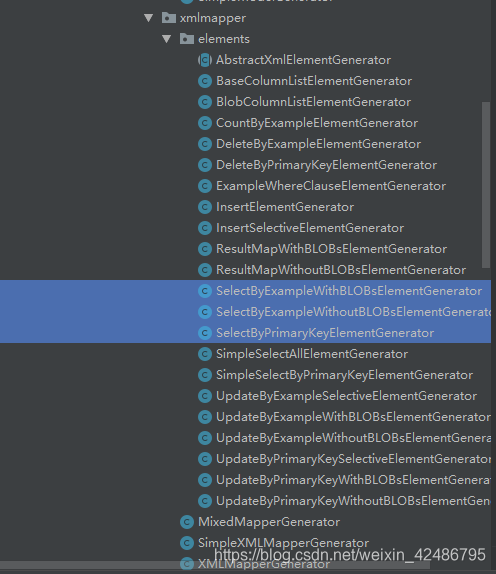
6.4 但现在有三个select,我们该选哪个呢?
显然,我们不可能修改SelectByPrimaryKeyElementGenerator类,这个类一看就是通过主键查询,查询结果只有一条记录,谈不上分页。
SelectByExampleWithBLOBsElementGenerator
SelectByExampleWithoutBLOBsElementGenerator
这两个类的前缀都是SelectByExample,显然就是我们要修改的类。
这两个类十分相似,稍不注意就会看成一样的。
但一个是WithBLOBs,一个是WithoutBLOBs。
BLOBs表示大字段类型,意味着数据库中有字段类型是text。
也就是说,当数据库中有字段类型是text时,generator调用SelectByExampleWithBLOBsElementGenerator方法,没有时,就调用SelectByExampleWithoutBLOBsElementGenerator方法。
我们可以只改前一个,也可以改两个,这里我只改前一个,后一个大家根据需要自行修改,方式是一样的。
6.5 打开SelectByExampleWithBLOBsElementGenerator 类,发现很多select 、if之类的字符串。
ctrl+f,查找 orderByClause ,定位到如下代码:
		ifElement = new XmlElement("if"); //$NON-NLS-1$
        ifElement.addAttribute(new Attribute("test", "orderByClause != null")); //$NON-NLS-1$ //$NON-NLS-2$
        ifElement.addElement(new TextElement("order by ${orderByClause}")); //$NON-NLS-1$
        answer.addElement(ifElement);
这段代码,作用就是生成如下代码:
<if test="orderByClause != null">
      order by ${orderByClause}
    </if>
按照惯例,我们把那段代码复制,粘贴到其后面,修改一下:
		ifElement = new XmlElement("if"); //$NON-NLS-1$
        ifElement.addAttribute(new Attribute("test", "orderByClause != null")); //$NON-NLS-1$ //$NON-NLS-2$
        ifElement.addElement(new TextElement("order by ${orderByClause}")); //$NON-NLS-1$
        answer.addElement(ifElement);

        ifElement = new XmlElement("if"); //$NON-NLS-1$
        ifElement.addAttribute(new Attribute("test", "startRow >= 0 and pageRows > 0")); //$NON-NLS-1$ //$NON-NLS-2$
        ifElement.addElement(new TextElement("limit ${startRow},${pageRows}")); //$NON-NLS-1$
        answer.addElement(ifElement);
好了,就是这么简单,这个文件改好了。
现在generator生成的mapper.xml文件也带有分页功能了。
到此两个文件的修改完毕。
7. 用maven打包,生成jar文件
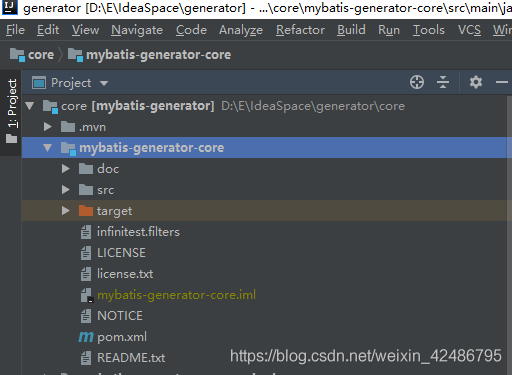
收缩mybatis-generator-core目录,如下:
看到pom.xml,鼠标右键,点击下面的选项,将项目转为maven项目
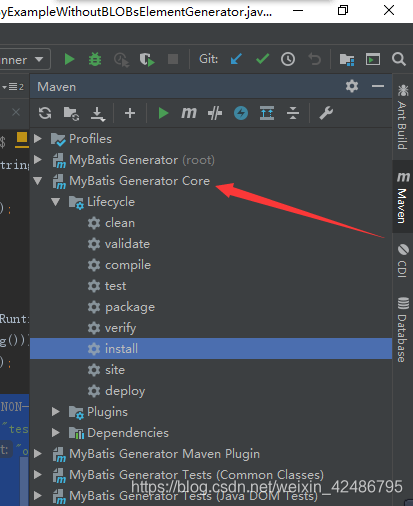
成功之后,点击箭头目录下的install,maven会为我们的项目打包。
第一次打包会很久,因为要下载很多依赖文件。
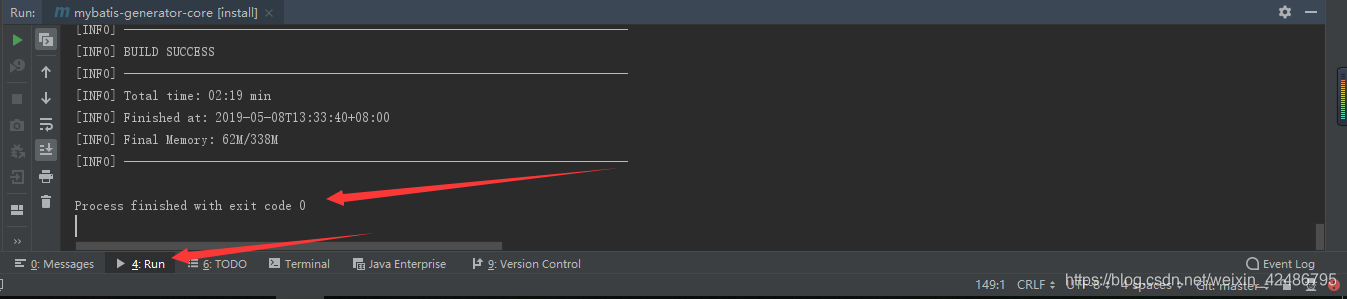
打包成功,会有如下提示:
成功之后,再看项目,就会发现多了一个target目录,展开:
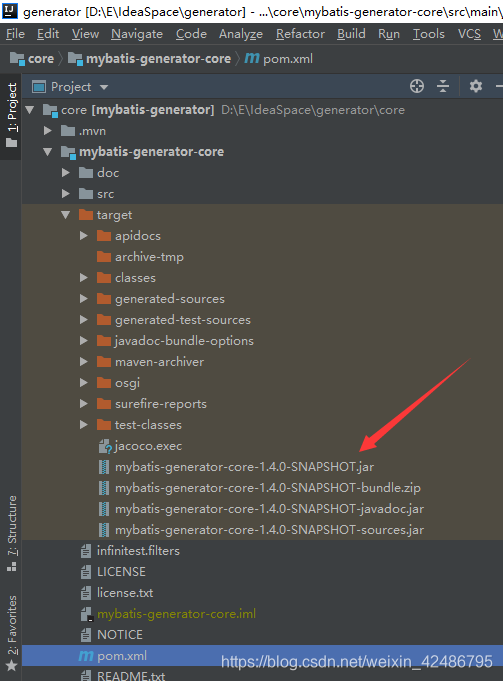
如图,箭头所指的文件就是generator程序的jar文件,可以运行生成mybatis文件。
与原本的mybatis-generator-core-1.3.6.jar文件作用一样,用法也完全相同,只是名字不一样,而且生成的代码有分页功能。
关于generator文件的使用,网上的教程很多,我暂时就不写了,后面如有需要,我会专门写一个文章介绍。
此外,修改mybatis-generator源码(二) 将会在几天后发布,将会为generator增加 or连接的多列模糊查询 功能。
也就是实现类似如下sql语句的 where条件:
where A = 1
	  and (B like '%张%' or C like '%李%' or D like '%王%' )
	  and E > 12