LVS负载均衡群集
理解负载均衡群集的原理
掌握LVS-NAT的部署
企业群集应用概述
群集的含义:
1.Cluster,集群、群集
2.由多台主机构成,但对外只表现为一个整体
在互联网应用中,随着站点对硬件性能、响应速度、服务稳定性、数据可靠性等要求越来越高,单台服务器力不从心
解决方法:
1.使用价格昂贵的小型机、大型机
2.使用普通服务器构建服务群集
企业群集分类
根据群集所针对的目标差异,可分为三种类型:
1.负载均衡群集(轮询,最小连接的加权重)
2.高可用群集(访问的速度,可靠性)
3.高性能运算群集(并发处理任务)负载均衡群集(Load Balance Cluster):
1.以提高应用系统的响应能力、尽可能处理更多的访问请求、减少延迟为目标,获得高并发、负载(LB) 的整体性能
2.LB的负载分配依赖于主节点的分流算法
高可用群集(High Availability Cluster):
1.以提高应用系统的可靠性、尽可能地减少中断时间为目标,确保服务的连续性,达到高可用(HA) 的容错效果
2.HA的工作方式包括双工和主从两种模式
高性能运算群集(High Performance Computer Cluster):
1.以提高应用系统的CPU运算速度、扩展硬件资源和分析能力为目标,获得相当于大型、超级计算机的高性能运算(HPC)能力
2.高性能运算群集的高性能依赖于"分布式运算”、“并行计算” ,通过专用硬件和软件将多个服务器的CPU、内存等资源整合在一起,实现只有大型、超级计算机才具备的计算能力
负载均衡群集工作模式分析
负载均衡群集是目前企业用得最多的群集类型
群集的负载调度技术有三种工作模式:
1.地址转换
2.IP隧道
3.直接路由(DR)
NAT模式
地址转换(Network Address Translation):
1.简称NAT模式,类似于防火墙的私有网络结构,负载调度器作为所有服务器节点的网关,即作为客户机的访问入口,也是各节点回应客户机的访问出口
2.服务器节点使用私有IP地址,与负载调度器位于同一个物理网络,安全性要优于其他两种方式

TUN模式
IP隧道(IP Tunnel):
1.简称TUN模式,采用开放式的网络结构,负载调度器仅作为客户机的访问入口,各节点通过各自的Internet连接直接回应客户机,而不再经过负载调度器
2.服务器节点分散在互联网中的不同位置,具有独立的公网IP地址,通过专用IP隧道与负载调度器相互通信

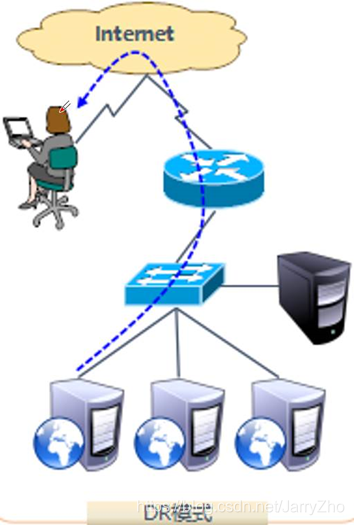
DR模式
直接路由(Direct Routing):
1.简称DR模式,采用半开放式的网络结构,与TUN模式的结构类似,但各节点并不是分散在各地,而是与调度器位于同一个物理网络
2.负载调度器与各节点服务器通过本地网络连接,不需要建立专用的IP隧道
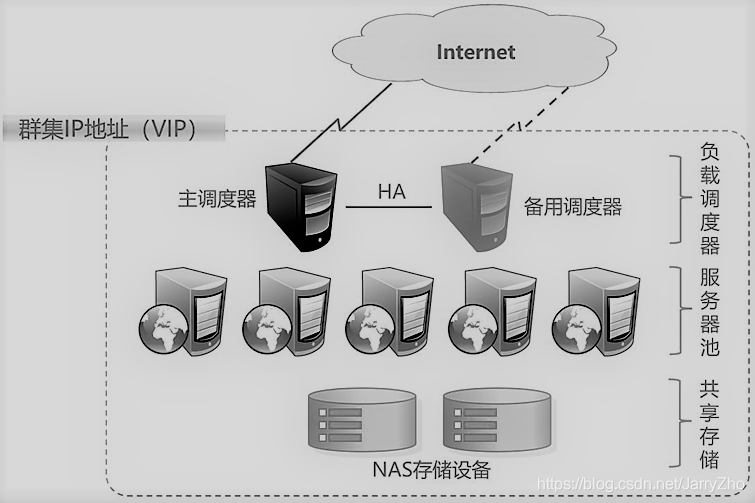
负载均衡群集架构
####负载均衡的结构:
1.第一层,负载调度器(Load Balancer或Director)
2.第二层,服务器池(Server Pool)
3.第三层,共享存储(Share Storage)
关于LVS虚拟服务器
Linux Virtual Server:
1.针对Linux内核的负载均衡解决方案
2.1998年5月,由我国的章文嵩博士创建
3.官方网站: http://www.linuxvirtualserver.org/
LVS的负载调度算法
1.轮询(Round Robin):
①将收到的访问请求按照顺序轮流分配给群集中的各节点(真实服务器)
②均等地对待每一台服务器, 而不管服务器实际的连接数和系统负载
2.加权轮询(Weighted Round Robin):
①根据真实服务器的处理能力轮流分配收到的访问请求,调度器可以自动查询各节点的负载情况,并动态调整其权重
②保证处理能力强的服务器承担更多的访问流量
3.最少连接(Least Connections)
①根据真实服务器已建立的连接数进行分配,将收到的访问请求优先分配给连接数最少的节点
4.加权最少连接(Weighted Least Connections)
①在服务器节点的性能差异较大的情况下,可以为真实服务器自动调整权重
②权重较高的节点将承担更大比例的活动连接负载
使用ipvsadm工具
VS群集创建与管理

NFS共享存储服务
Network File System,网络文件系统
1.依赖于RPC (远端过程调用)
2.需安装nfs-utils、rpcbind软件包
3.系统服务: nfs、 rpcbind
4.共享配置文件: /etc/exports
在客户机中访问NFS共享资源
1.安装rpcbind软件包,并启动rpcbind服务
2.手动挂载NFS共享目录
3.fstab自动挂载设置
Demo:LVS负载均衡群集
环境准备:
CentOS 7-1:调度器,网关(需要两块网卡)外:12.0.0.1 内:192.168.200.1
CentOS 7-2:网站服务器(Apache)192.168.200.110
CentOS 7-3:网站服务器(Apache)192.168.200.120
CentOS 7-4:提供共享存储 192.168.200.130
win7-1:客户端 12.0.0.12
yum在线安装前置操作:
1.共享存储服务器CentOS 7-4的操作:
[root@localhost ~]# rpm -q nfs-utils
nfs-utils-1.3.0-0.48.el7.x86_64
[root@localhost ~]# rpm -q rpcbind
rpcbind-0.2.0-42.el7.x86_64
2.节点服务器CentOS 7-2和7-3两台节点服务器:
[root@localhost ~]# yum install httpd -y3.调度器网关CentOS 7-1操作:
//要先添加一个网络适配器,成为两个网卡
[root@localhost ~]# yum install ipvsadm -y
共享存储服务器CentOS 7-4:
//先将网卡更改为仅主机模式
[root@localhost ~]# vim /etc/sysconfig/network-scripts/ifcfg-ens33
BOOTPROTO="static"      //将dhcp改为static
DEVICE="ens33"
ONBOOT="yes"
IPADDR=192.168.200.130      //在末行下插入:IP,子网,网关
NETMASK=255.255.255.0
GATEWAY=192.168.200.1
修改完成后输入:wq保存退出
[root@localhost ~]# service network restart
Restarting network (via systemctl):                        [  确定  ]
[root@localhost ~]# systemctl stop firewalld.service
[root@localhost ~]# setenforce 0
[root@localhost ~]# systemctl start nfs.service
[root@localhost ~]# systemctl status nfs.service
● nfs-server.service - NFS server and services
   Loaded: loaded (/usr/lib/systemd/system/nfs-server.service; disabled; vendor preset: disabled)
   Active: active (exited) since 二 2019-11-26 17:42:05 CST; 11s ago
......省略多行,状态为Active说明正常
[root@localhost ~]# systemctl start rpcbind.service
[root@localhost ~]# systemctl status rpcbind.service
● rpcbind.service - RPC bind service
   Loaded: loaded (/usr/lib/systemd/system/rpcbind.service; indirect; vendor preset: enabled)
   Active: active (running) since 二 2019-11-26 17:40:23 CST; 4min 26s ago
......省略多行,状态为Active说明正常
[root@localhost ~]# vim /etc/exports
/usr/share *(ro,sync)
/opt/accp 192.168.200.0/24(rw,sync)
/opt/benet 192.168.200.0/24(rw,sync)
//加入以上内容之后输入:wq保存退出
[root@localhost ~]# cd /opt/
[root@localhost opt]# mkdir benet accp
[root@localhost opt]# ls -l
总用量 0
drwxr-xr-x. 2 root root 6 11月 26 17:50 accp
drwxr-xr-x. 2 root root 6 11月 26 17:50 benet
drwxr-xr-x. 2 root root 6 3月  26 2015 rh
[root@localhost opt]# chmod 777 accp/ benet/        //提升权限
[root@localhost opt]# ls -l
总用量 0
drwxrwxrwx. 2 root root 6 11月 26 17:50 accp
drwxrwxrwx. 2 root root 6 11月 26 17:50 benet
drwxr-xr-x. 2 root root 6 3月  26 2015 rh
[root@localhost opt]# exportfs -rv      //进行发布
exporting 192.168.200.0/24:/opt/benet
exporting 192.168.200.0/24:/opt/accp
exporting *:/usr/share
节点服务器(CentOS 7-2)上的操作:
[root@localhost ~]# vim /etc/sysconfig/network-scripts/ifcfg-ens33
BOOTPROTO="static"      //将dhcp改为static
DEVICE="ens33"
ONBOOT="yes"
IPADDR=192.168.200.110      //在末行下插入:IP,子网,网关
NETMASK=255.255.255.0
GATEWAY=192.168.200.1
修改完成后输入:wq保存退出
[root@localhost ~]# service network restart
Restarting network (via systemctl):                        [  确定  ]
[root@localhost ~]# systemctl stop firewalld.service
[root@localhost ~]# setenforce 0
[root@localhost ~]# systemctl start httpd.service
[root@localhost ~]# netstat -ntap | grep 80
tcp6       0      0 :::80               :::*            LISTEN          7315/httpd
//设置网络适配器为仅主机
[root@localhost ~]# ping 192.168.200.130
PING 192.168.200.130 (192.168.200.130) 56(84) bytes of data.
64 bytes from 192.168.200.130: icmp_seq=1 ttl=64 time=0.754 ms
64 bytes from 192.168.200.130: icmp_seq=2 ttl=64 time=0.368 ms
64 bytes from 192.168.200.130: icmp_seq=3 ttl=64 time=0.398 ms
[root@localhost ~]# showmount -e 192.168.200.130
Export list for 192.168.200.130:
/usr/share *
/opt/benet 192.168.200.0/24
/opt/accp  192.168.200.0/24
[root@localhost ~]# mount.nfs 192.168.200.130:/opt/accp /var/www/html/
[root@localhost ~]# df -h
文件系统           容量    已用  可用   已用%  挂载点
/dev/sda2          20G   4.3G   16G  22%  /
devtmpfs           898M     0  898M   0%  /dev
tmpfs              912M     0  912M   0%  /dev/shm
tmpfs              912M  9.0M  903M   1%  /run
tmpfs              912M     0  912M   0%  /sys/fs/cgroup
/dev/sda1          6.0G  174M  5.9G   3%  /boot
/dev/sda5          10G    54M   10G   1%  /home
tmpfs              183M  4.0K  183M   1%  /run/user/42
tmpfs              183M   20K  183M   1%  /run/user/0
/dev/sr0           4.3G  4.3G     0  100% /run/media/root/CentOS 7 x86_64
192.168.200.130:/opt/accp   20G  3.4G   17G   17% /var/www/html
[root@localhost ~]# cd /var/www/html/
[root@localhost html]# echo "this is accp web" > index.html
[root@localhost html]# ls
index.html
此时回到存储服务器CentOS 7-4上看是否有此文件:
[root@localhost ~]# cd /opt/
[root@localhost opt]# ls
accp benet rh
[root@localhost opt]# cd accp/
[root@localhost accp]# ls
index.html
[root@localhost accp]# cat index.html
this is accp web
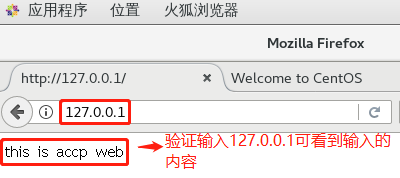
//此时有我们新建的index.html文件验证:在CentOS 7-2节点服务器上使用火狐浏览器输入:127.0.0.1看是否可以显示我们写入的网页内容:
节点服务器(CentOS 7-3)上的操作:
[root@localhost ~]# vim /etc/sysconfig/network-scripts/ifcfg-ens33
BOOTPROTO="static" //将dhcp改为static
DEVICE="ens33"
ONBOOT="yes"
IPADDR=192.168.200.120 //在末行下插入:IP,子网,网关
NETMASK=255.255.255.0
GATEWAY=192.168.200.1
//修改完成后输入:wq保存退出
[root@localhost ~]# service network restart
Restarting network (via systemctl): [ 确定 ]
[root@localhost ~]# systemctl stop firewalld.service
[root@localhost ~]# setenforce 0
[root@localhost ~]# systemctl start httpd.service
[root@localhost ~]# netstat -ntap | grep 80
tcp6 0 0 :::80 :::* LISTEN 7315/httpd //设置网络适配器为仅主机
[root@localhost ~]# ping 192.168.200.130
PING 192.168.200.130 (192.168.200.130) 56(84) bytes of data.
64 bytes from 192.168.200.130: icmp_seq=1 ttl=64 time=0.532 ms
64 bytes from 192.168.200.130: icmp_seq=2 ttl=64 time=1.01 ms
64 bytes from 192.168.200.130: icmp_seq=3 ttl=64 time=0.940 ms
[root@localhost ~]# showmount -e 192.168.200.130
Export list for 192.168.200.130:
/usr/share *
/opt/benet 192.168.200.0/24
/opt/accp 192.168.200.0/24
[root@localhost ~]# mount.nfs 192.168.200.130:/opt/benet /var/www/html/
[root@localhost ~]# df -h
文件系统 容量 已用 可用 已用% 挂载点
/dev/sda2 20G 3.4G 17G 17% /
devtmpfs 898M 0 898M 0% /dev
tmpfs 912M 0 912M 0% /dev/shm
tmpfs 912M 9.0M 903M 1% /run
tmpfs 912M 0 912M 0% /sys/fs/cgroup
/dev/sda1 6.0G 174M 5.9G 3% /boot
/dev/sda5 10G 54M 10G 1% /home
tmpfs 183M 4.0K 183M 1% /run/user/42
tmpfs 183M 20K 183M 1% /run/user/0
/dev/sr0 4.3G 4.3G 0 100% /run/media/root/CentOS 7 x86_64
192.168.200.130:/opt/benet 20G 3.4G 17G 17% /var/www/html
[root@localhost ~]# cd /var/www/html/
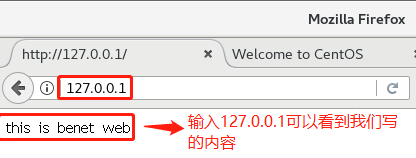
[root@localhost html]# echo "this is benet web" > index.html
[root@localhost html]# ls
index.html此时回到存储服务器CentOS 7-4上看是否有此文件:
[root@localhost ~]# cd /opt/
[root@localhost opt]# ls
accp  benet  rh
[root@localhost opt]# cd accp/
[root@localhost accp]# ls
index.html
[root@localhost accp]# cat index.html
this is benet web
//此时有我们新建的index.html文件
验证:在CentOS 7-3节点服务器上使用火狐浏览器输入:127.0.0.1看是否可以显示我们写入的网页内容:
调度,网关服务器CentOS 7-1的操作:
[root@localhost ~]# cd /etc/sysconfig/network-scripts/
[root@localhost network-scripts]# ls
ifcfg-ens33 ifdown-ppp ifup-ib ifup-Team
ifcfg-lo ifdown-routes ifup-ippp ifup-TeamPort
[root@localhost network-scripts]# cp ifcfg-ens33 ifcfg-ens36
[root@localhost network-scripts]# vim ifcfg-ens36
BOOTPROTO="static" //将dhcp改为static
NAME="ens36" //把名称改为ens36
UUID号删除
DEVICE="ens36" //把名称改为ens36
ONBOOT="yes"
IPADDR=12.0.0.1 //在末行下插入:IP,子网
NETMASK=255.255.255.0
//修改完成后输入:wq保存退出
[root@localhost network-scripts]# vim ifcfg-ens33
BOOTPROTO="static" //将dhcp改为static
DEVICE="ens33"
ONBOOT="yes" //在末行下插入:IP,子网
IPADDR=192.168.200.1
NETMASK=255.255.255.0
//修改完成后输入:wq保存退出
[root@localhost network-scripts]# service network restart
Restarting network (via systemctl): [ 确定 ]
[root@localhost network-scripts]# vim /etc/sysctl.conf
//在最后一行按o转下行插入
net.ipv4.ip_forward=1
//修改完成后输入:wq保存退出
[root@localhost network-scripts]# sysctl -p
net.ipv4.ip_forward = 1
[root@localhost network-scripts]# iptables -t nat -F
[root@localhost network-scripts]# iptables -F
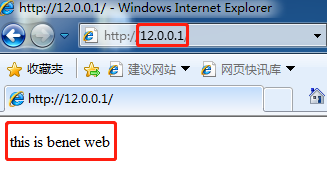
[root@localhost network-scripts]# iptables -t nat -A POSTROUTING -o ens36 -s 192.168.200.0/24 -j SNAT --to-source 12.0.0.1win7-1中验证转发:
先把网卡设置为仅主机模式,网卡配置为静态地址,同时关闭防火墙:
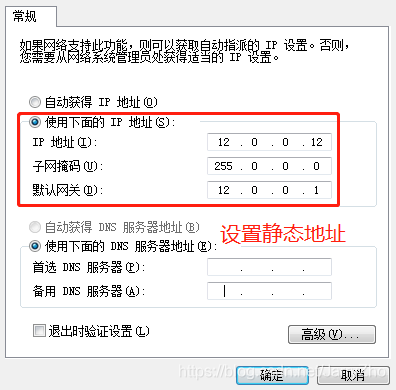
此时用内部的节点服务器ping:12.0.0.12测试能否ping通:
[root@localhost html]# ping 12.0.0.12
PING 12.0.0.12 (12.0.0.12) 56(84) bytes of data.
64 bytes from 12.0.0.12: icmp_seq=1 ttl=127 time=1.14 ms
64 bytes from 12.0.0.12: icmp_seq=2 ttl=127 time=1.78 ms
64 bytes from 12.0.0.12: icmp_seq=3 ttl=127 time=1.02 ms
//此时可以ping通,说明回应没有问题
加载LVS内核模块:
[root@localhost network-scripts]# modprobe ip_vs
[root@localhost network-scripts]# cat /proc/net/ip_vs
IP Virtual Server version 1.2.1 (size=4096)
Prot LocalAddress:Port Scheduler Flags
  -> RemoteAddress:Port Forward Weight ActiveConn InActConn
启动服务:(注意:在CentOS 7中必须要先保存在启动服务,否则会报错!!!)
[root@localhost network-scripts]# ipvsadm --save > /etc/sysconfig/ipvsadm
[root@localhost network-scripts]# systemctl start ipvsadm.service
编写配置规则:
[root@localhost network-scripts]# cd /opt/
[root@localhost opt]# vim nat.sh
#!/bin/bash
ipvsadm -C          //清除内核虚拟服务器表中的所有记录
ipvsadm -A -t 12.0.0.1:80 -s rr         //添加新的虚拟的服务器
ipvsadm -a -t 12.0.0.1:80 -r 192.168.200.110:80 -m
ipvsadm -a -t 12.0.0.1:80 -r 192.168.200.120:80 -m
ipvsadm
//输入完成后输入:wq保存退出
[root@localhost opt]# source nat.sh
IP Virtual Server version 1.2.1 (size=4096)
Prot LocalAddress:Port Scheduler Flags
  -> RemoteAddress:Port           Forward Weight ActiveConn InActConn
TCP  localhost.localdomain:http rr
  -> 129.168.200.110:http         Masq    1      0          0
  -> 129.168.200.120:http         Masq    1      0          0
验证:使用win7-1客户终端访问12.0.0.1,看是否可以成功: