android开发APP调用照相机,将拍照图片存储在SD卡中,并通过一个Listview列表进行管理的步骤讲解
本次博客主要讲解利用开发的
(一)、项目功能的界面设计
1、拍照的图片显示到图片框的xml设计如下:
<LinearLayout
        android:layout_width="match_parent"
        android:layout_height="200dp"
        android:background="#00B8D4">
        <ImageView
            android:layout_width="match_parent"
            android:layout_height="200dp"
            android:src="@drawable/view1"
            android:id="@+id/image"/>
    </LinearLayout>
2、拍照按钮的xml代码设计如下:
<Button
        android:layout_width="match_parent"
        android:layout_height="wrap_content"
        android:text="拍个照片吧!"
        android:onClick="takePicture"
        android:id="@+id/save"/>
3、listview的控件设置如下:
<ListView
        android:layout_width="match_parent"
        android:layout_height="wrap_content"
        android:descendantFocusability="blocksDescendants"
        android:id="@+id/imageList"/>
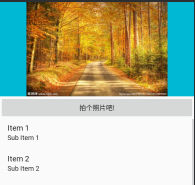
以上设计的界面的效果如下图所示:
(二)、主界面实现的功能代码编写
将图片保存到手机内存中主要是利用sd卡的保存,目前大多数手机已经是内置的sd卡,这里我们主要讲解这种方法:
1、在项目的配置文件中为项目申请调用手机相机和访问内存空间的权限:
<uses-permission android:name="android.permission.WRITE_EXTERNAL_STORAGE" />
<uses-permission android:name="android.permission.READ_EXTERNAL_STORAGE" />
<uses-permission android:name="android.permission.READ_PHONE_STATE" />
2、listview适配器的自定义编写的主要函数如下:
自己创建一个名为imageAdapter的java类,进行适配器的自定义:
public View getView(int i, View view, ViewGroup viewGroup) {
        View v =View.inflate(stuContext,R.layout.myspinner_item,null);
        Map<String,Object> tupian = (Map<String,Object> )a.get(i);
        ImageView image = (ImageView) v.findViewById(R.id.image);
        TextView nameText = (TextView) v.findViewById(R.id.name);

        //设置图片信息
        String name = tupian.get("name").toString();   //拿到图片的名字
        nameText.setText(name);
        //设置图片
        String imagepath=(String)tupian.get("imagePath");
        Bitmap bitmap = BitmapFactory.decodeFile(imagepath);//此处放路径名
        image.setImageBitmap(bitmap);
        //设置标识符
        image.setTag(i);
        return v;
    }
}
3、声明对象并进行相应的实例化:
private int TAKE_PHOTO=1;   //拍照
    private int GET_PHOTO=2;    //取照片
    private ListView imageList;
    public imageAdapter imageAdapter;
    @Override
    protected void onCreate(Bundle savedInstanceState) {
        super.onCreate(savedInstanceState);
        setContentView(R.layout.activity_work42);
        exitSD();
        imageList=(ListView)findViewById(R.id.imageList);
        imageAdapter();
        ///为配置器设置一个自定义的item内部控件的点击监听
        imageAdapter.setOnInnerItemOnClickListener(this);
        imageAdapter.notifyDataSetChanged();
        imageList.setAdapter(imageAdapter);
        imageList.setOnItemClickListener(this);
    }
4、适配器的调用函数如下:
private void imageAdapter(){
        imageAdapter = new imageAdapter(this,getDatas());
    }
5、获取存储卡状态的函数编写如下(判断是否有SD卡):
 private void exitSD() {
        //获取存储卡状态
        String state = Environment.getExternalStorageState();
        if(Environment.MEDIA_MOUNTED.equals(state)){
            Toast.makeText(this, "有SD卡 ", Toast.LENGTH_SHORT).show();
        }else{
            Toast.makeText(this, "没有SD卡 ", Toast.LENGTH_SHORT).show();
        }
    }
6、拍照时刻的函数编写如下:
用来记录拍照的时间,这个图片的详细信息可以查看到的内容,也是必要的一步
public String timee(){
        SimpleDateFormat simpleDateFormat = new SimpleDateFormat("yyyyMMdd_HHmmss");// HH:mm:ss
        Date date = new Date(System.currentTimeMillis());
        return simpleDateFormat.format(date);
    }
7、调用相机拍照函数的编写如下:
通过拍照按钮、调用手机的摄像机进行拍照
 public void takePicture(View view) {
        Intent mIntent = new Intent(android.provider.MediaStore.ACTION_IMAGE_CAPTURE);
        startActivityForResult(mIntent,TAKE_PHOTO);
    }
8、将拍摄的照片进行保存函数如下:
获取系统的存储空间的代码如下:
imagePath=Environment.getExternalStorageDirectory().getPath()//此语句用来获取手机的存储空间
将拍照好的图片保存到我们设置路径imagePath=Environment.getExternalStorageDirectory().getPath()+"/service" 下面;
 public void saveImageSd(Bitmap bitmap, String fileName){
        FileOutputStream fos=null;
        if(Environment.getExternalStorageState().equals(Environment.MEDIA_MOUNTED)){
            String imagePath=Environment.getExternalStorageDirectory().getPath()+"/service";
            try {
                File file=new File(imagePath,fileName+".jpg");
                System.out.println(file.getPath());
                fos=new FileOutputStream(file);
                bitmap.compress(Bitmap.CompressFormat.JPEG,100,fos);
                fos.flush();
                Toast.makeText(this,"图片保存成功"+imagePath,Toast.LENGTH_SHORT).show();

            } catch (FileNotFoundException e) {
                e.printStackTrace();
            } catch (IOException e) {
                e.printStackTrace();
            }
        /*
        通过广播更新图片管理
         */
            Intent intent=new Intent();
            intent.setAction(Intent.ACTION_MEDIA_SCANNER_SCAN_FILE);
            Uri uri = Uri.parse("file://"+imagePath+fileName);
            intent.setData(uri);
            this.sendBroadcast(intent);
        }
    }
9、获取相册拍摄的图片进行listview展示的函数编写如下:
listview读取图片保存路径中的图片,然后显示到listview上面:
private List<Map<String,Object>> getDatas() {
        List<Map<String,Object>> list = new ArrayList<Map<String,Object>>();
        String sdpath = "";
        sdpath = Environment.getExternalStorageDirectory().getPath();
        sdpath = sdpath+"/service/";
        File file = new File(sdpath);
        if (!file.exists()) {    //文件不存在
            return null;
        }
        else{
            //获取以jpg为后缀的图片
            File[] files = file.listFiles(new FilenameFilter() { // 找到匹配的图片
                public boolean accept(File dir, String filename) {
                    return filename.endsWith(".jpg");
                }
            });
            //将图片装载到List中,方便ListView进行显示
            for (int i = 0; i <files.length; i++) {
                Map<String, Object> map = new HashMap<String, Object>();
                String imagePath = sdpath+files[i].getName();
                map.put("imagePath",imagePath);
                map.put("name",files[i].getName());
                list.add(map);
            }
            System.out.println("装载了"+files.length+"张照片");
            return list;
        }
    }
(三)、项目的整体java代码如下:
1、主界面的整体设计如下代码所示:
<?xml version="1.0" encoding="utf-8"?>
<LinearLayout xmlns:android="http://schemas.android.com/apk/res/android"
    xmlns:tools="http://schemas.android.com/tools"
    android:layout_width="match_parent"
    android:layout_height="match_parent"
    android:orientation="vertical"
    tools:context=".work42">
    <LinearLayout
        android:layout_width="match_parent"
        android:layout_height="200dp"
        android:background="#00B8D4">
        <ImageView
            android:layout_width="match_parent"
            android:layout_height="200dp"
            android:src="@drawable/view1"
            android:id="@+id/image"/>
    </LinearLayout>
    <Button
        android:layout_width="match_parent"
        android:layout_height="wrap_content"
        android:text="拍个照片吧!"
        android:onClick="takePicture"
        android:id="@+id/save"/>
    <ListView
        android:layout_width="match_parent"
        android:layout_height="wrap_content"
        android:descendantFocusability="blocksDescendants"
        android:id="@+id/imageList"/>
</LinearLayout>
2、主界面的java类代码
package *******;//填写自己的项目包名
import androidx.appcompat.app.AppCompatActivity;
import androidx.core.content.FileProvider;
import android.content.Intent;
import android.graphics.Bitmap;
import android.graphics.BitmapFactory;
import android.net.Uri;
import android.os.Bundle;
import android.os.Environment;
import android.os.StrictMode;
import android.provider.MediaStore;
import android.text.format.DateFormat;
import android.util.Log;
import android.view.View;
import android.widget.AdapterView;
import android.widget.Button;
import android.widget.ImageView;
import android.widget.ListView;
import android.widget.Toast;
import java.io.File;
import java.io.FileFilter;
import java.io.FileInputStream;
import java.io.FileNotFoundException;
import java.io.FileOutputStream;
import java.io.FilenameFilter;
import java.io.IOException;
import java.io.UnsupportedEncodingException;
import java.text.SimpleDateFormat;
import java.util.ArrayList;
import java.util.Calendar;
import java.util.Date;
import java.util.HashMap;
import java.util.List;
import java.util.Locale;
import java.util.Map;
public class work42 extends AppCompatActivity implements imageAdapter.InnerItemOnClickListener, AdapterView.OnItemClickListener{
    private int TAKE_PHOTO=1;   //拍照
    private int GET_PHOTO=2;    //取照片
    private ListView imageList;
    public imageAdapter imageAdapter;
    @Override
    protected void onCreate(Bundle savedInstanceState) {
        super.onCreate(savedInstanceState);
        setContentView(R.layout.activity_work42);
        exitSD();
        imageList=(ListView)findViewById(R.id.imageList);
        imageAdapter();
        ///为配置器设置一个自定义的item内部控件的点击监听
        imageAdapter.setOnInnerItemOnClickListener(this);
        imageAdapter.notifyDataSetChanged();
        imageList.setAdapter(imageAdapter);
        imageList.setOnItemClickListener(this);
    }
    private void imageAdapter(){
        imageAdapter = new imageAdapter(this,getDatas());
    }
    private void exitSD() {
        //获取存储卡状态
        String state = Environment.getExternalStorageState();
        if(Environment.MEDIA_MOUNTED.equals(state)){
            Toast.makeText(this, "有SD卡 ", Toast.LENGTH_SHORT).show();
        }else{
            Toast.makeText(this, "没有SD卡 ", Toast.LENGTH_SHORT).show();
        }
    }
    //一下函数是系统自动生成的,主要用来将拍摄的照片显示到我们的图片框上面
    @Override
    protected void onActivityResult(int requestCode,int resultCode,Intent data){
        super.onActivityResult(requestCode,resultCode,data);
        if (resultCode == RESULT_OK) {  //回传值接受成功
            if (requestCode == TAKE_PHOTO) {    //拍照取图
                Bundle bundle = data.getExtras();   //获取data数据集合
                Bitmap bitmap = (Bitmap) bundle.get("data");        //获得data数据
                saveImageSd(bitmap,"此刻"+timee());//存图
                imageAdapter();
                imageList.setAdapter(imageAdapter);
                imageAdapter.notifyDataSetChanged();
            }
        }
    }
    public String timee(){
        SimpleDateFormat simpleDateFormat = new SimpleDateFormat("yyyyMMdd_HHmmss");// HH:mm:ss
        Date date = new Date(System.currentTimeMillis());
        return simpleDateFormat.format(date);
    }
    @Override
    public void itemClick(View view) {
    }

    @Override
    public void onItemClick(AdapterView<?> adapterView, View view, int i, long l) {
        Toast.makeText(work42.this,"此刻,最美的记忆!",Toast.LENGTH_SHORT).show();

    }
    public void takePicture(View view) {
        Intent mIntent = new Intent(android.provider.MediaStore.ACTION_IMAGE_CAPTURE);
        startActivityForResult(mIntent,TAKE_PHOTO);
    }
    public void saveImageSd(Bitmap bitmap, String fileName){
        FileOutputStream fos=null;
        if(Environment.getExternalStorageState().equals(Environment.MEDIA_MOUNTED)){
            String imagePath=Environment.getExternalStorageDirectory().getPath()+"/service";
            try {
                File file=new File(imagePath,fileName+".jpg");
                System.out.println(file.getPath());
                fos=new FileOutputStream(file);
                bitmap.compress(Bitmap.CompressFormat.JPEG,100,fos);
                fos.flush();
                Toast.makeText(this,"图片保存成功"+imagePath,Toast.LENGTH_SHORT).show();

            } catch (FileNotFoundException e) {
                e.printStackTrace();
            } catch (IOException e) {
                e.printStackTrace();
            }
        /*
        通过广播更新图片管理
         */
            Intent intent=new Intent();
            intent.setAction(Intent.ACTION_MEDIA_SCANNER_SCAN_FILE);
            Uri uri = Uri.parse("file://"+imagePath+fileName);
            intent.setData(uri);
            this.sendBroadcast(intent);
        }
    }
    private List<Map<String,Object>> getDatas() {
        List<Map<String,Object>> list = new ArrayList<Map<String,Object>>();
        String sdpath = "";
        sdpath = Environment.getExternalStorageDirectory().getPath();
        sdpath = sdpath+"/service/";
        File file = new File(sdpath);
        if (!file.exists()) {    //文件不存在
            return null;
        }
        else{
            //获取以jpg为后缀的图片
            File[] files = file.listFiles(new FilenameFilter() { // 找到匹配的图片
                public boolean accept(File dir, String filename) {
                    return filename.endsWith(".jpg");
                }
            });
            //将图片装载到List中,方便ListView进行显示
            for (int i = 0; i <files.length; i++) {
                Map<String, Object> map = new HashMap<String, Object>();
                String imagePath = sdpath+files[i].getName();
                map.put("imagePath",imagePath);
                map.put("name",files[i].getName());
                list.add(map);
            }
            System.out.println("装载了"+files.length+"张照片");
            return list;
        }
    }
}
3、自定义适配器类的代码编写如下:
package *****;//填写自己的项目包名
import android.content.Context;
import android.graphics.Bitmap;
import android.graphics.BitmapFactory;
import android.view.View;
import android.view.ViewGroup;
import android.widget.BaseAdapter;
import android.widget.ImageView;
import android.widget.TextView;
import java.util.List;
import java.util.Map;
public class imageAdapter extends BaseAdapter implements View.OnClickListener {
    private Context stuContext;
    private InnerItemOnClickListener myListener;
    private List a;
    public imageAdapter(Context context,List list){
        this.stuContext=context;
        this.a=list;
    }
    @Override
    public void onClick(View view) {
        myListener.itemClick(view);
    }
    @Override
    public int getCount() {
        return a.size();
    }
    @Override
    public Object getItem(int i) {
        return null;
    }
    @Override
    public long getItemId(int i) {
        return i;
    }
    @Override
    public View getView(int i, View view, ViewGroup viewGroup) {
        View v =View.inflate(stuContext,R.layout.myspinner_item,null);
        Map<String,Object> tupian = (Map<String,Object> )a.get(i);
        ImageView image = (ImageView) v.findViewById(R.id.image);
        TextView nameText = (TextView) v.findViewById(R.id.name);
        //设置图片信息
        String name = tupian.get("name").toString();   //拿到图片的名字
        nameText.setText(name);
        //设置图片
        String imagepath=(String)tupian.get("imagePath");
        Bitmap bitmap = BitmapFactory.decodeFile(imagepath);//此处放路径名
        image.setImageBitmap(bitmap);
        //设置标识符
        image.setTag(i);
        return v;
    }
    interface InnerItemOnClickListener {
        abstract void itemClick(View view);
    }
    public void setOnInnerItemOnClickListener(InnerItemOnClickListener listener){
        this.myListener=listener;
    }
}
以上就是本次博客的全部内容啦,感谢大家的收看哦,欢迎大家留言评论、点赞讨论哦!
