目录
1 Ambari + HDP离线安装
1.1 介绍
1.1.1 Ambari介绍
1.1.2 HDP
1.1.3 HDP-UTILS
1.2 登录ambari官网地址
1.3 Ambari和HDP下载
1.4 系统要求
1.4.1 软件需求
1.5 修改打开文件的最大数量
1.6 集群节点规划
1.7 防火墙设置
1.8 关闭selinux
1.9 安装jdk
1.10 设置hostname
1.11 设置阿里开源镜像yum源
1.12 安装时间同步服务(ntp)
1.13 安装mysql
1.13.1 卸载原来的mysql
1.13.2 前期准备
1.13.3 使用yum命令即可完成安装
1.13.4 登录
1.13.5 需要更改权限才能实现远程连接MYSQL数据库
1.14 在mysql数据库创建相应的用户和DB
1.14.1 创建ambari数据库及数据库的用户名和密码
1.14.2 创建hive数据库及hive库的用户名和密码
1.14.3 创建oozie数据库及oozie库的用户名和密码
1.14.4 当使用ranger的时候,需要配置数据库
1.14.5 在MySQL中配置SAM和Schemal Registry Metadata Stores
1.14.6 Druid和Superset需要关系型的数据存储来存储metadata,使用如下命令来创建
1.14.7 下载mysql-connection-java(3台服务器上都执行):
1.15 在bigdata1机器上安装Ambari
1.15.1 安装yum相关工具
1.15.2 安装Apache httpd
1.16 配置本地Repo
1.16.1 配置Ambari
1.16.2 配置HDP和HDP-UTILS
1.16.3 配置HDP-GPL的repo
1.16.4 分发Ambari.repo和HDP.repo
1.16.5 生成本地源
1.17 安装Ambari-Server
1.17.1 Bigdata1节点安装
1.17.2 登录MySQL并初始化ambari的表
1.17.3 启动Ambari-Server
1.18 安装Agent
1.19 访问Ambari web页面
1.20 开始安装集群
1.21 hadoop HA配置
1.22 其它知识点
1.22.1 Ambari Server启动、查看状态、停止
1.22.2 Ambari启动时数据配置检测
1.22.3 修改yarn配置重启时的注意点
1.22.4 获取Ambari的运行日志:
1.1. Ambari卸载
1.1.1. 关闭所有组件
1.1.2. 关闭ambari-server,ambari-agent
1.1.3. yum删除所有Ambari组件
1.1.4. 删除各种文件
1.1.5. 清理数据库
1.1.6. 重装ambari
1.23 其它配置
1.23.1 设置dfs权限
1.23.2 hive之Cannot modify mapred.job.name at runtime
1.23.3 修改hive-site.xml中的文件格式,解决SQOOP导入时出错的问题
1.23.4 /usr/hdp/3.1.4.0-315/accumulo does not exist! Accumulo imports will fail.问题
1.23.5 spark访问hive数据库访问不了的相关问题解决
1.23.6 sqoop将MySql数据导入到hive中,出现类似卡住的现象
1.23.7 kernel:NMI watchdog: BUG: soft lockup - CPU#2 stuck for 23s!
1.23.8 Spark没法读取hive3.x中的属性:
1.23.9 sqoop导入mysql数据hive中,但是spark-sql不能访问的问题解决
1.23.10 配置hive整合hbase(在hive的自定义配置中定义)
1.23.11 Hive数据迁移之后Error communicating with the metastore (state=42000,code=10280)
1.23.12 KeeperErrorCode = NoNode for /hbase/hbaseid问题
1.23.13 配置虚拟vcores
1.23.14 sqoop从oracle导数据的时候,由于ojdbc版本问题,出现以下问题
1.23.15 解决hive add jar的权限问题
1.23.16 ogg和Ambari Hbase 2.0.2整合的时候出现问题
1.23.17 Hive界面上配置hive.aux.jars.path
1.23.18 datanode 目录设置 can’t start with home(s) in ambari】
1.23.19 Caused by: java.lang.OutOfMemoryError: unable to create new native thread问题解决
1.23.20 /usr/bin/hdp-select set zookeeper-server 3.1.4.0-315’ returned 1. symlink target /usr/hdp/current/zookeeper-server for zookeeper already exists and it is not a symlink
1.23.21 设置Block replication的副本数量为3
1.23.22 Error: java.lang.IllegalArgumentException: KeyValue size too large
1.23.23 解决475175982519323-1/-ext-10000/000000_0 as the file is not owned by hive and load data is also not ran as hive问题
1.24 Hive1.1.0升级到hive3.x
1.24.1 找到两个hive的版本
1.24.2 Hive库1.1.0升级到hive3.1.0对应的库
1.25 备份和恢复HDFS数据
1.26 hbase数据备份和恢复
1.26.1 Export过程
1.26.2 Import过程
1.26.3 统计hbase表行数
1.27 Hive和ElasticSearch整合(3太服务器上)
1.27.1 配置auxlib
1.27.2 验证配置是否正确
1.28 oracle golden gate和Ambari hbase整合
1.29 参考资料
1Ambari + HDP离线安装
1.1介绍
1.1.1Ambari介绍
Ambar跟Hadoop等开源软件一样,也是Apache Software Foundation中的一个项目,并且是顶级项目。就Ambari的作用来说,就是创建、管理、监视Hadoop的集群,但是这里的Hadoop指的是Hadoop整个生态圈(例如:Hive,Hbase,Sqoop,Zookeeper等),而并不仅仅是特指Hadoop。用一句话来说,Ambari就是为了让Hadoop以及相关的大数据软件更容易使用的一个工具。
Ambari 自身也是一个分布式架构的软件,主要由两部分组成:Ambari Server 和 Ambari Agent。简单来说,用户Ambari Server通知Ambari Agent安装对应的软件;Agent会定时发送各机器每个软件模块的状态给Ambari Server,最终这些状态信息会呈现在Ambari的GUI,方便用户了解到集群的各种状态,并进行相应的维护。
1.1.2HDP
HDP是hortonworks的软件栈,里面包含了hadoop生态系统的所有软件项目,比如HBase,Zookeeper,Hive,Pig等等。
1.1.3HDP-UTILS
HDP-UTILS是工具类库。
1.2登录ambari官网地址
https://docs.cloudera.com/HDPDocuments/Ambari/Ambari-2.4.2.0/index.html

点击Ambari,进入:

点击Installation

点击Apache Ambari Installation:

1.3Ambari和HDP下载
点击Ambari Repositories:
即:https://docs.cloudera.com/HDPDocuments/Ambari-2.7.4.0/bk_ambari-installation/content/ambari_repositories.html

点击HDP3.1.4 Repositories下载HDP相关的内容:
即:https://docs.cloudera.com/HDPDocuments/Ambari-2.7.4.0/bk_ambari-installation/content/hdp_314_repositories.html

1.4系统要求
1.4.1软件需求

1.5修改打开文件的最大数量
与之相关的配置有:
修改Linux操作系统最大打开的Linux的数量,修改内容:
修改的文件是:/etc/security/limits.conf

* soft nofile 162144
* hard nofile 162144 #更改linux的锁内存限制要求
es soft memlock unlimited #这里es是es用户
es hard memlock unlimited
2、修改Linux的最大线程数
修改文件是:/etc/security/limits.d/20-nproc.conf
* soft nproc unlimited
root soft nproc unlimited
3、四台机器都修改配置 Linux下/etc/sysctl.conf文件设置
(root用户下修改)
更改linux一个进行能拥有的最多的内存区域要求,添加或修改如下:
vm.max_map_count = 162144 更改linux禁用swapping,添加或修改如下:
vm.swappiness = 1

并执行如下命令:
sysctl -p
1.6集群节点规划

1.7防火墙设置
systemctl status firewalld.service	        # 查看防火墙的状态
systemctl stop firewalld.service		    # 关闭防火墙
systemctl disable firewalld.service		    # 设置开机不启动
systemctl is-enabled firewalld.service		# 查看防火墙服务是否设置开机启动

1.8关闭selinux
https://www.linuxidc.com/Linux/2016-11/137723.htm
1.9安装jdk
安装jdk8+(此处略)
1.10设置hostname
[root@bigdata2 installed]# cat /etc/hosts
xxx    bigdata1
xxx    bigdata2
xxx    bigdata3
1.11设置阿里开源镜像yum源
访问:https://developer.aliyun.com/mirror

点击进入CentOS镜像:https://developer.aliyun.com/mirror/centos?spm=a2c6h.13651102.0.0.53322f70HdVnlQ


Linux上的运行如下命令:
mv /etc/yum.repos.d/CentOS-Base.repo /etc/yum.repos.d/CentOS-Base.repo.backup
wget -O /etc/yum.repos.d/CentOS-Base.repo http://mirrors.aliyun.com/repo/Centos-7.repo
yum makecache

下面可以不执行
sed -i -e '/mirrors.cloud.aliyuncs.com/d' -e '/mirrors.aliyuncs.com/d' /etc/yum.repos.d/CentOS-Base.repo

1.12安装时间同步服务(ntp)
让Linux上的时间和网络时间保持一致,避免一些时间不一致的问题(必须在root命令下执行)
[root@bigdata1 ~]# yum install -y ntp
[root@bigdata1 ~]# ntpdate pool.ntp.org && hwclock –w
1.13安装mysql
1.13.1卸载原来的mysql
可以参考:https://blog.csdn.net/zhwyj1019/article/details/80274269,主要的步骤如下:
查看是否有安装的mysql
rpm -qa | grep -i mysql // 查看命令1
yum list install mysql* // 查看命令2

卸载mysql安装包
yum remove mysql mysql-server mysql-libs compat-mysql51
yum remove mysql-community-release
rpm -e --nodeps mysql-community-libs-5.7.22-1.el7.x86_64
rpm -e –nodeps mysql57-community-release-el7-11.noarch
1.13.2前期准备
由于CentosOS的yum源中没有mysql,需要到mysql的官网下载yum repo配置文件。
下载命令:
wget https://dev.mysql.com/get/mysql57-community-release-el7-9.noarch.rpm
然后进行repo的安装
rpm -ivh mysql57-community-release-el7-9.noarch.rpm
执行完成后会在/etc/yum.repos.d/目录下生成两个repo文件mysql-community.repo mysql-community-source.repo
1.13.3使用yum命令即可完成安装
注意:必须进入到/etc/yum.repos.d/目录后再执行以下脚本
1.13.3.1安装命令
yum install -y mysql-server
1.13.3.2启动mysql
systemctl start mysqld #启动MySQL
1.13.3.3获取安装时的临时密码(在第一次登录时就是用这个密码)
一定要注意,一定要先启动mysql
[root@bigdata1 yum.repos.d]# grep 'temporary password' /var/log/mysqld.log
2019-12-18T06:14:31.848884Z 1 [Note] A temporary password is generated for root@localhost: hR_is6(nhhtt
[root@bigdata1 yum.repos.d]#
1.13.4登录
登录方式:
[root@bigdata1 yum.repos.d]# mysql -u root -p
Enter password:      #这里是上面得到的密码
Welcome to the MySQL monitor.  Commands end with ; or \g.
Your MySQL connection id is 3
Server version: 5.7.28

Copyright (c) 2000, 2019, Oracle and/or its affiliates. All rights reserved.

Oracle is a registered trademark of Oracle Corporation and/or its
affiliates. Other names may be trademarks of their respective
owners.

Type 'help;' or '\h' for help. Type '\c' to clear the current input statement.

mysql> ALTER USER 'root'@'localhost' IDENTIFIED BY '123456';
ERROR 1819 (HY000): Your password does not satisfy the current policy requirements
mysql> use mysql
ERROR 1820 (HY000): You must reset your password using ALTER USER statement before executing this statement.
mysql> update user set authentication_string = PASSWORD('123456') where user = 'root';
ERROR 1046 (3D000): No database selected
如果出现上面的现象,解决办法是:
mysql> set global validate_password_policy=0;
Query OK, 0 rows affected (0.00 sec)

mysql> set global validate_password_length=1;
Query OK, 0 rows affected (0.00 sec)

mysql> alter user 'root'@'localhost' identified by 'password';
Query OK, 0 rows affected (0.00 sec)

mysql>
1.13.4.1修改mysql的配置
修改/etc/my.cnf (增加最后行的配置)
[mysqld]
#
# Remove leading # and set to the amount of RAM for the most important data
# cache in MySQL. Start at 70% of total RAM for dedicated server, else 10%.
# innodb_buffer_pool_size = 128M
#
# Remove leading # to turn on a very important data integrity option: logging
# changes to the binary log between backups.
# log_bin
#
# Remove leading # to set options mainly useful for reporting servers.
# The server defaults are faster for transactions and fast SELECTs.
# Adjust sizes as needed, experiment to find the optimal values.
# join_buffer_size = 128M
# sort_buffer_size = 2M
# read_rnd_buffer_size = 2M
datadir=/var/lib/mysql
socket=/var/lib/mysql/mysql.sock

# Disabling symbolic-links is recommended to prevent assorted security risks
symbolic-links=0

log-error=/var/log/mysqld.log
pid-file=/var/run/mysqld/mysqld.pid

sql_mode=NO_ENGINE_SUBSTITUTION,STRICT_TRANS_TABLES

collation_server=utf8_general_ci
character_set_server=utf8
default-storage-engine=INNODB
validate_password_policy=0
validate_password_length=1

[client]
default_character-set=utf8
即:
重启mysql:
systemctl restart mysqld
24.13.3.1 关于validate_password_policy/validate_password_length有以下取值(本章节不作为Ambari的文档)

默认是1,即MEDIUM,所以刚开始设置的密码必须符合长度,且必须含有数字,小写或大写字母,特殊字符。
有时候,只是为了自己测试,不想密码设置得那么复杂,譬如说,我只想设置root的密码为123456。
必须修改两个全局参数:
首先,修改validate_password_policy参数的值
mysql> set global validate_password_policy=0;
这样,判断密码的标准就基于密码的长度了。这个由validate_password_length参数来决定。
mysql> select @@validate_password_length;
+----------------------------+
| @@validate_password_length |
+----------------------------+
|                          8 |
+----------------------------+
1 row in set (0.01 sec)
validate_password_length参数默认为8,它有最小值的限制,最小值为:
validate_password_number_count
+ validate_password_special_char_count
+ (2 * validate_password_mixed_case_count)
其中,validate_password_number_count指定了密码中数据的长度,validate_password_special_char_count指定了密码中特殊字符的长度,validate_password_mixed_case_count指定了密码中大小字母的长度。
这些参数,默认值均为1,所以validate_password_length最小值为4,如果你显性指定validate_password_length的值小于4,尽管不会报错,但validate_password_length的值将设为4。如下所示:
mysql> select @@validate_password_length;
+----------------------------+
| @@validate_password_length |
+----------------------------+
|                          8 |
+----------------------------+
1 row in set (0.01 sec)

mysql> set global validate_password_length=1;
Query OK, 0 rows affected (0.00 sec)

mysql> select @@validate_password_length;
+----------------------------+
| @@validate_password_length |
+----------------------------+
|                          4 |
+----------------------------+
1 row in set (0.00 sec)
如果修改了validate_password_number_count,validate_password_special_char_count,
validate_password_mixed_case_count中任何一个值,则validate_password_length将进行动态修改。
mysql> select @@validate_password_length;
+----------------------------+
| @@validate_password_length |
+----------------------------+
|                          4 |
+----------------------------+
row in set (0.00 sec)

mysql> select @@validate_password_mixed_case_count;
+--------------------------------------+
| @@validate_password_mixed_case_count |
+--------------------------------------+
|                                    1 |
+--------------------------------------+
row in set (0.00 sec)

mysql> set global validate_password_mixed_case_count=2;
Query OK, 0 rows affected (0.00 sec)

mysql> select @@validate_password_mixed_case_count;
+--------------------------------------+
| @@validate_password_mixed_case_count |
+--------------------------------------+
|                                    2 |
+--------------------------------------+
row in set (0.00 sec)

mysql> select @@validate_password_length;
+----------------------------+
| @@validate_password_length |
+----------------------------+
|                          6 |
+----------------------------+
row in set (0.00 sec)
当然,前提是validate_password插件必须已经安装,MySQL5.7是默认安装的。
那么如何验证validate_password插件是否安装呢?可通过查看以下参数,如果没有安装,则输出将为空。
mysql> SHOW VARIABLES LIKE 'validate_password%';
+--------------------------------------+-------+
| Variable_name                        | Value |
+--------------------------------------+-------+
| validate_password_dictionary_file    |       |
| validate_password_length             | 6     |
| validate_password_mixed_case_count   | 2     |
| validate_password_number_count       | 1     |
| validate_password_policy             | LOW   |
| validate_password_special_char_count | 1     |
+--------------------------------------+-------+
rows in set (0.00 sec)
1.13.5需要更改权限才能实现远程连接MYSQL数据库
可以通过以下方式来确认:
mysql -u root -p     #接下来输入密码:password
mysql> alter user 'root'@'localhost' identified by 'password';
Query OK, 0 rows affected (0.00 sec)

mysql> grant all privileges on *.* to 'root'@'%' identified by 'password' with grant option;
Query OK, 0 rows affected, 1 warning (0.00 sec)

mysql> flush privileges;
Query OK, 0 rows affected (0.00 sec)

mysql>
查看字符集:
mysql> show variables like 'character_set_%';
+--------------------------+----------------------------+
| Variable_name            | Value                      |
+--------------------------+----------------------------+
| character_set_client     | utf8                       |
| character_set_connection | utf8                       |
| character_set_database   | utf8                       |
| character_set_filesystem | binary                     |
| character_set_results    | utf8                       |
| character_set_server     | utf8                       |
| character_set_system     | utf8                       |
| character_sets_dir       | /usr/share/mysql/charsets/ |
+--------------------------+----------------------------+
8 rows in set (0.01 sec)

mysql>
1.14在mysql数据库创建相应的用户和DB
1.14.1创建ambari数据库及数据库的用户名和密码
mysql> set global validate_password_policy=0;
mysql> set global validate_password_length=1;

mysql> create database ambari character set utf8;
Query OK, 1 row affected (0.00 sec)
mysql> CREATE USER 'ambari'@'%'IDENTIFIED BY 'password';
Query OK, 0 rows affected (0.00 sec)

mysql> GRANT ALL PRIVILEGES ON ambari.* TO 'ambari'@'%';
Query OK, 0 rows affected (0.00 sec)

mysql> FLUSH PRIVILEGES;
Query OK, 0 rows affected (0.01 sec)
1.14.2创建hive数据库及hive库的用户名和密码
mysql> create database hive character set utf8;
Query OK, 1 row affected (0.00 sec)

mysql> CREATE USER 'hive'@'%'IDENTIFIED BY 'password';
Query OK, 0 rows affected (0.00 sec)

mysql> GRANT ALL PRIVILEGES ON hive.* TO 'hive'@'%';
Query OK, 0 rows affected (0.00 sec)

mysql> FLUSH PRIVILEGES;
Query OK, 0 rows affected (0.00 sec)
为了解决hive出现的乱码,解决办法是:
因为我们知道 metastore 支持数据库级别,表级别的字符集是 latin1,那么我们只需要把相应注释的地方的字符集由 latin1 改成 utf-8,就可以了。用到注释的就三个地方,表、分区、视图。如下修改分为两个步骤:
执行下面的操作:
(1)、进入数据库 Metastore 中执行以下 5 条 SQL 语句
①修改表字段注解和表注解
ALTER TABLE COLUMNS_V2 MODIFY COLUMN COMMENT VARCHAR(256) CHARACTER SET utf8;
ALTER TABLE TABLE_PARAMS MODIFY COLUMN PARAM_VALUE VARCHAR(4000) CHARACTER SET utf8;
② 修改分区字段注解:
ALTER TABLE PARTITION_PARAMS MODIFY COLUMN PARAM_VALUE VARCHAR(4000) CHARACTER SET utf8 ;
ALTER TABLE PARTITION_KEYS MODIFY COLUMN PKEY_COMMENT VARCHAR(4000) CHARACTER SET utf8;
③修改索引注解:
alter table INDEX_PARAMS modify column PARAM_VALUE varchar(4000) character set utf8;
如果还是不给力,修改mysql的/etc/my.cnf中的内容,添加如下:
[mysqld]
character-set-server=utf8
[client]
default-character-set=utf8
[mysql]
default-character-set=utf8
注意顺序,然后重启mysql
systemctl restart mysqld.service
或:
sudo service mysqld restart
1.14.3创建oozie数据库及oozie库的用户名和密码
mysql> create database oozie character set utf8;
Query OK, 1 row affected (0.00 sec)

mysql> CREATE USER 'oozie'@'%'IDENTIFIED BY 'password';
Query OK, 0 rows affected (0.00 sec)

mysql>  GRANT ALL PRIVILEGES ON oozie.* TO 'oozie'@'%';
Query OK, 0 rows affected (0.00 sec)

mysql> FLUSH PRIVILEGES;
Query OK, 0 rows affected (0.00 sec)
1.14.4当使用ranger的时候,需要配置数据库
CREATE USER 'rangerdba'@'localhost' IDENTIFIED BY 'password';

GRANT ALL PRIVILEGES ON *.* TO 'rangerdba'@'localhost';

CREATE USER 'rangerdba'@'%' IDENTIFIED BY 'password';

GRANT ALL PRIVILEGES ON *.* TO 'rangerdba'@'%';

GRANT ALL PRIVILEGES ON *.* TO 'rangerdba'@'localhost' WITH GRANT OPTION;

GRANT ALL PRIVILEGES ON *.* TO 'rangerdba'@'%' WITH GRANT OPTION;

FLUSH PRIVILEGES;
要注意的是在ranger安装的时候,必须要在mysql的my.cnf中配置:
log_bin_trust_function_creators=1
在Ranger安装完成之后,重新设置log_bin_trust_function_creators的值为原始的设置,这个参数只有在ranger安装的过程中才会需要。
1.14.5在MySQL中配置SAM和Schemal Registry Metadata Stores
create database registry;
create database streamline;
创建Registry和SAM的用户accounts,并使用IDENTIFIED BY赋予新的密码:
CREATE USER 'registry'@'%' IDENTIFIED BY 'password';
CREATE USER 'streamline'@'%' IDENTIFIED BY 'password';
赋权:
GRANT ALL PRIVILEGES ON registry.* TO 'registry'@'%' WITH GRANT OPTION ;
GRANT ALL PRIVILEGES ON streamline.* TO 'streamline'@'%' WITH GRANT OPTION;
提交事务
commit;
1.14.6Druid和Superset需要关系型的数据存储来存储metadata,使用如下命令来创建
CREATE DATABASE druid DEFAULT CHARACTER SET utf8;
CREATE DATABASE superset DEFAULT CHARACTER SET utf8;

创建用户并赋值密码
CREATE USER 'druid'@'%' IDENTIFIED BY 'password';
CREATE USER 'superset'@'%' IDENTIFIED BY 'password';

赋权限
GRANT ALL PRIVILEGES ON *.* TO 'druid'@'%' WITH GRANT OPTION;
GRANT ALL PRIVILEGES ON *.* TO 'superset'@'%' WITH GRANT OPTION;

提交
commit;
1.14.7下载mysql-connection-java(3台服务器上都执行):
yum -y install mysql-connector-java
查看下载后的jar包,看目录中是否有mysql-connector-java:
[root@bigdata1 ~]# ls -a /usr/share/java
 ### 1.15在bigdata1机器上安装Ambari
1.15.1安装yum相关工具
yum install yum-utils -y
yum repolist
yum install createrepo -y
1.15.2安装Apache httpd
把安装ambari所需的ambari、HDP、HDP-UTILS上传到/home/software。如下所示:

使用yum在线安装httpd。
[root@bigdata1 software]# yum install httpd -y

安装完成后,会生成/var/www/html目录(相当于Tomcat的webapps目录),进入到/var/www/html目录下,创建ambari和hdp目录,用来存放安装文件。
[root@bigdata1 software]# cd /home/software
[root@bigdata1 software]# mkdir /var/www/html/ambari
[root@bigdata1 software]# mkdir /var/www/html/hdp
[root@bigdata1 software]# mkdir /var/www/html/hdp/HDP-UTILS-1.1.0.22
[root@bigdata1 software]# mkdir /var/www/html/hdp/HDP-GPL-3.1.4.0
[root@bigdata1 software]# tar -zxvf ambari-2.7.4.0-centos7.tar.gz -C /var/www/html/ambari/
[root@bigdata1 software]# tar -zxvf HDP-3.1.4.0-centos7-rpm.tar.gz -C /var/www/html/hdp/
[root@bigdata1 software]# tar -zxvf HDP-UTILS-1.1.0.22-centos7.tar.gz -C /var/www/html/hdp/HDP-UTILS-1.1.0.22/
[root@bigdata1 software]# tar -zxvf HDP-GPL-3.1.4.0-centos7-gpl.tar.gz -C /var/www/html/hdp/HDP-GPL-3.1.4.0
启动httpd服务:
systemctl start httpd          # 启动httpd
systemctl status httpd		   # 查看httpd状态
systemctl enable httpd	       # 设置httpd开机自启
默认端口80,浏览器输入:http://192.168.106.128/


1.16配置本地Repo
1.16.1配置Ambari
下载
wget -nv http://public-repo-1.hortonworks.com/ambari/centos7/2.x/updates/2.7.4.0/ambari.repo -O /etc/yum.repos.d/ambari.repo
修改配置文件vim /etc/yum.repos.d/ambari.repo
#VERSION_NUMBER=2.7.4.0-118
[ambari-2.7.4.0]
#json.url = http://public-repo-1.hortonworks.com/HDP/hdp_urlinfo.json
name=ambari Version - ambari-2.7.4.0
#baseurl=http://public-repo-1.hortonworks.com/ambari/centos7/2.x/updates/2.7.4.0
baseurl=http://192.168.106.128/ambari/ambari/centos7/
gpgcheck=1
#gpgkey=http://public-repo-1.hortonworks.com/ambari/centos7/2.x/updates/2.7.4.0/RPM-GPG-KEY/RPM-GPG-KEY-Jenkins
gpgkey=http://192.168.106.128/ambari/ambari/centos7/2.7.4.0-118/RPM-GPG-KEY/RPM-GPG-KEY-Jenkins
enabled=1
priority=1
1.16.2配置HDP和HDP-UTILS
创建配置文件:touch /etc/yum.repos.d/HDP.repo
下载repo(下载地址可以从下载tar包的地方找到):
wget -nv http://public-repo-1.hortonworks.com/HDP/centos7/3.x/updates/3.1.4.0/hdp.repo -O /etc/yum.repos.d/HDP.repo
修改内容:
#VERSION_NUMBER=3.1.4.0-315
[HDP-3.1.4.0]
name=HDP Version - HDP-3.1.4.0
#baseurl=http://public-repo-1.hortonworks.com/HDP/centos7/3.x/updates/3.1.4.0
baseurl=http://192.168.106.128/hdp/HDP/centos7/
gpgcheck=1
#gpgkey=http://public-repo-1.hortonworks.com/HDP/centos7/3.x/updates/3.1.4.0/RPM-GPG-KEY/RPM-GPG-KEY-Jenkins
gpgkey=http://192.168.106.128/hdp/HDP/centos7/3.1.4.0-315/RPM-GPG-KEY/RPM-GPG-KEY-Jenkins
enabled=1
priority=1


[HDP-UTILS-1.1.0.22]
name=HDP-UTILS Version - HDP-UTILS-1.1.0.22
#baseurl=http://public-repo-1.hortonworks.com/HDP-UTILS-1.1.0.22/repos/centos7
baseurl=http://192.168.106.128/hdp/HDP-UTILS-1.1.0.22/
gpgcheck=1
#gpgkey=http://public-repo-1.hortonworks.com/HDP/centos7/3.x/updates/3.1.4.0/RPM-GPG-KEY/RPM-GPG-KEY-Jenkins
gpgkey=http://192.168.106.128/hdp/HDP-UTILS-1.1.0.22/HDP-UTILS/centos7/1.1.0.22/RPM-GPG-KEY/RPM-GPG-KEY-Jenkins
enabled=1
priority=1
1.16.3配置HDP-GPL的repo
wget -nv http://public-repo-1.hortonworks.com/HDP-GPL/centos7/3.x/updates/3.1.4.0/hdp.gpl.repo -O /etc/yum.repos.d/hdp.gpl.repo
修改内容:
[root@bigdata1 yum.repos.d]# cd /etc/yum.repos.d
[root@bigdata1 yum.repos.d]# vim hdp.gpl.repo
修改内容:
#VERSION_NUMBER=3.1.4.0-315
[HDP-GPL-3.1.4.0]
name=HDP-GPL Version - HDP-GPL-3.1.4.0
#baseurl=http://public-repo-1.hortonworks.com/HDP-GPL/centos7/3.x/updates/3.1.4.0
baseurl=http://192.168.106.128/hdp/HDP-GPL-3.1.4.0/HDP-GPL/centos7/
gpgcheck=1
#gpgkey=http://public-repo-1.hortonworks.com/HDP-GPL/centos7/3.x/updates/3.1.4.0/RPM-GPG-KEY/RPM-GPG-KEY-Jenkins
gpgkey=http://192.168.106.128/hdp/HDP-GPL-3.1.4.0/HDP-GPL/centos7/3.1.4.0-315/RPM-GPG-KEY/RPM-GPG-KEY-Jenkins
enabled=1
priority=1
1.16.4分发Ambari.repo和HDP.repo
把ambari.repo HDP.repo分发到各个节点的相同目录下:
[root@bigdata1 yum.repos.d]# scp ambari.repo HDP.repo root@bigdata2:$PWD
ambari.repo                                                                                               100%  516    33.7KB/s   00:00
HDP.repo                                                                                                  100%  845    52.4KB/s   00:00
[root@bigdata1 yum.repos.d]# scp ambari.repo HDP.repo root@bigdata3:$PWD
ambari.repo                                                                                               100%  516   130.5KB/s   00:00
HDP.repo                                                                                                  100%  845   272.2KB/s   00:00
[root@bigdata1 yum.repos.d]# scp hdp.gpl.repo root@bigdata2:$PWD
hdp.gpl.repo                                                                             100%  490    60.0KB/s   00:00
[root@bigdata1 yum.repos.d]# scp hdp.gpl.repo root@bigdata3:$PWD
hdp.gpl.repo
1.16.5生成本地源
使用createrepo命令,创建yum本地源(软件仓库),即为存放本地特定位置的众多rpm包建立索引,描述各包所需依赖信息,并形成元数据。
[root@bigdata1 yum.repos.d]# createrepo /var/www/html/hdp/HDP/centos7/
Spawning worker 0 with 51 pkgs
Spawning worker 1 with 50 pkgs
Spawning worker 2 with 50 pkgs
Spawning worker 3 with 50 pkgs
Workers Finished
Saving Primary metadata
Saving file lists metadata
Saving other metadata
Generating sqlite DBs
Sqlite DBs complete

[root@bigdata1 yum.repos.d]# createrepo /var/www/html/hdp/HDP-UTILS-1.1.0.22/
Spawning worker 0 with 4 pkgs
Spawning worker 1 with 4 pkgs
Spawning worker 2 with 4 pkgs
Spawning worker 3 with 4 pkgs
Workers Finished
Saving Primary metadata
Saving file lists metadata
Saving other metadata
Generating sqlite DBs
Sqlite DBs complete


[root@bigdata1 yum.repos.d]# createrepo /var/www/html/ambari/ambari/centos7/
Spawning worker 0 with 4 pkgs
Spawning worker 1 with 3 pkgs
Spawning worker 2 with 3 pkgs
Spawning worker 3 with 3 pkgs
Workers Finished
Saving Primary metadata
Saving file lists metadata
Saving other metadata
Generating sqlite DBs
Sqlite DBs complete

[root@bigdata1 yum.repos.d]# createrepo /var/www/html/hdp/HDP-GPL-3.1.4.0/HDP-GPL/centos7
Spawning worker 0 with 1 pkgs
Spawning worker 1 with 1 pkgs
Spawning worker 2 with 1 pkgs
Spawning worker 3 with 1 pkgs
Workers Finished
Saving Primary metadata
Saving file lists metadata
Saving other metadata
Generating sqlite DBs
Sqlite DBs complete
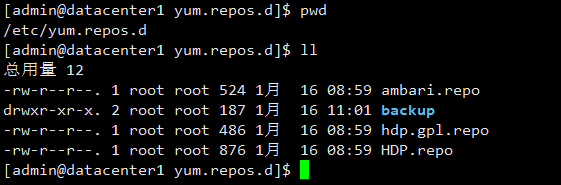
由于离线安装,若想使用确实是自己的repo,解决办法是:
将/etc/yum.repos.d/下的非repo文件放到backup中,然后执行:
yum makecache
最后效果如下:
1.17安装Ambari-Server
1.17.1Bigdata1节点安装
[root@bigdata1 ~]# yum install -y ambari-server
已加载插件:fastestmirror
HDP-3.1.4.0                                                                                                          | 2.9 kB  00:00:00
HDP-UTILS-1.1.0.22                                                                                                   | 2.9 kB  00:00:00
ambari-2.7.4.0                                                                                                       | 2.9 kB  00:00:00
Loading mirror speeds from cached hostfile
正在解决依赖关系
--> 正在检查事务
---> 软件包 ambari-server.x86_64.0.2.7.4.0-118 将被 安装
--> 正在处理依赖关系 postgresql-server >= 8.1,它被软件包 ambari-server-2.7.4.0-118.x86_64 需要
--> 正在检查事务
---> 软件包 postgresql-server.x86_64.0.9.2.24-1.el7_5 将被 安装
--> 正在处理依赖关系 postgresql-libs(x86-64) = 9.2.24-1.el7_5,它被软件包 postgresql-server-9.2.24-1.el7_5.x86_64 需要
--> 正在处理依赖关系 postgresql(x86-64) = 9.2.24-1.el7_5,它被软件包 postgresql-server-9.2.24-1.el7_5.x86_64 需要
--> 正在处理依赖关系 libpq.so.5()(64bit),它被软件包 postgresql-server-9.2.24-1.el7_5.x86_64 需要
--> 正在检查事务
---> 软件包 postgresql.x86_64.0.9.2.24-1.el7_5 将被 安装
---> 软件包 postgresql-libs.x86_64.0.9.2.24-1.el7_5 将被 安装
--> 解决依赖关系完成

依赖关系解决

============================================================================================================================================
 Package                              架构                      版本                                源                                 大小
============================================================================================================================================
正在安装:
 ambari-server                        x86_64                    2.7.4.0-118                         ambari-2.7.4.0                    370 M
为依赖而安装:
 postgresql                           x86_64                    9.2.24-1.el7_5                      base                              3.0 M
 postgresql-libs                      x86_64                    9.2.24-1.el7_5                      base                              234 k
 postgresql-server                    x86_64                    9.2.24-1.el7_5                      base                              3.8 M

事务概要
============================================================================================================================================
安装  1 软件包 (+3 依赖软件包)

总计:377 M
安装大小:470 M
Is this ok [y/d/N]: y
Downloading packages:
warning: /var/cache/yum/x86_64/7/ambari-2.7.4.0/packages/ambari-server-2.7.4.0-118.x86_64.rpm: Header V4 RSA/SHA1 Signature, key ID 07513cad: NOKEY
从 http://192.168.106.128/ambari/ambari/centos7/2.7.4.0-118/RPM-GPG-KEY/RPM-GPG-KEY-Jenkins 检索密钥
导入 GPG key 0x07513CAD:
 用户ID     : "Jenkins (HDP Builds) <[email protected]>"
 指纹       : df52 ed4f 7a3a 5882 c099 4c66 b973 3a7a 0751 3cad
 来自       : http://192.168.106.128/ambari/ambari/centos7/2.7.4.0-118/RPM-GPG-KEY/RPM-GPG-KEY-Jenkins
是否继续?[y/N]:y
Running transaction check
Running transaction test
Transaction test succeeded
Running transaction
  正在安装    : postgresql-libs-9.2.24-1.el7_5.x86_64                                                                                   1/4
  正在安装    : postgresql-9.2.24-1.el7_5.x86_64                                                                                        2/4
  正在安装    : postgresql-server-9.2.24-1.el7_5.x86_64                                                                                 3/4
  正在安装    : ambari-server-2.7.4.0-118.x86_64                                                                                        4/4
  验证中      : postgresql-server-9.2.24-1.el7_5.x86_64                                                                                 1/4
  验证中      : postgresql-libs-9.2.24-1.el7_5.x86_64                                                                                   2/4
  验证中      : ambari-server-2.7.4.0-118.x86_64                                                                                        3/4
  验证中      : postgresql-9.2.24-1.el7_5.x86_64                                                                                        4/4

已安装:
  ambari-server.x86_64 0:2.7.4.0-118

作为依赖被安装:
  postgresql.x86_64 0:9.2.24-1.el7_5        postgresql-libs.x86_64 0:9.2.24-1.el7_5        postgresql-server.x86_64 0:9.2.24-1.el7_5

完毕!
[root@bigdata1 ~]#
1.17.2登录MySQL并初始化ambari的表
[root@bigdata1 ~]# mysql -u root -p
Enter password:
Welcome to the MySQL monitor.  Commands end with ; or \g.
sYour MySQL connection id is 3
Server version: 5.7.28 MySQL Community Server (GPL)

Copyright (c) 2000, 2019, Oracle and/or its affiliates. All rights reserved.

Oracle is a registered trademark of Oracle Corporation and/or its
affiliates. Other names may be trademarks of their respective
owners.

Type 'help;' or '\h' for help. Type '\c' to clear the current input statement.

mysql> show databases;
+--------------------+
| Database           |
+--------------------+
| information_schema |
| ambari             |
| hive               |
| mysql              |
| oozie              |
| performance_schema |
| sys                |
+--------------------+
7 rows in set (0.25 sec)

mysql> use ambari;
Database changed
mysql> show tables;
Empty set (0.00 sec)

mysql> source /var/lib/ambari-server/resources/Ambari-DDL-MySQL-CREATE.sql
# 在Ambari的主机上,安装MySQL的JDBC driver.接着把它添加到Ambari上,命令如下:
[root@bigdata1 java]# ambari-server setup --jdbc-db=mysql --jdbc-driver=/usr/share/java/mysql-connector-java.jar   #加了这一句之后,hive连接库的才能成功
Using python  /usr/bin/python
Setup ambari-server
Copying /usr/share/java/mysql-connector-java.jar to /var/lib/ambari-server/resources/mysql-connector-java.jar
If you are updating existing jdbc driver jar for mysql with mysql-connector-java.jar. Please remove the old driver jar, from all hosts. Restarting services that need the driver, will automatically copy the new jar to the hosts.
JDBC driver was successfully initialized.
Ambari Server 'setup' completed successfully.
[root@bigdata1 java]#

[root@bigdata1 ~]# ambari-server setup
Using python  /usr/bin/python
Setup ambari-server
Checking SELinux...
SELinux status is 'disabled'
Customize user account for ambari-server daemon [y/n] (n)? y
Enter user account for ambari-server daemon (root):root
Adjusting ambari-server permissions and ownership...
Checking firewall status...
Checking JDK...
[1] Oracle JDK 1.8 + Java Cryptography Extension (JCE) Policy Files 8
[2] Custom JDK
==============================================================================
Enter choice (1): 2     #自己定义JDK路径
WARNING: JDK must be installed on all hosts and JAVA_HOME must be valid on all hosts.
WARNING: JCE Policy files are required for configuring Kerberos security. If you plan to use Kerberos,please make sure JCE Unlimited Strength Jurisdiction Policy Files are valid on all hosts.
Path to JAVA_HOME: /home/installed/jdk1.8.0_161
Validating JDK on Ambari Server...done.
Check JDK version for Ambari Server...
JDK version found: 8
Minimum JDK version is 8 for Ambari. Skipping to setup different JDK for Ambari Server.
Checking GPL software agreement...
GPL License for LZO: https://www.gnu.org/licenses/old-licenses/gpl-2.0.en.html
Enable Ambari Server to download and install GPL Licensed LZO packages [y/n] (n)? y
Completing setup...
Configuring database...
Enter advanced database configuration [y/n] (n)? y
Configuring database...
==============================================================================
Choose one of the following options:
[1] - PostgreSQL (Embedded)
[2] - Oracle
[3] - MySQL / MariaDB
[4] - PostgreSQL
[5] - Microsoft SQL Server (Tech Preview)
[6] - SQL Anywhere
[7] - BDB
==============================================================================
Enter choice (1): 3
Hostname (localhost): bigdata1     #主机名
Port (3306): 3306
Database name (ambari): ambari     #数据库名称
Username (ambari): ambari
Enter Database Password (bigdata):        #输入上面自己创建的数据库的密码
Re-enter password:
Configuring ambari database...
Should ambari use existing default jdbc /usr/share/java/mysql-connector-java.jar [y/n] (y)? y
Configuring remote database connection properties...
WARNING: Before starting Ambari Server, you must run the following DDL directly from the database shell to create the schema: /var/lib/ambari-server/resources/Ambari-DDL-MySQL-CREATE.sql
Proceed with configuring remote database connection properties [y/n] (y)? y
Extracting system views...
ambari-admin-2.7.4.0.118.jar
....
Ambari repo file contains latest json url http://public-repo-1.hortonworks.com/HDP/hdp_urlinfo.json, updating stacks repoinfos with it...
Adjusting ambari-server permissions and ownership...
Ambari Server 'setup' completed successfully.
[root@bigdata1 ~]#
修改配置文件(以下配置可以不执行,因为已经有了)
echo server.jdbc.driver.path=/usr/share/java/mysql-connector-java.jar >> /etc/ambari-server/conf/ambari.properties
1.17.3启动Ambari-Server
如果启动失败,关闭服务【ambari-server stop】,重新启动:
[root@bigdata1 ~]# ambari-server start
Using python  /usr/bin/python
Starting ambari-server
Ambari Server running with administrator privileges.
Organizing resource files at /var/lib/ambari-server/resources...
Ambari database consistency check started...
Server PID at: /var/run/ambari-server/ambari-server.pid
Server out at: /var/log/ambari-server/ambari-server.out
Server log at: /var/log/ambari-server/ambari-server.log
Waiting for server start..............................
Server started listening on 8080

DB configs consistency check: no errors and warnings were found.
Ambari Server 'start' completed successfully.
[root@bigdata1 ~]#
1.18安装Agent
在3台服务器上安装agent
yum -y install ambari-agent
运行结果:

启动ambari-agent
[root@hadoop4 yum.repos.d]# ambari-agent start
1.19访问Ambari web页面
默认端口,Username: admin; Password: admin http://xxx:8080/#/login


1.20开始安装集群
点击”LAUNCH INSTALL WIZARD”,启动安装向导创建集群,并起一个名字

选择版本:

选择:Use Local Repository

然后点击”Next”按钮。配置节点和密钥


主机确认


选择大数据组件,这里选择


然后点击”Next”,进行节点分配:


然后点击Next,配置从属和客户端


以下数据库的密码都是password


上面的这些设置好了之后,点击next


然后点击next,进行确认,确认内容是:

点击DEPLOY开始部署。

1.21hadoop HA配置
在进行HA配置的时候,最好是先停止集群。然后选中HDFS,然后点击Actions中的”Enable NameNode HA”,即:


检查配置信息


登录bigdata1执行:
hbase(main):004:0* [root@bigdata1 bin]#
[root@bigdata1 bin]# sudo su hdfs -l -c 'hdfs dfsadmin -safemode enter'
Safe mode is ON
[root@bigdata1 bin]# sudo su hdfs -l -c 'hdfs dfsadmin -saveNamespace'
Save namespace successful
[root@bigdata1 bin]#
开始进行HA配置

在bigdata1上执行如下配置:
sudo su hdfs -l -c 'hdfs namenode -initializeSharedEdits'

启动HA

手动执行下面的命令:
bigdata1上执行:
sudo su hdfs -l -c 'hdfs zkfc -formatZK'

bigdata2上执行:
sudo su hdfs -l -c 'hdfs namenode -bootstrapStandby'

最后的安装配置:

最后,经过调整服务配资,最终bigdata1上配置的内容如下:


bigdata2上配置的服务内容如下:

bigdata3上配置的内容如下:

1.22其它知识点
1.22.1Ambari Server启动、查看状态、停止
启动Ambari-server:
ambari-server start

检查Ambari Server的状态
ambari-server status

停止Ambari Server:
ambari-server stop
1.22.2Ambari启动时数据配置检测
在Ambari Server启动的时候,Ambari运行数据库检测,如果发现了什么问题,Ambari Server start将会停止并且显示以下的消息日志信息:DB configs consistency check failed。Ambari写入更多的日志信息到/var/log/ambari-server/ambari-server-check-database.log。
也可以停止ambari的启动,通过执行以下的命令:
ambari-server start --skip-database-check
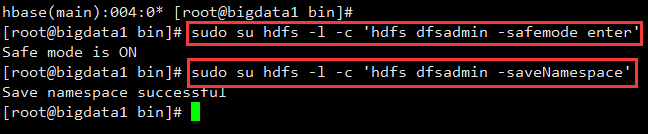
1.22.3修改yarn配置重启时的注意点


sudo su hdfs -l -c 'hdfs dfsadmin -safemode enter'
sudo su hdfs -l -c 'hdfs dfsadmin -saveNamespace'
1.22.4获取Ambari的运行日志:
tail -f /var/log/ambari-server/ambari-server.log -n 500
1.1.Ambari卸载
1.1.1.关闭所有组件
通过ambari将集群中的所用组件都关闭,如果关闭不了,直接kill-9 XXX
1.1.2.关闭ambari-server,ambari-agent
ambari-server stop
ambari-agent stop
1.1.3.yum删除所有Ambari组件
sudo yum remove -y hadoop_3* ranger* zookeeper* atlas-metadata* ambari* spark* slide* hive* oozie* pig* tez* hbase* knox* storm* accumulo* falcon* ambari* smartsense*
1.1.4.删除各种文件
特别注意:这里删除的时候,一定要慎重检查
ambari安装hadoop集群会创建一些用户,清除集群时有必要清除这些用户,并删除对应的文件夹。这样做可以避免集群运行时出现的文件访问权限错误的问题。总之,Ambari自己创建的东西全部删完,不然的话重新安装的时候会报各种“找不到文件”的错误。
sudo userdel oozie
sudo userdel hive
sudo userdel ambari-qa
sudo userdel flume
sudo userdel hdfs
sudo userdel knox
sudo userdel storm
sudo userdel mapred
sudo userdel hbase
sudo userdel tez
sudo userdel zookeeper
sudo userdel kafka
sudo userdel falcon
sudo userdel sqoop
sudo userdel yarn
sudo userdel hcat
sudo userdel atlas
sudo userdel spark
sudo userdel ams
sudo userdel zeppelin

sudo rm -rf /home/atlas
sudo rm -rf /home/accumulo
sudo rm -rf /home/hbase
sudo rm -rf /home/hive
sudo rm -rf /home/oozie
sudo rm -rf /home/storm
sudo rm -rf /home/yarn
sudo rm -rf /home/ambari-qa
sudo rm -rf /home/falcon
sudo rm -rf /home/hcat
sudo rm -rf /home/kafka
sudo rm -rf /home/mahout
sudo rm -rf /home/spark
sudo rm -rf /home/tez
sudo rm -rf /home/zookeeper
sudo rm -rf /home/flume
sudo rm -rf /home/hdfs
sudo rm -rf /home/knox
sudo rm -rf /home/mapred
sudo rm -rf /home/sqoop

下面三个慎重
sudo rm -rf /var/lib/ambari*
sudo rm -rf /usr/lib/ambari-*
sudo rm -rf /usr/lib/ams-hbase*


sudo rm -rf /etc/ambari-*
sudo rm -rf /etc/hadoop
sudo rm -rf /etc/hbase
sudo rm -rf /etc/hive*
sudo rm -rf /etc/sqoop
sudo rm -rf /etc/zookeeper
sudo rm -rf /etc/tez*
sudo rm -rf /etc/spark2
sudo rm -rf /etc/phoenix
sudo rm -rf /etc/kafka

sudo rm -rf /var/run/spark*
sudo rm -rf /var/run/hadoop*
sudo rm -rf /var/run/hbase
sudo rm -rf /var/run/zookeeper
sudo rm -rf /var/run/hive*
sudo rm -rf /var/run/sqoop
sudo rm -rf /var/run/ambari-*
sudo rm -rf /var/log/hadoop*
sudo rm -rf /var/log/hive*
sudo rm -rf /var/log/ambari-*
sudo rm -rf /var/log/hbase
sudo rm -rf /var/log/sqoop

sudo rm -rf /usr/lib/ambari-*

sudo rm -rf /usr/hdp

sudo rm -rf /usr/bin/zookeeper-*
sudo rm -rf /usr/bin/yarn
sudo rm -rf /usr/bin/sqoop*
sudo rm -rf /usr/bin/ranger-admin-start
sudo rm -rf /usr/bin/ranger-admin-stop
sudo rm -rf /usr/bin/ranger-kms
sudo rm -rf /usr/bin/phoenix-psql
sudo rm -rf /usr/bin/phoenix-*
sudo rm -rf /usr/bin/mapred
sudo rm -rf /usr/bin/hive
sudo rm -rf /usr/bin/hiveserver2
sudo rm -rf /usr/bin/hbase
sudo rm -rf /usr/bin/hcat
sudo rm -rf /usr/bin/hdfs
sudo rm -rf /usr/bin/hadoop
sudo rm -rf /usr/bin/beeline

sudo rpm -qa | grep ambari   获取到要删除的列表
sudo rpm -e --nodeps 列表中条项

sudo rpm -qa | grep zookeeper
sudo rpm -e --nodeps 列表中的条项
1.1.5.清理数据库
删除mysql中的ambari库
drop database ambari;
1.1.6.重装ambari
通过以上清理后,重新安装ambari和hadoop集群(包括HDFS,YARN+MapReduce2,Zookeeper,AmbariMetrics,Spark)成功。
1.23其它配置
1.23.1设置dfs权限
将这个值的权限改成false

即:hdfs服务修改dfs.permissions.enabled参数,设置为false
1.23.2hive之Cannot modify mapred.job.name at runtime
解决办法是添加:
hive.security.authorization.sqlstd.confwhitelist
mapred.|hive.|mapreduce.|spark.
hive.security.authorization.sqlstd.confwhitelist.append
mapred.|hive.|mapreduce.|spark.
即:

1.23.3修改hive-site.xml中的文件格式,解决SQOOP导入时出错的问题
将ORC改成textfile格式的,最终如下:

1.23.4/usr/hdp/3.1.4.0-315/accumulo does not exist! Accumulo imports will fail.问题

解决办法:
mkdir /var/lib/accumulo
echo "export ACCUMULO_HOME=/var/lib/accumulo" >> /etc/profile
source /etc/profile
1.23.5spark访问hive数据库访问不了的相关问题解决
配置Hive的hive.metastore.uris属性

改成hive:


1.23.6sqoop将MySql数据导入到hive中,出现类似卡住的现象
问题描述,如下所示:

问题分析:
在Hive3的版本中,进入hive命令需要执行输入用户名和密码。猜测流程卡住的原因正是缺少用户名和密码的输入。
解决办法:
编辑办法:
编辑所在主机的beeline-site.xml文件,执行如下命令:
[root@bigdata1 conf]# vim /usr/hdp/current/hive-client/conf/beeline-site.xml
在beeline.hs2.jdbc.url.container里面添加password=root;user=root;
修改内容如下:
<configuration  xmlns:xi="http://www.w3.org/2001/XInclude">

    <property>
      <name>beeline.hs2.jdbc.url.container</name>
      <value>jdbc:hive2://bigdata3:2181,bigdata1:2181,bigdata2:2181/;serviceDiscoveryMode=zooKeeper;user=root;password=root;zooKeeperNamespace=hiveserver2</value>
    </property>

    <property>
      <name>beeline.hs2.jdbc.url.default</name>
      <value>container</value>
    </property>

</configuration>
添加之后,然后再进行操作,发现正常了。
保存修改后,无需重启Hive服务,直接生效。此时再次执行Sqoop相关命令进行尝试。发现一切正常了。
要注意的是:若在ambari界面上执行了配置,并且重新启动之后,需要再给上面的配置给配置上。否则还会出现sqoop被卡这的现象。
1.23.7kernel:NMI watchdog: BUG: soft lockup - CPU#2 stuck for 23s!
解决办法:
#追加到配置文件中
echo 30 > /proc/sys/kernel/watchdog_thresh
#查看
[root@git-node1 data]# tail -1 /proc/sys/kernel/watchdog_thresh
30
#临时生效
sysctl -w kernel.watchdog_thresh=30
#修改/etc/sysctl.conf中的配置
添加内容:
kernel.watchdog_thresh=30

[root@bigdata1 ~]# sysctl -p
参考网址:https://blog.csdn.net/qq_41204714/article/details/84756734
1.23.8Spark没法读取hive3.x中的属性:
解决办法是hive-site.xml中配置:
hive.strict.managed.tables=false
hive.create.as.insert.only=false
metastore.create.as.acid=false
然后修改界面上的配置。
1.23.9sqoop导入mysql数据hive中,但是spark-sql不能访问的问题解决
解决办法是在beenline-site.xml中手动配置
<property>
      <name>hive.strict.managed.tables</name>
      <value>false</value>
    </property>

    <property>
      <name>hive.create.as.insert.only</name>
      <value>false</value>
    </property>

    <property>
      <name>metastore.create.as.acid</name>
      <value>false</value>
    </property>

    <property>
      <name>hbase.zookeeper.quorum</name>
      <value>bigdata1:2181,bigdata2:2181,bigdata3:2181</value>
    </property>
1.23.10配置hive整合hbase(在hive的自定义配置中定义)


1.23.11Hive数据迁移之后Error communicating with the metastore (state=42000,code=10280)
https://blog.csdn.net/weixin_38256474/article/details/92080701
1.23.12KeeperErrorCode = NoNode for /hbase/hbaseid问题
问题现象:

解决办法:
所以解决办法是,修改hbase-site.xml,指定hbase.tmp.dir,这样hbase的tmp目录不会被定时清理
<configuration>

....(省略)

<property>
        <name>hbase.tmp.dir</name>
        <value>/hbase/tmp</value>
        <description>Temporary directory on the local filesystem.</description>
</property>

</configuration>

改成(如果没有目录的话,手动创建目录):

另外,如果原来使用的是CDH,在hbase的hbase-site.xml中zookeeper.znode.parent配置的是/hbase.所以,为了兼容它,在此处也将此配置改成:

1.23.13配置虚拟vcores
位置为:


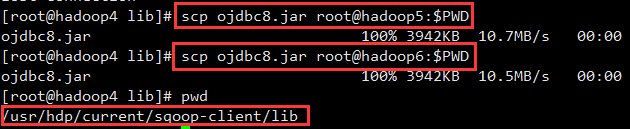
1.23.14sqoop从oracle导数据的时候,由于ojdbc版本问题,出现以下问题

解决办法:
下载ojdbc8.jar放入到:/usr/hdp/current/sqoop-client/lib中
1.23.15解决hive add jar的权限问题

1.23.16ogg和Ambari Hbase 2.0.2整合的时候出现问题
问题内容为:
ERROR 2020-01-10 16:49:33.000116 [main] - org.springframework.beans.factory.BeanCreationException: Error creating bean with name 'userExitDataSource' defined in class path resource [oracle/goldengate/dat
asource/DataSource-context.xml]: Bean instantiation via factory method failed; nested exception is org.springframework.beans.BeanInstantiationException: Failed to instantiate [oracle.goldengate.datasource
.GGDataSource]: Factory method 'getDataSource' threw exception; nested exception is java.lang.NoSuchMethodError: org.apache.hadoop.hbase.client.HBaseAdmin.checkHBaseAvailable(Lorg/apache/hadoop/conf/Confi
guration;)V
org.springframework.beans.factory.BeanCreationException: Error creating bean with name 'userExitDataSource' defined in class path resource [oracle/goldengate/datasource/DataSource-context.xml]: Bean insta
ntiation via factory method failed; nested exception is org.springframework.beans.BeanInstantiationException: Failed to instantiate [oracle.goldengate.datasource.GGDataSource]: Factory method 'getDataSour
ce' threw exception; nested exception is java.lang.NoSuchMethodError: org.apache.hadoop.hbase.client.HBaseAdmin.checkHBaseAvailable(Lorg/apache/hadoop/conf/Configuration;)V
        at oracle.goldengate.datasource.DataSourceLauncher.<init>(DataSourceLauncher.java:168)
        at oracle.goldengate.datasource.UserExitMain.main(UserExitMain.java:124)
Caused by: org.springframework.beans.BeanInstantiationException: Failed to instantiate [oracle.goldengate.datasource.GGDataSource]: Factory method 'getDataSource' threw exception; nested exception is java
.lang.NoSuchMethodError: org.apache.hadoop.hbase.client.HBaseAdmin.checkHBaseAvailable(Lorg/apache/hadoop/conf/Configuration;)V
        at org.springframework.beans.factory.support.SimpleInstantiationStrategy.instantiate(SimpleInstantiationStrategy.java:189)
        at org.springframework.beans.factory.support.ConstructorResolver.instantiateUsingFactoryMethod(ConstructorResolver.java:588)
        ... 11 more
Caused by: java.lang.NoSuchMethodError: org.apache.hadoop.hbase.client.HBaseAdmin.checkHBaseAvailable(Lorg/apache/hadoop/conf/Configuration;)V
        at oracle.goldengate.handler.hbase.operations.HBase1Writer.open(HBase1Writer.java:64)
        at oracle.goldengate.handler.hbase.operations.HBaseWriterFactory.init(HBaseWriterFactory.java:32)
        at oracle.goldengate.handler.hbase.HBaseHandler.init(HBaseHandler.java:245)
        at oracle.goldengate.datasource.AbstractDataSource.addDataSourceListener(AbstractDataSource.java:592)
        at oracle.goldengate.datasource.factory.DataSourceFactory.getDataSource(DataSourceFactory.java:161)
        at sun.reflect.NativeMethodAccessorImpl.invoke0(Native Method)
        at sun.reflect.NativeMethodAccessorImpl.invoke(NativeMethodAccessorImpl.java:62)
        at sun.reflect.DelegatingMethodAccessorImpl.invoke(DelegatingMethodAccessorImpl.java:43)
        at java.lang.reflect.Method.invoke(Method.java:498)
        at org.springframework.beans.factory.support.SimpleInstantiationStrategy.instantiate(SimpleInstantiationStrategy.java:162)
        ... 12 more

org.springframework.beans.factory.BeanCreationException: Error creating bean with name 'userExitDataSource' defined in class path resource [oracle/goldengate/datasource/DataSource-context.xml]: Bean insta
ntiation via factory method failed; nested exception is org.springframework.beans.BeanInstantiationException: Failed to instantiate [oracle.goldengate.datasource.GGDataSource]: Factory method 'getDataSour
ce' threw exception; nested exception is java.lang.NoSuchMethodError: org.apache.hadoop.hbase.client.HBaseAdmin.checkHBaseAvailable(Lorg/apache/hadoop/conf/Configuration;)V
        at org.springframework.beans.factory.support.ConstructorResolver.instantiateUsingFactoryMethod(ConstructorResolver.java:599) ~[spring-beans-4.3.20.RELEASE.jar:4.3.20.RELEASE]
        at org.springframework.beans.factory.support.AbstractAutowireCapableBeanFactory.instantiateUsingFactoryMethod(AbstractAutowireCapableBeanFactory.java:1178) ~[spring-beans-4.3.20.RELEASE.jar:4.3.20
.RELEASE]
        at org.springframework.beans.factory.support.AbstractAutowireCapableBeanFactory.createBeanInstance(AbstractAutowireCapableBeanFactory.java:1072) ~[spring-beans-4.3.20.RELEASE.jar:4.3.20.RELEASE]
        at org.springframework.beans.factory.support.AbstractAutowireCapableBeanFactory.doCreateBean(AbstractAutowireCapableBeanFactory.java:511) ~[spring-beans-4.3.20.RELEASE.jar:4.3.20.RELEASE]
        at org.springframework.beans.factory.support.AbstractAutowireCapableBeanFactory.createBean(AbstractAutowireCapableBeanFactory.java:481) ~[spring-beans-4.3.20.RELEASE.jar:4.3.20.RELEASE]
        at org.springframework.beans.factory.support.AbstractBeanFactory$1.getObject(AbstractBeanFactory.java:312) ~[spring-beans-4.3.20.RELEASE.jar:4.3.20.RELEASE]
        at org.springframework.beans.factory.support.DefaultSingletonBeanRegistry.getSingleton(DefaultSingletonBeanRegistry.java:230) ~[spring-beans-4.3.20.RELEASE.jar:4.3.20.RELEASE]
        at org.springframework.beans.factory.support.AbstractBeanFactory.doGetBean(AbstractBeanFactory.java:308) ~[spring-beans-4.3.20.RELEASE.jar:4.3.20.RELEASE]
        at org.springframework.beans.factory.support.AbstractBeanFactory.getBean(AbstractBeanFactory.java:197) ~[spring-beans-4.3.20.RELEASE.jar:4.3.20.RELEASE]
        at org.springframework.context.support.AbstractApplicationContext.getBean(AbstractApplicationContext.java:1080) ~[spring-context-4.3.20.RELEASE.jar:4.3.20.RELEASE]
        at oracle.goldengate.datasource.DataSourceLauncher.<init>(DataSourceLauncher.java:168) ~[ggdbutil-19.1.0.0.1.003.jar:19.1.0.0.1.003]
        at oracle.goldengate.datasource.UserExitMain.main(UserExitMain.java:124) [ggcmdui-19.1.0.0.1.003.jar:19.1.0.0.1.003]
这个问题主要是hbase-client-2.0.2.3.1.4.0-315.jar中的org.apache.hadoop.hbase.client.HBaseAdmin这个类中没有上面报错的方法导致的,解决办法,是将hbase-1.4.11的lib包放入到/usr/hdp/3.1.4.0-315/hbase-patch/hbase-1.4.11-lib

然后在ogg的配置文件:/opt/ogg/dirprm/hbase.props中配置如下:
#Sample gg.classpath for Apache HBase
#gg.classpath=/usr/hdp/current/hbase-client/lib/*:/usr/hdp/current/hbase-client/conf/
#Sample gg.classpath for CDH
#gg.classpath=/opt/cloudera/parcels/CDH/lib/hbase/lib/*:/etc/hbase/conf
#Sample gg.classpath for HDP
#gg.classpath=/usr/hdp/current/hbase-client/lib/*:/etc/hbase/conf
gg.classpath=/usr/hdp/3.1.4.0-315/hbase-patch/hbase-1.4.11-lib/*:/usr/hdp/3.1.4.0-315/hbase/lib/conf/:/usr/hdp/3.1.4.0-315/hadoop/client/*
具体如下:

1.23.17Hive界面上配置hive.aux.jars.path
界面效果如下(hive.aux.jars.path):

file:///usr/hdp/3.1.4.0-315/hive/auxlib/elasticsearch-adoop-6.7.1.jar,file:///usr/hdp/3.1.4.0-315/hive/auxlib/commons-httpclient-3.1.jar
1.23.18datanode 目录设置 can’t start with home(s) in ambari】】
/usr/lib/ambari-server/web/javascripts/app.js
isAllowedDir: function(value) {
   var dirs = value.replace(/,/g,' ').trim().split(new RegExp("\\s+", "g"));
   for(var i = 0; i < dirs.length; i++){
     if(dirs[i].startsWith('/home') || dirs[i].startsWith('/homes')) {
       return false;
     }
   }
   return true;
 }
将该方法直接return true;就可以了。
1.23.19Caused by: java.lang.OutOfMemoryError: unable to create new native thread问题解决
使用ulimit -a,查看结果:
[admin@datacenter3 hbase-1.2.0-cdh5.7.0]$ ulimit -a
core file size          (blocks, -c) 0
data seg size           (kbytes, -d) unlimited
scheduling priority             (-e) 0
file size               (blocks, -f) unlimited
pending signals                 (-i) 256459
max locked memory       (kbytes, -l) 64
max memory size         (kbytes, -m) unlimited
open files                      (-n) 262144
pipe size            (512 bytes, -p) 8
POSIX message queues     (bytes, -q) 819200
real-time priority              (-r) 0
stack size              (kbytes, -s) 8096
cpu time               (seconds, -t) unlimited
max user processes              (-u) 4096
virtual memory          (kbytes, -v) unlimited
file locks                      (-x) unlimited
[admin@datacenter3 hbase-1.2.0-cdh5.7.0]$
修改stack size和max user processes的值,分别改成:
[admin@datacenter3 hbase-1.2.0-cdh5.7.0]$ ulimit -a
core file size          (blocks, -c) 0
data seg size           (kbytes, -d) unlimited
scheduling priority             (-e) 0
file size               (blocks, -f) unlimited
pending signals                 (-i) 256459
max locked memory       (kbytes, -l) 64
max memory size         (kbytes, -m) unlimited
open files                      (-n) 262144
pipe size            (512 bytes, -p) 8
POSIX message queues     (bytes, -q) 819200
real-time priority              (-r) 0
stack size              (kbytes, -s) 10240
cpu time               (seconds, -t) unlimited
max user processes              (-u) 131072
virtual memory          (kbytes, -v) unlimited
file locks                      (-x) unlimited
[admin@datacenter3 hbase-1.2.0-cdh5.7.0]$
即:stack size的值为10240、max user processes的值为131072
另外,如果是内存溢出的问题,还可能是map,reduce内存等信息配置出错,这时候要修改map-site.xml和yarn-site.xml中的内存配置和虚拟内存配置。
map-site.xml中的配置修改如下。
<!-- 2020-01-15新增,可删除 -->
        <property>
            <name>mapreduce.map.java.opts</name>
            <value>-Xms3g -Xmx10g</value>
        </property>

        <property>
            <name>mapreduce.reduce.java.opts</name>
            <value>-Xms6g -Xmx20g</value>
        </property>

        <property>
            <name>mapreduce.map.memory.mb</name>
            <value>10240</value>
        </property>

        <property>
            <name>mapreduce.reduce.input.buffer.percent</name>
            <value>0.5</value>
        </property>

        <property>
            <name>mapreduce.reduce.memory.mb</name>
            <value>20480</value>
        </property>

        <!-- 2020-01-15对应的配置 -->
        <property>
            <name>mapreduce.tasktracker.http.threads</name>
            <value>8192</value>
        </property>
yarn中的配置如下:
<!-- 任务每使用1MB物理内存,最多可使用虚拟内存,默认是2.1 -->
<property>
  <name>yarn.nodemanager.vmem-pmem-ratio</name>
  <value>5</value>
</property>
另外重启hadoop和hbase,这里要特别注意的是重启之后一定要检验一个DataNode是否是是active的。也要重启一下hbase,否则会出现类似如下的错误:
Caused by: java.io.IOException: Couldn't set up IO streams
	at org.apache.hadoop.ipc.Client$Connection.setupIOstreams(Client.java:795)
	at org.apache.hadoop.ipc.Client$Connection.access$2900(Client.java:375)
	at org.apache.hadoop.ipc.Client.getConnection(Client.java:1524)
	at org.apache.hadoop.ipc.Client.call(Client.java:1447)
	... 43 more
Caused by: java.lang.OutOfMemoryError: unable to create new native thread
	at java.lang.Thread.start0(Native Method)
	at java.lang.Thread.start(Thread.java:717)
	at org.apache.hadoop.ipc.Client$Connection.setupIOstreams(Client.java:788)
	... 46 more
1.23.20/usr/bin/hdp-select set zookeeper-server 3.1.4.0-315’ returned 1. symlink target /usr/hdp/current/zookeeper-server for zookeeper already exists and it is not a symlink
File "/usr/lib/ambari-agent/lib/resource_management/core/shell.py", line 314, in _call
    raise ExecutionFailed(err_msg, code, out, err)
resource_management.core.exceptions.ExecutionFailed: Execution of 'ambari-python-wrap /usr/bin/hdp-select set zookeeper-server 3.1.4.0-315' returned 1. symlink target /usr/hdp/current/zookeeper-server for zookeeper already exists and it is not a symlink
解决办法是:
查看/usr/hdp/current下面有没有没有生成软链接的文件,如果没有就删除,执行下面命令重建软链接
然后执行:
[admin@datacenter2 current]$ sudo rm -rf zookeeper-server
[admin@datacenter2 current]$ sudo hdp-select set zookeeper-server 3.1.4.0-315
1.23.21设置Block replication的副本数量为3
Block replication的值为3

1.23.22Error: java.lang.IllegalArgumentException: KeyValue size too large
错误内容:
Error: java.lang.IllegalArgumentException: KeyValue size too large
	at org.apache.hadoop.hbase.client.HTable.validatePut(HTable.java:952)
	at org.apache.hadoop.hbase.client.BufferedMutatorImpl.mutate(BufferedMutatorImpl.java:191)
	at org.apache.hadoop.hbase.client.BufferedMutatorImpl.mutate(BufferedMutatorImpl.java:179)
	at org.apache.hadoop.hbase.mapreduce.TableOutputFormat$TableRecordWriter.write(TableOutputFormat.java:143)
	at org.apache.hadoop.hbase.mapreduce.TableOutputFormat$TableRecordWriter.write(TableOutputFormat.java:93)
	at org.apache.hadoop.mapred.MapTask$NewDirectOutputCollector.write(MapTask.java:670)
	at org.apache.hadoop.mapreduce.task.TaskInputOutputContextImpl.write(TaskInputOutputContextImpl.java:89)
	at org.apache.hadoop.mapreduce.lib.map.WrappedMapper$Context.write(WrappedMapper.java:112)
	at org.apache.hadoop.hbase.mapreduce.Import$Importer.processKV(Import.java:584)
	at org.apache.hadoop.hbase.mapreduce.Import$Importer.writeResult(Import.java:539)
	at org.apache.hadoop.hbase.mapreduce.Import$Importer.map(Import.java:522)
	at org.apache.hadoop.hbase.mapreduce.Import$Importer.map(Import.java:505)
	at org.apache.hadoop.mapreduce.Mapper.run(Mapper.java:146)
	at org.apache.hadoop.mapred.MapTask.runNewMapper(MapTask.java:799)
	at org.apache.hadoop.mapred.MapTask.run(MapTask.java:347)
	at org.apache.hadoop.mapred.YarnChild$2.run(YarnChild.java:174)
	at java.security.AccessController.doPrivileged(Native Method)
	at javax.security.auth.Subject.doAs(Subject.java:422)
	at org.apache.hadoop.security.UserGroupInformation.doAs(UserGroupInformation.java:1730)
	at org.apache.hadoop.mapred.YarnChild.main(YarnChild.java:168)
在进行插入操作的时候,hbase会挨个检查要插入的列,检查每个列的大小是否小于 maxKeyValueSize值,当cell的大小大于maxKeyValueSize时,就会抛出KeyValue size too large的异常。问题定位到了,下面看这个maxKeyValueSize值是在哪里设定的。在validatePut方法所在的同一个类(HTable.class)中,可以找到maxKeyValueSize的信息:
public static int getMaxKeyValueSize(Configuration conf) {
        return conf.getInt("hbase.client.keyvalue.maxsize", -1);
    }
在上述方法中可以看出,maxKeyValueSize的值是在配置文件中配置的,配置参数的key值就是:hbase.client.keyvalue.maxsize。
在官网,我查到了关于hbase.client.keyvalue.maxsize的描述信息:
hbase.client.keyvalue.maxsize
一个KeyValue实例的最大size.这个是用来设置存储文件中的单个entry的大小上界。因为一个KeyValue是不能分割的,所以可以避免因为数据过大导致region不可分割。
明智的做法是把它设为可以被最大region size整除的数。如果设置为0或者更小,就会禁用这个检查。默认10MB。
默认: 10485760
也就是说,hbase.client.keyvalue.maxsize 的默认大小是10M,如果cell的大小超过10M,那么就会报 KeyValue size too large的错误。
解决方法:
方法一、根据官网提示,修改配置文件hbase-default.xml ,调大hbase.client.keyvalue.maxsize 的值:
<property>
    <name>hbase.client.keyvalue.maxsize</name>
    <value>20971520</value>
  </property>
不建议通过直接修改配置文件的方式修改。改完后,需重启hbase(需不需要重启?带验证)
方法二:修改代码,使用configuration对象修改此配置:
Configuration conf = HBaseConfiguration.create();
conf.set(“hbase.client.keyvalue.maxsize”,“20971520”);
即修改hbase中:

1.23.23解决475175982519323-1/-ext-10000/000000_0 as the file is not owned by hive and load data is also not ran as hive问题
hive-site.xml添加hive.load.data.owner=这里填写具体用户
1.24Hive1.1.0升级到hive3.x
1.24.1找到两个hive的版本
进入到hive的安装目录(或者安装软件包所在位置),例如ambari中hive的默认安装目录(安装包)在:/usr/hdp/3.1.4.0-315/hive,升级sql包在:
/usr/hdp/3.1.4.0-315/hive/scripts/metastore/upgrade/mysql

通过上面可以知道Ambari的最高版本是3.1.1版本。若想找到具体的Ambari版本,可以进入Ambari的web界面,然后按照如下步骤进行查看:
第一步:点击Add Service

第二步:进入Add Service Wizard界面即可看到自己安装的hive和其它组件的版本。

通过上面的界面可知,具体的Ambari版本是3.1.0版本。
1.24.2Hive库1.1.0升级到hive3.1.0对应的库
1.24.2.1备份旧数据库
进入MySQL客户端界面,创建新的库:
CREATE DATABASE hive_1.1.0 DEFAULT CHARACTER SET utf8;
然后将旧的hive库备份到hive_1.1.0中

1.24.2.2对比sql找到升级脚本
初步发现右侧没有勾选的sql文件即为要升级的脚本。

再次整理之后,发现要升级的sql脚本如下:
 将要升级的sql放置到/home/workspace目录下(/home/workspace/ambari3.1.4.0-sqls/hive-sql/mysql),即:

1.24.2.3升级hive库
登录mysql,然后通过source命令执行脚本
[root@bigdata1 mysql]# mysql -u root -p
输入密码:
然后分别执行:
mysql> use hive;
Reading table information for completion of table and column names
You can turn off this feature to get a quicker startup with -A

Database changed
mysql> source /home/workspace/ambari3.1.4.0-sqls/hive-sql/mysql/create-user.mysql.sql
mysql> set global validate_password_policy=0;
mysql> set global validate_password_length=1;


mysql> source /home/workspace/ambari3.1.4.0-sqls/hive-sql/mysql/create-user.mysql.sql

mysql> source /home/workspace/ambari3.1.4.0-sqls/hive-sql/mysql/hive-txn-schema-1.3.0.mysql.sql
mysql> source /home/workspace/ambari3.1.4.0-sqls/hive-sql/mysql/hive-txn-schema-2.0.0.mysql.sql
mysql> source /home/workspace/ambari3.1.4.0-sqls/hive-sql/mysql/hive-txn-schema-2.1.0.mysql.sql
mysql> source /home/workspace/ambari3.1.4.0-sqls/hive-sql/mysql/hive-txn-schema-2.2.0.mysql.sql
mysql> source /home/workspace/ambari3.1.4.0-sqls/hive-sql/mysql/hive-txn-schema-2.3.0.mysql.sql
mysql> source /home/workspace/ambari3.1.4.0-sqls/hive-sql/mysql/hive-schema-3.1.1000.mysql.sql

mysql> source /home/workspace/ambari3.1.4.0-sqls/hive-sql/mysql/upgrade-1.1.0-to-1.2.0.mysql.sql

mysql> source /home/workspace/ambari3.1.4.0-sqls/hive-sql/mysql/upgrade-1.2.0-to-1.2.1000.mysql.sql
mysql> source /home/workspace/ambari3.1.4.0-sqls/hive-sql/mysql/upgrade-1.2.1000-to-2.0.0.mysql.sql
mysql> source /home/workspace/ambari3.1.4.0-sqls/hive-sql/mysql/upgrade-2.0.0-to-2.1.0.mysql.sql
mysql> source /home/workspace/ambari3.1.4.0-sqls/hive-sql/mysql/upgrade-2.1.0-to-2.1.1000.mysql.sql
mysql> source /home/workspace/ambari3.1.4.0-sqls/hive-sql/mysql/upgrade-2.1.1000-to-2.1.2000.mysql.sql
mysql> source /home/workspace/ambari3.1.4.0-sqls/hive-sql/mysql/upgrade-2.1.2000-to-3.0.0.mysql.sql
mysql> source /home/workspace/ambari3.1.4.0-sqls/hive-sql/mysql/upgrade-3.0.0-to-3.1.0.mysql.sql
mysql> source /home/workspace/ambari3.1.4.0-sqls/hive-sql/mysql/upgrade-3.1.0-to-3.1.1000.mysql.sql
1.25备份和恢复HDFS数据
将HDFS数据从根目录拷贝到本地目录文件
hadoop fs -copyToLocal hdfs://tqHadoopCluster/ ./dataFolder
将本地HDFS数据文件put到指定目录
hdfs dfs -put -f dataFolder hdfs://tqHadoopCluster/
1.26hbase数据备份和恢复
以下过程针对线上没有启动新旧集群的情况,所以使用hbase export / import的方式进行数据的备份和迁移
1.26.1Export过程
首先,先进入hbase所在机器,然后执行命令:
hbase shell

hbase(main):001:0> list
TABLE
test_migration

然后执行:
hbase(main):003:0> describe 'test_migration'
Table test_migration is ENABLED
test_migration
COLUMN FAMILIES DESCRIPTION
{NAME => 'cf1', BLOOMFILTER => 'ROW', VERSIONS => '1', IN_MEMORY => 'false', KEEP_DELETED_CELLS => 'FALSE', DATA_BLOCK_EN
DING => 'NONE', TTL => 'FOREVER', COMPRESSION => 'NONE', MIN_VERSIONS => '0', BLOCKCACHE => 'true', BLOCKSIZE => '65536',
EPLICATION_SCOPE => '0'}
1 row(s) in 0.1710 seconds

通过上面发现有一个列族’cf1’

hbase(main):004:0> scan test_migration
NameError: undefined local variable or method `test_migration' for #<Object:0x48268eec>

hbase(main):005:0> scan 'test_migration'
ROW                             COLUMN+CELL
 1                              column=cf1:age, timestamp=1553738512684, value=18
 1                              column=cf1:name, timestamp=1553738512531, value=zhangsan
 1                              column=cf1:sex, timestamp=1553738512591, value=\xE7\x94\xB7
1 row(s) in 0.0950 seconds

Export数据(以下直接在bash中执行):
hbase org.apache.hadoop.hbase.mapreduce.Export test_migration /tzq/hbaseData

将数据拷贝到本地:
scp -r admin@datacenter1:/home/admin/hbaseDataTest /home/admin/ambari

然后将数据通过xftp拷贝到本地
1.26.2Import过程
首先创建一个命令空间(这里是带有命名空间的场景),然后创建相关表
hbase>create_namespace 'test'

hbase(main):022:0> create 'test:test_migration','cf1'    (其中cf1为列族)

hbase(main):023:0> list
TABLE
test:test_migration
user
3 row(s)
Took 0.0086 second
将本地数据put到hdfs上:
hdfs dfs -put hbaseData /
然后import数据到 'test:test_migration’中(以下直接在bash中执行)
hbase org.apache.hadoop.hbase.mapreduce.Import 'test:test_migration' /hbaseData
最后进入hbase中验证数据:
hbase(main):024:0> scan 'test:test_migration'
ROW                             COLUMN+CELL
 1                              column=cf1:age, timestamp=1553738512684, value=18
 1                              column=cf1:name, timestamp=1553738512531, value=zhangsan
 1                              column=cf1:sex, timestamp=1553738512591, value=\xE7\x94\xB7
发现数据和原来的一致
1.26.3统计hbase表行数
hbase org.apache.hadoop.hbase.mapreduce.RowCounter 'test:test_migration'
1.27Hive和ElasticSearch整合(3太服务器上)
1.27.1配置auxlib
在/usr/hdp/current/hive-client中创建auxlib,然后将:commons-httpclient-3.1.jar,elasticsearch-hadoop-6.7.1.jar放到这个文件夹下,如:

若发现hive中add jar 这两个的时候不给力,就重启hiveserver2试试
1.27.2验证配置是否正确
配置完成之后,进入hive cli,执行如下:
drop table if exists test_new_hive_02;
CREATE EXTERNAL TABLE test_new_hive_02 (
one_idcardnumber string comment '身份证号码',
age bigint comment '身份证号码',
one_birtyday String comment '身份证号码',
one_name string comment '姓名:有多个的只取最新的1个'
)STORED BY 'org.elasticsearch.hadoop.hive.EsStorageHandler'
TBLPROPERTIES(
'es.resource' = 'test_population_info2/_doc',
'es.mapping.id'='one_idcardnumber',
'es.nodes'='192.168.110.182',
'es.index.auto.create' = 'true',
'es.index.read.missing.as.empty' = 'true',
'es.field.read.empty.as.null' = 'true'
);
要注意的是,这里的index是自动创建的。
insert into test_new_hive_02 values('1112',25,'2019-01-01','李四');
若整个过程都执行正确,则可以进入Kibana中进行查找:http://192.168.110.182:5601/app/kibana#/dev_tools/console?_g=()
GET /test_population_info2/_search
{
  "query": {
    "match_all": {}
  }
}
1.28oracle golden gate和Ambari hbase整合
略
