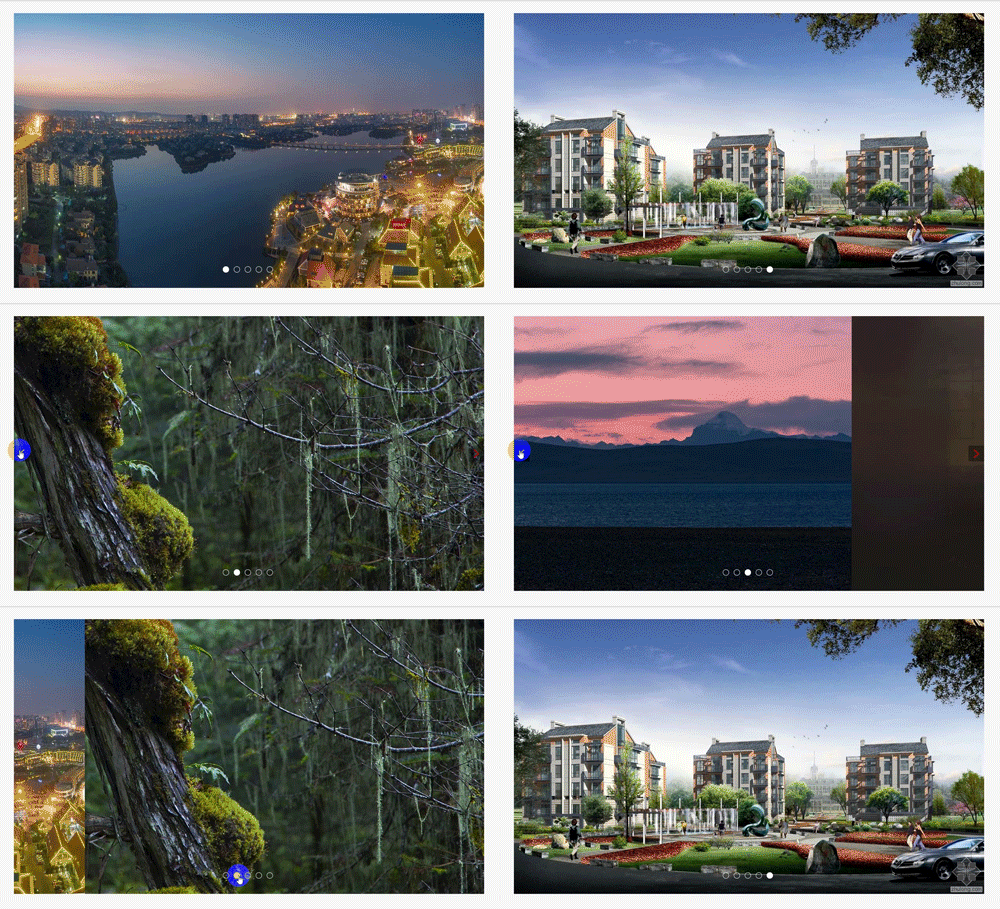
原生js——轮播图、焦点图的实现
1.Demo展示:

2 . Html布局:
<div class="main">
<div id="main-content">
<div id="list" style="left:-1200px;">
<a href=""><img src="img/5.jpg"></a>
<a href=""><img src="img/1.jpg"></a>
<a href=""><img src="img/2.jpg"></a>
<a href=""><img src="img/3.jpg"></a>
<a href=""><img src="img/4.jpg"></a>
<a href=""><img src="img/5.jpg"></a>
<a href=""><img src="img/1.jpg"></a>
</div>
<!--------------上一页按钮--------------->
<div id="prev" class="arrow">
<a href="javascript:;"><</a>
</div>
<!-------------下一页按钮----------------->
<div id="next" class="arrow">
<a href="javascript:;">></a>
</div>
</div>
<!--------------小圆点------------------>
<div class="circle">
<ul>
<li class="active"></li>
<li></li>
<li></li>
<li></li>
<li></li>
</ul>
</div>
</div>
3. css样式表:
	*{
		margin:0;
		padding:0;
	}

	a{
		text-decoration:none;
	}

	ul{
		list-style:none;
	}

	.main{
		width:100%;
		height:700px;
		position:relative;
	}

	#main-content{
		width:1200px;
		height:100%;
		margin:30px auto;
		overflow:hidden;
		position:relative;
	}

	#main-content #list{
		position:absolute;
		width:8400px;
		height:700px;
	}

	#main-content #list img{
		float:left;
		width:1200px;
		height:700px;
	}

	#main-content .arrow{
		display:none;
	}

	#main-content:hover .arrow{
		display:block;
	}

	/*左右按钮*/
	#prev,#next{
		width:40px;
		height:40px;
		position:absolute;
		margin-top:-20px;
		top:50%;
		text-align:center;
		background-color: rgba(0,0,0,.4);
		cursor:pointer;
	}

	#prev{
		left:0;
	}

	#next{
		right:0;
	}

	#prev a,
	#next a{
		font-size:30px;
		line-height:40px;
		color:red;
		display:block;
	}

	#prev a:hover,
	#next a:hover{
		color:white;
		transition:background-color .5s linear;
		background-color: rgba(0,0,0,.6);
	}

	/*小圆点*/
	.circle{
		position:absolute;
		bottom:5%;
		left:50%;
		margin-left:-67px;
		width:140px;
		height:20px;
	}

	.circle ul li{
		width:14px;
		height:14px;
		float:left;
		border:1px solid white;
		border-radius:50%;
		float:left;
		margin:0 12px 0 0;
		cursor:pointer;
	}

	.circle .active{
		background-color:white;
	}
4. 原生js代码:
window.onload = function(){
	var wrap = document.getElementById("list");
	var prev = document.getElementById("prev");
	var next = document.getElementById("next");
	var list = document.getElementsByTagName("li");
	var container = document.getElementById("main-content");

	var index = 0;
	var newleft;
	var timer = null;

	//上一页;
	prev.onclick = function(){
		prev_pic();
	}

	//下一页;
	next.onclick = function(){
		next_pic();
	}

	//点击下一页父盒子left的变化,所传入的参数boxWidth为'每一个子元素(img)'的大小;
	function leftChange(boxWidth){
		if(wrap.style.left === (-boxWidth * 5 + "px")){
			newleft = -boxWidth;
		}else{
			newleft = parseInt(wrap.style.left) - boxWidth;
		}
		wrap.style.left = newleft + "px";
	}

	//点击上一页父盒子left的变化,所传入的参数boxWidth为'每一个子元素(img)'的大小;
	function rightChange(boxWidth){
		if(wrap.style.left === "-1200px"){
			newleft = -boxWidth * 5;
		}else{
			var newleft = parseInt(wrap.style.left) + boxWidth;
		}
		wrap.style.left = newleft + "px";
	}

	//点击下一页,小原点的位置跟着改变;
	function next_pic(){
		index++;
		if(index > 4){
			index = 0;
		}
		cut_circle();
		leftChange(1200);
	}

	//点击上一页,小原点的位置跟着改变;
	function prev_pic(){
		index--;
		if(index < 0){
			index = 4;
		}
		cut_circle();
		rightChange(1200);
	}

	//设置计时器
	function autoplay(){
		timer = setInterval(next_pic,2000);
	}
	//自动调用计时器;
	autoplay();

	//鼠标移入,清除计时器
	container.onmouseover = function(){
		clearInterval(timer);
	}

	//鼠标移出,调用计时器
	container.onmouseout = function(){
		autoplay();
	}

	//控制小圆点,小圆点随着图片的切换而改变;
	function cut_circle(){
		for(var i = 0; i < list.length; i++){
			list[i].className = "";
		}
		list[index].className = "active";
	}

	//小圆点的移动;
	function circle_move(boxWidth){
		for(var i = 0; i < list.length; i++){
			list[i].id = i;
			//鼠标移入小圆点;
			list[i].onmouseover = function(){
				clearInterval(timer);
				for(var j = 0; j < list.length; j++){
					list[j].className = "";
				}
				this.className = "active";
				wrap.style.left = - ( (this.id) * boxWidth ) - boxWidth + "px";
			}
			//鼠标移出小圆点;
			list[i].onmouseout = function(){
				//这里应该把现在的值赋值给计时器里面的index;
				index = this.id ;
			}
		}
	}

	//调用小圆点移动函数;
	circle_move(1200);

}
总结:
-
注意这种写法,容易被忽略 ( 我个人经常忘记 );
<a href="javascript:;"></a> -
通过改变外部盒子的left值,一定要进行定位,并且给父盒子事先添加一个left值(一定不能忘记);
<div id="list" style="left:-1200px;"> -
里面有涉及到函数的传参,就拿小圆点的移动函数来说 ( 其他函数也类似 );
//小圆点的移动;
	function circle_move(boxWidth){
		for(var i = 0; i < list.length; i++){
			list[i].id = i;
			//鼠标移入
			list[i].onmouseover = function(){
				clearInterval(timer);
				for(var j = 0; j < list.length; j++){
					list[j].className = "";
				}
				this.className = "active";
				wrap.style.left = - ( (this.id) * boxWidth ) - boxWidth + "px";
			}
注:boxWidth为每一个子盒子的大小,简单来说就是每一张滚动图片的大小,只要知道图片的大小,即可调用;
-
只滚动五张图片,但却有七张图片,是为了实现无缝拼接,不至于影响用户的体验;
	<div id="list" style="left:-1200px;">
		<a href=""><img src="img/5.jpg"></a>
		<a href=""><img src="img/1.jpg"></a>
		<a href=""><img src="img/2.jpg"></a>
		<a href=""><img src="img/3.jpg"></a>
		<a href=""><img src="img/4.jpg"></a>
		<a href=""><img src="img/5.jpg"></a>
		<a href=""><img src="img/1.jpg"></a>
	</div>
~如遇错误,欢迎指正;
