webpack打包原理:手写一个bundler
Webpack 凭借强大的功能与良好的使用体验,已经成为目前最流行,社区最活跃的打包工具,是现代 Web 开发必须掌握的技能之一,在本文中,将会讲解webpack底层,是如何将我们的业务代码打包并编译为浏览器可以运行的代码
准备工作
在讲解webpack打包原理之前,我们先进行一些准备工作,创建一些js文件,来供我们的bundler做打包测试
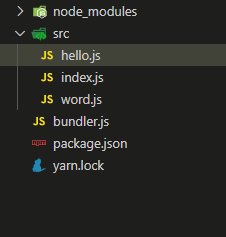
三个文件的具体内容
index.js:
import message from './message.js'
console.log(message)
hello.js
import { word } from './hello.js'

const message = `hello ${word}`

export default message
word.js
export const word = 'world'
然后,下载我们所需要的第三方依赖
- @babel/parser ---- 帮助我们分析代码并生成抽象语法树(AST)
- @babel/traverse ---- 帮助我们对抽象语法树进行遍历
- @babel/core ---- 将原始代码打包编译成浏览器能够运行的代码
那么到此,我们的准备工作就完成了,接下来,我们将一起开始编写bundler源码
正式开始
首先,我们在src平级的目录下,创建一个bundler.js,作为我们的打包文件,并导入我们所需的依赖,然后开始webpack打包的第一部,分析入口文件
const fs = require('fs') // 想要分析文件,需要用fs获取到文件内容
const path = require('path') // dependencies中的文件路径不可以是相对路径,因此需要path
const parser = require('@babel/parser') // 帮助我们分析代码
const traverse = require('@babel/traverse').default // 帮助我们对抽象语法树进行遍历
const babel = require('@babel/core') // 将原始代码打包编译成浏览器能够运行的代码

const moduleAnalyser = (filename) => { // 帮助我们分析模块
  const content = fs.readFileSync(filename, 'utf-8')
  const ast = parser.parse(content, {
    sourceType: 'module'
  }) // 抽象语法树AST
  console.log(ast.program.body)
}

const moduleInfo = moduleAnalyser('./src/index.js')
在上面这段代码中,我们首先,定义了一个函数,帮助我们分析模块,接受的参数就是我们打包时的入口文件index.js,之后,我们通过node的核心模块fs模块,读取入口文件的内容,并转为utf-8格式.
之后通过@babel/parser将index.js中的代码转换为抽象语法树来获取index.js所依赖的文件,至于为什么要使用抽象语法树,而不是正则等方法,可以看我的上一篇文章,里面有对应的介绍
我们先看一下打印出的内容:
// ast.program.body
Node {
  type: 'ImportDeclaration',
    start: 0,
      end: 32,
        loc: SourceLocation { start: [Position], end: [Position] },
  specifiers: [[Node]],
    source:
  Node {
    type: 'StringLiteral',
      start: 20,
        end: 32,
          loc: [SourceLocation],
            extra: [Object],
              value: './hello.js'
  }
},
Node {
  type: 'ExpressionStatement',
    start: 36,
      end: 56,
        loc: SourceLocation { start: [Position], end: [Position] },
  expression:
  Node {
    type: 'CallExpression',
      start: 36,
        end: 56,
          loc: [SourceLocation],
            callee: [Node],
              arguments: [Array]
  }
}
可以看到,打印出了两个node节点,分别对应我们index.js中的两行代码,可以看到,我们的import语句对应的类型为ImportDeclaration,有个这个类型,就到了@babel/traverse大展身手的时候了
const fs = require('fs') // 想要分析文件,需要用fs获取到文件内容
const path = require('path') // dependencies中的文件路径不可以是相对路径,因此需要path
const parser = require('@babel/parser') // 帮助我们分析代码
const traverse = require('@babel/traverse').default // 帮助我们对抽象语法树进行遍历
const babel = require('@babel/core') // 将原始代码打包编译成浏览器能够运行的代码

const moduleAnalyser = (filename) => { // 帮助我们分析模块
  const content = fs.readFileSync(filename, 'utf-8')
  const ast = parser.parse(content, {
    sourceType: 'module'
  }) // 抽象语法树AST
  const dependencies = {}
  traverse(ast, { // 对抽象语法树进行遍历
    ImportDeclaration ({ node }) { // 如果遇见类型为ImportDeclaration的元素,则执行这个函数
      const dirname = path.dirname(filename)
      const newFile = './' + path.join(dirname, node.source.value)
      // console.log(newFile)
      // console.log(node) // 类型为ImportDeclaration的元素
      dependencies[node.source.value] = newFile // 将依赖中的文件存入对象,键是依赖文件的相对路径,值是依赖文件的绝对路径
      console.log(dependencies) //{ './hello.js': './src\\hello.js' }
    }
  })
}
const moduleInfo = moduleAnalyser('./src/index.js')
我们来看一下打印出的node详情
Node {
  type: 'ImportDeclaration',
    start: 0,
      end: 32,
        loc:
  SourceLocation {
    start: Position { line: 1, column: 0 },
    end: Position { line: 1, column: 32 }
  },
  specifiers:
  [Node {
    type: 'ImportDefaultSpecifier',
    start: 7,
    end: 14,
    loc: [SourceLocation],
    local: [Node]
  }],
    source:
  Node {
    type: 'StringLiteral',
      start: 20,
        end: 32,
          loc: SourceLocation { start: [Position], end: [Position] },
    extra: { rawValue: './hello.js', raw: '\'./hello.js\'' },
    value: './hello.js'
  }
}
在这里,我们可以看到node.source.value正是我们在index.js中引入的依赖,获得了这个依赖的路径后,我们就可以顺着这个路径,依次将所有的文件都打包,不过我们还需要做很多工作
首先,我们引入的依赖不会只有一个hello.js,将来还可能有hello2,hello3,因此,我们需要将这些依赖对应的路径先存储起来,因此,我们定义了一个对象dependencies,在这个对象中,将存储我们的依赖路径.
需要注意的是,我们在存储依赖的路径时,必须要获得的是这些依赖正确的路径,如同刚刚的例子,我们获得的是./hello.js,但这个路径时相对于index.js来说的,因此,我们需要用到另一个node的核心模块path
我们通过path.dirname(filename)来获取index所在的文件夹路径,并将之拼接到node.source.value上,这样,我们就可以得到一个正确的路径了
打印出的dependencies:
{ './hello.js': './src\\hello.js' }
在完成这些之后,我们开始对index.js进行编译,将它转换成可以在浏览器上运行的代码,这里,我们将通过@babel/core来帮助我们进行代码的编译
const fs = require('fs') // 想要分析文件,需要用fs获取到文件内容
const path = require('path') // dependencies中的文件路径不可以是相对路径,因此需要path
const parser = require('@babel/parser') // 帮助我们分析代码
const traverse = require('@babel/traverse').default // 帮助我们对抽象语法树进行遍历
const babel = require('@babel/core') // 将原始代码打包编译成浏览器能够运行的代码

const moduleAnalyser = (filename) => { // 帮助我们分析模块
  const content = fs.readFileSync(filename, 'utf-8')
  const ast = parser.parse(content, {
    sourceType: 'module'
  }) // 抽象语法树AST
  const dependencies = {}
  traverse(ast, { // 对抽象语法树进行遍历
    ImportDeclaration ({ node }) { // 如果遇见类型为ImportDeclaration的元素,则执行这个函数
      const dirname = path.dirname(filename)
      const newFile = './' + path.join(dirname, node.source.value)
      dependencies[node.source.value] = newFile // 将依赖中的文件存入对象,键是依赖文件的相对路径,值是依赖文件的绝对路径
    }
  })
  // 通过@babel/core的transformFromAst来将AST编译为可以在浏览器上运行的代码,在这个过程中,我们还可以加入一些其他插件,例如著名的@babel/preset-env
  const {code} = babel.transformFromAst(ast,null,{
    presets: ['@babel/preset-env'] // babel插件的集合,常见的有将ES6转换为ES5的@babel/preset-env
  }) // 将ast语法树转换成一个对象,这个对象中有一个code字段,其中为编译生成的可以在浏览器上运行的代码
  // console.log(code)
  return {
    filename,
    dependencies,
    code
  }
}
const moduleInfo = moduleAnalyser('./src/index.js')
console.log(moduleInfo)
打印出的结果:
{
  filename: './src/index.js',
    dependencies: { './hello.js': './src\\hello.js' },
  code:
  '"use strict";\n\nvar _hello = _interopRequireDefault(require("./hello.js"));\n\nfunction _interopRequireDefault(obj) { return obj && obj.__esModule ? obj : { "default": obj }; }\n\nconsole.log(_hello["default"]);'
}
至此,我们的index.js就打包完成了,但是我们的任务还没有结束,我们现在只是打包了一个index文件,还需要将整个项目的所有模块进行分析
依赖图谱
我们刚刚将index模块的代码分析完毕了,接下来,我们将对整个工程所有的文件进行分析打包,首先,我们需要获取整个工程所有模块的依赖关系,并将它们存储起来,我们直接使用代码来讲解
// 依赖图谱
const makeDependenciesGraph = (entry) => {
  const entryModule = moduleAnalyser(entry) // 对入口模块进行分析
  const graphArray = [entryModule] // 将分析的结果存储到一个数组中
  for (let i = 0; i < graphArray.length; i++) {
    const item = graphArray[i] // 每一个模块的分析结果,第一次则为入口文件的分析结果
    const { dependencies } = item // 在上面我们已经看到了,分析结果中有 dependencie这一项,存储了入口文件的依赖路径{ './hello.js': './src\\hello.js' },
    if (dependencies) {
      for (let j in dependencies) {
        graphArray.push(
          moduleAnalyser(dependencies[j])
        )
      }
    }
  }
// --------------------------------------------------------
// 上面这段代码的解释:
// 首先,我们定义了一个数组graphArray ,这个数组存放我们所有模块的分析结果,
// 在初始时,我们将index模块的分析结果放入这个数组,之后,对数组进行遍历
// 在此时,数组中只有一项,就是index文件的分析结果,在这个结果中,存储了index依赖的文件路径
// 然后,我们根据这个依赖路径,使用我们在上面定义的分析模块的方法moduleAnalyser来分析这些依赖文件
// 分析结束后,将分析结果放入graphArray 中,这样,当第一次循环结束后
// graphArray 中就有了第二个模块的分析结果graphArray.length就不再是1,而是变为了2,所以,for语句会再次执行下去
// 这样,通过这个循环,我们就可以将入口文件,以及入口文件的依赖文件一层一层的push进graphArray 中,这样就将整个工程内所有的模块全部分析完毕
// --------------------------------------------------------

  // 现在graphArray依赖图谱是一个数组,后面打包时不方便,所以做一个格式上的转换
  const graph = {}
  graphArray.forEach(item => {
    graph[item.filename] = {
      dependencies: item.dependencies,
      code: item.code
    }
  })
  return graph
}
const graghInfo = makeDependenciesGraph('./src/index.js')
console.log(graghInfo)
我们可以看一下最终graghInfo的结果:
{
  './src/index.js':
  {
    dependencies: { './hello.js': './src\\hello.js' },
    code:
    '"use strict";\n\nvar _hello = _interopRequireDefault(require("./hello.js"));\n\nfunction _interopRequireDefault(obj) { return obj && obj.__esModule ? obj : { "default": obj }; }\n\nconsole.log(_hello["default"]);'
  },
  './src\\hello.js':
  {
    dependencies: { './word.js': './src\\word.js' },
    code:
    '"use strict";\n\nObject.defineProperty(exports, "__esModule", {\n  value:
    true\n
  }); \nexports["default"] = void 0; \n\nvar _word = require("./word.js"); \n\nvar message = "say ".concat(_word.word); \nvar _default = message; \nexports["default"] = _default; ' },
  './src\\word.js':
  {
    dependencies: { },
    code:
    '"use strict";\n\nObject.defineProperty(exports, "__esModule", {\n  value:
    true\n
  }); \nexports.word = void 0; \nvar word = \'hello\';\nexports.word = word;'}
}
这样,我们就完成了自己的依赖图谱
生成真正可以在浏览器上运行的代码
进行了这么多的铺垫,在获得了所有模块的分析结果之后,我们终于可以来到了最后一步,借助graghInfo来生成真正可以在浏览器上运行的代码
// 生成浏览器可运行的代码
const generateCode = (entry) => {
// makeDependenciesGraph就是我们上面定义的生成依赖图谱的函数
  const graph = JSON.stringify(makeDependenciesGraph(entry))
  // 之所以使用JSON.stringify,是因为接下来我们要将graph作为参数传递给我们的函数
  // 如果直接将对象当做参数传递进去的话,那么最终返回时,它会被转化成[object  Object]


  // 这段代码有些难以理解,实际上,我们要在此处,返回一个最终能在浏览器运行的代码
  // 首先,我们返回一个大闭包函数,防止污染全局变量,这个函数,我们接受刚刚生成的依赖图谱
  // 接受之后,我们定义一个require函数,这个函数,我们接受初始的入口文件路径,即'./src/index.js'
  // 在require中,我们再定义一个闭包函数,由于我们接受了依赖图谱grahp
  // 同时因为我们有入口文件的路径 './src/index.js',因此我们可以取到grahp['./src/index.js'],获取到index.js的分析结果
  // 也就能通过grahp['./src/index.js'].code获取到index编译出的js代码,通过eval来运行这段代码
  // 在运行时,由于浏览器并不存在require这个方法,所以,我们需要将require方法也作为参数传递进去,这样,在eval执行代码时,如果遇到了require,就会执行我们传入的函数

  // 需要注意的是,在依赖图谱的code中,是这样的require("./hello.js"),这就会产生一个问题, './hello.js'并不是一个正确的路径,它是相对于index来说的,因此我们还需要取得正确的路径
  // 因此,我们并不能直接将require传递进去,而是要做一些修改,重新定义一个localRequire
  // 在localRequire中,我们通过graph['./src/index.js'].dependencies[./hello.js],就可以获得hello.js的正确路径了
  // 同时返回require(graph['./src/index.js'].dependencies[./hello.js])

  // 这样,我们就能在每一层,都给require传递一个正确的键,来让它取得正确的code来运行了

  // 第二个需要我们自己创建的是一个exports对象,因为在编译的代码中,有这样的代码:
  // Object.defineProperty(exports, "__esModule", {\n  value:
  //   true
  // })
  // 因此,我们自己定义一个exports空对象,并将之传递给下一层
  return `
    ;(function(graph){
      function require(module){
        function localRequire(relativePath){
          return require(graph[module].dependencies[relativePath])
        }
        var exports = {}
        ;(function(require, exports, code){
          eval(code)
        })(localRequire, exports, graph[module].code)
        return exports
      }
      require('${entry}')
    })(${graph})
  `
}
const code = generateCode('./src/index.js')
console.log(code)
我们来看一看最终返回的代码:
; (function (graph) {
  function require (module) {
    function localRequire (relativePath) {
      return require(graph[module].dependencies[relativePath])
    }
    var exports = {}
      ; (function (require, exports, code) {
        eval(code)
      })(localRequire, exports, graph[module].code)
    return exports
  }
  require('./src/index.js')
})({ "./src/index.js": { "dependencies": { "./message.js": "./src\\message.js" }, "code": "\"use strict\";\n\nvar _message = _interopRequireDefault(require(\"./message.js\"));\n\nfunction _interopRequireDefault(obj) { return obj && obj.__esModule ? obj : { \"default\": obj }; }\n\nconsole.log(_message[\"default\"]);" }, "./src\\message.js": { "dependencies": { "./word.js": "./src\\word.js" }, "code": "\"use strict\";\n\nObject.defineProperty(exports, \"__esModule\", {\n  value: true\n});\nexports[\"default\"] = void 0;\n\nvar _word = require(\"./word.js\");\n\nvar message = \"say \".concat(_word.word);\nvar _default = message;\nexports[\"default\"] = _default;" }, "./src\\word.js": { "dependencies": {}, "code": "\"use strict\";\n\nObject.defineProperty(exports, \"__esModule\", {\n  value: true\n});\nexports.word = void 0;\nvar word = 'hello';\nexports.word = word;" } })
我们把它拿到浏览器上运行一下,看看结果:
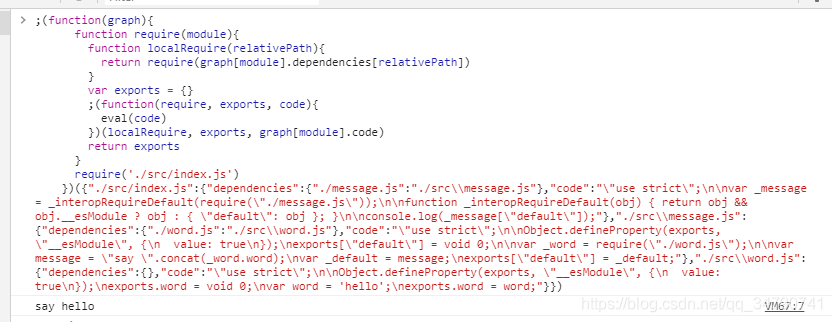
可以看到,完美的运行,并打印出了正确的字符串
最后,贴上完整的代码
const fs = require('fs') // 想要分析文件,需要用fs获取到文件内容
const path = require('path') // dependencies中的文件路径不可以是相对路径,因此需要path
const parser = require('@babel/parser') // 帮助我们分析代码
const traverse = require('@babel/traverse').default // 帮助我们对抽象语法树进行遍历
const babel = require('@babel/core') // 将原始代码打包编译成浏览器能够运行的代码

const moduleAnalyser = (filename) => { // 帮助我们分析模块
  const content = fs.readFileSync(filename, 'utf-8')
  const ast = parser.parse(content, {
    sourceType: 'module'
  }) // 抽象语法树AST
  const dependencies = {}
  traverse(ast, { // 对抽象语法树进行遍历
    ImportDeclaration ({ node }) { // 如果遇见类型为ImportDeclaration的元素,则执行这个函数
      const dirname = path.dirname(filename)
      const newFile = './' + path.join(dirname, node.source.value)
      dependencies[node.source.value] = newFile
    }
  })
  const { code } = babel.transformFromAst(ast, null, {
    presets: ['@babel/preset-env'] // babel插件的集合,常见的有将ES6转换为ES5的@babel/preset-env
  }) // 将ast语法树转换成一个对象,这个对象中有一个code字段,其中为编译生成的可以在浏览器上运行的代码
  return {
    filename,
    dependencies,
    code
  }
}

// 依赖图谱
const makeDependenciesGraph = (entry) => {
  const entryModule = moduleAnalyser(entry)
  const graphArray = [entryModule]
  for (let i = 0; i < graphArray.length; i++) {
    const item = graphArray[i]
    const { dependencies } = item
    if (dependencies) {
      for (let j in dependencies) {
        graphArray.push(
          moduleAnalyser(dependencies[j])
        )
      }
    }
  }
  // 现在graphArray依赖图谱是一个数组,后面打包时不方便,所以做一个格式上的转换
  const graph = {}
  graphArray.forEach(item => {
    graph[item.filename] = {
      dependencies: item.dependencies,
      code: item.code
    }
  })
  return graph
}

// 生成浏览器可运行的代码
const generateCode = (entry) => {
  const graph = JSON.stringify(makeDependenciesGraph(entry))
  return `
    ;(function(graph){
      function require(module){
        function localRequire(relativePath){
          return require(graph[module].dependencies[relativePath])
        }
        var exports = {}
        ;(function(require, exports, code){
          eval(code)
        })(localRequire, exports, graph[module].code)
        return exports
      }
      require('${entry}')
    })(${graph})
  `

}
const code = generateCode('./src/index.js')
console.log(code)
注小伙伴们学习愉快~
