文章目录
效果

Gitee
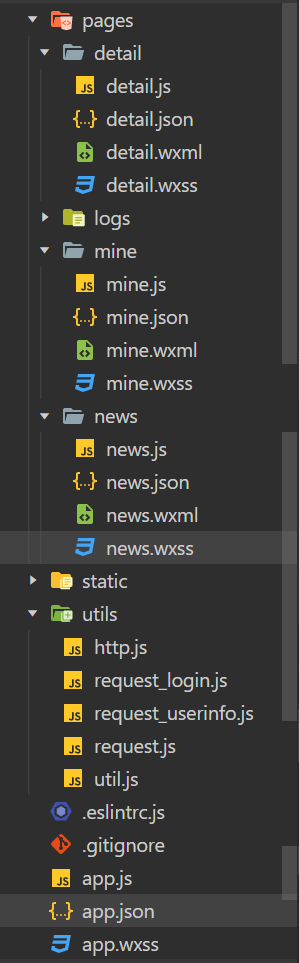
目录结构
app.json
{


  "pages":[
    "pages/news/news",
    "pages/mine/mine",
    "pages/detail/detail"
  ],
  "window":{


    "backgroundTextStyle":"light",
    "navigationBarBackgroundColor": "#fff",
    "navigationBarTitleText": "新闻网",
    "navigationBarTextStyle":"black",
    "onReachBottomDistance": 50
  },
  "tabBar": {


    "color":"#000",
    "selectedColor": "#ff0000",
    "list": [
      {


        "pagePath": "pages/news/news",
        "text": "新闻",
        "iconPath":"static/img/fen1.png",
        "selectedIconPath": "static/img/fen2.png"
      },

      {


        "pagePath": "pages/mine/mine",
        "text": "我的",
        "iconPath":"static/img/mine1.png",
        "selectedIconPath": "static/img/mine2.png"
      }
    ]
  },
  "style": "v2",
  "sitemapLocation": "sitemap.json"
}
首页

pages/news/news.wxml

<!--pages/news/news.wxml-->
<view class="news-box">
    <view class="header">
        <!-- 搜索框 -->
        <view class="search-box">
            <icon type="search"></icon>
            <input type="text" placeholder="搜索" bindconfirm="bindKeyconfirm"></input>
        </view>
    </view>

    <!-- 轮播图 -->
    <swiper indicator-dots="true" autoplay="true" interval="1000" duration="500" class="swiper-box">
        <!-- newsHotdata存放轮播图数据 -->
        <block wx:for="{

    {newsHotdata}}" wx:key="index">
            <!-- 绑定点击事件,,跳转到每一条新闻的详情页,使用data-把单项新闻的id传过去 -->
            <swiper-item bindtap="tapHandler" data-id="{

    {item.id}}">
                <image src='{

    {item.pic}}' mode=" widthFix"></image>
                <view class="txt">{

    {

    item.title}}</view>
            </swiper-item>
        </block>
    </swiper>

    <!-- 新闻列表 -->
    <!-- newsdataList存放新闻列表数据,绑定点击事件,跳转到每一条新闻的详情页,使用data-把单项新闻的id传过去 -->
    <view class="news-area" wx:for="{

    {newsdataList}}" wx:key="index" bindtap="tapHandler" data-id="{

    {item.id}}">
            <!-- 图片区域 -->
            <view class="pic-area">
                <image src="{

    {item.pic}}"></image>
            </view>
            <!-- 文字区域 -->
            <view class="content-area">
                <view class="title">{

    {

    item.title}}</view>
                <view class="desc">{

    {

    item.desn}}</view>
                <view class="bot">{

    {

    item.author}}</view>
            </view>
    </view>

    <!-- 没有数据时,显示 -->
    <view class="nomore" wx:if="page>last_page">
        没有更多数据了
    </view>
</view>
pages/news/news.wxss

pages/news/news.js

// pages/news/news.js
import {

    GetnewsHot,GetnewsList,GetnewsSearch} from '../..//utils/http'

Page({


    /**
     * 页面的初始数据
     */
    data: {


        newsHotdata: [],  //热点新闻列表
        newsdataList:[],  // 新闻列表
        page:1,   // 页码数
        last_page:2  // 最后一页的页码数
    },

    /**
     * 生命周期函数--监听页面加载
     */
    onLoad: function (options) {


        // 获取热点新闻的接口
        GetnewsHot(null).then((res) => {


            console.log('热点新闻', res);
            this.setData({


                newsHotdata: res.data,
            })
        });
         // 获取新闻列表
        this.getNewsList()
    },

    // 获取新闻列表
    getNewsList:function(){


        GetnewsList({

    page:this.data.page}).then((res)=>{


            console.log('新闻列表',res);
            let new_data = res.data.data
            this.setData({


                newsdataList: this.data.newsdataList.concat(new_data),
                last_page:res.data.last_page
            })
        })
    },

    // 回车搜索
    bindKeyconfirm: function (e) {


        // 搜索新闻的接口
        GetnewsSearch({

    keyword:e.detail.value}).then(res => {


            console.log('搜索新闻',res);
            this.setData({


                newsdataList: res.data.data,
            })
        })
    },

    // 跳转到详情页
    tapHandler(event){


        // 获取新闻id
        console.log(888,event);

        // 跳转到详情页,携带参数过去
        wx.navigateTo({


            url:"/pages/detail/detail?id="+event.currentTarget.dataset.id
         })
    },

    /**
     * 页面上拉触底事件的处理函数
     */
    onReachBottom: function () {


        console.log('触底啦');
        this.setData({


            page:this.data.page+1
          })
        // 加载下一页数据
        if(this.data.page<=this.data.last_page){


            console.log('this.data.page',this.data.page);
            this.getNewsList()
        }
    },
配置网络请求
utils/http.js
// 管理所有的请求
import ajax from './request'

let base_url = 'https://mpapi.iynn.cn/api/v1/'

// 首页热点新闻接口
export function GetnewsHot(data){


  return ajax(base_url+'news/hot','get',data)
}

// 首页新闻列表接口
export function GetnewsList(data){


  return ajax(base_url+'news','get',data)
}

// 首页新闻搜索接口
export function GetnewsSearch(data){


  return ajax(base_url+'news/search','get',data)
}

// 首页新闻详情接口
export function GetnewsDetail(data){


  return ajax(base_url+'news/'+data.id,'get')
}

// 登录接口
export function GetLogin(data){


  return ajax(base_url+'login','post',data)
}
utils/request.js
// 封装请求
  const  ajax = (url,method,data)=>{


  // 显示loading
   wx.showLoading({


     title: '加载中',
   })

   return new Promise((resolve,reject)=>{


     wx.request({


       url: url,
       data:data,
       method:method,
       header: {


         'content-type': 'application/json' // 默认值
       },
       success (res) {


         // console.log(res.data)
         resolve(res.data)
         // 隐藏loading
         wx.hideLoading()
       },
       fail(err){


         reject(err)
       }
     })
   })
}

export default ajax
utils/request_login.js
获取code,登录用的
const wxLogin = () => {


  return new Promise((reslove,reject) => {


    wx.login({


      success(res) {


        if (res.code) {


          reslove(res.code)
        }
        else {


          reject({

     message: "登录失败" })
        }
      },
      fail(err) {


        reject(err)
      }
    })
  })
}

export default wxLogin
utils/request_userinfo.js
获取用户基本信息:昵称,头像。。
const wxUserProfile = () => {


  return new Promise((reslove,reject) => {


    wx.getUserProfile({


      desc: '用于完善会员资料', // 声明获取用户个人信息后的用途,后续会展示在弹窗中,请谨慎填写
      success: (res) => {


        console.log(res);
        reslove(res.userInfo)

      }
    })
  })
}

export default wxUserProfile
详情页

pages/detail/detail.wxml
<!--pages/detail/detail.wxml-->
<view class="detail-box">
    <view class="title">
        {

   {newsdata.title}}
    </view>
    <view class="author">
        {

   {newsdata.author}}
    </view>
    <view class="info">
        <view class="info-innner">访问:{

   {newsdata.click}} | </view>
        <view class="info-innner">收藏:{

   {newsdata.fav}} | </view>
        <view class="info-innner">点赞:{

   {newsdata.like}}</view>
    </view>
    <view class="content">
        <view class="content-inner">{

   {newsdata.desn}}</view>
    </view>
    <view class="pic">
        <image src="{

     {newsdata.pic}}"></image>
    </view>
</view>
pages/detail/detail.js
// pages/detail/detail.js
import {

    GetnewsDetail} from '../../utils/http'
Page({


    data: {


        newsdata:{

    },  // 详情页数据
    },

    onLoad: function (options) {


        // 使用options获取导航携带的参数
        console.log('options',options);  //{id: "30"}

        // 获取详情页的接口
        GetnewsDetail({

    id:options.id}).then(res=>{


            console.log(888,res);
            this.setData({


                newsdata:res.data
            })
        })
    },
注意点:


我的页

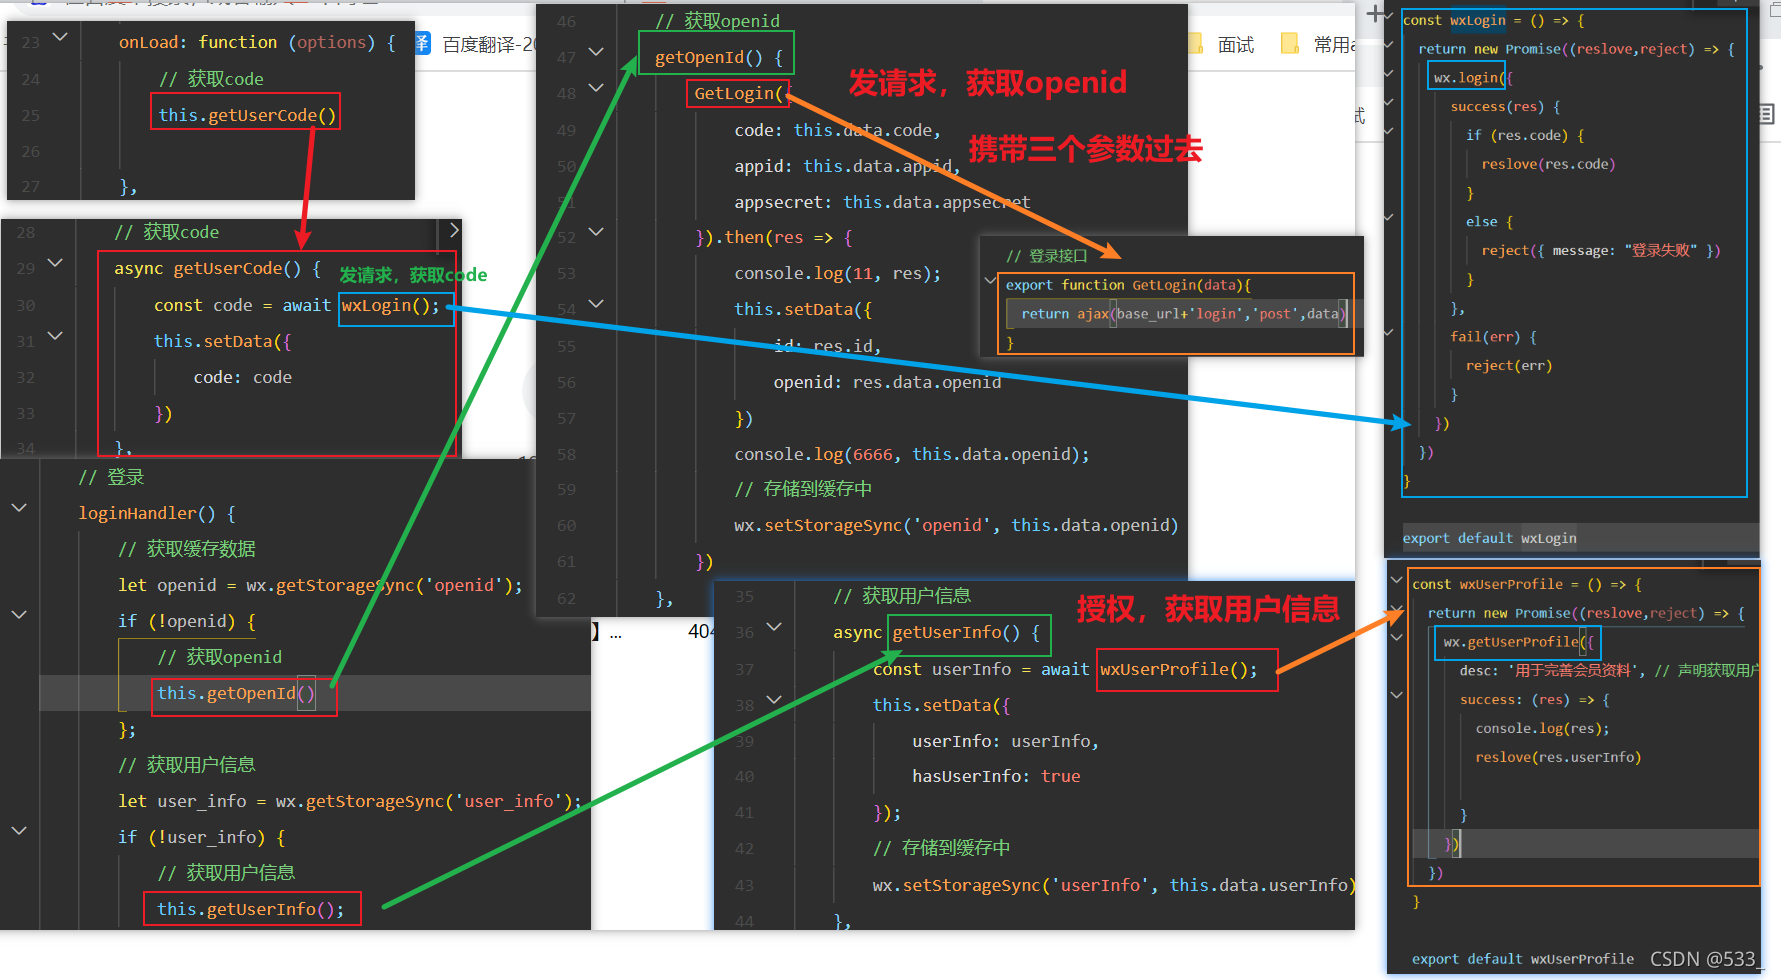
openid
是用户身份的标识符,为了方便开发者识别用户的。其是一个字符串,包含了数字和字母。
openid有一个特征,同一个用户在使用很多个应用的时候,每个应用获取到这个用户的openid值是不一样的。例如,张三在使用App1,App1程序获取到其openid可能是123456789,App2获取到张三的openid可能是234567890。
想要获取openid,需要code(调用wx.login的api获得code),appid、appsecret。. 将code与appid及appsecret(后端)三个参数一起去腾讯换openid【由后端去换】
【后端要做】在换取到openid之后,去数据库中判断该openid是否存在(判断当前这个用户是新用户还是老用户),如果在则直接登录,如果不在后端会往数据库中建立一个用户账号。最终返回给前端openid及用户在项目中标识符(一般是用户名或用户id号)
pages/mine/mine.wxml
<!--pages/mine/mine.wxml-->
<view class="mine-box">
    <view class="userinfo" >
        {

   {userInfo.nickName}}
    </view>
    <view class="login-info" bindtap="loginHandler">登录/注册</view>
</view>
pages/mine/mine.js

// pages/mine/mine.js
import {

    GetLogin} from '../../utils/http'
import wxLogin from '../../utils/request_login'
import wxUserProfile from '../../utils/request_userinfo'
Page({


    /**
     * 页面的初始数据
     */
    data: {


        code: '',  //code,请求wx.login获取到,用来获取openid的,
        appid: '。。',
        appsecret: '。。',
        id: '',
        openid: '',  //openid,登录用的
        userInfo:'', // 用户基本信息
        hasUserInfo: true
    },

    /**
     * 生命周期函数--监听页面加载
     */
    onLoad: function (options) {


        // 获取code
        this.getUserCode()

    },
    // 获取code
    async getUserCode() {


        const code = await wxLogin();
        this.setData({


            code: code
        })
    },
    // 获取用户信息
    async getUserInfo() {


        const userInfo = await wxUserProfile();
        this.setData({


            userInfo: userInfo,
            hasUserInfo: true
        });
        // 存储到缓存中
        wx.setStorageSync('userInfo', this.data.userInfo)
    },

    // 获取openid
    getOpenId() {


        GetLogin({


            code: this.data.code,
            appid: this.data.appid,
            appsecret: this.data.appsecret
        }).then(res => {


            console.log(11, res);
            this.setData({


                id: res.id,
                openid: res.data.openid
            })
            console.log(6666, this.data.openid);
            // 存储到缓存中
            wx.setStorageSync('openid', this.data.openid)
        })
    },
    // 登录
    loginHandler() {


        // 获取缓存数据
        let openid = wx.getStorageSync('openid');
        if (!openid) {


            // 获取openid
            this.getOpenId()
        };
        // 获取用户信息
        let user_info = wx.getStorageSync('user_info');
        if (!user_info) {


            // 获取用户信息
            this.getUserInfo();
        }
    },
分析