前言
这些天在做一个文件预览的功能,由于之前没有这方面的经验,因此在市面上找了一些这方面的资料,发现目前市面上主流的文件预览服务是由几家厂商提供的,做的比较好的有如永中软件,officeweb365等,不过你们都懂得,是要收费的,所以即便做的再好,我也只能观望观望,然后也百度了其他的一些做法,基本上都是利用flexmapper+swf来做的,这种做法最终我没有采用,因为要依赖的外部的东西实在是太多了,一个文件在线预览的服务真的要依赖那么多外部的服务吗?在网上搜索的同时,发现了一个开源项目,项目地址是点击打开链接。我要说明的是,这篇文章确实参考了其中某些实现思路,但还是有很多不同的地方,比如ppt文件的处理,比如利用map缓存等等,希望大家能仔细阅读之后再做出评论!
思路
这里说一下我的应用场景:给定一个网址,输入网址后立即显示预览文件。就这么一个简单的场景,文件的上传在这里就不讲了,重点要实现的是文件的预览,花了大概两个礼拜的时间终于把这个功能做得差不多了,在这里特此记录一下实现的过程以及中途遇到的问题。
步骤:1、先将文件下载到本地,存储到某个指定目录 2、进行文件转换,此处是重点 3、进行文件展示
主要步骤就三个,其中文件的转换是重点,因为此处涉及到文件的操作,我也在这步花了较长的时间。那么开始梳理实现的过程。
实现过程
首先,搭建一个springboot项目,搭建完毕后项目结构如图:
之后我们要做的是建立目录结构,如下图:
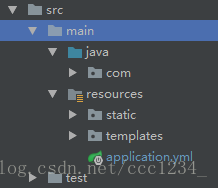
目录结构中static存放的是静态资源,templates中存放页面。其中配置文件里存放我们的配置信息:application.yml
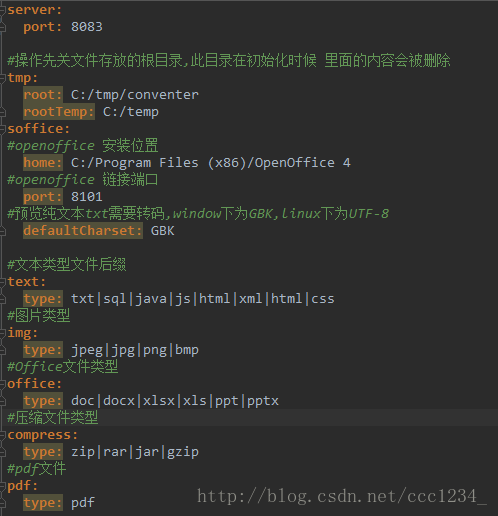
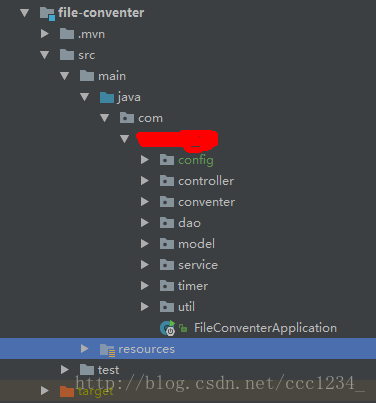
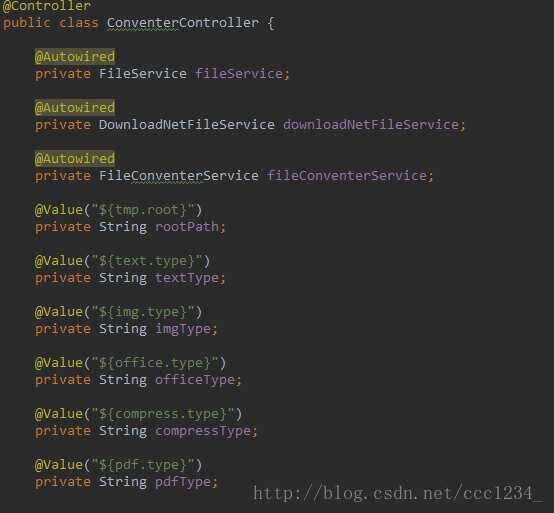
其中tmp:root下面是转换后文件的存放位置,rootTemp则是下载文件的临时存放位置,后续会有定时器定时删除该目录下的内容,soffice:home配置的是openoffice的安装目录,因为office文件的转换要用到openoffice。其中的type则是可以预览的文件类型。好了,搭建完毕之后开始搭建Service层,Dao层(可用可不用),Controller层。整体搭建完毕之后如下图:
相关依赖pom.xml
<?xml version="1.0" encoding="UTF-8"?>
<project xmlns="http://maven.apache.org/POM/4.0.0" xmlns:xsi="http://www.w3.org/2001/XMLSchema-instance"
	xsi:schemaLocation="http://maven.apache.org/POM/4.0.0 http://maven.apache.org/xsd/maven-4.0.0.xsd">
	<modelVersion>4.0.0</modelVersion>


	<name>file-conventer</name>
	<description>Demo project for Spring Boot</description>

	<parent>
		<groupId>org.springframework.boot</groupId>
		<artifactId>spring-boot-starter-parent</artifactId>
		<version>1.5.9.RELEASE</version>
		<relativePath/> <!-- lookup parent from repository -->
	</parent>

	<properties>
		<project.build.sourceEncoding>UTF-8</project.build.sourceEncoding>
		<project.reporting.outputEncoding>UTF-8</project.reporting.outputEncoding>
		<java.version>1.8</java.version>
	</properties>

	<dependencies>
		<dependency>
			<groupId>org.springframework.boot</groupId>
			<artifactId>spring-boot-starter-web</artifactId>
		</dependency>

		<dependency>
			<groupId>org.springframework.boot</groupId>
			<artifactId>spring-boot-starter-test</artifactId>
			<scope>test</scope>
		</dependency>
		<!-- jchardet检查文本字符编码 start -->
		<dependency>
			<groupId>net.sourceforge.jchardet</groupId>
			<artifactId>jchardet</artifactId>
			<version>1.0</version>
		</dependency>
		<!-- jchardet检查文本字符编码 end -->
		<dependency>
			<groupId>org.artofsolving.jodconverter</groupId>
			<artifactId>jodconverter-core</artifactId>
			<version>3.0.0</version>
		</dependency>
        <dependency>
            <groupId>org.apache.commons</groupId>
            <artifactId>commons-compress</artifactId>
            <version>1.11</version>
        </dependency>
		<!-- 解压(apache) -->
		<dependency>
			<groupId>org.apache.commons</groupId>
			<artifactId>commons-compress</artifactId>
			<version>1.9</version>
		</dependency>
		<!-- 解压(rar)-->
		<dependency>
			<groupId>com.github.junrar</groupId>
			<artifactId>junrar</artifactId>
			<version>0.7</version>
		</dependency>
		<dependency>
			<groupId>com.google.guava</groupId>
			<artifactId>guava</artifactId>
			<version>19.0</version>
		</dependency>
		<dependency>
			<groupId>commons-codec</groupId>
			<artifactId>commons-codec</artifactId>
			<version>2.0-SNAPSHOT</version>
		</dependency>
		<!--解压(zip4j) -->
		<dependency>
			<groupId>net.lingala.zip4j</groupId>
			<artifactId>zip4j</artifactId>
			<version>1.3.2</version>
		</dependency>
        <dependency>
            <groupId>org.springframework</groupId>
            <artifactId>spring-context-support</artifactId>
            <version>4.3.10.RELEASE</version>
        </dependency>
		<dependency>
			<groupId>org.freemarker</groupId>
			<artifactId>freemarker</artifactId>
			<version>2.3.25-incubating</version>
		</dependency>
		<!-- https://mvnrepository.com/artifact/net.sf.json-lib/json-lib -->
		<dependency>
			<groupId>net.sf.json-lib</groupId>
			<artifactId>json-lib</artifactId>
			<version>2.4</version>
		</dependency>
		<!-- https://mvnrepository.com/artifact/com.google.code.gson/gson -->
		<dependency>
			<groupId>com.google.code.gson</groupId>
			<artifactId>gson</artifactId>
			<version>2.3.1</version>
		</dependency>
		<!-- openoffice 相关依赖 -->
		<dependency>
			<groupId>commons-io</groupId>
			<artifactId>commons-io</artifactId>
			<version>1.4</version>
		</dependency>
		<dependency>
			<groupId>org.openoffice</groupId>
			<artifactId>juh</artifactId>
			<version>3.2.1</version>
		</dependency>
		<dependency>
			<groupId>org.openoffice</groupId>
			<artifactId>ridl</artifactId>
			<version>3.2.1</version>
		</dependency>
		<dependency>
			<groupId>org.openoffice</groupId>
			<artifactId>unoil</artifactId>
			<version>3.2.1</version>
		</dependency>
		<dependency>
			<!-- for the command line tool -->
			<groupId>commons-cli</groupId>
			<artifactId>commons-cli</artifactId>
			<version>1.1</version>
			<optional>true</optional>
		</dependency>
		<dependency>
			<groupId>org.hyperic</groupId>
			<artifactId>sigar</artifactId>
			<version>1.6.5.132</version>
			<optional>true</optional>
		</dependency>
		<dependency>
			<groupId>org.json</groupId>
			<artifactId>json</artifactId>
			<version>20090211</version>
			<optional>true</optional>
		</dependency>
		<dependency>
			<groupId>org.testng</groupId>
			<artifactId>testng</artifactId>
			<version>6.0.1</version>
			<scope>test</scope>
		</dependency>
	</dependencies>

	<build>
		<plugins>
			<plugin>
				<groupId>org.springframework.boot</groupId>
				<artifactId>spring-boot-maven-plugin</artifactId>
			</plugin>
		</plugins>
	</build>


</project>
项目开始,要做的第一件事是下载文件,这里下载文件有一个要注意的地方,打开HttpURLConnection的时候
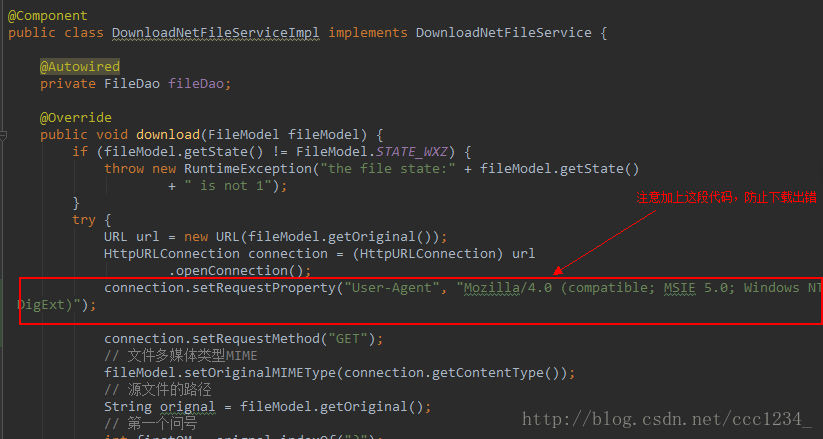
这里我没有截全,因为文件的下载在这篇文章里不是重点,所以在这里不做详细记录,只要最后将文件存储到临时目录就行了。
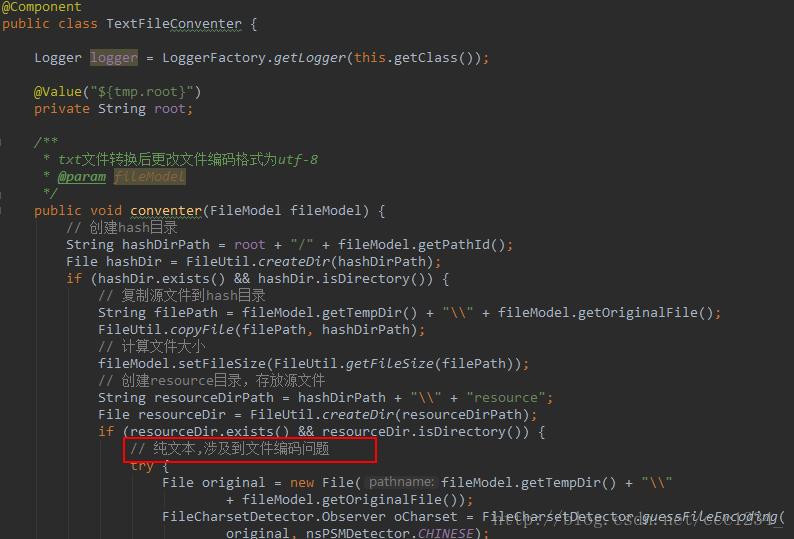
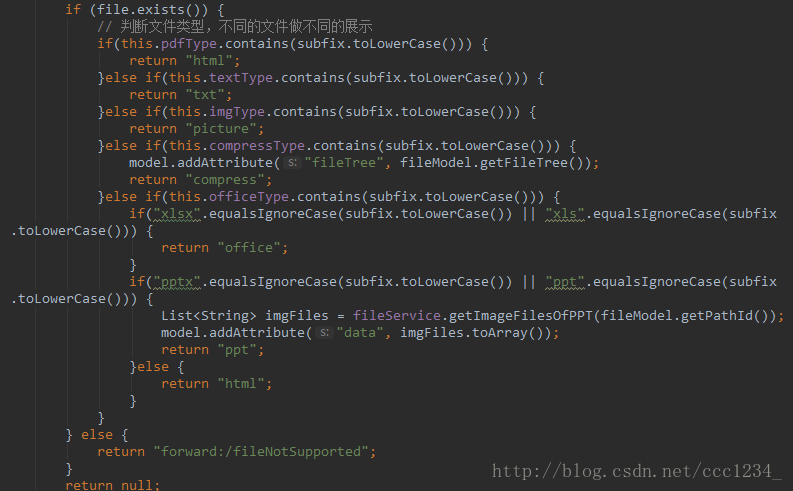
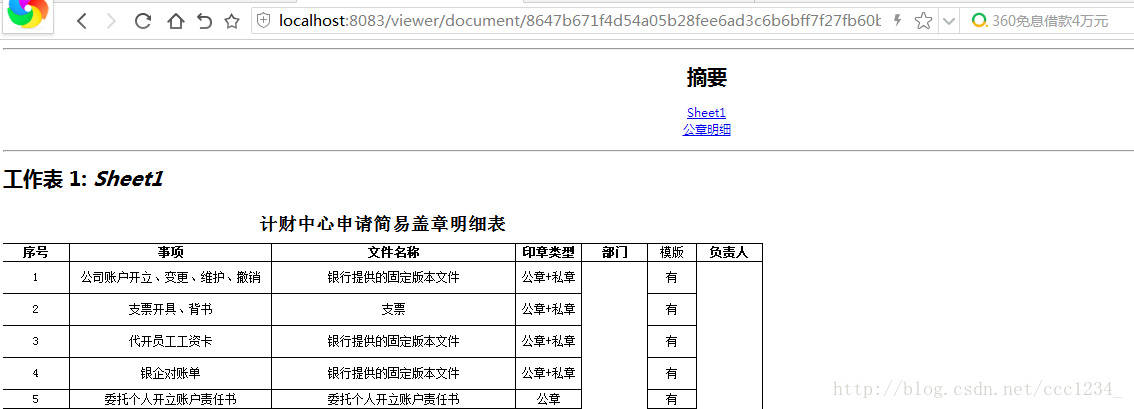
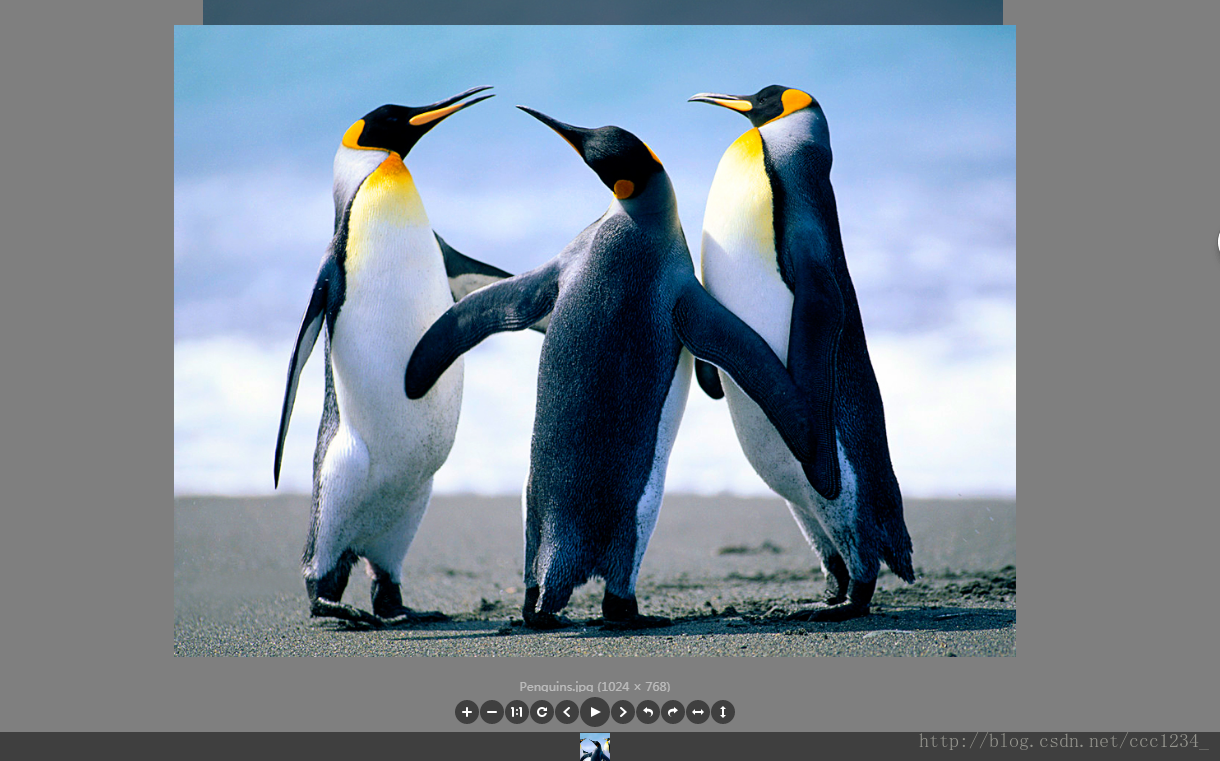
文件下载完之后在进行文章的转换,这里我的转换规则是:图片不进行转换,文本文件转换编码为utf-8, office文件选择将word文档转为pdf文件,xls表格和ppt文件转为html文件,因为表格和ppt文件转换为pdf格式之后不太美观,ppt转为html格式之后会变成许多张图片,那么后期的展示就是一个取本地图片数据的过程,前端再稍微配点样式就基本差不多了。那么对于压缩文件呢, 我选择的是先解压到本地,展示的时候运用Ztree插件(一个很轻大的文件展示插件)做前端的展示。这个在下文都会记录。因为涉及文件的操作,所以在这里一定要注意文件流的运用,用完了一定要及时关闭,还有文件的其他操作也要注意,比如文件地址的指向。当时我就是因为一个文件地址未仍指向一个操作中的目录导致后面临时文件的删除出错。
下面开始文件的转换,重点记录文本文件以及压缩文件的转换,当时在这花了较长时间,office文件的转换可以参照其他人写的。
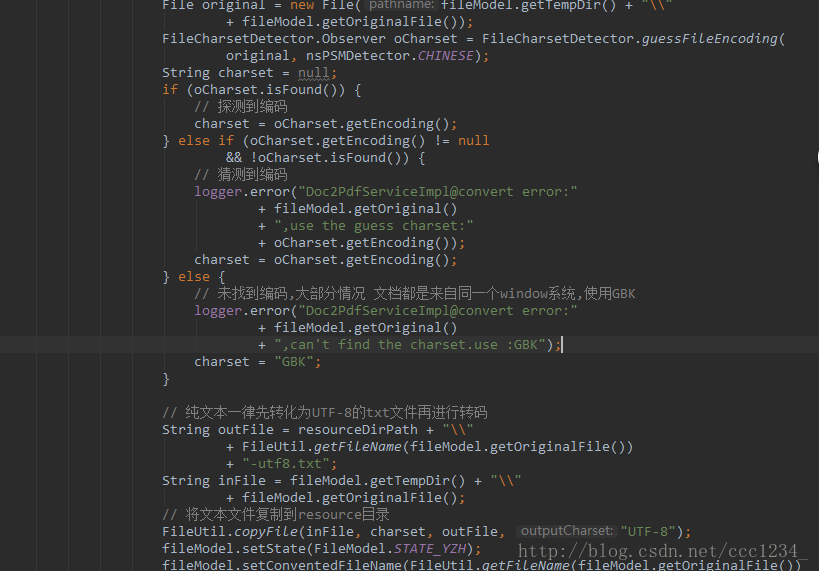
文本文件的转换(这里要注意的是文本文件涉及到文件的编码问题,这里采用文本编码探测器进行探测):
文本探测器如下:
import org.mozilla.intl.chardet.nsDetector;
import org.mozilla.intl.chardet.nsICharsetDetectionObserver;

import java.io.*;

/**
 * Created by asus on 2017/12/28.
 */
public class FileCharsetDetector {

    /**
     * 传入一个文件(File)对象,检查文件编码
     *
     * @param file
     *            File对象实例
     * @return 文件编码,若无,则返回null
     * @throws FileNotFoundException
     * @throws IOException
     */
    public static Observer guessFileEncoding(File file)
            throws FileNotFoundException, IOException {
        return guessFileEncoding(file, new nsDetector());
    }

    /**
     * <pre>
     * 获取文件的编码
     * @param file
     *            File对象实例
     * @param languageHint
     *            语言提示区域代码 @see #nsPSMDetector ,取值如下:
     *             1 : Japanese
     *             2 : Chinese
     *             3 : Simplified Chinese
     *             4 : Traditional Chinese
     *             5 : Korean
     *             6 : Dont know(default)
     * </pre>
     *
     * @return 文件编码,eg:UTF-8,GBK,GB2312形式(不确定的时候,返回可能的字符编码序列);若无,则返回null
     * @throws FileNotFoundException
     * @throws IOException
     */
    public static Observer guessFileEncoding(File file, int languageHint)
            throws FileNotFoundException, IOException {
        return guessFileEncoding(file, new nsDetector(languageHint));
    }

    /**
     * 获取文件的编码
     *
     * @param file
     * @param det
     * @return
     * @throws FileNotFoundException
     * @throws IOException
     */
    private static Observer guessFileEncoding(File file, nsDetector det)
            throws FileNotFoundException, IOException {
        // new Observer
        Observer observer = new Observer();
        // set Observer
        // The Notify() will be called when a matching charset is found.
        det.Init(observer);

        BufferedInputStream imp = new BufferedInputStream(new FileInputStream(
                file));
        byte[] buf = new byte[1024];
        int len;
        boolean done = false;
        boolean isAscii = false;

        while ((len = imp.read(buf, 0, buf.length)) != -1) {
            // Check if the stream is only ascii.
            isAscii = det.isAscii(buf, len);
            if (isAscii) {
                break;
            }
            // DoIt if non-ascii and not done yet.
            done = det.DoIt(buf, len, false);
            if (done) {
                break;
            }
        }
        imp.close();
        det.DataEnd();

        if (isAscii) {
            observer.encoding = "ASCII";
            observer.found = true;
        }

        if (!observer.isFound()) {
            String[] prob = det.getProbableCharsets();
            // // 这里将可能的字符集组合起来返回
            // for (int i = 0; i < prob.length; i++) {
            // if (i == 0) {
            // encoding = prob[i];
            // } else {
            // encoding += "," + prob[i];
            // }
            // }
            if (prob.length > 0) {
                // 在没有发现情况下,去第一个可能的编码
                observer.encoding = prob[0];
            } else {
                return null;
            }
        }
        return observer;
    }

    /**
     * @Description: 文件字符编码观察者,但判断出字符编码时候调用
     */
    public static class Observer implements nsICharsetDetectionObserver {

        /**
         * @Fields encoding : 字符编码
         */
        private String encoding = null;
        /**
         * @Fields found : 是否找到字符集
         */
        private boolean found = false;

        @Override
        public void Notify(String charset) {
            this.encoding = charset;
            this.found = true;
        }

        public String getEncoding() {
            return encoding;
        }

        public boolean isFound() {
            return found;
        }

        @Override
        public String toString() {
            return "Observer [encoding=" + encoding + ", found=" + found + "]";
        }
    }

}
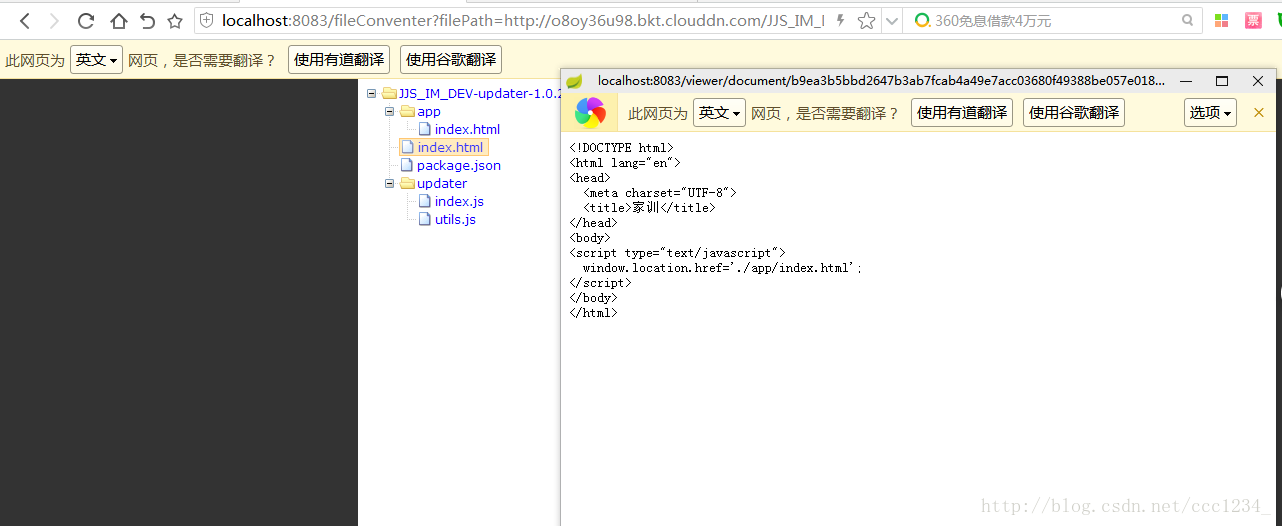
压缩文件转换(因为前端要生成文件树,所以在这里要先进行文件解压,在进行文件的读取,最终要生成的是一段字符串里面包含所有文件的信息):
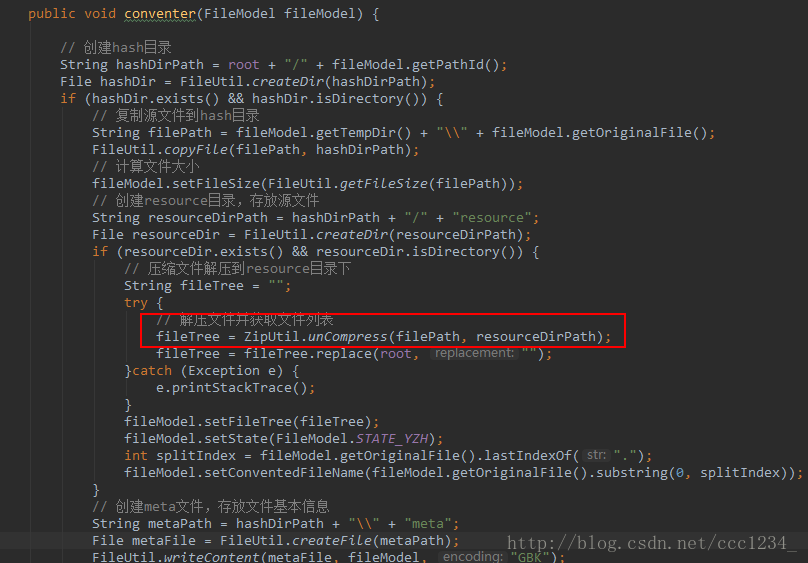
解压文件的操作这里也不详细记录了,很多网上的资料,这里记录一下文件树的生成,首先我们定义一个文件节点,里面包含子文件,文件名称,判断是否为文件夹以及文件绝对路径:
/**
     * 文件节点(区分文件上下级)
     */
    public static class FileNode{

        private String originName;
        private boolean directory;
        private String fullPath;

        private List<FileNode> childList;

        public FileNode(String originName, List<FileNode> childList, boolean directory, String fullPath) {
            this.originName = originName;
            this.childList = childList;
            this.directory = directory;
            this.fullPath = fullPath;

        }

        public String getFullPath() {
            return fullPath;
        }

        public void setFullPath(String fullPath) {
            this.fullPath = fullPath;
        }

        public List<FileNode> getChildList() {
            return childList;
        }

        public void setChildList(List<FileNode> childList) {
            this.childList = childList;
        }

        @Override
        public String toString() {
            try {
                return new ObjectMapper().writeValueAsString(this);
            } catch (JsonProcessingException e) {
                e.printStackTrace();
                return "";
            }
        }

        public String getOriginName() {
            return originName;
        }

        public void setOriginName(String originName) {
            this.originName = originName;
        }

        public boolean isDirectory() {
            return directory;
        }

        public void setDirectory(boolean directory) {
            this.directory = directory;
        }
    }


/**
     * 通过递归得到某一路径下所有的目录及其文件
     */
    public static List<FileNode> getFiles(String filePath){
        File root = new File(filePath);
        File[] files = root.listFiles();
        String originName = "";
        boolean isDirectory = false;
        String fullPath = "";

        List<FileNode> fileNodes = new ArrayList<>();
        for(File file:files){

            List<FileNode> childList = new ArrayList<>();

            if(file.isDirectory()){
                isDirectory = true;
                originName = file.getName();
                fullPath = file.getAbsolutePath();
                childList = getFiles(file.getPath());
            } else {
                originName = file.getName();
                isDirectory = false;
                fullPath = file.getAbsolutePath();
            }
            // 进行转义,否则json解析不了
            fullPath = fullPath.replace("\\", "/");
            FileNode fileNode = new FileNode(originName, childList, isDirectory, fullPath);
            fileNodes.add(fileNode);
        }
        return fileNodes;
}文件展示 :前面一直没有说Controller层如何写,这里开始说明
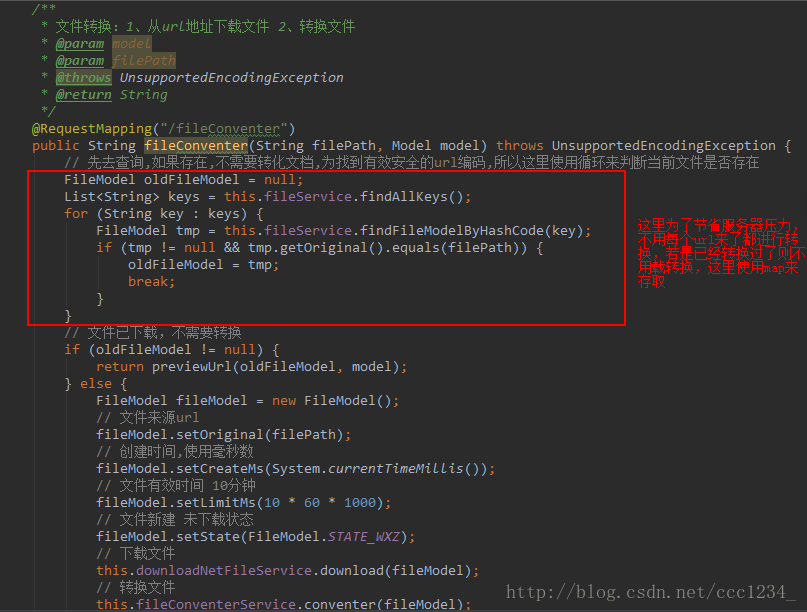
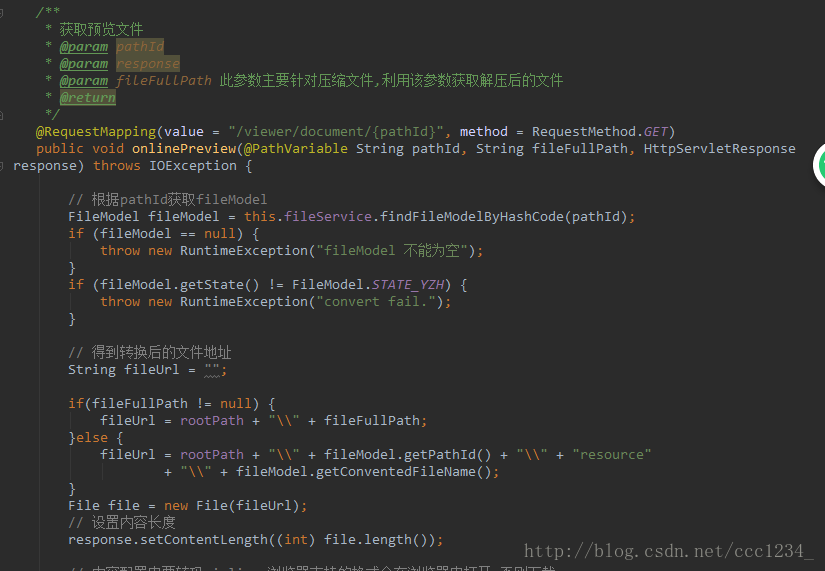
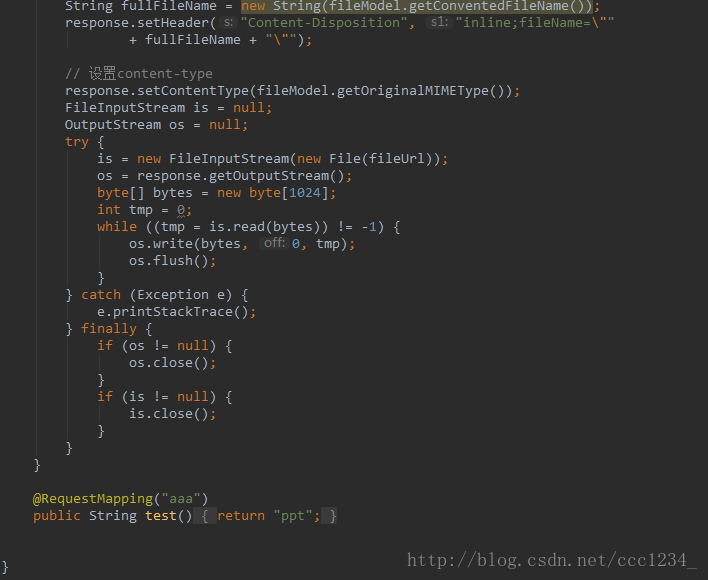
大体就是这样,说明一下,原理就是转换完文件之后再定位到文件存放的目录,将本地文件以流的方式输出到页面。
这样写完之后便可以写页面了,页面显示规则:1、图片的显示可以用viewer.js插件(一个图片显示器,支持主流的图片显示操作),我这里直接写到页面上,后续再加上。2、pdf文件的显示可以用pdf.js插件。3、压缩文件显示用Ztree插件。4、ppt文件的显示这里推荐一个开源js,个人觉得还不错,
点击打开链接。总体上就是这样。
每个人有所好,所以这里我只记录压缩文件的显示,加粗的部分表示与后台的交互:
<!DOCTYPE html>

<html lang="en">
<head>
    <link href="css/zTreeStyle.css" rel="stylesheet" type="text/css">
    <style type="text/css">
        html, body, div, span, applet, object, iframe, h1, h2, h3, h4, h5, h6, p, blockquote, pre, a, abbr, acronym, address, big, cite, code, del, dfn, em, font, img, ins, kbd, q, s, samp, small, strike, strong, sub, sup, tt, var, dl, dt, dd, ol, ul, li, fieldset, form, label, legend, table, caption, tbody, tfoot, thead, tr, th, td {
            margin: 0;padding: 0;border: 0;outline: 0;font-weight: inherit;font-style: inherit;font-size: 100%;font-family: inherit;vertical-align: baseline;}
        body {color: #2f332a;font: 15px/21px Arial, Helvetica, simsun, sans-serif;background: #f0f6e4 \9;}
        body{
            margin:0 auto;
            width: 600px;
            background-color: #333333;
            font-size: 4em;
        }
        h1, h2, h3, h4, h5, h6 {color: #2f332a;font-weight: bold;font-family: Helvetica, Arial, sans-serif;padding-bottom: 5px;}
        h1 {font-size: 24px;line-height: 34px;text-align: center;}
        h2 {font-size: 14px;line-height: 24px;padding-top: 5px;}
        h6 {font-weight: normal;font-size: 12px;letter-spacing: 1px;line-height: 24px;text-align: center;}
        a {color:#3C6E31;text-decoration: underline;}
        a:hover {background-color:#3C6E31;color:white;}
        input.radio {margin: 0 2px 0 8px;}
        input.radio.first {margin-left:0;}
        input.empty {color: lightgray;}
        code {color: #2f332a;}
        div.zTreeDemoBackground {width:600px;text-align:center;background-color: #ffffff;}
    </style>
</head>
<body>

<div class="zTreeDemoBackground left">
    <ul id="treeDemo" class="ztree"></ul>
</div>
</body>
<script type="text/javascript" src="js/jquery-3.0.0.min.js"></script>
<script type="text/javascript" src="js/jquery.ztree.core.js"></script>
<script type="text/javascript">

    var data = JSON.parse('${fileTree}');
    var setting = {
        view: {
            fontCss : {"color":"blue"},
            showLine: true
        },
        data: {
            key: {
                children: 'childList',
                name: 'originName'
            }
        },
        callback:{
            beforeClick:function (treeId, treeNode, clickFlag) {
                console.log("节点参数:treeId-" + treeId + "treeNode-"
                        + JSON.stringify(treeNode) + "clickFlag-" + clickFlag);
            },
            onClick:function (event, treeId, treeNode) {
                if (!treeNode.directory) {
                    /**实现窗口最大化**/
                    var fulls = "left=100,screenX=600,top=0,screenY=0,scrollbars=1";    //定义弹出窗口的参数
                    if (window.screen) {
                        var ah = screen.availHeight - 30;
                        var aw = (screen.availWidth - 10) / 2;
                        fulls += ",height=" + ah;
                        fulls += ",innerHeight=" + ah;
                        fulls += ",width=" + aw;
                        fulls += ",innerWidth=" + aw;
                        fulls += ",resizable"
                    } else {
                        fulls += ",resizable"; // 对于不支持screen属性的浏览器,可以手工进行最大化。 manually
                    }
                    // 传递文件路径到后台
                    var fileFullPath = treeNode.fullPath;
                    // 后台返回文件
                    window.open("viewer/document/${pathId}?fileFullPath=" + fileFullPath, "_blank",fulls);
                }
            }
        }
    };
    var height = 0;
    $(document).ready(function(){
        var treeObj = $.fn.zTree.init($("#treeDemo"), setting, data);
        treeObj.expandAll(true);
        height = getZtreeDomHeight();
        $(".zTreeDemoBackground").css("height", height);
    });

    /**
     *  计算ztreedom的高度
     */
    function getZtreeDomHeight() {
        return $("#treeDemo").height() > window.document.documentElement.clientHeight - 1
                ? $("#treeDemo").height() : window.document.documentElement.clientHeight - 1;
    }
    /**
     * 页面变化调整高度
     */
    window.onresize = function(){
        height = getZtreeDomHeight();
        $(".zTreeDemoBackground").css("height", height);
    }
    /**
     * 滚动时调整高度
     */
    window.onscroll = function(){
        height = getZtreeDomHeight();
        $(".zTreeDemoBackground").css("height", height);
    }
</script>
</html>
压缩文件:
文档:
文档:

报表:
PPT文件:

图片:
总结
个人项目可以采用和我一样的方式,写的有点乱,有问题欢迎在底部留言。虽然花了较多的时间,但最后的结果还是值得的,所以一定要多加思考,后期考虑整合到github上去。