Author | Shengdong Alibaba Cloud after-sales technical expert
Introduction : I don't know if you are aware of a reality: most of the time, we no longer use a system through the command line or visual window as before.
foreword
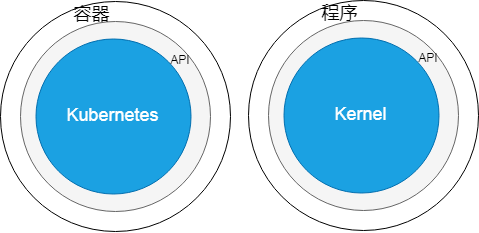
Now when we go to Weibo or online shopping, what we operate is not the device in front of us, but one cluster after another. Typically, such clusters have hundreds or thousands of nodes, each of which is a physical or virtual machine. Clusters are generally located away from users and located in data centers. In order for these nodes to cooperate with each other and provide consistent and efficient services to the outside world, the cluster needs an operating system. Kubernetes is such an operating system.

Comparing Kubernetes with a stand-alone operating system, Kubernetes is equivalent to the kernel. It is responsible for the management of cluster software and hardware resources, and provides a unified entrance to the outside world, through which users can use the cluster and communicate with the cluster.
The programs running on the cluster are very different from ordinary programs. Such procedures are "in a cage" procedures. It's unusual for them to go from being made, to being deployed, to being used. Only by digging deep into the root can we understand its essence.
The "Cage" Procedure
code
We used the go language to write a simple web server program app.go, which listens on port 2580. Accessing the root path of this service via http protocol, the service will return the string "This is a small app for kubernetes...".
package main
import (
        "github.com/gorilla/mux"
        "log"
        "net/http"
)
func about(w http.ResponseWriter, r *http.Request) {
        w.Write([]byte("This is a small app for kubernetes...\n"))
}
func main() {
        r := mux.NewRouter()
        r.HandleFunc("/", about)
        log.Fatal(http.ListenAndServe("0.0.0.0:2580", r))
}
Compile the program using the go build command, producing the app executable. This is an ordinary executable file that runs in the operating system and depends on the library files in the system.
# ldd app
linux-vdso.so.1 => (0x00007ffd1f7a3000)
libpthread.so.0 => /lib64/libpthread.so.0 (0x00007f554fd4a000)
libc.so.6 => /lib64/libc.so.6 (0x00007f554f97d000)
/lib64/ld-linux-x86-64.so.2 (0x00007f554ff66000)
"cage"
In order to make this program independent of the operating system's own library files, we need to make a container image, that is, an isolated runtime environment. A Dockerfile is a "recipe" for making container images. Our recipe has only two steps, download a base image of centos, and put the executable file of app in the /usr/local/bin directory of the image.
FROM centos
ADD app /usr/local/bin
address
The created image is stored locally, and we need to upload the image to the image repository. The mirror warehouse here is equivalent to the application store. We use Alibaba Cloud's image repository. After uploading, the image address is:
registry.cn-hangzhou.aliyuncs.com/kube-easy/app:latest
The image address can be split into four parts: repository address/namespace/image name: image version. Obviously, the image above the image, in the Alibaba Cloud Hangzhou Mirror Warehouse, uses the namespace kube-easy, and the image name:version is app:latest. At this point, we have an applet "in a cage" that can run on a Kubernetes cluster.
get in
Entrance
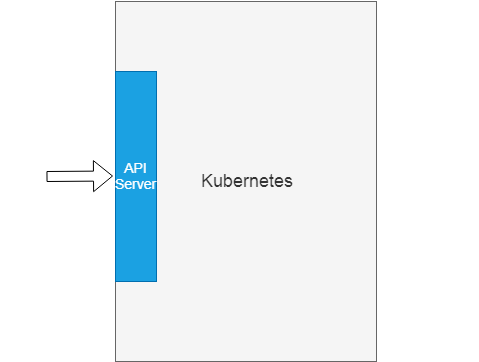
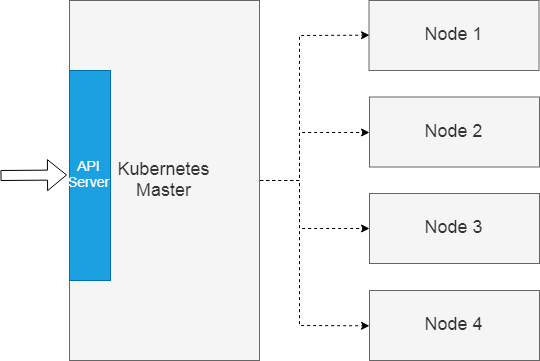
As an operating system, Kubernetes, like ordinary operating systems, has the concept of API. With the API, the cluster has an entrance; with the API, we can use the cluster to gain entry. The Kubernetes API is implemented as a component API Server that runs on cluster nodes. This component is a typical web server program that provides services by exposing the http(s) interface to the outside world.
Here we create an Alibaba Cloud Kubernetes cluster. Log in to the cluster management page, we can see the public network entry of API Server.
API Server 内网连接端点: https://xx.xxx.xxx.xxx:6443
Two-way digital certificate verification
The API Server component of Alibaba Cloud Kubernetes cluster uses CA-signed bidirectional digital certificate authentication to ensure secure communication between the client and the api server. This sentence is very convoluted, and it is not easy for beginners to understand, let's explain it in depth.
Conceptually, a digital certificate is a document used to authenticate participants in network communications. This is similar to the graduation certificate that the school issues to students. Between the school and the student, the school is a trusted third-party CA, and the student is a communication participant. If the society generally trusts the reputation of a school, then the graduation certificate issued by this school will also be recognized by the society. Participant certificates and CA certificates can be compared to graduation certificates and school licenses.
Here we have two types of participants, CA and common participants; correspondingly, we have two kinds of certificates, CA certificate and participant certificate; in addition, we have two kinds of relationships, certificate issuing relationship and trust relationship. These two relationships are crucial.
Let's look at the issuing relationship first. As shown in the figure below, we have two CA certificates and three participant certificates.
The top CA certificate has issued two certificates, one is the middle CA certificate and the other is the participant certificate on the right; the middle CA certificate has issued the lower two participant certificates. These six certificates are linked by the issuance relationship, forming a tree-like certificate issuance relationship diagram.
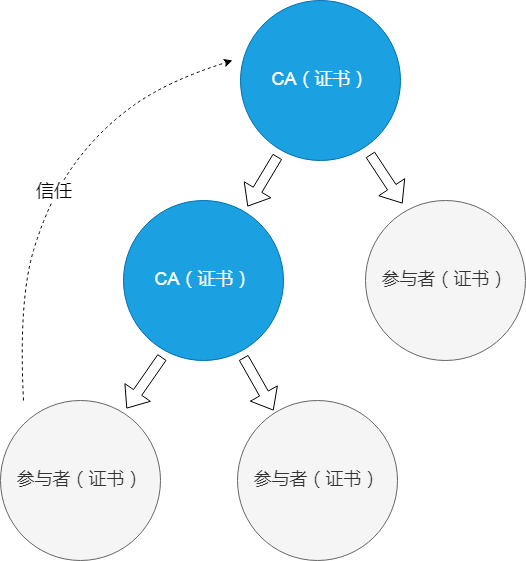
However, certificates, and the issuing relationship itself, do not guarantee that trusted communication can take place between participants. Take the above picture as an example, assuming that the participant on the far right is a website, and the participant on the far left is a browser. The browser believes the data of the website, not because the website has a certificate, nor because the certificate of the website is issued by a CA, but It's because the browser trusts the top CA, which is the trust relationship.
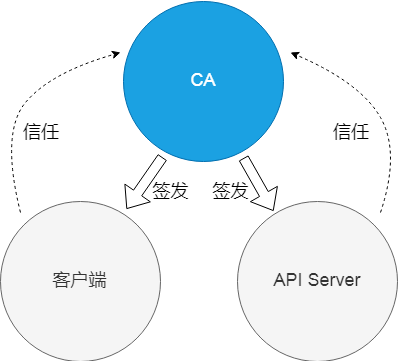
After understanding the CA (certificate), the participant (certificate), the issuing relationship, and the trust relationship, let's go back to "two-way digital certificate authentication based on CA signature". The client and the API Server, as common participants in communication, each have a certificate. These two certificates are issued by CA, we simply call them cluster CA and client CA. The client trusts the cluster CA, so it trusts the API Server with the certificate issued by the cluster CA; in turn, the API Server needs to trust the client CA before it is willing to communicate with the client.
Alibaba Cloud Kubernetes cluster, cluster CA certificate, and client CA certificate are actually one certificate, so we have such a relationship diagram.
KubeConfig file
Log in to the cluster management console, and we can get the KubeConfig file. This file includes client certificates, cluster CA certificates, and more. The certificate is encoded in base64, so we can decode the certificate using base64 tools and view the certificate text using openssl.
- First, the issuer CN of the client certificate is the cluster id c0256a3b8e4b948bb9c21e66b0e1d9a72, and the CN of the certificate itself is the sub-account 252771643302762862;
Certificate:
    Data:
        Version: 3 (0x2)
        Serial Number: 787224 (0xc0318)
    Signature Algorithm: sha256WithRSAEncryption
        Issuer: O=c0256a3b8e4b948bb9c21e66b0e1d9a72, OU=default, CN=c0256a3b8e4b948bb9c21e66b0e1d9a72
        Validity
            Not Before: Nov 29 06:03:00 2018 GMT
            Not After : Nov 28 06:08:39 2021 GMT
        Subject: O=system:users, OU=, CN=252771643302762862
- Second, the client certificate above can be verified by API Server only if the API Server trusts the client CA certificate. The kube-apiserver process specifies the client CA certificate it trusts through the client-ca-file parameter. The specified certificate is /etc/kubernetes/pki/apiserver-ca.crt. This file actually contains two client CA certificates, one of which is related to cluster management and control, which is not explained here, and the other one is as follows, its CN is the same as the issuer CN of the client certificate;
Certificate:
    Data:
        Version: 3 (0x2)
        Serial Number: 787224 (0xc0318)
    Signature Algorithm: sha256WithRSAEncryption
        Issuer: O=c0256a3b8e4b948bb9c21e66b0e1d9a72, OU=default, CN=c0256a3b8e4b948bb9c21e66b0e1d9a72
        Validity
            Not Before: Nov 29 06:03:00 2018 GMT
            Not After : Nov 28 06:08:39 2021 GMT
        Subject: O=system:users, OU=, CN=252771643302762862
- Again, the certificate used by the API Server is determined by the parameter tls-cert-file of kube-apiserver, which points to the certificate /etc/kubernetes/pki/apiserver.crt. The CN of this certificate is kube-apiserver, and the issuer is c0256a3b8e4b948bb9c21e66b0e1d9a72, which is the cluster CA certificate;
Certificate:
    Data:
        Version: 3 (0x2)
        Serial Number: 2184578451551960857 (0x1e512e86fcba3f19)
    Signature Algorithm: sha256WithRSAEncryption
        Issuer: O=c0256a3b8e4b948bb9c21e66b0e1d9a72, OU=default, CN=c0256a3b8e4b948bb9c21e66b0e1d9a72
        Validity
            Not Before: Nov 29 03:59:00 2018 GMT
            Not After : Nov 29 04:14:23 2019 GMT
        Subject: CN=kube-apiserver
- Finally, the client needs to verify the certificate of the API Server above, so the KubeConfig file contains its issuer, that is, the cluster CA certificate. Comparing the cluster CA certificate and the client CA certificate, we found that the two certificates are exactly the same, which is in line with our expectations.
Certificate:
    Data:
        Version: 3 (0x2)
        Serial Number: 786974 (0xc021e)
    Signature Algorithm: sha256WithRSAEncryption
        Issuer: C=CN, ST=ZheJiang, L=HangZhou, O=Alibaba, OU=ACS, CN=root
        Validity
            Not Before: Nov 29 03:59:00 2018 GMT
            Not After : Nov 24 04:04:00 2038 GMT
        Subject: O=c0256a3b8e4b948bb9c21e66b0e1d9a72, OU=default, CN=c0256a3b8e4b948bb9c21e66b0e1d9a72
access
After understanding the principle, we can do a simple test: use the certificate as a parameter, use curl to access the api server, and get the expected result.
# curl --cert ./client.crt --cacert ./ca.crt --key ./client.key https://xx.xx.xx.xxx:6443/api/
{
  "kind": "APIVersions",
  "versions": [
    "v1"
  ],
  "serverAddressByClientCIDRs": [
    {
      "clientCIDR": "0.0.0.0/0",
      "serverAddress": "192.168.0.222:6443"
    }
  ]
}
Living by merit
Two kinds of nodes, one task
As we said at the beginning, Kubernetes is an operating system that manages multiple nodes in a cluster. The roles of these nodes in the cluster do not have to be exactly the same. A Kubernetes cluster has two types of nodes: master nodes and worker nodes.
This distinction of roles is actually a division of labor: the master is responsible for the management of the entire cluster, and the cluster management components running on it mainly include the api server that implements the cluster entry; the worker nodes are mainly responsible for carrying common tasks.
In a Kubernetes cluster, tasks are defined as the concept of pods. A pod is an atomic unit of tasks that a cluster can carry. A pod is translated into a container group, which is actually a paraphrase, because a pod actually encapsulates multiple containerized applications. In principle, containers encapsulated in a pod should have a considerable degree of coupling.
Living by merit
The problem that the scheduling algorithm needs to solve is to choose a comfortable "home" for the pod, so that the tasks defined by the pod can be successfully completed on this node.
In order to achieve the goal of "selecting the best", the Kubernetes cluster scheduling algorithm adopts a two-step strategy:
- The first step is to exclude nodes that do not meet the conditions from all nodes, that is, pre-selection;
- The second step is to score the remaining nodes, and the one with the highest score wins, that is, the selection.
Next, we use the image made at the beginning of the article, create a pod, and analyze how this pod is scheduled to a certain cluster node through the log.
Pod configuration
First, we create the configuration file of the pod. The format of the configuration file is json. There are three key places in this configuration file, which are the mirror address, the command, and the port of the container.
{
    "apiVersion": "v1",
    "kind": "Pod",
    "metadata": {
        "name": "app"
    },
    "spec": {
        "containers": [
            {
                "name": "app",
                "image": "registry.cn-hangzhou.aliyuncs.com/kube-easy/app:latest",
                "command": [
                    "app"
                ],
                "ports": [
                    {
                        "containerPort": 2580
                    }
                ]
            }
        ]
    }
}
log level
The cluster scheduling algorithm is implemented as a system component running on the master node, similar to the api server. Its corresponding process name is kube-scheduler. kube-scheduler supports multiple levels of log output, but the community does not provide detailed log level documentation. Looking at the process of screening and scoring nodes by the scheduling algorithm, we need to increase the log level to 10, that is, add the parameter --v=10.
kube-scheduler --address=127.0.0.1 --kubeconfig=/etc/kubernetes/scheduler.conf --leader-elect=true --v=10
Create Pod
Using curl, with the certificate and pod configuration file as parameters, we can create the corresponding pod in the cluster by accessing the interface of the api server through a POST request.
# curl -X POST -H 'Content-Type: application/json;charset=utf-8' --cert ./client.crt --cacert ./ca.crt --key ./client.key https://47.110.197.238:6443/api/v1/namespaces/default/pods [email protected]
preselection
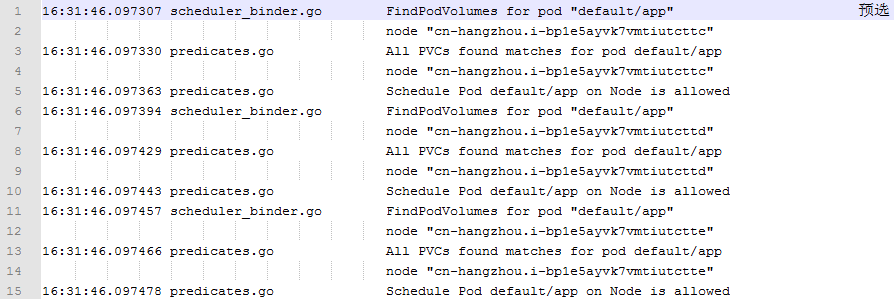
Pre-selection is the first step in Kubernetes scheduling. What this step needs to do is to filter out nodes that do not meet the conditions according to pre-defined rules. The pre-selection rules implemented by different versions of Kubernetes are very different, but the basic trend is that the pre-selection rules will become more and more abundant.
Two common preselection rules are PodFitsResourcesPred and PodFitsHostPortsPred. The former rule is used to judge whether the remaining resources on a node can meet the needs of the pod; the latter rule is used to check whether a port on a node has been used by other pods.
The following figure is the log of the preselection rules output by the scheduling algorithm when processing the test pod. This log records the execution of the preselection rule CheckVolumeBindingPred. Certain types of storage volumes (PVs) can only be mounted on one node. This rule can filter out nodes that do not meet the PV requirements of pods.
As you can see from the app's orchestration file, pods have no requirement for storage volumes, so this condition does not filter out nodes.
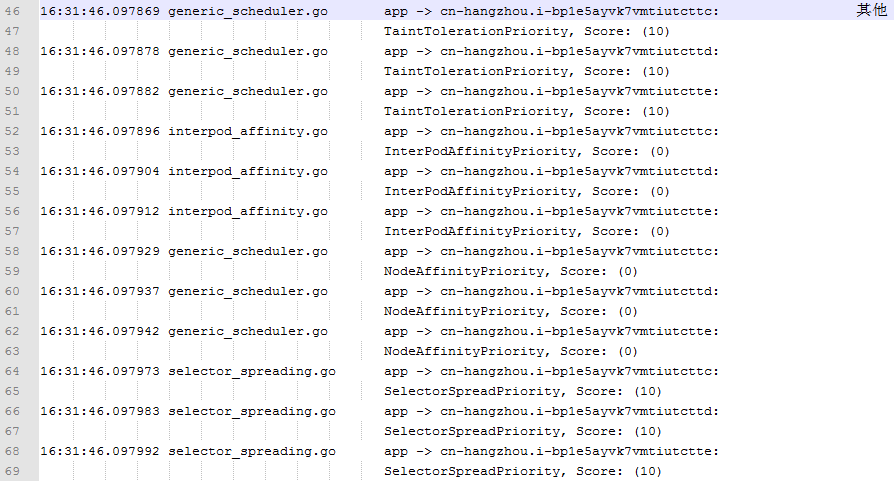
preferred
The second phase of the scheduling algorithm is the optimization phase. At this stage, kube-scheduler will score the remaining nodes according to the node's available resources and some other rules.
At present, CPU and memory are the two main resources considered by the scheduling algorithm, but the way of consideration is not simple. The more CPU and memory resources remaining, the higher the score.
The log records two calculations: LeastResourceAllocation and BalancedResourceAllocation.
- The former method calculates the ratio of the remaining CPU and memory of the node to the total CPU and memory after the pod is scheduled to the node. The higher the ratio, the higher the score;
- The second method calculates the absolute value of the difference between the CPU and memory usage ratios on the node. The larger the absolute value, the lower the score.
Of these two methods, one tends to select nodes with lower resource usage rates, and the second prefers to select nodes with similar resource usage ratios. These two methods have some contradictions, and ultimately rely on a certain weight to balance these two factors.

In addition to resources, the optimization algorithm will consider other factors, such as the affinity of pods with nodes, or if a service consists of multiple identical pods, the degree of dispersion of multiple pods on different nodes, which is guaranteed A high-availability strategy.
Score
Finally, the scheduling algorithm multiplies all score terms by their weights and sums them up to get the final score for each node. Because the test cluster uses the default scheduling algorithm, and the default scheduling algorithm sets the weights corresponding to the score items in the log to 1, so if the score items are recorded in the log, the final scores of the three nodes will be calculated. Should be 29, 28 and 29.

The reason why the score of the log output does not match the score we calculated by ourselves is because the log does not output all the score items. It is guessed that the missing policy should be NodePreferAvoidPodsPriority. The weight of this policy is 10000, and each node has a score of 10. , so the final log output result is obtained.
concluding remarks
In this article, we take a simple containerized web program as an example, and focus on analyzing how the client is authenticated by the Kubernetes cluster API Server and how the container application is dispatched to the appropriate node.
During the analysis, we deprecated some convenience tools, such as kubectl, or the console. We used some small experiments closer to the bottom, such as dismantling the KubeConfig file, and analyzing the scheduler log to analyze the working principle of the authentication and scheduling algorithms. Hope these are helpful for you to further understand the Kubernetes cluster.
Architect Growth Series Live

" Alibaba Cloud Native focuses on micro-services, serverless, containers, Service Mesh and other technical fields, focuses on popular cloud-native technology trends, and implements large-scale implementation of cloud-native, and is the technology circle that understands cloud-native developers best."