文章目录
- 2.1 synchronized 同步方法
- 2.1.1 方法内的变量为线程安全
- 2.1.2 实例变量非线程安全
- 2.1.3 多个对象多个锁
- 2.1.4 synchronized 方法与锁对象
- 2.1.5 脏读
- 2.1.6 synchronized 锁重入
- 2.1.7 出现异常,锁自动释放
- 2.1.8 同步不具有继承性
- 2.2 synchronized 同步语句块
- 2.2.1 synchronized 方法的弊端
- 2.2.2 synchronized 同步代码块的使用
- 2.2.3 用同步代码块解决同步方法的弊端
- 2.2.4 一半异步,一半同步
- 2.2.5 synchronized 代码块间的同步性
- 2.2.6 验证同步 synchronized(this) 代码块是锁定当前对象的
- 2.2.7 将任意对象作为对象监视器
- 2.2.8 细化验证 3 个结论
- 2.2.9 静态同步 synchronized 方法与 synchronized(class) 代码块
- 2.2.10 数据类型 String 的常量池特性
- 2.2.11 同步 synchronized 方法无限等待与解决
- 2.2.12 多线程的死锁
- 2.3.13 内置类与静态内置类
- 2.2.14 内置类与同步:实验1
- 2.2.15 内置类与同步:实验2
- 2.2.16 锁对象的改变
- 2.3 volatile 关键字
本章主要介绍 Java 多线程中的同步,也就是如何在 Java 语言中写出线程安全的程序,如何在 Java 语言中解决非线程安全的相关问题。
本章应该着重掌握如下技术点:
- synchronized 对象监视器为 Object 时的使用
- synchronized 对象监视器为 Class 时的使用
- 非线程安全是如何出现的
- 关键字 volatile 的主要作用
- 关键字 volatile 和 synchronized 的区别及使用情况
2.1 synchronized 同步方法
非线程安全:在多个线程对同一个对象中的实例变量进行并发访问时发生,产生的后果就是脏读,也就是读到的数据其实是被更改过的。
线程安全:获得的实例变量的值是经过同步处理的,不会出现脏读的现象。
2.1.1 方法内的变量为线程安全
”非线程安全“ 问题存在于 ”实例变量“ 中,如果是方法内部的私有变量,则不存在 ”非线程安全“ 问题。这是方法内部的变量是私有的特性造成的。
下面通过一个示例来演示,方法内部的变量不存在 ”非线程安全“ 问题:
-
创建一个公共类
public class HasSelfPrivateNum { public void addI(String username) { int num = 0; try { if(username.equals("a")) { num = 100; System.out.println("a set over !"); Thread.sleep(1000); } else { num = 200; System.out.println("b set over !"); } System.out.println(username + " num=" + num); } catch (InterruptedException e) { e.printStackTrace(); } } } -
创建两个自定义的线程类
public class MyThread1 extends Thread {
    private HasSelfPrivateNum hasSelfPrivateNum;

    public MyThread1(HasSelfPrivateNum hasSelfPrivateNum) {
        this.hasSelfPrivateNum = hasSelfPrivateNum;
    }

    @Override
    public void run() {
        super.run();
        hasSelfPrivateNum.addI("a");
    }
}
public class MyThread1_2 extends Thread { private HasSelfPrivateNum hasSelfPrivateNum; public MyThread1_2(HasSelfPrivateNum hasSelfPrivateNum) { this.hasSelfPrivateNum = hasSelfPrivateNum; } @Override public void run() { super.run(); hasSelfPrivateNum.addI("b"); } } -
测试类
public class MyThread1Test {
    public static void main(String[] args) {
        HasSelfPrivateNum hasSelfPrivateNum = new HasSelfPrivateNum();
        MyThread1 myThread1 = new MyThread1(hasSelfPrivateNum);
        myThread1.start();
        MyThread1_2 myThread1_2 = new MyThread1_2(hasSelfPrivateNum);
        myThread1_2.start();
    }
}
运行结果
扫描二维码关注公众号,回复: 10013530 查看本文章
a set over !
b set over !
b num=200
a num=100
2.1.2 实例变量非线程安全
如果多个线程共同访问一个对象中的实例变量,则有可能出现 “非线程安全” 问题。
如果访问的对象有多个实例变量,则运行结果有可能出现交叉的情况。
如果访问的对象仅有一个实例变量,则有可能出现覆盖的情况。
下面通过一个示例来演示:
-
创建一个公共类
public class HasSelfPrivateNum2 { private int num = 0; public void addI(String username) { try { if(username.equals("a")) { num = 100; System.out.println("a set over !"); Thread.sleep(1000); } else { num = 200; System.out.println("b set over !"); } System.out.println(username + " num=" + num); } catch (InterruptedException e) { e.printStackTrace(); } } } -
创建两个自定义的线程类
public class MyThread2 extends Thread {
    private HasSelfPrivateNum2 HasSelfPrivateNum2;

    public MyThread2(HasSelfPrivateNum2 HasSelfPrivateNum2) {
        this.HasSelfPrivateNum2 = HasSelfPrivateNum2;
    }

    @Override
    public void run() {
        super.run();
        HasSelfPrivateNum2.addI("a");
    }
}
public class MyThread2_2 extends Thread { private HasSelfPrivateNum2 HasSelfPrivateNum2; public MyThread2_2(HasSelfPrivateNum2 HasSelfPrivateNum2) { this.HasSelfPrivateNum2 = HasSelfPrivateNum2; } @Override public void run() { super.run(); HasSelfPrivateNum2.addI("b"); } } -
测试类
public class MyThread2Test {
    public static void main(String[] args) {
        HasSelfPrivateNum2 hasSelfPrivateNum2 = new HasSelfPrivateNum2();
        MyThread2 myThread2 = new MyThread2(hasSelfPrivateNum2);
        myThread2.start();
        MyThread2_2 myThread2_2 = new MyThread2_2(hasSelfPrivateNum2);
        myThread2_2.start();
    }
}
运行结果
a set over !
b set over !
b num=200
a num=200
2.1.3 多个对象多个锁
下面看一个示例:
-
创建一个公共类
public class HasSelfPrivateNum3 { private int num = 0; synchronized public void addI(String username) { try { if(username.equals("a")) { num = 100; System.out.println("a set over !"); Thread.sleep(1000); } else { num = 200; System.out.println("b set over !"); } System.out.println(username + " num=" + num); } catch (InterruptedException e) { e.printStackTrace(); } } } -
创建两个自定义的线程类
public class MyThread3 extends Thread {
    private HasSelfPrivateNum3 HasSelfPrivateNum3;

    public MyThread3(HasSelfPrivateNum3 HasSelfPrivateNum3) {
        this.HasSelfPrivateNum3 = HasSelfPrivateNum3;
    }

    @Override
    public void run() {
        super.run();
        HasSelfPrivateNum3.addI("a");
    }
}
public class MyThread3_2 extends Thread { private HasSelfPrivateNum3 HasSelfPrivateNum3; public MyThread3_2(HasSelfPrivateNum3 HasSelfPrivateNum3) { this.HasSelfPrivateNum3 = HasSelfPrivateNum3; } @Override public void run() { super.run(); HasSelfPrivateNum3.addI("b"); } } -
测试类
public class MyThread3Test {
    public static void main(String[] args) {
        HasSelfPrivateNum3 hasSelfPrivateNum3 = new HasSelfPrivateNum3();
        HasSelfPrivateNum3 hasSelfPrivateNum3_2 = new HasSelfPrivateNum3();
        MyThread3 myThread3 = new MyThread3(hasSelfPrivateNum3);
        myThread3.start();
        MyThread3_2 myThread3_2 = new MyThread3_2(hasSelfPrivateNum3_2);
        myThread3_2.start();
    }
}
运行结果
a set over !
b set over !
b num=200
a num=100
分析:上面两个线程分别访问同一个类的两个不同实例的相同名称的同步方法,效果却是以异步的方式运行的。这是因为关键字 synchronized 取得的锁都是对象锁,如果多个线程访问多个对象,则 JVM 会创建多个锁。
2.1.4 synchronized 方法与锁对象
下面通过一个示例来证明前面说的线程锁的是对象:
-
创建一个公共类
public class MyObject { public void methodA() { try { System.out.println("begin methodA threadName = " + Thread.currentThread().getName()); Thread.sleep(1000); System.out.println("end"); } catch (InterruptedException e) { e.printStackTrace(); } } } -
创建两个自定义的线程类
public class MyThread4 extends Thread {
    private MyObject myObject;

    public MyThread4(MyObject myObject) {
        this.myObject = myObject;
    }

    @Override
    public void run() {
        super.run();
        myObject.methodA();
    }
}
public class MyThread4_2 extends Thread { private MyObject myObject; public MyThread4_2(MyObject myObject) { this.myObject = myObject; } @Override public void run() { super.run(); myObject.methodA(); } } -
测试类
public class MyThread4Test {
    public static void main(String[] args) {
        MyObject myObject = new MyObject();
        MyThread4 myThread4 = new MyThread4(myObject);
        myThread4.setName("A");
        myThread4.start();
        MyThread4_2 myThread4_2 = new MyThread4_2(myObject);
        myThread4.setName("B");
        myThread4_2.start();
    }
}
运行结果
begin methodA threadName = A
begin methodA threadName = B
end
end
分析:从打印结果可以看出,两个线程可同时进入没上锁的方法 methodA
接下来把 methodA 上锁,再次运行:
-
给 methodA 上锁
public class MyObject { synchronized public void methodA() { try { System.out.println("begin methodA threadName = " + Thread.currentThread().getName()); Thread.sleep(1000); System.out.println("end"); } catch (InterruptedException e) { e.printStackTrace(); } } } -
运行结果
begin methodA threadName = A
end
begin methodA threadName = B
end
分析:线程调用上锁的方法 methodA 是排队运行的
那其他方法在被调用时,会是什么效果呢?如何查看 Lock 锁对象的效果呢?
下面通过一个示例来演示:
-
创建一个公共类
public class MyObject2 { synchronized public void methodA() { try { System.out.println("begin methodA threadName = " + Thread.currentThread().getName()); Thread.sleep(1000); System.out.println("end"); } catch (InterruptedException e) { e.printStackTrace(); } } public void methodB() { try { System.out.println("begin methodB threadName = " + Thread.currentThread().getName()); Thread.sleep(1000); System.out.println("end"); } catch (InterruptedException e) { e.printStackTrace(); } } } -
创建两个自定义的线程类
public class MyThread5 extends Thread {
    private MyObject2 myObject2;

    public MyThread5(MyObject2 myObject2) {
        this.myObject2 = myObject2;
    }

    @Override
    public void run() {
        super.run();
        myObject2.methodA();
    }
}
public class MyThread5_2 extends Thread { private MyObject2 myObject2; public MyThread5_2(MyObject2 myObject2) { this.myObject2 = myObject2; } @Override public void run() { super.run(); myObject2.methodB(); } } -
测试类
public class MyThread5Test {
    public static void main(String[] args) {
        MyObject2 myObject2 = new MyObject2();
        MyThread5 myThread5 = new MyThread5(myObject2);
        myThread5.setName("A");
        myThread5.start();
        MyThread5_2 myThread5_2 = new MyThread5_2(myObject2);
        myThread5_2.setName("B");
        myThread5_2.start();
    }
}
运行结果
begin methodA threadName = A
begin methodB threadName = B
end
end
分析:A 线程先持有了 myObject2 对象的 Lock 锁,B 线程可以以异步的方式调用 myObject2 对象中的非 synchronized 类型的方法
继续实验,给 methodB 上锁,再次运行:
-
给 methodB 上锁
public class MyObject2 { synchronized public void methodA() { try { System.out.println("begin methodA threadName = " + Thread.currentThread().getName()); Thread.sleep(1000); System.out.println("end"); } catch (InterruptedException e) { e.printStackTrace(); } } synchronized public void methodB() { try { System.out.println("begin methodB threadName = " + Thread.currentThread().getName()); Thread.sleep(1000); System.out.println("end"); } catch (InterruptedException e) { e.printStackTrace(); } } } -
运行结果
begin methodA threadName = A
end
begin methodB threadName = B
end
分析:A 线程先持有了 myObject2 对象的 Lock 锁,B 线程如果在这时调用 myObject2 对象中的 synchronized 类型的方法则需等待,也就是同步
2.1.5 脏读
在实现多个线程调用同一个方法时,为了避免数据出现交叉的情况,使用 synchronized 关键字来进行同步。虽然在赋值时进行了同步,但是在取值时可能出现一些想不到的意外,这种情况就是脏读。发送脏读的情况是在读取实例变量时,此值已经被其他线程更改过了。
下面通过一个实例来演示脏读的情况:
-
创建一个公共类
public class PublicVar { private String username = "A"; private String password = "AA"; synchronized public void setValue(String username, String password) { try { this.username = username; Thread.sleep(5000); this.password = password; System.out.println("setValue method name =" + Thread.currentThread().getName() + " username = " + username + " password = " + password); } catch (InterruptedException e) { e.printStackTrace(); } } public void getValue() { System.out.println("getValue method name =" + Thread.currentThread().getName() + " username = " + username + " password = " + password); } } -
创建自定义的线程类
public class MyThread6 extends Thread { private PublicVar publicVar; public MyThread6(PublicVar publicVar) { this.publicVar = publicVar; } @Override public void run() { super.run(); publicVar.setValue("B","BB"); } } -
测试类
public class MyThread6Test {
    public static void main(String[] args) {
        try {
            PublicVar publicVar = new PublicVar();
            MyThread6 myThread6 = new MyThread6(publicVar);
            myThread6.start();
            Thread.sleep(1000);
            publicVar.getValue();
        } catch (InterruptedException e) {
            e.printStackTrace();
        }
    }
}
运行结果
getValue method name =main username = B password = AA
setValue method name =Thread-0 username = B password = BB
分析:出现脏读是因为 public void getValue() 方法不是同步的,所以可以在任意的时候进行调用,解决办法方然就是加上同步 synchronized 关键字。
2.1.6 synchronized 锁重入
**关键字 synchronized 拥有锁重入的功能, 也就是使用 synchronized 的时候,当一个线程得到一个对象的锁后,再次请求此对象是是可以再次得到该对象的锁。**这也证明在一个 synchronized 方法/块的内部调用本类的其他 synchronized 方法/块时,是永远可以得到锁的。
下面通过一个示例演示:
-
创建一个公共类
public class Service { synchronized public void service1() { System.out.println("service1"); this.service2(); } synchronized public void service2() { System.out.println("service2"); this.service3(); } synchronized public void service3() { System.out.println("service3"); } } -
创建自定义的线程类
public class MyThread7 extends Thread { private Service service; public MyThread7(Service service) { this.service = service; } @Override public void run() { super.run(); service.service1(); } } -
测试类
public class MyThread7Test {
    public static void main(String[] args) {
        Service service = new Service();
        MyThread7 myThread7 = new MyThread7(service);
        myThread7.start();
    }
}
运行结果
service1
service2
service3
当存在父子类继承关系时,子类完全可以通过 ”可重入锁“ 调用父类的同步方法,下面通过一个实例演示:
-
创建一个父类和一个子类
public class Main {
    public int i = 10;
    synchronized public void operateIMainMethod() {
        i--;
        System.out.println("main print i: " + i);
    }
}
public class Sub extends Main { synchronized public void operateISubMethod() { while (i > 0) { i--; System.out.println("sub print i: " + i); this.operateIMainMethod(); } } } -
创建自定义的线程类
public class MyThread8 extends Thread { @Override public void run() { super.run(); Sub sub = new Sub(); sub.operateISubMethod(); } } -
测试类
public class MyThread8Test {
    public static void main(String[] args) {
        MyThread8 myThread8 = new MyThread8();
        myThread8.start();
    }
}
运行结果
sub print i: 9
main print i: 8
sub print i: 7
main print i: 6
sub print i: 5
main print i: 4
sub print i: 3
main print i: 2
sub print i: 1
main print i: 0
2.1.7 出现异常,锁自动释放
当一个线程执行的代码出现异常时,其所持有的锁会自动释放。
下面通过一个示例来演示:
-
创建一个公共类
public class Service2 { synchronized public void testMethod() { if (Thread.currentThread().getName() == "A") { System.out.println("thread A run time: " + System.currentTimeMillis()); int i = 1/0; } else { System.out.println("thread B run time: " + System.currentTimeMillis()); } } } -
创建两个自定义的线程类
public class MyThread9 extends Thread {
    private Service2 service2;

    public MyThread9(Service2 service2) {
        this.service2 = service2;
    }

    @Override
    public void run() {
        super.run();
        service2.testMethod();
    }
}
public class MyThread9_2 extends Thread{ private Service2 service2; public MyThread9_2(Service2 service2) { this.service2 = service2; } @Override public void run() { super.run(); service2.testMethod(); } } -
测试类
public class MyThread9Test {
    public static void main(String[] args) {
        try {
            Service2 service2 = new Service2();
            MyThread9 myThread9 = new MyThread9(service2);
            myThread9.setName("A");
            myThread9.start();
            Thread.sleep(500);
            MyThread9_2 myThread9_2 = new MyThread9_2(service2);
            myThread9_2.setName("B");
            myThread9_2.start();
        } catch (InterruptedException e) {
            e.printStackTrace();
        }
    }
}
运行结果
thread A run time: 1574394712072
Exception in thread "A" java.lang.ArithmeticException: / by zero
	at Service2.testMethod(Service2.java:5)
	at MyThread9.run(MyThread9.java:11)
thread B run time: 1574394712572
2.1.8 同步不具有继承性
同步不具有继承性。
下面通过一个示例来演示:
-
创建一个父类和一个子类
public class Main2 {
    synchronized public void serviceMethod() {
        try {
            System.out.println("main2 begin thread name = " + Thread.currentThread().getName() + " begin time = " + System.currentTimeMillis());
            Thread.sleep(2000);
            System.out.println("main2 end thread name = " + Thread.currentThread().getName() + " end time = " + System.currentTimeMillis());
        } catch (InterruptedException e) {
            e.printStackTrace();
        }
    }
}
public class Sub2 extends Main2 { public void serviceMethod() { try { System.out.println("sub2 begin thread name = " + Thread.currentThread().getName() + " begin time = " + System.currentTimeMillis()); Thread.sleep(2000); System.out.println("sub2 end thread name = " + Thread.currentThread().getName() + " end time = " + System.currentTimeMillis()); super.serviceMethod(); } catch (InterruptedException e) { e.printStackTrace(); } } } -
创建自定义的线程类
public class MyThread10 extends Thread { private Sub2 sub2; public MyThread10(Sub2 sub2) { this.sub2 = sub2; } @Override public void run() { super.run(); sub2.serviceMethod(); } } -
测试类
public class MyThread10Test {
    public static void main(String[] args) {
        Sub2 sub2 = new Sub2();
        MyThread10 myThread10 = new MyThread10(sub2);
        myThread10.setName("A");
        myThread10.start();
        MyThread10 myThread10_2 = new MyThread10(sub2);
        myThread10_2.setName("B");
        myThread10_2.start();
    }
}
运行结果
sub2 begin thread name = A begin time = 1574396491420
sub2 begin thread name = B begin time = 1574396491420
sub2 end thread name = B end time = 1574396493420
sub2 end thread name = A end time = 1574396493420
main2 begin thread name = B begin time = 1574396493420
main2 end thread name = B end time = 1574396495421
main2 begin thread name = A begin time = 1574396495421
main2 end thread name = A end time = 1574396497421
分析:线程 A 和 线程 B 在异步调用 Sub2 的 serviceMethod() 方法
接下来在 Sub2 的 serviceMethod() 方法上加上 synchronized 关键字后,再次运行:
sub2 begin thread name = A begin time = 1574397046198
sub2 end thread name = A end time = 1574397048199
main2 begin thread name = A begin time = 1574397048199
main2 end thread name = A end time = 1574397050199
sub2 begin thread name = B begin time = 1574397050199
sub2 end thread name = B end time = 1574397052199
main2 begin thread name = B begin time = 1574397052199
main2 end thread name = B end time = 1574397054199
分析:线程 A 和 线程 B 在同步调用 Sub2 的 serviceMethod() 方法
2.2 synchronized 同步语句块
用关键字 synchronized 声明方法在某些情况下是有弊端的,比如 A 线程调用同步方法执行一个较长时间的任务,那么 B 线程必须等待比较长的时间。这种情况下可以尝试使用 synchronized 同步代码块来解决问题。
synchronized 方法是对当前对象进行加锁,而 synchronized 代码块是对某一个对象进行加锁。
2.2.1 synchronized 方法的弊端
下面用一个示例来演示 synchronized 方法的弊端:
-
创建一个公共类
public class Task { private String getData1; private String getData2; synchronized public void doLongTimeTask() { try { System.out.println("begin task"); Thread.sleep(3000); getData1 = " 长时间处理任务后从远程返回的值1,threadName = " + Thread.currentThread().getName(); getData2 = " 长时间处理任务后从远程返回的值2,threadName = " + Thread.currentThread().getName(); System.out.println(getData1); System.out.println(getData2); System.out.println("end task"); } catch (InterruptedException e) { e.printStackTrace(); } } } -
创建一个工具类
public class CommonUtils { public static long beginTime1; public static long beginTime2; public static long endTime1; public static long endTime2; } -
创建两个自定义的线程类
public class MyThread1 extends Thread {
    private Task task;

    public MyThread1(Task task) {
        this.task = task;
    }

    @Override
    public void run() {
        super.run();
        CommonUtils.beginTime1 = System.currentTimeMillis();
        task.doLongTimeTask();
        CommonUtils.endTime1 = System.currentTimeMillis();
    }
}
public class MyThread1_2 extends Thread { private Task task; public MyThread1_2(Task task) { this.task = task; } @Override public void run() { super.run(); CommonUtils.beginTime2 = System.currentTimeMillis(); task.doLongTimeTask(); CommonUtils.endTime2 = System.currentTimeMillis(); } } -
测试类
public class MyThread1Test {
    public static void main(String[] args) {
        Task task = new Task();
        MyThread1 myThread1 = new MyThread1(task);
        myThread1.start();
        MyThread1_2 myThread1_2 = new MyThread1_2(task);
        myThread1_2.start();
        try {
            Thread.sleep(10000);
        } catch (InterruptedException e) {
            e.printStackTrace();
        }
        long beginTime = CommonUtils.beginTime1;
        if (CommonUtils.beginTime1 > CommonUtils.beginTime2) {
            beginTime = CommonUtils.beginTime2;
        }
        long endTime = CommonUtils.endTime1;
        if (CommonUtils.endTime1 < CommonUtils.endTime2) {
            endTime = CommonUtils.endTime2;
        }
        System.out.println("耗时:" + (endTime - beginTime)/1000 + " 秒");
    }
}
运行结果
begin task
 长时间处理任务后从远程返回的值1,threadName = Thread-0
 长时间处理任务后从远程返回的值2,threadName = Thread-0
end task
begin task
 长时间处理任务后从远程返回的值1,threadName = Thread-1
 长时间处理任务后从远程返回的值2,threadName = Thread-1
end task
耗时:6 秒
分析:在使用 synchronized 关键字来声明方法 synchronized public void doLongTimeTask() 时,从运行时间上来看,弊端很明显
2.2.2 synchronized 同步代码块的使用
当两个并发线程访问同一个对象 Object 中的 synchronized(this) 同步代码块时,一段时间只能有一个线程被执行,另一个线程必须等待当前线程执行完这个代码块后才执行该代码块。
下面通过一个示例来演示 synchronized 同步代码块的使用:
-
创建一个公共类
public class ObjectService { public void serviceMethod() { try { synchronized (this) { System.out.println("begin time = "+ System.currentTimeMillis()); Thread.sleep(2000); System.out.println("end time = "+ System.currentTimeMillis()); } } catch (InterruptedException e) { e.printStackTrace(); } } } -
创建两个自定义的线程类
public class MyThread2 extends Thread {
    private ObjectService objectService;

    public MyThread2(ObjectService objectService) {
        this.objectService = objectService;
    }

    @Override
    public void run() {
        super.run();
        objectService.serviceMethod();
    }
}
public class MyThread2_2 extends Thread { private ObjectService objectService; public MyThread2_2(ObjectService objectService) { this.objectService = objectService; } @Override public void run() { super.run(); objectService.serviceMethod(); } } -
测试类
public class MyThread2Test {
    public static void main(String[] args) {
        ObjectService objectService = new ObjectService();
        MyThread2 myThread2 = new MyThread2(objectService);
        myThread2.start();
        MyThread2_2 myThread2_2 = new MyThread2_2(objectService);
        myThread2_2.start();
    }
}
运行结果
begin time = 1574418400128
end time = 1574418402128
begin time = 1574418402128
end time = 1574418404129
2.2.3 用同步代码块解决同步方法的弊端
上面介绍了 synchronized 同步代码块的使用,但执行的效率还是没有提高,如何使用 synchronized 同步代码块解决同步方法的弊端呢?
下面通过一个示例来演示使用 synchronized 同步代码块解决同步方法的弊端:
-
修改 2.2.1 中的公共类
public class Task { private String getData1; private String getData2; public void doLongTimeTask() { try { System.out.println("begin task"); Thread.sleep(3000); String privateGetData1 = " 长时间处理任务后从远程返回的值1,threadName = " + Thread.currentThread().getName(); String privateGetData2 = " 长时间处理任务后从远程返回的值2,threadName = " + Thread.currentThread().getName(); synchronized (this) { getData1 = privateGetData1; getData2 = privateGetData2; } System.out.println(getData1); System.out.println(getData2); System.out.println("end task"); } catch (InterruptedException e) { e.printStackTrace(); } } } -
再次运行,得到运行结果如下
begin task
begin task
 长时间处理任务后从远程返回的值1,threadName = Thread-0
 长时间处理任务后从远程返回的值2,threadName = Thread-1
end task
 长时间处理任务后从远程返回的值1,threadName = Thread-1
 长时间处理任务后从远程返回的值2,threadName = Thread-1
end task
耗时:3 秒
分析:当一个线程访问 object 的一个 synchronized(this) 同步代码块时,另一个线程仍然可以访问该 object 对象中的非 synchronized(this) 同步代码块
2.2.4 一半异步,一半同步
下面一个实验说明:不在 synchronized 代码块中就是异步执行,在 synchronized 代码块中就是同步执行
-
创建一个公共类
public class Task2 { public void doLongTimeTask() { for (int i = 0; i < 10; i++) { System.out.println("no synchronized threadName = " + Thread.currentThread().getName() + " i = " + i); } synchronized (this) { for (int i = 0; i < 10; i++) { System.out.println("synchronized threadName = " + Thread.currentThread().getName() + " i = " + i); } } } } -
创建两个自定义的线程类
public class MyThread3 extends Thread {
    private Task2 task2;

    public MyThread3(Task2 task2) {
        this.task2 = task2;
    }

    @Override
    public void run() {
        super.run();
        task2.doLongTimeTask();
    }
}
public class MyThread3_2 extends Thread { private Task2 task2; public MyThread3_2(Task2 task2) { this.task2 = task2; } @Override public void run() { super.run(); task2.doLongTimeTask(); } } -
测试类
public class MyThread3Test {
    public static void main(String[] args) {
        Task2 task2 = new Task2();
        MyThread3 myThread3 = new MyThread3(task2);
        myThread3.start();
        MyThread3_2 myThread3_2 = new MyThread3_2(task2);
        myThread3_2.start();
    }
}
运行结果
no synchronized threadName = Thread-0 i = 0
no synchronized threadName = Thread-0 i = 1
no synchronized threadName = Thread-0 i = 2
no synchronized threadName = Thread-0 i = 3
no synchronized threadName = Thread-1 i = 0
no synchronized threadName = Thread-1 i = 1
no synchronized threadName = Thread-1 i = 2
no synchronized threadName = Thread-1 i = 3
no synchronized threadName = Thread-1 i = 4
no synchronized threadName = Thread-1 i = 5
no synchronized threadName = Thread-1 i = 6
no synchronized threadName = Thread-1 i = 7
no synchronized threadName = Thread-1 i = 8
no synchronized threadName = Thread-1 i = 9
synchronized threadName = Thread-1 i = 0
synchronized threadName = Thread-1 i = 1
synchronized threadName = Thread-1 i = 2
synchronized threadName = Thread-1 i = 3
synchronized threadName = Thread-1 i = 4
synchronized threadName = Thread-1 i = 5
synchronized threadName = Thread-1 i = 6
no synchronized threadName = Thread-0 i = 4
synchronized threadName = Thread-1 i = 7
no synchronized threadName = Thread-0 i = 5
synchronized threadName = Thread-1 i = 8
synchronized threadName = Thread-1 i = 9
no synchronized threadName = Thread-0 i = 6
no synchronized threadName = Thread-0 i = 7
no synchronized threadName = Thread-0 i = 8
no synchronized threadName = Thread-0 i = 9
synchronized threadName = Thread-0 i = 0
synchronized threadName = Thread-0 i = 1
synchronized threadName = Thread-0 i = 2
synchronized threadName = Thread-0 i = 3
synchronized threadName = Thread-0 i = 4
synchronized threadName = Thread-0 i = 5
synchronized threadName = Thread-0 i = 6
synchronized threadName = Thread-0 i = 7
synchronized threadName = Thread-0 i = 8
synchronized threadName = Thread-0 i = 9
2.2.5 synchronized 代码块间的同步性
当一个线程访问 object 的一个 synchronized(this) 同步代码块时,其他线程对 object 中所有其它 synchronized(this) 同步代码块的访问将被阻塞。这说明 synchronized 使用的 “对象监视器” 是一个。
下面通过一个示例来演示:
-
创建一个公共类
public class ObjectService2 { public void serviceMethodA() { try { synchronized (this) { System.out.println("A begin time = " + System.currentTimeMillis()); Thread.sleep(1000); System.out.println("A end time = " + System.currentTimeMillis()); } } catch (InterruptedException e) { e.printStackTrace(); } } public void serviceMethodB() { synchronized (this) { System.out.println("B begin time = " + System.currentTimeMillis()); System.out.println("B end time = " + System.currentTimeMillis()); } } } -
创建两个自定义的线程类
public class MyThread4 extends Thread {
    private ObjectService2 objectService2;

    public MyThread4(ObjectService2 objectService2) {
        this.objectService2 = objectService2;
    }

    @Override
    public void run() {
        super.run();
        objectService2.serviceMethodA();
    }
}
public class MyThread4_2 extends Thread { private ObjectService2 objectService2; public MyThread4_2(ObjectService2 objectService2) { this.objectService2 = objectService2; } @Override public void run() { super.run(); objectService2.serviceMethodB(); } } -
测试类
public class MyThread4Test {
    public static void main(String[] args) {
        ObjectService2 objectService2 = new ObjectService2();
        MyThread4 myThread4 = new MyThread4(objectService2);
        myThread4.start();
        MyThread4_2 myThread4_2 = new MyThread4_2(objectService2);
        myThread4_2.start();
    }
}
运行结果
A begin time = 1574423146307
A end time = 1574423147309
B begin time = 1574423147309
B end time = 1574423147309
分析:两个同步代码块按顺序执行
2.2.6 验证同步 synchronized(this) 代码块是锁定当前对象的
和 synchronized 方法一样,synchronized(this) 代码块也是锁定当前对象的
下面通过一个示例来演示:
-
创建一个公共类
public class Task3 { public void otherMethod() { System.out.println("run otherMethod..."); } public void doLongTimeTask() { try { synchronized (this) { for (int i = 0; i < 10; i++){ System.out.println(i); Thread.sleep(500); } } } catch (InterruptedException e) { e.printStackTrace(); } } } -
创建两个自定义的线程类
public class MyThread5 extends Thread {
    private Task3 task3;

    public MyThread5(Task3 task3) {
        this.task3 = task3;
    }

    @Override
    public void run() {
        super.run();
        task3.doLongTimeTask();
    }
}
public class MyThread5_2 extends Thread { private Task3 task3; public MyThread5_2(Task3 task3) { this.task3 = task3; } @Override public void run() { super.run(); task3.otherMethod(); } } -
测试类
public class MyThread5Test {
    public static void main(String[] args) {
        Task3 task3 = new Task3();
        MyThread5 myThread5 = new MyThread5(task3);
        myThread5.start();
        MyThread5_2 myThread5_2 = new MyThread5_2(task3);
        myThread5_2.start();
    }
}
运行结果
0
run otherMethod...
1
2
3
4
5
6
7
8
9
分析:myThread5 线程先持有了 Task3 对象的 Lock 锁,myThread5_2 线程可以以异步的方式调用 Task3 对象中的非 synchronized 类型的方法 otherMethod()
接下来把 Task3 对象中的非 synchronized 类型的方法 otherMethod() 上锁,再次运行:
-
把 Task3 对象中的非 synchronized 类型的方法 otherMethod() 上锁
public class Task3 { synchronized public void otherMethod() { System.out.println("run otherMethod..."); } public void doLongTimeTask() { try { synchronized (this) { for (int i = 0; i < 10; i++){ System.out.println(i); Thread.sleep(500); } } } catch (InterruptedException e) { e.printStackTrace(); } } } -
再次运行,运行结果如下
0
1
2
3
4
5
6
7
8
9
run otherMethod...
分析:synchronized(this) 代码块和 synchronized 方法同步执行,这说明和 synchronized 方法一样,synchronized(this) 代码块也是锁定当前对象的
2.2.7 将任意对象作为对象监视器
在前面的学习中,使用 synchronized(this) 格式来同步代码块,其实 Java 还支持对 “任意对象” 作为 “对象监视器” 来实现同步的功能。这个 “任意对象” 大多数是实例变量及方法的参数,使用格式为 synchronized(非 this 对象)。
在多个线程持有 “对象监视器” 为同一个对象的前提下,同一时间只有一个线程可以执行 synchronized(非 this 对象 x) 同步代码块中的代码,下面通过一个示例来演示:
-
创建一个公共类
public class Service { private String username; private String password; private String anyString = new String(); public void setUsernameAndPassword(String username, String password) { try { synchronized (anyString) { System.out.println("threadName = " + Thread.currentThread().getName() +" begin time = " + System.currentTimeMillis()); this.username = username; Thread.sleep(3000); this.password = password; System.out.println("threadName = " + Thread.currentThread().getName() +" end time = " + System.currentTimeMillis()); } } catch (InterruptedException e) { e.printStackTrace(); } } } -
创建两个自定义的线程类
public class MyThread6 extends Thread {
    private Service service;

    public MyThread6(Service service) {
        this.service = service;
    }

    @Override
    public void run() {
        super.run();
        service.setUsernameAndPassword("A","AA");
    }
}
public class MyThread6_2 extends Thread { private Service service; public MyThread6_2(Service service) { this.service = service; } @Override public void run() { super.run(); service.setUsernameAndPassword("B","BB"); } } -
测试类
public class MyThread6Test {
    public static void main(String[] args) {
        Service service = new Service();
        MyThread6 myThread6 = new MyThread6(service);
        myThread6.setName("A");
        myThread6.start();
        MyThread6_2 myThread6_2 = new MyThread6_2(service);
        myThread6_2.setName("B");
        myThread6_2.start();
    }
}
运行结果
threadName = A begin time = 1574427244475
threadName = A end time = 1574427247476
threadName = B begin time = 1574427247476
threadName = B end time = 1574427250476
使用 synchronized(非 this 对象 x) 同步代码块时,对象监视器必须是同一个对象,否则运行的结果就是异步调用了,下面通过一个示例来演示:
-
修改 Service 类
public class Service { private String username; private String password; public void setUsernameAndPassword(String username, String password) { try { String anyString = new String(); synchronized (anyString) { System.out.println("threadName = " + Thread.currentThread().getName() + " begin time = " + System.currentTimeMillis()); this.username = username; Thread.sleep(3000); this.password = password; System.out.println("threadName = " + Thread.currentThread().getName() + " end time = " + System.currentTimeMillis()); } } catch (InterruptedException e) { e.printStackTrace(); } } } -
再次运行,运行结果如下
threadName = A begin time = 1574428254678
threadName = B begin time = 1574428254679
threadName = A end time = 1574428257680
threadName = B end time = 1574428257681
锁非 this 对象具有一定的优点:如果一个类中有很多个 synchronized 同步方法,这时虽然能实现同步,但会受到阻塞,所以影响运行效率;但如果使用同步代码块锁非 this 对象,则 synchronized(非 this 对象) 代码块的程序与 synchronized 同步方法是异步调用的。不与其他锁 this 同步方法争抢 this 锁,则可以大大提高运行效率。
下面通过一个示例来演示 synchronized(非 this 对象) 与 synchronized 同步方法是异步调用的:
-
创建一个公共类
public class Service2 { private String anyString = new String(); public void a() { try { synchronized (anyString) { System.out.println("a begin"); Thread.sleep(3000); System.out.println("a end"); } } catch (InterruptedException e) { e.printStackTrace(); } } synchronized public void b() { System.out.println("b begin"); System.out.println("b end"); } } -
创建两个自定义的线程类
public class MyThread7 extends Thread {
    private Service2 service2;

    public MyThread7(Service2 service2) {
        this.service2 = service2;
    }

    @Override
    public void run() {
        super.run();
        service2.a();
    }
}
public class MyThread7_2 extends Thread { private Service2 service2; public MyThread7_2(Service2 service2) { this.service2 = service2; } @Override public void run() { super.run(); service2.b(); } } -
测试类
public class MyThread7Test {
    public static void main(String[] args) {
        Service2 service2 = new Service2();
        MyThread7 myThread7 = new MyThread7(service2);
        myThread7.start();
        MyThread7_2 myThread7_2 = new MyThread7_2(service2);
        myThread7_2.start();
    }
}
运行结果
a begin
b begin
b end
a end
分析:由于对象监视器不同,所以运行结果就是异步的
使用 “synchronized(非 this 对象 x)同步代码块" 格式也可以解决 ”脏读问题“。但在解决脏读问题之前,先做一个实验,实验的目标是验证多个线程调用同一个方法是随机的。
-
创建一个公共类
public class MyList { private List list = new ArrayList(); synchronized public void add(String username) { System.out.println("ThreadName = " + Thread.currentThread().getName() +" 执行了 add 方法"); list.add(username); System.out.println("ThreadName = " + Thread.currentThread().getName() +" 退出了 add 方法"); } } -
创建两个自定义的线程类
public class MyThread8 extends Thread {
    private MyList myList;

    public MyThread8(MyList myList) {
        this.myList = myList;
    }

    @Override
    public void run() {
        super.run();
        for (int i = 0; i < 10; i++) {
            myList.add("ThreadA"+i);
        }
    }
}
public class MyThread8_2 extends Thread { private MyList myList; public MyThread8_2(MyList myList) { this.myList = myList; } @Override public void run() { super.run(); for (int i = 0; i < 10; i++) { myList.add("ThreadB"+i); } } } -
测试类
public class MyThread8Test {
    public static void main(String[] args) {
        MyList myList = new MyList();
        MyThread8 myThread8 = new MyThread8(myList);
        myThread8.setName("A");
        myThread8.start();
        MyThread8_2 myThread8_2 = new MyThread8_2(myList);
        myThread8_2.setName("B");
        myThread8_2.start();
    }
}
运行结果
ThreadName = A 执行了 add 方法
ThreadName = A 退出了 add 方法
ThreadName = B 执行了 add 方法
ThreadName = B 退出了 add 方法
ThreadName = A 执行了 add 方法
ThreadName = A 退出了 add 方法
ThreadName = B 执行了 add 方法
ThreadName = B 退出了 add 方法
ThreadName = B 执行了 add 方法
ThreadName = B 退出了 add 方法
ThreadName = A 执行了 add 方法
ThreadName = A 退出了 add 方法
ThreadName = B 执行了 add 方法
ThreadName = B 退出了 add 方法
ThreadName = B 执行了 add 方法
ThreadName = B 退出了 add 方法
ThreadName = A 执行了 add 方法
ThreadName = A 退出了 add 方法
ThreadName = B 执行了 add 方法
ThreadName = B 退出了 add 方法
ThreadName = B 执行了 add 方法
ThreadName = B 退出了 add 方法
ThreadName = A 执行了 add 方法
ThreadName = A 退出了 add 方法
ThreadName = B 执行了 add 方法
ThreadName = B 退出了 add 方法
ThreadName = A 执行了 add 方法
ThreadName = A 退出了 add 方法
ThreadName = A 执行了 add 方法
ThreadName = A 退出了 add 方法
ThreadName = B 执行了 add 方法
ThreadName = B 退出了 add 方法
ThreadName = A 执行了 add 方法
ThreadName = A 退出了 add 方法
ThreadName = A 执行了 add 方法
ThreadName = A 退出了 add 方法
ThreadName = A 执行了 add 方法
ThreadName = A 退出了 add 方法
ThreadName = B 执行了 add 方法
ThreadName = B 退出了 add 方法
分析:从运行结果上来看,同步方法中的程序是同步执行的,但线程 A 和线程 B 的执行却是异步的,这就有可能出现脏读的环境。
下面通过一个示例来演示出现脏读的情况:
-
创建一个公共类
public class MyList2 { private List list = new ArrayList(); synchronized public void add(String username) { list.add(username); } synchronized public int getSize() { return list.size(); } } -
创建一个业务类
public class MyService { public void addService(MyList2 myList2, String username) { try { if (myList2.getSize() < 1) { Thread.sleep(2000); myList2.add(username); } } catch (InterruptedException e) { e.printStackTrace(); } } } -
创建两个自定义的线程类
public class MyThread9 extends Thread {
    private MyList2 myList2;

    public MyThread9(MyList2 myList2) {
        this.myList2 = myList2;
    }

    @Override
    public void run() {
        super.run();
        MyService myService = new MyService();
        myService.addService(myList2,"A");
    }
}
public class MyThread9_2 extends Thread{ private MyList2 myList2; public MyThread9_2(MyList2 myList2) { this.myList2 = myList2; } @Override public void run() { super.run(); MyService myService = new MyService(); myService.addService(myList2,"B"); } } -
测试类
public class MyThread9Test {
    public static void main(String[] args) throws InterruptedException {
        MyList2 myList2 = new MyList2();
        MyThread9 myThread9 = new MyThread9(myList2);
        myThread9.start();
        MyThread9_2 myThread9_2 = new MyThread9_2(myList2);
        myThread9_2.start();
        Thread.sleep(6000);
        System.out.println(myList2.getSize());
    }
}
运行结果
2
分析:脏读出现了。出现原因是两个线程异步执行 addService 方法中的代码,解决办法就是 ”同步化“
下面通过一个示例解决脏读问题:
-
修改 MyService
public class MyService { public void addService(MyList2 myList2, String username) { try { synchronized (myList2) { if (myList2.getSize() < 1) { Thread.sleep(2000); myList2.add(username); } } } catch (InterruptedException e) { e.printStackTrace(); } } } -
再次运行,运行结果如下
1
分析:由于 list 参数对象在项目中是一份实例,是单例的,而且也正需要对 list 参数的 getSize() 方法做同步的调用,所以就对 list 参数进行同步处理
2.2.8 细化验证 3 个结论
“synchronized(非 this 对象 x)” 格式的写法是将 x 对象本身作为 ”对象监视器“,这样就可以得出以下三个结论:
-
当多个线程同时执行 synchronized(x){} 同步代码块时呈同步效果
-
当其他线程执行 x 对象中的 synchronized 同步方法时呈同步效果
-
当其他线程执行 x 对象中的 synchronized(this) 方法时也呈现同步效果
下面验证第 1 个结论:
当多个线程同时执行 synchronized(x){} 同步代码块时呈同步效果
-
创建一个公共类
public class MyObject { } -
创建一个业务类
public class Service3 { public void testMethod1(MyObject myObject) { synchronized (myObject) { try { System.out.println("testMethod1 begin" + " run threadName = " + Thread.currentThread().getName()); Thread.sleep(2000); System.out.println("testMethod1 end" + " run threadName = " + Thread.currentThread().getName()); } catch (InterruptedException e) { e.printStackTrace(); } } } } -
创建两个自定义的线程类
public class MyThread10 extends Thread {
    private MyObject myObject;
    private Service3 service3;

    public MyThread10(MyObject myObject, Service3 service3) {
        this.myObject = myObject;
        this.service3 = service3;
    }

    @Override
    public void run() {
        super.run();
        service3.testMethod1(myObject);
    }
}
public class MyThread10_2 extends Thread { private MyObject myObject; private Service3 service3; public MyThread10_2(MyObject myObject, Service3 service3) { this.myObject = myObject; this.service3 = service3; } @Override public void run() { super.run(); service3.testMethod1(myObject); } } -
测试类
public class MyThread10Test {
    public static void main(String[] args) {
        MyObject myObject = new MyObject();
        Service3 service3 = new Service3();
        MyThread10 myThread10 = new MyThread10(myObject, service3);
        myThread10.setName("A");
        myThread10.start();
        MyThread10_2 myThread10_2 = new MyThread10_2(myObject, service3);
        myThread10_2.setName("B");
        myThread10_2.start();
    }
}
运行结果
testMethod1 begin run threadName = A
testMethod1 end run threadName = A
testMethod1 begin run threadName = B
testMethod1 end run threadName = B
分析:同步的原因是因为使用了同一个对象监视器
下面验证第 2 个结论:
当其他线程执行 x 对象中的 synchronized 同步方法时呈同步效果
-
创建一个公共类
public class MyObject2 { synchronized public void speedPrintString() { System.out.println("speedPrintString begin" + "run threadName = " + Thread.currentThread().getName()); System.out.println("speedPrintString end" + "run threadName = " + Thread.currentThread().getName()); } } -
创建一个业务类
public class Service4 { public void testMethod1(MyObject2 myObject2) { synchronized (myObject2) { try { System.out.println("testMethod1 begin" + " run threadName = " + Thread.currentThread().getName()); Thread.sleep(2000); System.out.println("testMethod1 end" + " run threadName = " + Thread.currentThread().getName()); } catch (InterruptedException e) { e.printStackTrace(); } } } } -
创建两个自定义的线程类
public class MyThread11 extends Thread {
    private Service4 service4;
    private MyObject2 myObject2;

    public MyThread11(Service4 service4, MyObject2 myObject2) {
        this.service4 = service4;
        this.myObject2 = myObject2;
    }

    @Override
    public void run() {
        super.run();
        service4.testMethod1(myObject2);
    }
}
public class MyThread11_2 extends Thread { private MyObject2 myObject2; public MyThread11_2(MyObject2 myObject2) { this.myObject2 = myObject2; } @Override public void run() { super.run(); myObject2.speedPrintString(); } } -
测试类
public class MyThread11Test {
    public static void main(String[] args) {
        MyObject2 myObject2 = new MyObject2();
        Service4 service4 = new Service4();

        MyThread11 myThread11 = new MyThread11(service4, myObject2);
        myThread11.setName("A");
        myThread11.start();
        MyThread11_2 myThread11_2 = new MyThread11_2(myObject2);
        myThread11_2.setName("B");
        myThread11_2.start();
    }
}
运行结果
testMethod1 begin run threadName = A
testMethod1 end run threadName = A
speedPrintString beginrun threadName = B
speedPrintString endrun threadName = B
下面验证第 3 个结论:
当其他线程执行 x 对象中的 synchronized(this) 方法时也呈现同步效果
-
修改 MyObject2
public class MyObject2 { public void speedPrintString() { synchronized (this) { System.out.println("speedPrintString begin" + "run threadName = " + Thread.currentThread().getName()); System.out.println("speedPrintString end" + "run threadName = " + Thread.currentThread().getName()); } } } -
再次运行,运行结果如下
testMethod1 begin run threadName = A
testMethod1 end run threadName = A
speedPrintString beginrun threadName = B
speedPrintString endrun threadName = B
2.2.9 静态同步 synchronized 方法与 synchronized(class) 代码块
*关键字 synchronized 还可以应用在 static 静态方法上,如果这样写,那是对当前的 .java 文件对应的 Class 类进行持锁
下面通过一个示例来演示 synchronized 应用在 static 静态方法上:
-
创建一个公共类
public class Service5 { synchronized public static void printA() { try { System.out.println("printA begin" + " run threadName = " + Thread.currentThread().getName()); Thread.sleep(3000); System.out.println("printA end" + " run threadName = " + Thread.currentThread().getName()); } catch (InterruptedException e) { e.printStackTrace(); } } synchronized public static void printB() { System.out.println("printB begin" + " run threadName = " + Thread.currentThread().getName()); System.out.println("printB end" + " run threadName = " + Thread.currentThread().getName()); } } -
创建两个自定义的线程类
public class MyThread12 extends Thread {
    @Override
    public void run() {
        super.run();
        Service5.printA();
    }
}
public class MyThread12_2 extends Thread { @Override public void run() { super.run(); Service5.printB(); } } -
测试类
public class MyThread12_Test {
    public static void main(String[] args) {
        MyThread12 myThread12 = new MyThread12();
        myThread12.setName("A");
        myThread12.start();
        MyThread12_2 myThread12_2 = new MyThread12_2();
        myThread12_2.setName("B");
        myThread12_2.start();
    }
}
运行结果
printA begin run threadName = A
printA end run threadName = A
printB begin run threadName = B
printB end run threadName = B
分析:从运行结果来看,并没有什么特别之处,都是同步的效果,和将 synchronized 关键字加到非 static 方法上使用的效果是一样的。其实还是有本质上的不同的,synchronized 关键字加到 static 静态方法上是给 Class 类上锁,而 synchronized 关键字加到非 static 静态方法上是给对象上锁。
为了验证它们不是一个锁,下面通过一个示例来演示:
-
创建一个公共类
public class Service6 { synchronized public static void printA() { try { System.out.println("printA begin" + " run threadName = " + Thread.currentThread().getName()); Thread.sleep(3000); System.out.println("printA end" + " run threadName = " + Thread.currentThread().getName()); } catch (InterruptedException e) { e.printStackTrace(); } } synchronized public static void printB() { System.out.println("printB begin" + " run threadName = " + Thread.currentThread().getName()); System.out.println("printB end" + " run threadName = " + Thread.currentThread().getName()); } synchronized public void printC() { System.out.println("printC begin" + " run threadName = " + Thread.currentThread().getName()); System.out.println("printC end" + " run threadName = " + Thread.currentThread().getName()); } } -
创建三个自定义的线程类
public class MyThread13 extends Thread {
    private Service6 service6;

    public MyThread13(Service6 service6) {
        this.service6 = service6;
    }

    @Override
    public void run() {
        super.run();
        service6.printA();
    }
}
public class MyThread13_2 extends Thread { private Service6 service6; public MyThread13_2(Service6 service6) { this.service6 = service6; } @Override public void run() { super.run(); service6.printB(); } }public class MyThread13_3 extends Thread { private Service6 service6; public MyThread13_3(Service6 service6) { this.service6 = service6; } @Override public void run() { super.run(); service6.printC(); } } -
测试类
public class MyThread13Test {
    public static void main(String[] args) {
        Service6 service6 = new Service6();
        MyThread13 myThread13 = new MyThread13(service6);
        myThread13.setName("A");
        myThread13.start();
        MyThread13_2 myThread13_2 = new MyThread13_2(service6);
        myThread13_2.setName("B");
        myThread13_2.start();
        MyThread13_3 myThread13_3 = new MyThread13_3(service6);
        myThread13_3.setName("C");
        myThread13_3.start();
    }
}
运行结果
printA begin run threadName = A
printC begin run threadName = C
printC end run threadName = C
printA end run threadName = A
printB begin run threadName = B
printB end run threadName = B
分析:方法 printC 为异步运行,异步的原因是持有不同的锁,PrintC 方法持有的是对象锁,printA 和 printB 方法持有的是 Class 锁
Class 锁可以对类的所有对象实例起作用,下面通过一个示例来演示:
-
创建一个公共类
public class Service7 { synchronized public static void printA() { try { System.out.println("printA begin" + " run threadName = " + Thread.currentThread().getName()); Thread.sleep(3000); System.out.println("printA end" + " run threadName = " + Thread.currentThread().getName()); } catch (InterruptedException e) { e.printStackTrace(); } } synchronized public static void printB() { System.out.println("printB begin" + " run threadName = " + Thread.currentThread().getName()); System.out.println("printB end" + " run threadName = " + Thread.currentThread().getName()); } } -
创建两个自定义的线程类
public class MyThread14 extends Thread {
    private Service7 service7;

    public MyThread14(Service7 service7) {
        this.service7 = service7;
    }

    @Override
    public void run() {
        super.run();
        service7.printA();
    }
}
public class MyThread14_2 extends Thread { private Service7 service7; public MyThread14_2(Service7 service7) { this.service7 = service7; } @Override public void run() { super.run(); service7.printB(); } } -
测试类
public class MyThread14Test {
    public static void main(String[] args) {
        Service7 service7 = new Service7();
        Service7 service7_2 = new Service7();
        MyThread14 myThread14 = new MyThread14(service7);
        myThread14.setName("A");
        myThread14.start();
        MyThread14_2 myThread14_2 = new MyThread14_2(service7_2);
        myThread14_2.setName("B");
        myThread14_2.start();
    }
}
运行结果
printA begin run threadName = A
printA end run threadName = A
printB begin run threadName = B
printB end run threadName = B
同步 synchronized(class) 代码块的作用其实和 synchronized static 方法的作用一样,也是对 class 类上锁。
下面通过一个示例演示:
-
创建一个公共类
public class Service8 { public static void printA() { synchronized (Service8.class) { try { System.out.println("printA begin" + " run threadName = " + Thread.currentThread().getName()); Thread.sleep(3000); System.out.println("printA end" + " run threadName = " + Thread.currentThread().getName()); } catch (InterruptedException e) { e.printStackTrace(); } } } public static void printB() { synchronized (Service8.class) { System.out.println("printB begin" + " run threadName = " + Thread.currentThread().getName()); System.out.println("printB end" + " run threadName = " + Thread.currentThread().getName()); } } } -
创建两个自定义的线程类
public class MyThread15 extends Thread {
    private Service8 service8;

    public MyThread15(Service8 service8) {
        this.service8 = service8;
    }

    @Override
    public void run() {
        super.run();
        service8.printA();
    }
}
public class MyThread15_2 extends Thread { private Service8 service8; public MyThread15_2(Service8 service8) { this.service8 = service8; } @Override public void run() { super.run(); service8.printB(); } } -
测试类
public class MyThread15Test {
    public static void main(String[] args) {
        Service8 service8 = new Service8();
        Service8 service8_2 = new Service8();
        MyThread15 myThread15 = new MyThread15(service8);
        myThread15.setName("A");
        myThread15.start();
        MyThread15_2 myThread15_2 = new MyThread15_2(service8_2);
        myThread15_2.setName("B");
        myThread15_2.start();
    }
}
运行结果
printA begin run threadName = A
printA end run threadName = A
printB begin run threadName = B
printB end run threadName = B
2.2.10 数据类型 String 的常量池特性
在 JVM 中具有 String 常量池缓存的功能,下面通过一个示例来演示:
public class Test {
    public static void main(String[] args) {
        String a = "a";
        String b = "a";
        System.out.println(a == b);
    }
}
将 synchronized(string) 同步块与 String 联合使用时,要注意常量池带来的一些例外,下面通过一个示例来演示:
-
创建一个公共类
public class Service9 { public void print(String stringParam) { try { synchronized (stringParam) { while (true) { System.out.println(Thread.currentThread().getName()); Thread.sleep(1000); } } } catch (InterruptedException e) { e.printStackTrace(); } } } -
创建两个自定义的线程类
public class MyThread16 extends Thread {
    private Service9 service9;

    public MyThread16(Service9 service9) {
        this.service9 = service9;
    }

    @Override
    public void run() {
        super.run();
        service9.print("A");
    }
}
public class MyThread16_2 extends Thread { private Service9 service9; public MyThread16_2(Service9 service9) { this.service9 = service9; } @Override public void run() { super.run(); service9.print("A"); } } -
测试类
public class MyThread16Test {
    public static void main(String[] args) {
        Service9 service9 = new Service9();
        MyThread16 myThread16 = new MyThread16(service9);
        myThread16.setName("A");
        myThread16.start();
        MyThread16 myThread16_2 = new MyThread16(service9);
        myThread16_2.setName("B");
        myThread16_2.start();
    }
}
运行结果
A
A
A
A
A
A
A
A
...
分析:出现这样的情况就是因为 String 的两个值都是 A,两个线程持有相同的锁,所以造成线程 B 不能执行。这就是 String 常量池所带来的问题。因此在大多数情况下,同步 synchronized 代码块都不使用 String 作为锁对象,而改用其他,比如 new Object() 实例化一个 Object 对象,但它并不放入缓存中。
下面通过一个示例来演示:
-
创建一个公共类
public class Service10 { public void print(Object object) { try { synchronized (object) { while (true) { System.out.println(Thread.currentThread().getName()); Thread.sleep(1000); } } } catch (InterruptedException e) { e.printStackTrace(); } } } -
创建两个自定义的线程类
public class MyThread17 extends Thread {
    private Service10 service10;

    public MyThread17(Service10 service10) {
        this.service10 = service10;
    }

    @Override
    public void run() {
        super.run();
        service10.print(new Object());
    }
}
public class MyThread17_2 extends Thread { private Service10 service10; public MyThread17_2(Service10 service10) { this.service10 = service10; } @Override public void run() { super.run(); service10.print(new Object()); } } -
测试类
public class MyThread17Test {
    public static void main(String[] args) {
        Service10 service10 = new Service10();
        MyThread17 myThread17 = new MyThread17(service10);
        myThread17.setName("A");
        myThread17.start();
        MyThread17_2 myThread17_2 = new MyThread17_2(service10);
        myThread17_2.setName("B");
        myThread17_2.start();
    }
}
运行结果
A
B
B
A
B
A
B
A
B
A
B
A
...
分析:交替打印的原因是持有的锁不是同一个
2.2.11 同步 synchronized 方法无限等待与解决
同步方法容易造成死循环,下面通过一个示例来演示:
-
创建一个公共类
public class Service11 { synchronized public void methodA() { System.out.println("methodA begin"); boolean isContinue = true; while (isContinue) { } System.out.println("methodA end"); } synchronized public void methodB() { System.out.println("methodB begin"); System.out.println("methodB end"); } } -
创建两个自定义的线程类
public class MyThread18 extends Thread {
    private Service11 service11;

    public MyThread18(Service11 service11) {
        this.service11 = service11;
    }

    @Override
    public void run() {
        super.run();
        service11.methodA();
    }
}
public class MyThread18_2 extends Thread { private Service11 service11; public MyThread18_2(Service11 service11) { this.service11 = service11; } @Override public void run() { super.run(); service11.methodB(); } } -
测试类
public class MyThread18Test {
    public static void main(String[] args) {
        Service11 service11 = new Service11();
        MyThread18 myThread18 = new MyThread18(service11);
        myThread18.start();
        MyThread18_2 myThread18_2 = new MyThread18_2(service11);
        myThread18_2.start();
    }
}
运行结果
methodA begin
分析:线程 B 永远得不到运行机会,锁死了
这时就可以使用同步块来解决这样的问题了,下面通过一个示例来演示:
-
更改 Service11
public class Service11 { private Object object1 = new Object(); private Object object2 = new Object(); public void methodA() { synchronized (object1) { System.out.println("methodA begin"); boolean isContinue = true; while (isContinue) { } System.out.println("methodA end"); } } public void methodB() { synchronized (object2) { System.out.println("methodB begin"); System.out.println("methodB end"); } } } -
再次运行,运行结果如下
methodA begin
methodB begin
methodB end
2.2.12 多线程的死锁
Java 线程死锁是一个经典的多线程问题,**因为不同的线程都在等待不可能被释放的锁,从而导致所有任务都无法继续完成。**在多线程技术中,“死锁” 是必须避免的,因为这会造成线程的 “假死”。
下面通过一个示例来演示多线程的死锁:
-
创建一个自定义的线程类
public class DealThread implements Runnable { public String username; public Object lock1 = new Object(); public Object lock2 = new Object(); public void setUsername(String username) { this.username = username; } @Override public void run() { if (username == "A") { synchronized (lock1) { try { System.out.println("username = " + username); Thread.sleep(3000); } catch (InterruptedException e) { e.printStackTrace(); } synchronized (lock2) { System.out.println("执行顺序为:lock1 -> lock2"); } } } if (username == "B") { synchronized (lock2) { try { System.out.println("username = " + username); Thread.sleep(3000); } catch (InterruptedException e) { e.printStackTrace(); } synchronized (lock1) { System.out.println("执行顺序为:lock2 -> lock1"); } } } } } -
测试类
public class DealThreadTest {
    public static void main(String[] args) {
        try {
            DealThread dealThread = new DealThread();
            dealThread.setUsername("A");
            Thread thread = new Thread(dealThread);
            thread.start();
            Thread.sleep(100);
            dealThread.setUsername("B");
            Thread thread_2 = new Thread(dealThread);
            thread_2.start();
        } catch (InterruptedException e) {
            e.printStackTrace();
        }
    }
}
运行结果
username = A
username = B
分析:**死锁是程序设计的 Bug,在设计程序时就要避免双方互相持有对方锁的情况。**需要说明的是,本实验使用 synchronized 嵌套的代码结构来实现死锁,其实不使用嵌套的 synchronized 代码结构也会出现死锁,与嵌套不嵌套无任何关系,不要被代码结构所误导。只要互相等待对方释放锁就有可能出现死锁。
2.3.13 内置类与静态内置类
先来看一下简单的内置类测试
-
创建 PublicClass 类,其中包含内置类 PrivateClass
public class PublicClass { private String username; private String password; class PrivateClass { private String age; private String address; public String getAge() { return age; } public void setAge(String age) { this.age = age; } public String getAddress() { return address; } public void setAddress(String address) { this.address = address; } public void printPublicProperty() { System.out.println(username + " " + password); } } public String getUsername() { return username; } public void setUsername(String username) { this.username = username; } public String getPassword() { return password; } public void setPassword(String password) { this.password = password; } } -
测试类
public class PublicClassTest {
    public static void main(String[] args) {
        PublicClass publicClass = new PublicClass();
        publicClass.setUsername("usernameValue");
        publicClass.setPassword("passwordValue");
        System.out.println(publicClass.getUsername() + " " + publicClass.getPassword());
        PublicClass.PrivateClass privateClass = publicClass.new PrivateClass();
        privateClass.setAge("ageValue");
        privateClass.setAddress("addressValue");
        System.out.println(privateClass.getAge() + " " + privateClass.getAddress());
    }
}
运行结果
usernameValue passwordValue
ageValue addressValue
内置类还有一种叫做静态内置类
-
创建 PublicClass 类,其中包含静态内置类 PrivateClass
public class PublicClass2 { static private String username; static private String password; static class PrivateClass { private String age; private String address; public String getAge() { return age; } public void setAge(String age) { this.age = age; } public String getAddress() { return address; } public void setAddress(String address) { this.address = address; } public void printPublicProperty() { System.out.println(username + " " + password); } } public String getUsername() { return username; } public void setUsername(String username) { this.username = username; } public String getPassword() { return password; } public void setPassword(String password) { this.password = password; } } -
测试类
public class PublicClass2Test {
    public static void main(String[] args) {
        PublicClass2 publicClass2 = new PublicClass2();
        publicClass2.setUsername("usernameValue");
        publicClass2.setPassword("passwordValue");
        System.out.println(publicClass2.getUsername() + " " + publicClass2.getPassword());
        PublicClass2.PrivateClass privateClass = new PublicClass2.PrivateClass();
        privateClass.setAge("ageValue");
        privateClass.setAddress("addressValue");
        System.out.println(privateClass.getAge() + " " + privateClass.getAddress());
    }
}
运行结果
usernameValue passwordValue
ageValue addressValue
2.2.14 内置类与同步:实验1
本实验测试的案例是在内置类中有两个同步方法。但使用的是不同的锁,打印的结果也是异步的。
-
创建 OutClass 类,其中包含静态内置类 InnerClass
public class OutClass { static class InnerClass { public void method1() { synchronized ("其他的锁") { for (int i = 1; i <= 10; i++) { System.out.println(Thread.currentThread().getName() + " i=" + i); try { Thread.sleep(100); } catch (InterruptedException e) { e.printStackTrace(); } } } } public synchronized void method2() { for (int i = 11; i <= 20; i++) { System.out.println(Thread.currentThread().getName() + " i=" + i); try { Thread.sleep(100); } catch (InterruptedException e) { e.printStackTrace(); } } } } } -
测试类
public class OutClassTest {
    public static void main(String[] args) {
        final OutClass.InnerClass innerClass = new OutClass.InnerClass();
        Thread thread1 = new Thread(new Runnable() {
            @Override
            public void run() {
                innerClass.method1();
            }
        }, "A");
        Thread thread2 = new Thread(new Runnable() {
            @Override
            public void run() {
                innerClass.method2();
            }
        }, "B");
        thread1.start();
        thread2.start();
    }
}
运行结果
B i=11
A i=1
B i=12
A i=2
A i=3
B i=13
A i=4
B i=14
A i=5
B i=15
A i=6
B i=16
A i=7
B i=17
B i=18
A i=8
A i=9
B i=19
B i=20
A i=10
注意:由于持有不同的"对象监视器",所以打印的结果也是异步的。
2.2.15 内置类与同步:实验2
本实验测试同步代码块 synchronized(class2) 对 innerclass2 上锁后,其他线程只能以同步的方式调用 innerclass2 中的静态同步方法。
-
创建 OutClass2 类,其中包含静态内置类 InnerClass1 和 InnerClass2
public class OutClass2 { static class InnerClass1 { public void method1(Innerclass2 innerclass2) { String threadName = Thread.currentThread().getName(); synchronized (innerclass2) { System.out.println(threadName + " 进入 InnerClass1 类中的 method1 方法"); for (int i = 0; i < 10; i++) { System.out.println("i=" + i); try { Thread.sleep(100); } catch (InterruptedException e) { e.printStackTrace(); } } System.out.println(threadName + " 离开 InnerClass1 类中的 method1 方法"); } } public synchronized void method2() { String threadName = Thread.currentThread().getName(); System.out.println(threadName + " 进入 InnerClass1 类中的 method2 方法"); for (int j = 0; j < 10; j++) { System.out.println("j=" + j); try { Thread.sleep(100); } catch (InterruptedException e) { e.printStackTrace(); } } System.out.println(threadName + " 离开 InnerClass1 类中的 method2 方法"); } } static class Innerclass2 { public synchronized void method1() { String threadName = Thread.currentThread().getName(); System.out.println(threadName + " 进入 InnerClass2 类中的 method1 方法"); for (int k = 0; k < 10; k++) { System.out.println("k=" + k); try { Thread.sleep(100); } catch (InterruptedException e) { e.printStackTrace(); } } System.out.println(threadName + " 离开 InnerClass2 类中的 method1 方法"); } } } -
测试类
public class OutClass2Test {
    public static void main(String[] args) {
        final OutClass2.InnerClass1 innerClass1 = new OutClass2.InnerClass1();
        final OutClass2.Innerclass2 innerclass2 = new OutClass2.Innerclass2();
        Thread thread1 = new Thread(new Runnable() {
            @Override
            public void run() {
                innerClass1.method1(innerclass2);
            }
        }, "A");
        Thread thread2 = new Thread(new Runnable() {
            @Override
            public void run() {
                innerClass1.method2();
            }
        }, "B");
        Thread thread3 = new Thread(new Runnable() {
            @Override
            public void run() {
                innerclass2.method1();
            }
        }, "C");
        thread1.start();
        thread2.start();
        thread3.start();
    }
}
运行结果
A 进入 InnerClass1 类中的 method1 方法
B 进入 InnerClass1 类中的 method2 方法
i=0
j=0
i=1
j=1
j=2
i=2
j=3
i=3
j=4
i=4
j=5
i=5
j=6
i=6
j=7
i=7
j=8
i=8
i=9
j=9
A 离开 InnerClass1 类中的 method1 方法
B 离开 InnerClass1 类中的 method2 方法
C 进入 InnerClass2 类中的 method1 方法
k=0
k=1
k=2
k=3
k=4
k=5
k=6
k=7
k=8
k=9
C 离开 InnerClass2 类中的 method1 方法
2.2.16 锁对象的改变
在将任何数据类型作为同步锁时,需要注意的是,是否有多个线程同时持有锁对象,如果同时持有相同的锁对象,则这些线程之间就是同步的;如果分别获得锁对象,这些线程之间就是异步的。
-
创建一个公共类
public class Service12 { private String lock = "123"; public void testMethod() { try { synchronized (lock) { System.out.println(Thread.currentThread().getName() + " begin " + System.currentTimeMillis()); lock = "456"; Thread.sleep(2000); System.out.println(Thread.currentThread().getName() + " end " + System.currentTimeMillis()); } } catch (InterruptedException e) { e.printStackTrace(); } } } -
创建两个自定义的线程类
public class MyThread19 extends Thread{
    private Service12 service12;

    public MyThread19(Service12 service12) {
        this.service12 = service12;
    }

    @Override
    public void run() {
        super.run();
        service12.testMethod();
    }
}
public class MyThread19_2 extends Thread{ private Service12 service12; public MyThread19_2(Service12 service12) { this.service12 = service12; } @Override public void run() { super.run(); service12.testMethod(); } } -
测试类
public class MyThread19Test {
    public static void main(String[] args) throws InterruptedException {
        Service12 service12 = new Service12();
        MyThread19 myThread19 = new MyThread19(service12);
        myThread19.setName("A");
        MyThread19_2 myThread19_2 = new MyThread19_2(service12);
        myThread19_2.setName("B");
        myThread19.start();
        Thread.sleep(500);
        myThread19_2.start();
    }
}
运行结果
A begin 1583841197512
B begin 1583841198012
A end 1583841199513
B end 1583841200013
分析:可以看到 A、B 之间是异步的,这是因为 500 毫秒后,线程 B 取得的锁是 “456”
继续实验,注释测试类中的 Thread.sleep(500)
public class MyThread19Test {
    public static void main(String[] args) throws InterruptedException {
        Service12 service12 = new Service12();
        MyThread19 myThread19 = new MyThread19(service12);
        myThread19.setName("A");
        MyThread19_2 myThread19_2 = new MyThread19_2(service12);
        myThread19_2.setName("B");
        myThread19.start();
//        Thread.sleep(500);
        myThread19_2.start();
    }
}
运行结果
A begin 1583841999930
A end 1583842001930
B begin 1583842001930
B end 1583842003931
分析:线程 A 和 B 持有的锁都是 “123”,虽然将锁改成了 “456”,但结果还是同步。
2.3 volatile 关键字
关键字 volatile 的主要作用是使变量在多个线程间可见。
2.3.1 同步死循环
-
创建一个公共类
public class Service1 { private boolean isContinuePrint = true; public boolean isContinuePrint() { return isContinuePrint; } public void setContinuePrint(boolean continuePrint) { isContinuePrint = continuePrint; } public void printStringMethod() { try { while (isContinuePrint == true) { System.out.println("run printStringMethod threadName = " +Thread.currentThread().getName()); Thread.sleep(1000); } } catch (InterruptedException e) { e.printStackTrace(); } } } -
测试类
public class Service1Test {
    public static void main(String[] args) {
        Service1 service1 = new Service1();
        service1.printStringMethod();
        System.out.println("我要停止它!stopThread=" + Thread.currentThread().getName());
        service1.setContinuePrint(false);
    }
}
运行结果
run printStringMethod threadName = main
run printStringMethod threadName = main
run printStringMethod threadName = main
run printStringMethod threadName = main
run printStringMethod threadName = main
run printStringMethod threadName = main
...
分析:程序运行后,根本停不下来。这是因为 main 线程一直在处理 while 循环,导致不能继续执行后面的代码。解决办法当然是使用多线程技术。
2.3.2 解决同步死循环
-
创建一个自定义线程类
public class Service2 implements Runnable{ private boolean isContinuePrint = true; public boolean isContinuePrint() { return isContinuePrint; } public void setContinuePrint(boolean continuePrint) { isContinuePrint = continuePrint; } public void printStringMethod() { try { while (isContinuePrint == true) { System.out.println("run printStringMethod threadName = " +Thread.currentThread().getName()); Thread.sleep(1000); } } catch (InterruptedException e) { e.printStackTrace(); } } @Override public void run() { printStringMethod(); } } -
测试类
public class Service2Test {
    public static void main(String[] args) throws InterruptedException {
        Service2 service2 = new Service2();
        new Thread(service2).start();
        Thread.sleep(2000);
        System.out.println("我要停止它!stopThread=" + Thread.currentThread().getName());
        service2.setContinuePrint(false);
    }
}
运行结果
run printStringMethod threadName = Thread-0
run printStringMethod threadName = Thread-0
我要停止它!stopThread=main
2.3.3 解决异步死循环
-
创建一个自定义线程类
public class RunThread extends Thread{ private boolean isRunning = true; public boolean isRunning() { return isRunning; } public void setRunning(boolean running) { isRunning = running; } @Override public void run() { super.run(); try { System.out.println("进入 run 了"); while (isRunning == true) { System.out.println("run printStringMethod threadName = " +Thread.currentThread().getName()); Thread.sleep(1000); } System.out.println("线程被停止了"); } catch (InterruptedException e) { e.printStackTrace(); } } } -
测试类
public class RunThreadTest {
    public static void main(String[] args) throws InterruptedException {
        RunThread runThread = new RunThread();
        runThread.start();
        Thread.sleep(2000);
        runThread.setRunning(false);
        System.out.println("已经赋值为 false");
    }
}
运行结果
进入 run 了
run printStringMethod threadName = Thread-0
run printStringMethod threadName = Thread-0
已经赋值为 false
线程被停止了
但上面的代码格式,一旦运行在 -server 服务器模式中 64bit 的 JVM 上时,会出现死循环。
-
打开 Edit Configurations --> RunThreadTest --> VM options,配置如下:
-server -
再次运行
进入 run 了
run printStringMethod threadName = Thread-0
run printStringMethod threadName = Thread-0
已经赋值为 false
run printStringMethod threadName = Thread-0
run printStringMethod threadName = Thread-0
...
分析:可以看到出现了死循环的效果。代码 System.out.println("线程被停止了"); 从未被执行。
是什么样的原因造成将 JVM 设置为 -server 时就出现死循环呢?
在启动 RunThread.java 线程时,变量 private boolean isRunning = true; 存在于公共堆栈及线程的私有堆栈中。在 JVM 被设置为 -server 模式是为了线程运行的效率,线程一直在私有堆栈中取得 isRunning 的值是 true。而代码 thread.setRunning(false); 虽然被执行,更新的却是公共堆栈中的 isRunning 变量值 false,所以一直就是死循环状态。内存结构如图所示:
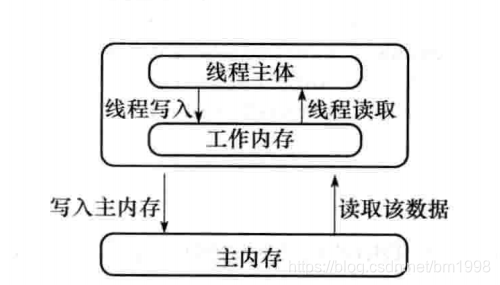
这个问题是私有堆栈中的值和公共堆栈中的值不同步造成的。解决这样的问题就要使用 volatile 关键字,它的作用就是当线程访问 isRunning 这个变量时,强制性从公有堆栈中进行取值。
-
修改自定义线程类
public class RunThread extends Thread{ volatile private boolean isRunning = true; public boolean isRunning() { return isRunning; } public void setRunning(boolean running) { isRunning = running; } @Override public void run() { super.run(); try { System.out.println("进入 run 了"); while (isRunning == true) { System.out.println("run printStringMethod threadName = " +Thread.currentThread().getName()); Thread.sleep(1000); } System.out.println("线程被停止了"); } catch (InterruptedException e) { e.printStackTrace(); } } } -
再次运行
进入 run 了
run printStringMethod threadName = Thread-0
run printStringMethod threadName = Thread-0
已经赋值为 false
线程被停止了
通过使用 volatile 关键字,强制的从公共内存中读取变量的值,内存结构如图所示:
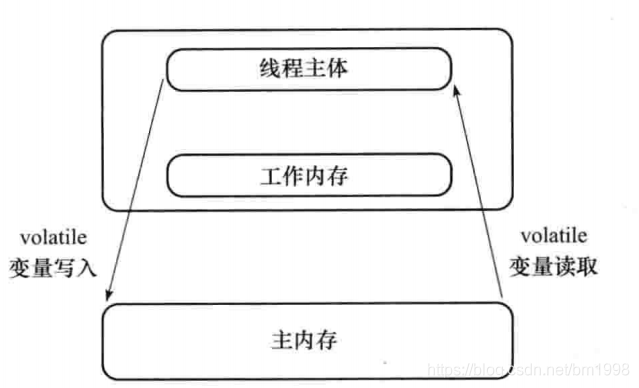
使用 volatile 关键字增加了实例变量在多个线程之间的可见性,但 volatile 关键字有一个致命的缺陷是不支持原子性。
原子性:即一个操作不会被线程调度器中断,要么执行完,要么就不执行。
volatile 和 synchronized 的区别
- 关键字 volatile 是线程同步的轻量级实现,所有 volatile 性能肯定比 synchronized 要好,并且 volatile 只能修饰于变量,而 synchronized 可以修饰方法以及代码块。随着 JDK 新版本的发布,synchronized 在执行效率上得到了很大的提升,在开发中使用 synchronized 的比率还是比较大的。
- 多线程访问 volatile 不会发生阻塞,而 synchronized 会出现阻塞。
- volatile 能保证数据的可见性,但不能保证原子性;而 synchronized 可以保证原子性,也可以间接保证可见性,以为它会将私有内存和公共内存中的数据做同步。
- 最后再次强调,volatile 解决的是变量在多个线程之间的可见性;而 synchronized 解决的是多个线程之间访问资源的同步性。
2.3.4 voletile 非原子的特性
下面来验证一下 voletile 的非原子性。
-
创建一个自定义线程类,其中 count 变量是 voletile 修饰的静态变量
public class MyThread1 extends Thread { volatile public static int count; private static void addCount() { for (int i = 0; i <100; i++) { count++; } System.out.println(count); } @Override public void run() { super.run(); addCount(); } } -
创建测试类
public class MyThread1Test {
    public static void main(String[] args) {
        MyThread1[] myThread1Arr = new MyThread1[1000];
        for (int i = 0; i < 100; i++) {
            myThread1Arr[i] = new MyThread1();
        }
        for (int i = 0; i < 100; i++) {
            myThread1Arr[i].start();
        }
    }
}
运行结果
...
7115
7015
6815
6615
9881
9481
9181
8881
8615
分析:如果 voletile 具有原子性的话,那每一次 count++ 都不会被线程调度器中断并成功执行,count 最后应该是 10000 才对,可是这里运行结果最大的值为 9881,显然证明了 voletile 不具有原子性。
-
修改自定义线程类,在 addCount 方法前加上 synchronized 关键字,这样相当于给 MyThread1.class 上锁
public class MyThread1 extends Thread { volatile public static int count; synchronized private static void addCount() { for (int i = 0; i <100; i++) { count++; } System.out.println(count); } @Override public void run() { super.run(); addCount(); } } -
再次运行,得到 10000 的正确结果
...
9300
9400
9500
9600
9700
9800
9900
10000
关键字 volatile 提示线程每次从共享内存中读取变量,而不是从私有内存中读取,这样就保证了同步数据的可见性。但在这里需要注意的是:如果修改实例变量中的数据,比如 i++,也就是 i=i+1,则这样的操作其实并不是一个原子操作,也就是非线程安全的。表达式 i++ 的操作步骤分解如下:
- 从内存中取出 i 的值。
- 计算 i 的值。
- 将 i 的值写到内存中。
假如在第 2 步计算值的时候,另外一个线程也修改 i 的值,那么这个时候就会出现脏读数据。解决的办法其实就是使用 synchronized 关键字,这个知识点在前面的案例中已经介绍过了。所以说 volatile 本身并不处理数据的原子性,而是强制对数据的读写及时影响到主内存的。
用图来演示一下使用关键字 volatile 时出现非线程安全的原因。变量在内存中工作的过程如下图所示:
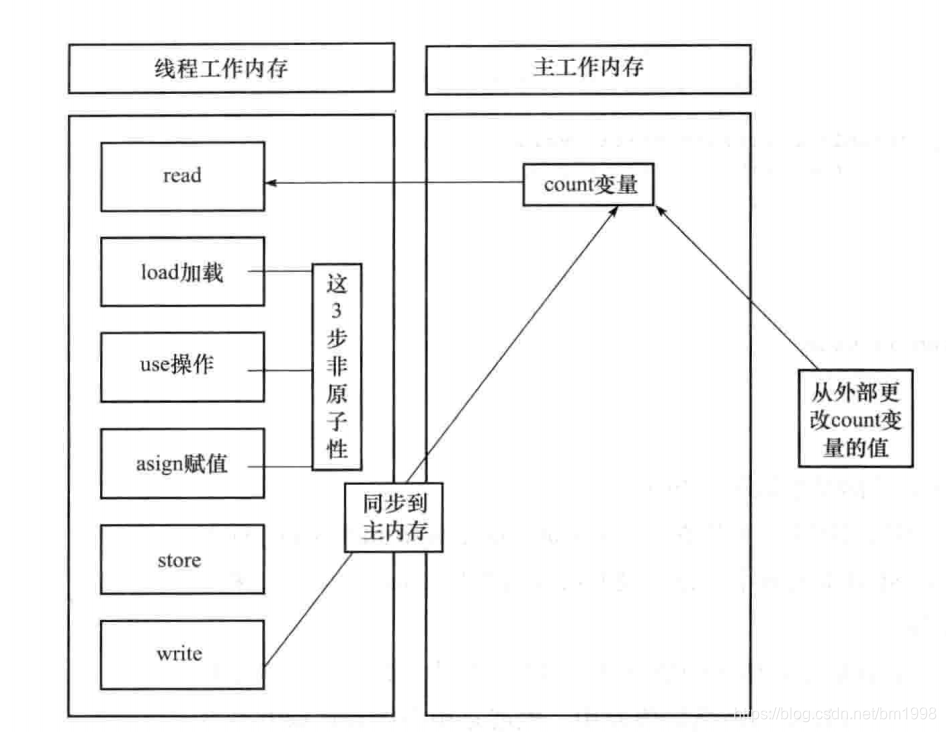
- read 和 load 阶段:从主存复制变量到当前线程工作内存。
- use 和 assign 阶段:执行代码,改变共享变量值。
- store 和 write 阶段:用工作内存数据刷新主存对应变量的值。
在多线程环境中,use 和 assign 是多次出现的,但这一操作并不是原子性,也就是在 read 和 load 之后,如果主内存 count 变量发生修改之后,线程工作内存中的值由于已经加载,不会产生对应的变化,也就是私有内存和公共内存中的变量不同步,所以计算出来的结果汇合预期不一样,也就出现了非线程安全问题。
2.3.5 使用原子类进行 i++
除了在 i++ 操作时使用 synchronized 关键字实现同步外,还可以使用 AtomicInteger 原子类进行实现。
原子操作是不能分割的整体,没有其他线程能够中断或检查正在原子操作中的变量。一个原子类型就是一个原子操作可用的类型,它可以在没有锁的情况下做到线程安全。
-
修改自定义线程类,使用 AtomicInteger 类型的 count
public class MyThread1 extends Thread { volatile public static AtomicInteger count = new AtomicInteger(); private static void addCount() { for (int i = 0; i <100; i++) { count.incrementAndGet(); } System.out.println(count.get()); } @Override public void run() { super.run(); addCount(); } } -
再次运行,得到 10000 的正确结果。
...
9400
9500
9600
9700
10000
9900
9800
2.3.6 原子类也不完全安全
从上面例子中虽然得到 10000 的正确结果,但打印的顺序有问题。这是因为虽然 count.incrementAndGet() 是原子的,但 addCount() 方法不是原子的,解决这个问题就要在 addCount() 前加 synchronized 就行了。
2.3.7 synchronized 代码块具有 volatile 同步的功能
关键字 synchronized 可以使多个线程访问同一个资源具有同步性,而且它还具有将线程工作内存中的私有变量与公共内存中的变量同步的功能。
它包含两个特征:互斥性和可见性。
