一,TensorFlow实现机器学习算法的基础
1,核心步骤
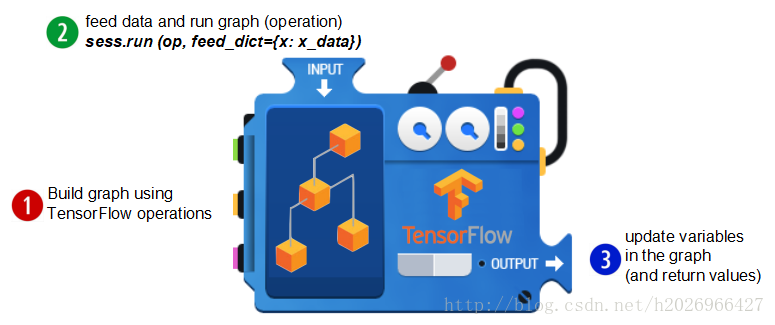
1. 定义算法公式,也就是神经网络forward时的计算。
2. 定义loss,选定优化器,并指定优化器优化loss。
3. 迭代地对数据进行训练。
4. 在测试集或验证集上对准确率进行评测。
这几个步骤是TensorFlow进行算法设计、训练的核心步骤,只有当调用run方法,并feed数据时计算才真正执行计算图中的节点或者说运算操作来获取结果。大体流程如下:
2,一些常识
- 需要输入的数据定义为tf.placeholder(type,shape),如X=tf.placeholder(tf.float32,[None,784])
- 需要训练的参数定义为tf.Variable(shape,name),如W=tf.Variable(tf.zeros([None,10]),name=’weigths’),因为Variable在反复运行计算图的过程中可以持久化。
- tf.nn下有大量的神经网络组建,例如激活函数等
- 在训练之前需要运行全局参数初始化器,即tf.global_variables_initializer().run()
- tf.train下有很多训练过程中需要用到的优化方法或者说是优化器,如tf.train.GradientDescentOptimizer(learning_rate=0.01)就是梯度下降优化方法。
3,tf.InteractiveSession()和tf.Session()的区别
tf.InteractiveSession()和tf.Session()的区别:前者会将当前的session注册为默认的sess,之后的运算也默认跑在这个session里,因为不同的session之间的数据和运算应该是相互独立的。使用InteractiveSession代替Session之后,就可以使用Tensor.eval()和Operation.run() 方法代替 Session.run(),使代码更简洁。
(1)Session
每一个Session都维护各自变量的副本。
如下所示:
W = tf.Variable(10)
sess1 = tf.Session()
sess2 = tf.Session()
sess1.run(W.initializer)
sess2.run(W.initializer)

print sess1.run(W.assign_add(10)) # >> 20
print sess2.run(W.assign_sub(2)) # >> ?
显然?等号8,因为sess1和sess2各自维护W,所以sess1中W增加10,不会影响sess2的W,所以它等于10-2=8.
(2)InteractiveSession()
有时候我们会看到:InteractiveSession,而不是Session,它们区别是?
One major change is the use of an InteractiveSession, which allows us to run variables without needing to constantly refer to the session object (less typing!).
- InteractiveSession()
sess = tf.InteractiveSession()
a = tf.constant(5.0)
b = tf.constant(6.0)
c = a * b
# We can just use 'c.eval()' without specifying the context 'sess'
print(c.eval())
sess.close()- Session()
sess = tf.Session()
a = tf.constant(5.0)
b = tf.constant(6.0)
c = a * b
with tf.Session() as sess:
    sess.run(print(c.eval()))
# 或者用以下方法
print(c.eval(Session=sess))
二,用TensorFlow实现Softmax Regression识别手写体数字
Softmax Regression本质上可以看成多分类的logistic regression。
import tensorflow as tf
from tensorflow.examples.tutorials.mnist import input_data
1,导入数据
mnist = input_data.read_data_sets("MNIST_data/",one_hot=True)
print(mnist.train.images.shape,mnist.train.labels.shape)
print(mnist.test.images.shape,mnist.test.labels.shape)
print(mnist.validation.images.shape,mnist.validation.labels.shape)
2,定义模型算法公式,类似神经网络的forward过程
sess = tf.InteractiveSession()
X = tf.placeholder(tf.float32,[None,784])
y = tf.placeholder(tf.float32,[None,10])
W = tf.Variable(tf.zeros([784,10]))
b = tf.Variable(tf.zeros([10]))
h = tf.nn.softmax(tf.matmul(X,W)+b)
3,定义loss,选定优化器,并指定优化器优化loss.
cross_entropy = tf.reduce_mean(-tf.reduce_sum(y*tf.log(h),reduction_indices=[1]))
optimizer = tf.train.GradientDescentOptimizer(learning_rate=0.5)
train_step = optimizer.minimize(cross_entropy)
4,定义精确度计算公式
correct_prediction = tf.equal(tf.argmax(h,1),tf.argmax(y,1))
accuracy = tf.reduce_mean(tf.cast(correct_prediction,tf.float32))
5,迭代训练(一般是批训练,例如随机梯度下降法)
epoch_num = 5
for epoch in range(epoch_num):
    avg_accuracy = 0.0
    avg_cost = 0.0
    for i in range(550):
        batch_xs,batch_ys = mnist.train.next_batch(100)
        cost,acc,_ = sess.run([cross_entropy,accuracy,train_step],feed_dict={X:batch_xs,y:batch_ys})
        avg_cost += cost
        avg_accuracy += acc/550
    print('Epoch %d: cost is %.7f,accuracy is %.7f.'%(epoch+1,avg_cost,avg_accuracy))
print('Train Finished!')
print('Test accuracy is %.4f.'%accuracy.eval({X:mnist.test.images,y:mnist.test.labels}))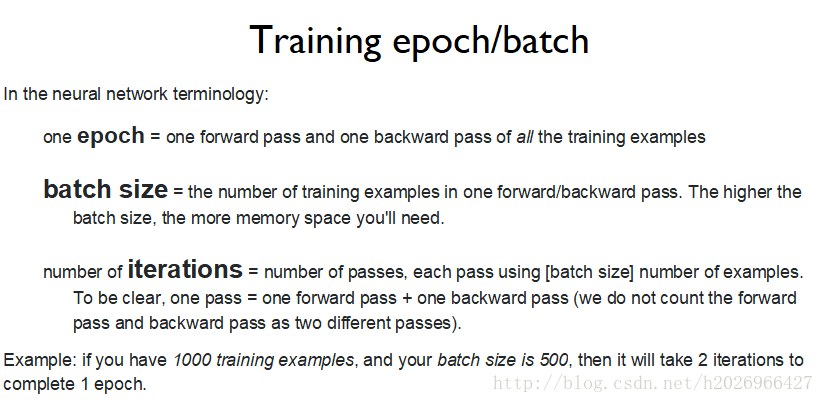
7,使用训练好的模型进行手写体识别
import matplotlib.pyplot as plt
import random
r = random.randint(0, mnist.test.num_examples - 1)
print("Label:", sess.run(tf.argmax(mnist.test.labels[r:r+1], 1)))
print("Prediction:", sess.run(tf.argmax(h, 1),feed_dict={X: mnist.test.images[r:r + 1]}))
plt.imshow(mnist.test.images[r:r + 1].reshape(28, 28), cmap='Greys',interpolation='nearest')
plt.show()
运行结果如下: