前言
嵌入式开发有两种选择: 前后台模式, 嵌入式操作系统. 两种模式对比(图自STM32RTOS培训):

当产品功能简单, 开发成员不多, 不需要复杂外设(USB/网络等), 成本资源要求苛刻时, 用前后台模式能满足需求. 形式一般是初始化, 进While循环, 配合中断. 当碰到复杂的功能, 复杂的外设(USB/网络/FS等), 上操作系统会比较爽一些.
用ST或者NXP的MCU的话, 不用考虑, 上FreeRTOS的车就对了. FreeRTOS的任务状态:
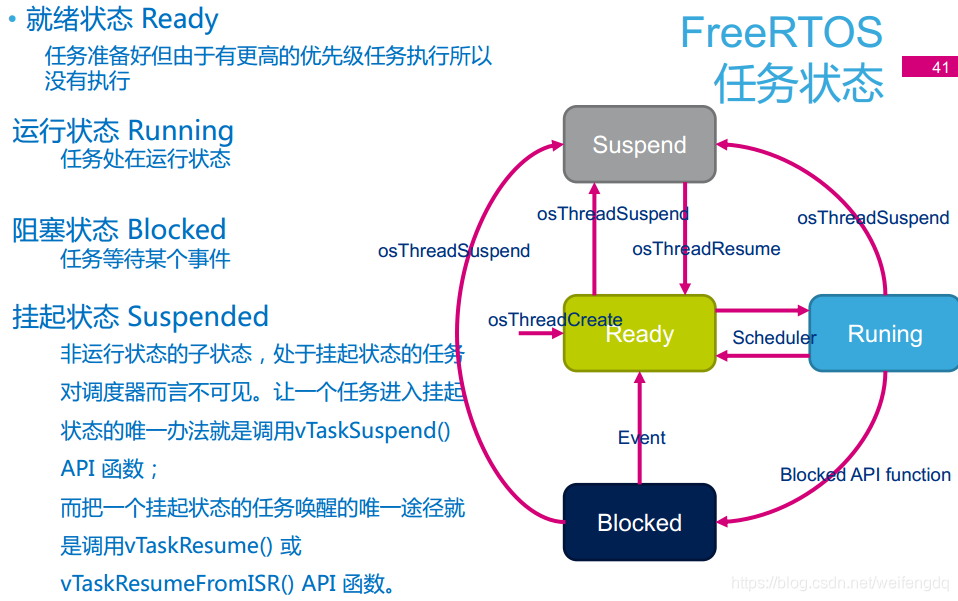
FreeRTOS官方文档很详细, 可以去翻一翻: https://www.freertos.org/FreeRTOS-quick-start-guide.html
先用起来
如果一开始花个几周时间了解基本原理, 可能会逐渐心灰意冷, STM32CubeMX直接集成了FreeRTOS, 直接用起来, 看看怎么用, 能干些啥, 做着理解着, 心里有底一些, 对精神的折磨也少一点.
这小节直接拿来点个灯, 创建两个线程, 每个线程单独点灯, 用ST官方的NUCLEO-F767ZI开发板, 用到的板子上的LED:
| Name | PIN |
|---|---|
| LED1 (Green, LD1) | PB0 |
| LED2 (Blue, LD2) | PB7 |
打开STM32CubeMX(这里用最新的5.4.0版本):
-
MCU选择: 点击
ACCESS TO MCU SELECTOR, 选择STM32F767ZI -
调试端口配置为SWD:
Pinout & Configuration->System Core->SYS->Debug选择Serial Wire -
Pinout & Configuration->System Core->RCC->HSE选择Crystal/Ceramic Resonator -
Clock Configuration:
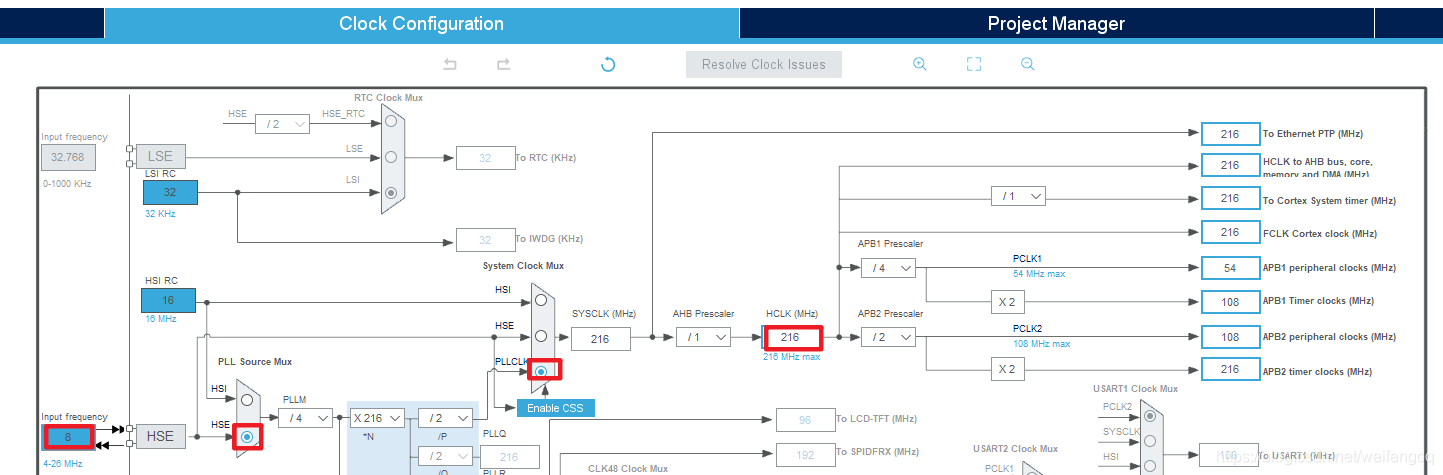
-
Pinout view图上找到PB0, 单击, 弹出的菜单中选择
GPIO_Output, 右击, 选择Enter User Label, 输入LED1; 同样方式设置PB7为LED2. -
Pinout & Configuration->System Core->SYS->Timebase Source选择TIM3. 设置这个主要是Generate Code式提示的, 大概是因为HAL库和FreeRTOS的时基都默认Systick的话, 可能导致HAL_Delay等的异常, 索性改掉HAL库的时基, 大家各自安好:
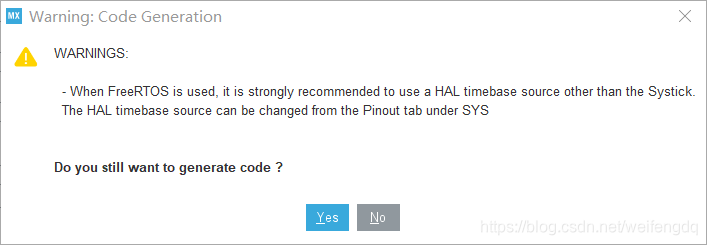
-
Pinout & Configuration->Middleware->FREERTOS->Interface选择较新的CMSIS_V2:
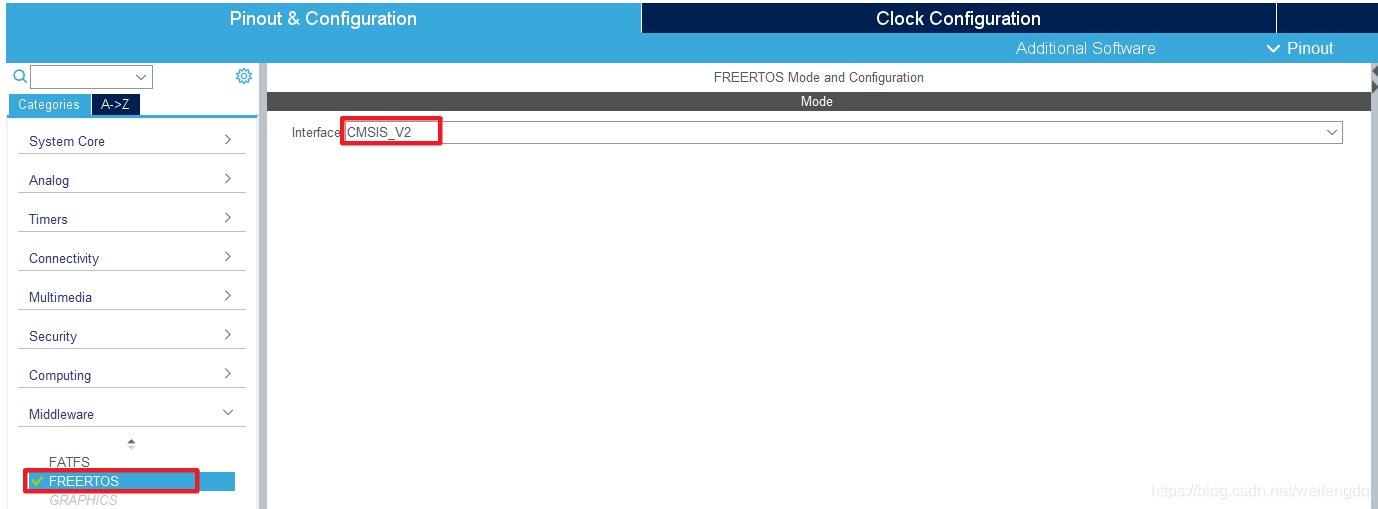
-
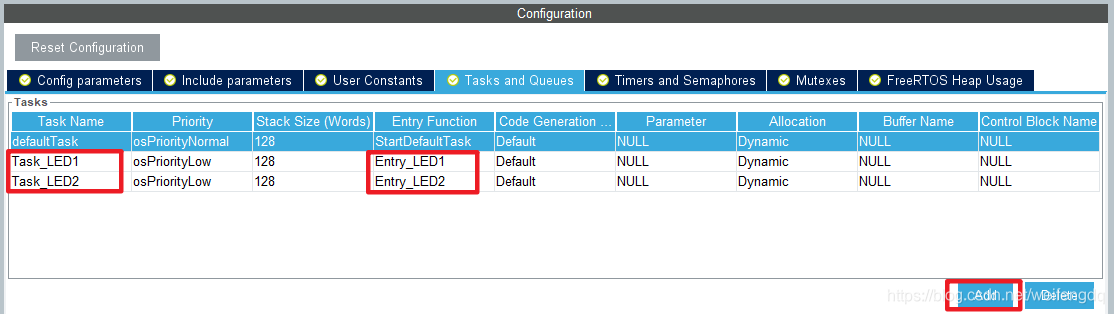
FREERTOS的Configuration->Tasks and Queues-> 有一个默认的defaultTask, 这个可以重命名或者不去管它, 点击Add按钮, 添加两个任务Task_LED1和Task_LED2, 入口函数名也填进去, 优先级默认先不变或设置为实时(osPriorityRealtime):
-
Project Manager->Project->Browse选择工程位置(Project Location), 填入工程名(Project Name),Toolchain/IDE选择MDK-ARM. -
Project Manager->Code Generator-> 勾选Copy only the necessary library files, 还有Generate peripheral initialization as a pair of .c/.h files per periphral -
点击右上角
GENERATE CODE按钮生成代码, 打开工程. -
Keil 点击魔术棒或者
Project->Options for Target ..., 默认配置Debug为ST-link Debugger, 点击Setting->Flash Download-> 勾选Reset and Run, 这样下载后可以自动复位运行.
以上操作陌生的话, 可以参考之前的STM32CubeMX系列文章.
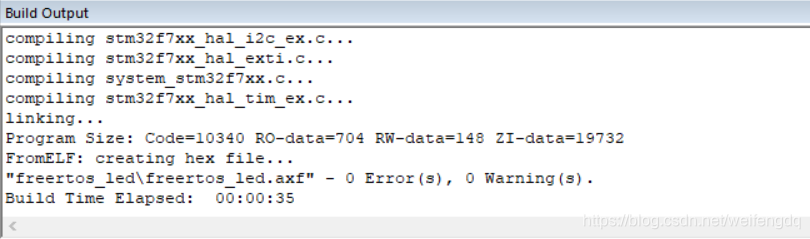
编译一下整个工程, 看看默认占用的空间, 如果是16kB Flash的单片机, 可能装不下, 对于64k以上Flash用起来压力不大, STM32F767ZI有2M Flash, 没有压力:
打开Application/User下的freertos.c文件, 在各自的入口函数里面点灯:
/* USER CODE END Header_Entry_LED1 */
void Entry_LED1(void *argument)
{
  /* USER CODE BEGIN Entry_LED1 */
  /* Infinite loop */
  for(;;)
  {
		HAL_GPIO_TogglePin(LED1_GPIO_Port, LED1_Pin);
		osDelay(1000);
  }
  /* USER CODE END Entry_LED1 */
}

/* USER CODE BEGIN Header_Entry_LED2 */
/**
* @brief Function implementing the Task_LED2 thread.
* @param argument: Not used
* @retval None
*/
/* USER CODE END Header_Entry_LED2 */
void Entry_LED2(void *argument)
{
  /* USER CODE BEGIN Entry_LED2 */

  /* Infinite loop */
  for(;;)
  {
		HAL_GPIO_TogglePin(LED2_GPIO_Port, LED2_Pin);
		osDelay(1000);
  }
  /* USER CODE END Entry_LED2 */
}
编译下载, 可以看到板子上的两个LED每隔1s翻转一次.
修改下LED1的代码, 加一行HAL_Delay(1000);:
/* USER CODE END Header_Entry_LED1 */
void Entry_LED1(void *argument)
{
  /* USER CODE BEGIN Entry_LED1 */
  /* Infinite loop */
  for(;;)
  {
		HAL_GPIO_TogglePin(LED1_GPIO_Port, LED1_Pin);
		HAL_Delay(1000);
		osDelay(1000);
  }
  /* USER CODE END Entry_LED1 */
}
编译下载, 可以看到LED1变成了2s翻转一次, 而LED2不受影响, 仍然是1s翻转一次.
MCU的初学者可能记得按键延时消抖的delay_ms(10), while中放一个这玩意很伤, 于是费劲九牛二虎之力用定时器把这个delay_ms消掉, 方法可参见 从单片机到操作系统③,走进FreeRTOS一文, 现在有了FreeRTOS, 有了STM32CubeMX, 这些都方便多了.
看一下上面工程中生成的代码, 初始化函数MX_FREERTOS_Init()中创建的LED1的任务(线程):
  /* definition and creation of Task_LED1 */
  const osThreadAttr_t Task_LED1_attributes = {
    .name = "Task_LED1",
    .priority = (osPriority_t) osPriorityLow,
    .stack_size = 128
  };
  Task_LED1Handle = osThreadNew(Entry_LED1, NULL, &Task_LED1_attributes);
可能许多人常见的是osThreadCreate, osThreadNew声明了LED1的入口函数Entry_LED1, 就是上面填进去的名字. 初始化完成后, 就开启了调度器:
  /* Start scheduler */
  osKernelStart();
Entry_LED1和Entry_LED2每个线程都有一个for(;;), 给人的感觉是单片机开启了分身.
抢占式 vs 协同式调度
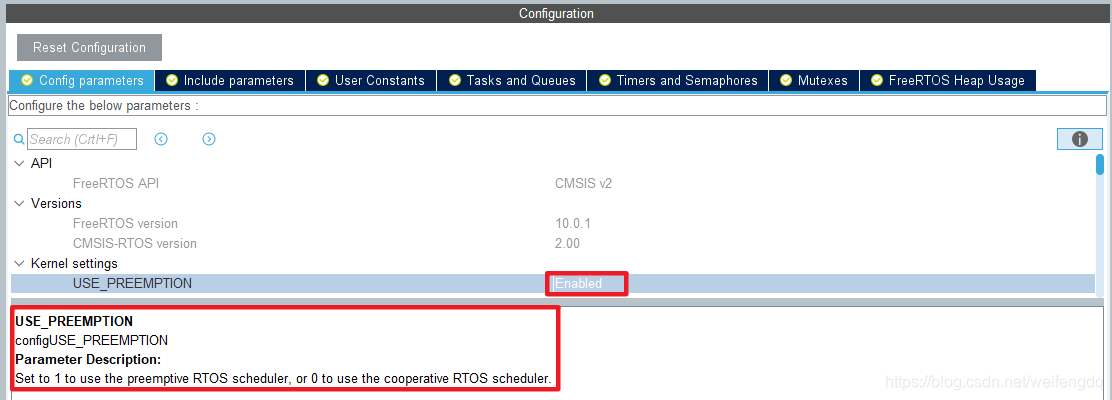
FreeRTOS可选两种调度算法: 优先级抢占式调度, 协同式(协作式)调度.
FREERTOS的Configuration里面默认的是抢占式:
改成Disable, 重新生成代码, Entry_LED1加入HAL_Delay(2000):
/* USER CODE END Header_Entry_LED1 */
void Entry_LED1(void *argument)
{
  /* USER CODE BEGIN Entry_LED1 */
  /* Infinite loop */
  for(;;)
  {
		HAL_GPIO_TogglePin(LED1_GPIO_Port, LED1_Pin);
		HAL_Delay(2000);
		osDelay(1000);
  }
  /* USER CODE END Entry_LED1 */
}
编译下载, 发现变成了: LED1亮, 2s后LED2才开始亮, 再1s后LED1灭, 再2s后LED2灭.
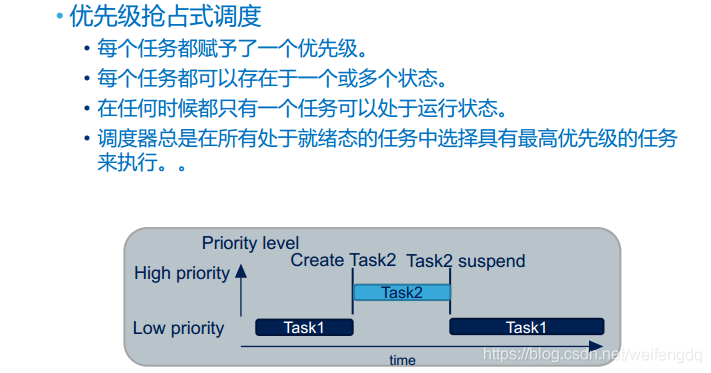
抢占式调度的特性:
协作式调度的特性:
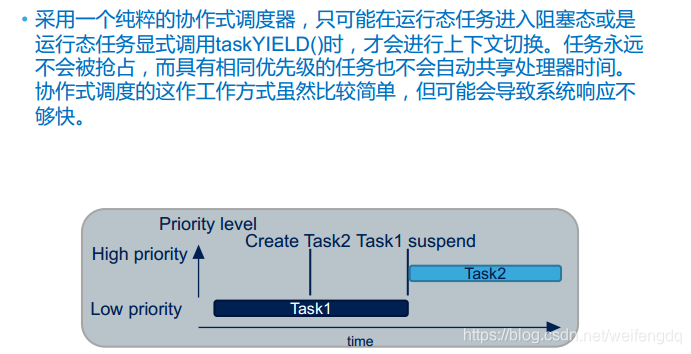
(备注: 如果此时把LED2的任务优先级调的比LED1高, 发现LED2和LED1是同时亮起, 但时间不准确).
TICK_RATE_HZ
滴答, 时基, 默认1000Hz. 这样osDelay(1000)才表示1s.
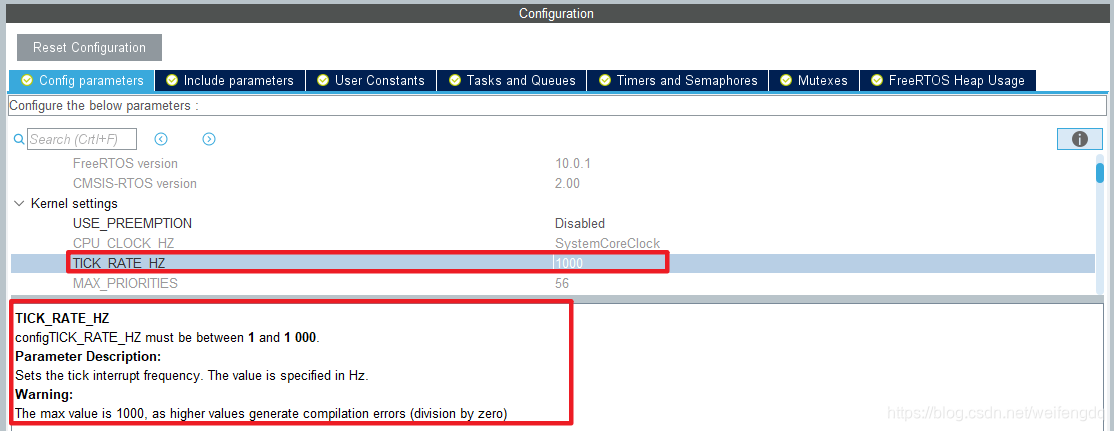
如果把这个值改为1, 那么osDelay(1000)的时间尺度将变得特别长且不准确, 实测达68s之久, 所以这个值还是不要改.
其实STM32的HAL库默认的时基也是1kHz, 如果改了, HAL_Delay(1000)也不再是1s了.
Kernel settings参数
上面两个参数着重介绍了下, 其余的可以了解的Kernel setting参数列表汇总一下:
| Kernel Parameters | Default Value | Description |
|---|---|---|
| USE_PREEMPTION | Enabled | Set to 1 to use the preemptive RTOS scheduler, or 0 to use the cooperative RTOS scheduler. (一般用抢占式调度) |
| TICK_RATE_HZ | 1000 | Sets the tick interrupt frequency. The value is specified in Hz. configTICK_RATE_HZ must be between 1 and 1 000. (默认的1000最好不改) |
| MINIMAL_STACK_SIZE | 128 Words | Sets the size of the stack allocated to the idle task. The value is specified in words (here, of 32 bits), not bytes. configMINIMAL_STACK_SIZE must be between 64 Words and 3.84 KWords. The value chosen by the user should take into account the number of threads, the total heap size and the system stack size. If the totality of used stack size is higher than the total heap size, FreeRTOS will not be able to create and manage the tasks. For information: max value = configTOTAL_HEAP_SIZE/4 (when allocation is dynamic), max value = MCU ram size/4 (when allocation is static)(特别注意, Project Manager中堆栈的配置, 必要时要放大) |
| MAX_TASK_NAME_LEN | 16 | Sets the maximum number of characters that can be used for the name of a task. The NULL terminator is included in the count of characters. configMAX_TASK_NAME_LEN must be between 12 and 255. |
| IDLE_SHOULD_YIELD | Enabled | IDLE_SHOULD_YIELD controls the behavior of the idle task if there are application tasks that also run at the idle priority. It only has an effect if the preemptive scheduler is being used. - if IDLE_SHOULD_YIELD is set to 0, then the idle task will never yield to another task, and will only leave the Running state when it is preempted. - if IDLE_SHOULD_YIELD is set to 1, then the idle task will never perform more than one iteration of its defined functionality without yielding to another task if there is another idle priority task that is in the Ready state. This ensures a minimum amount of time is spent in the idle task when application tasks are available to run. |
| USE_TASK_NOTIFICATIONS | Enabled | Each RTOS task has a 32-bit notification value. An RTOS task notification is an event sent directly to a task that can unblock the receiving task, and optionally update the receiving task’s notification value. RTOS task notification functionality is enabled by default, and can be excluded from a build (saving 8 bytes per task) by setting configUSE_TASK_NOTIFICATIONS to 0 in FreeRTOSConfig.h (achieved when setting USE_TASK_NOTIFICATIONS to Disabled). |
| RECORD_STACK_HIGH_ADDRESS | Diabled | When set to 1 (Enabled) the stack start address is saved into each task’s TCB (assuming stack grows down). |
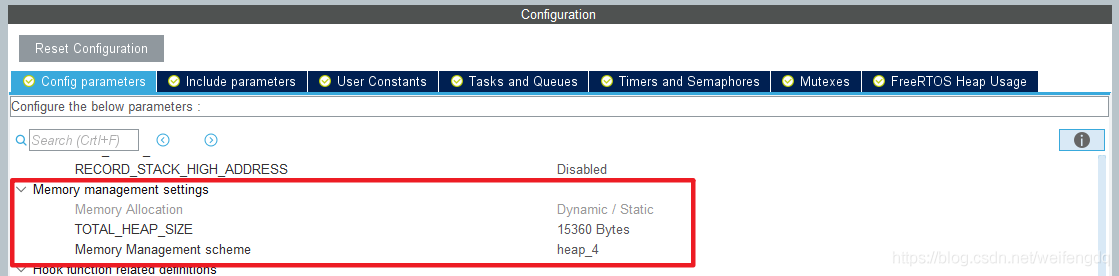
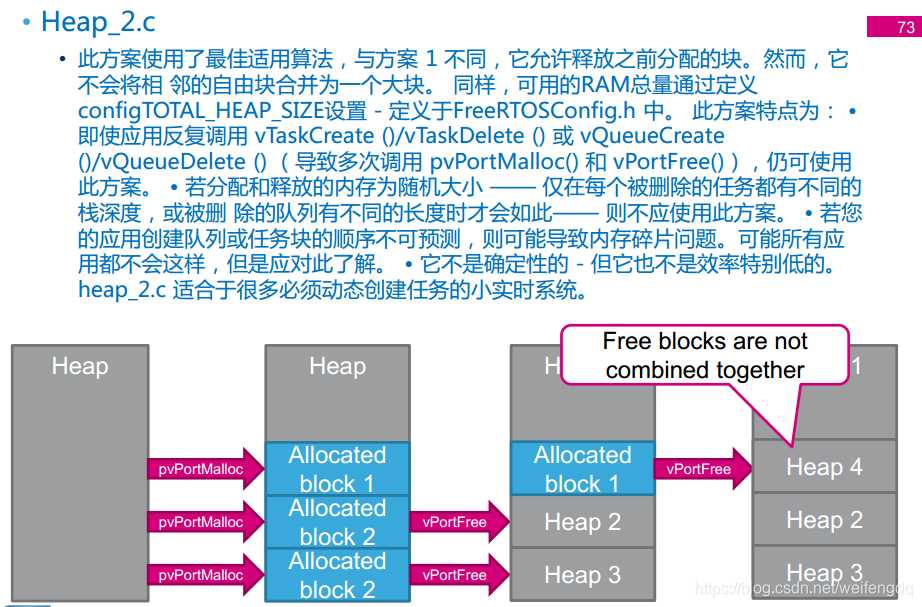
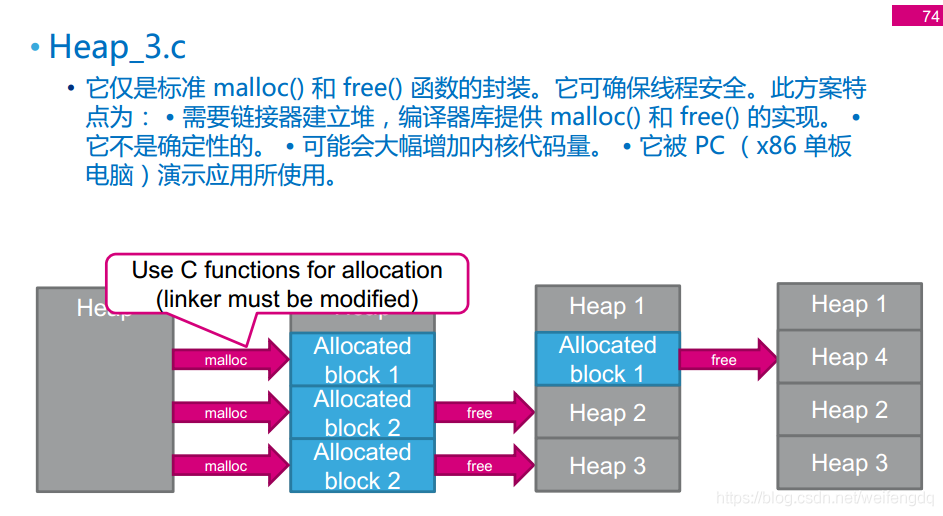
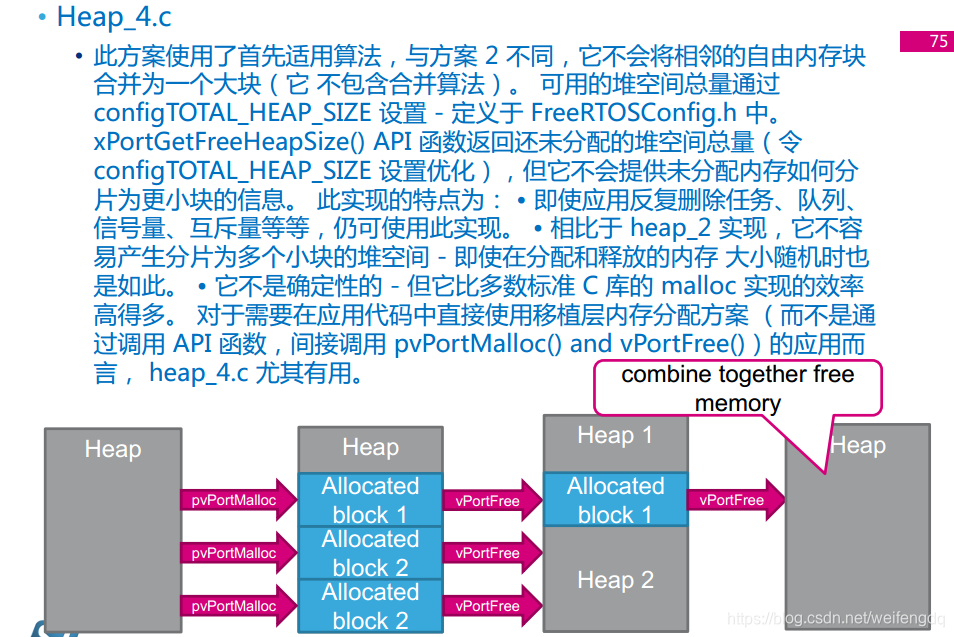
内存管理
FreeRTOS允许用户选择不同的内存管理方式(heap_1~heap_5), 默认为heap_4:
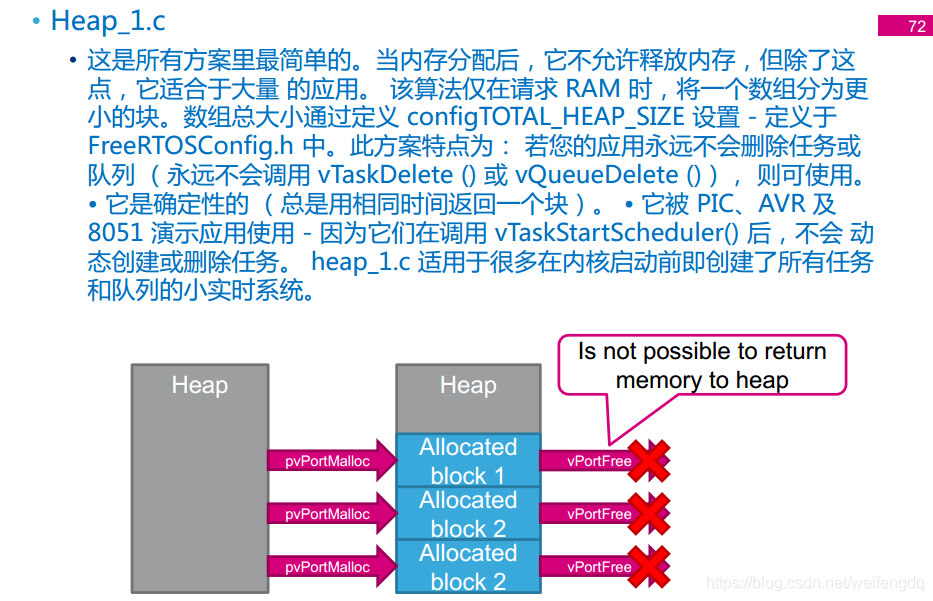
至于heap_5.c, 有兴趣去翻下源码.
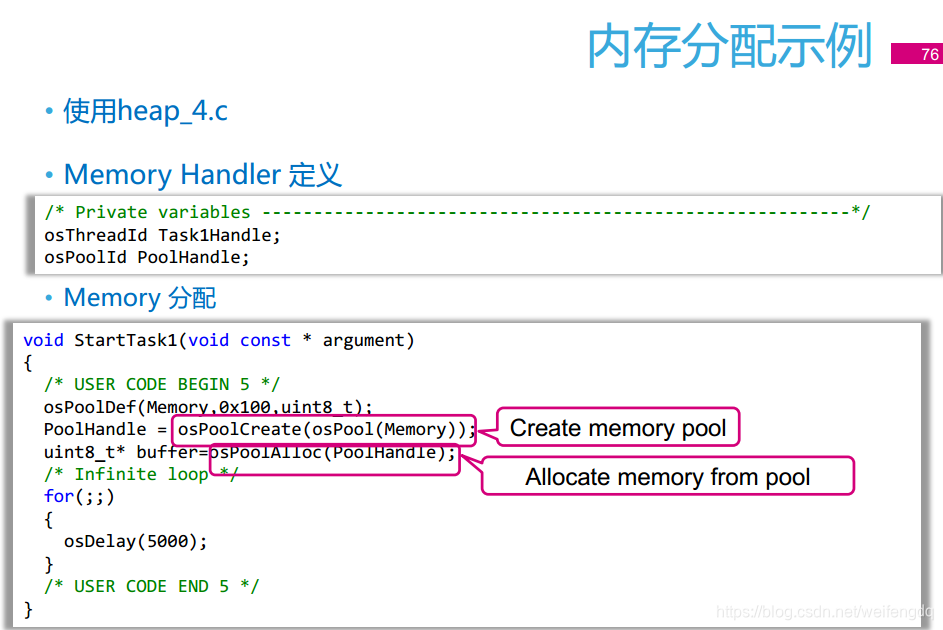
内存分配的示例:
空闲任务和空闲钩子
osKernelStart();函数原型为:
osStatus_t osKernelStart (void) {
  osStatus_t stat;

  if (IS_IRQ()) {
    stat = osErrorISR;
  }
  else {
    if (KernelState == osKernelReady) {
      KernelState = osKernelRunning;
      vTaskStartScheduler();
      stat = osOK;
    } else {
      stat = osError;
    }
  }

  return (stat);
}
调用了vTaskStartScheduler(), 里面自动创建了一个空闲任务portTASK_FUNCTION, 关于空闲任务:
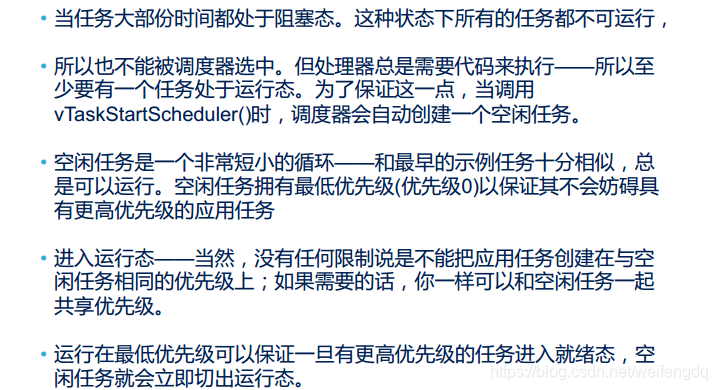
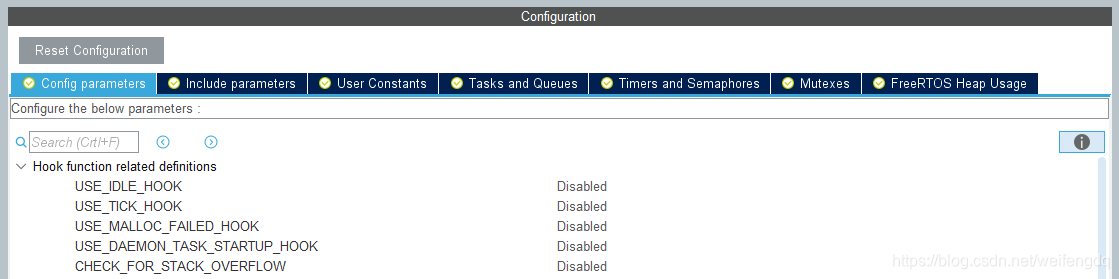
空闲任务的钩子函数:

默认配置如下图:
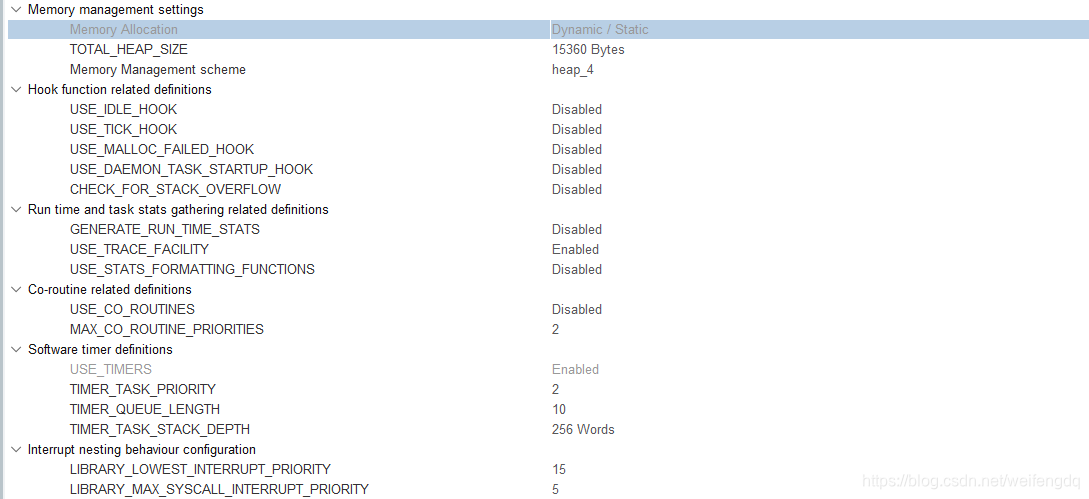
运行时等的参数
默认如下图:
线程(任务)管理
默认配置如下, 可参考注释食用:
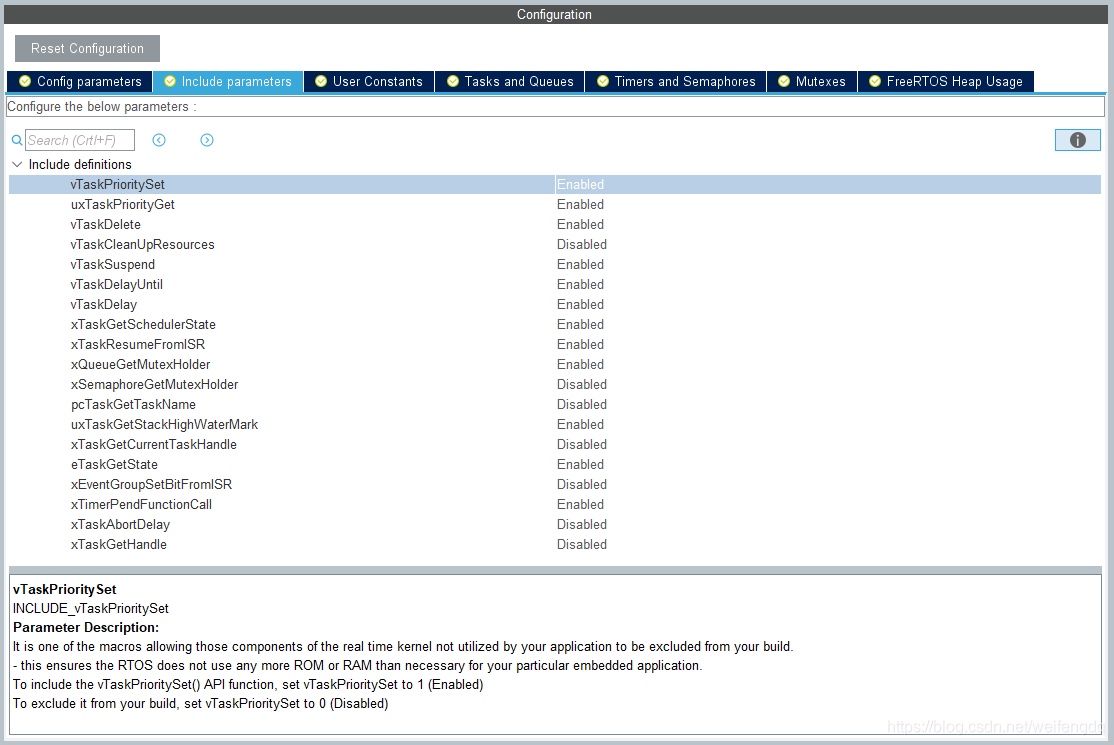
只有上面的Include definetions使能, 在cmsis_os2.h定义的线程管理函数(任务API)才能正常用:
//  ==== Thread Management Functions ====

/// Create a thread and add it to Active Threads.
/// \param[in]     func          thread function.
/// \param[in]     argument      pointer that is passed to the thread function as start argument.
/// \param[in]     attr          thread attributes; NULL: default values.
/// \return thread ID for reference by other functions or NULL in case of error.
osThreadId_t osThreadNew (osThreadFunc_t func, void *argument, const osThreadAttr_t *attr);

/// Get name of a thread.
/// \param[in]     thread_id     thread ID obtained by \ref osThreadNew or \ref osThreadGetId.
/// \return name as NULL terminated string.
const char *osThreadGetName (osThreadId_t thread_id);

/// Return the thread ID of the current running thread.
/// \return thread ID for reference by other functions or NULL in case of error.
osThreadId_t osThreadGetId (void);

/// Get current thread state of a thread.
/// \param[in]     thread_id     thread ID obtained by \ref osThreadNew or \ref osThreadGetId.
/// \return current thread state of the specified thread.
osThreadState_t osThreadGetState (osThreadId_t thread_id);

/// Get stack size of a thread.
/// \param[in]     thread_id     thread ID obtained by \ref osThreadNew or \ref osThreadGetId.
/// \return stack size in bytes.
uint32_t osThreadGetStackSize (osThreadId_t thread_id);

/// Get available stack space of a thread based on stack watermark recording during execution.
/// \param[in]     thread_id     thread ID obtained by \ref osThreadNew or \ref osThreadGetId.
/// \return remaining stack space in bytes.
uint32_t osThreadGetStackSpace (osThreadId_t thread_id);

/// Change priority of a thread.
/// \param[in]     thread_id     thread ID obtained by \ref osThreadNew or \ref osThreadGetId.
/// \param[in]     priority      new priority value for the thread function.
/// \return status code that indicates the execution status of the function.
osStatus_t osThreadSetPriority (osThreadId_t thread_id, osPriority_t priority);

/// Get current priority of a thread.
/// \param[in]     thread_id     thread ID obtained by \ref osThreadNew or \ref osThreadGetId.
/// \return current priority value of the specified thread.
osPriority_t osThreadGetPriority (osThreadId_t thread_id);

/// Pass control to next thread that is in state \b READY.
/// \return status code that indicates the execution status of the function.
osStatus_t osThreadYield (void);

/// Suspend execution of a thread.
/// \param[in]     thread_id     thread ID obtained by \ref osThreadNew or \ref osThreadGetId.
/// \return status code that indicates the execution status of the function.
osStatus_t osThreadSuspend (osThreadId_t thread_id);

/// Resume execution of a thread.
/// \param[in]     thread_id     thread ID obtained by \ref osThreadNew or \ref osThreadGetId.
/// \return status code that indicates the execution status of the function.
osStatus_t osThreadResume (osThreadId_t thread_id);

/// Detach a thread (thread storage can be reclaimed when thread terminates).
/// \param[in]     thread_id     thread ID obtained by \ref osThreadNew or \ref osThreadGetId.
/// \return status code that indicates the execution status of the function.
osStatus_t osThreadDetach (osThreadId_t thread_id);

/// Wait for specified thread to terminate.
/// \param[in]     thread_id     thread ID obtained by \ref osThreadNew or \ref osThreadGetId.
/// \return status code that indicates the execution status of the function.
osStatus_t osThreadJoin (osThreadId_t thread_id);

/// Terminate execution of current running thread.
__NO_RETURN void osThreadExit (void);

/// Terminate execution of a thread.
/// \param[in]     thread_id     thread ID obtained by \ref osThreadNew or \ref osThreadGetId.
/// \return status code that indicates the execution status of the function.
osStatus_t osThreadTerminate (osThreadId_t thread_id);

/// Get number of active threads.
/// \return number of active threads.
uint32_t osThreadGetCount (void);

/// Enumerate active threads.
/// \param[out]    thread_array  pointer to array for retrieving thread IDs.
/// \param[in]     array_items   maximum number of items in array for retrieving thread IDs.
/// \return number of enumerated threads.
uint32_t osThreadEnumerate (osThreadId_t *thread_array, uint32_t array_items);
比如上面点灯中, LED2作为系统初始化完成的指示灯, 点亮后就不再变化了, 可以把自己所在的任务给删除:
/* USER CODE END Header_Entry_LED2 */
void Entry_LED2(void *argument)
{
  /* USER CODE BEGIN Entry_LED2 */

  /* Infinite loop */
  for(;;)
  {
		HAL_GPIO_TogglePin(LED2_GPIO_Port, LED2_Pin);
		osThreadTerminate(Task_LED2Handle);
  }
  /* USER CODE END Entry_LED2 */
}
今天先介绍到这里, 后面大概会结合STM32CubeMX FREERTOS后面几个选项卡, 总结任务间通信(队列, 信号量, 互斥量), 软件定时器, 临界区等的知识或用法.
微信公众号
欢迎扫描二维码关注本人微信公众号, 及时获取或者发送给我最新消息: