FastDFS 分布式文件系统安装与集成
什么是分布式文件系统
分布式文件系统(Distributed File System) 是指文件系统管理的物理储存资源不一定直接连接本地节点上,而是通过计算机网络与节点相连。
分布式文件系统的出现缘由 计算机用文件系统来进行储存和管理数据,而在如今信息爆炸的时代,数据以指数倍的增长,只靠单纯的增加硬盘数量来扩展计算机的文件系统的储存容量无论是在容量大小,容量增长速度,数据备份,数据安全等方面都表现的差强人意!分布式文件系统 可以很好的解决文件系统的储存和管理的难题,它可以将固定某地点的某文件系统,扩展为任意地点的多个文件系统,众多节点组成一个文件系统网络。每个节点可以分布在任意地点,通过网络来进行通信和数据传输。而人们使用分布式系统时,无需关系数据从哪个节点上来的和存到了哪个节点,只需像操作本地文件系统一样进行储存和管理就行!
文件系统最初设计时,仅仅是为局域网内的本地数据服务的。而分布式文件系统将服务范围扩展到了整个网络。不仅改变了数据的存储和管理方式,也拥有了本地文件系统所无法具备的数据备份、数据安全等优点。判断一个分布式文件系统是否优秀,取决于以下三个因素:
数据的储存方式 通常有两种,一种是将数据存在一个节点上,其他多个节点进行均分备份。还有是将数据分开存在不同的节点上(FastDFS就是这种),无论哪种都是为了存储方便和数据的安全!
数据的读取速率 包括响应用户读取数据文件的请求、定位数据文件所在的节点、读取实际硬盘中数据文件的时间、不同节点间的数据传输时间以及一部分处理器的处理时间等。各种因素决定了分布式文件系统的用户体验。即分布式文件系统中数据的读取速率不能与本地文件系统中数据的读取速率相差太大,否则在本地文件系统中打开一个文件需要2秒,而在分布式文件系统中各种因素的影响下用时超过10秒,就会严重影响用户的使用体验。
数据的安全机制 由于数据分散在各个节点中,必须要采取冗余、备份、镜像等方式保证节点出现故障的情况下,能够进行数据的恢复,确保数据安全。
文件系统的分类
块存储:MongoDB数据库中的GridFS、Hadoop中的HDFS,这些系统在存储文件的的时候会尝试先将文件打碎存储(拆分成Data Block)。这样存储的优点可以存储超大型文件,更加高效的利用磁盘资源。但是需要额外存储文件碎片的元数据信息。
在块存储中HDFS存储的块128MB,但是在MongoDB中默认Chunk 255 KB,虽然都支持块存储但是应用场景有很大差异。HDFS使用于超大文本日志文件存储。但是MongoDB适合存储超大的流媒体文件例如操大的音频和视频,可以实现流媒体数据流的区间加载。
文件存储: GlusterFS、NFS、FastDFS等都是基于文件单位存储,这种存储并不会将文件系统打碎。而是文件存储到系统中的某一台服务器中。这样存储的优点可以应对一些小文件系统,系统维护简单,无需存储文件的元数据,系统设计和维护成本低。
FastDFS 介绍
FastDFS 是一款开源的轻量级分布式文件系统如下特点:
特点
纯粹C语言实现,支持Linux、FreeBSD等unix系统。
类似GoogleFS/HDFS,但是不是通用的文件系统,只能通过专有的API访问,目前提供了C、Java和PHPAPI
互联网量身定做,最求高性能,高扩展.
FastDFS不仅仅可以存储文件,还可以存储文件的元数据信息(可选)。
架构
整个Fast架构有Client、Tracker和Storage服务。其中,Client用于提交文件给FastDFS集群,Storage负责实际数据的储存,Tracker负责监控和调度Storage,起到负载均衡器的作用!
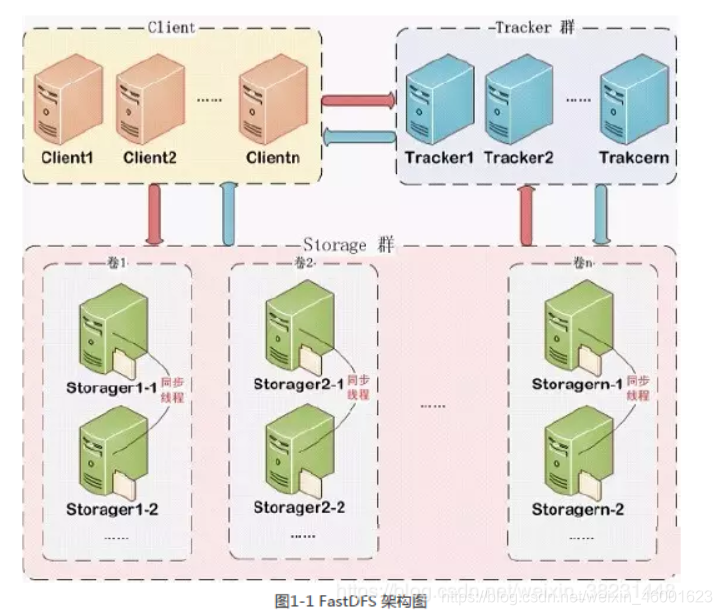
图1-1 里的卷中之间的代表互相之间可以备份,实现数据的冗余备份。不同卷储存着整个集群的部分文件,类似与普通文件系统分区的特点(比如C盘和D盘等),Tracker Server主要做工作调度,在访问上起到负载均衡的作用。在内存中记录group(卷)和Storage Server的状态信息,是连接Client和Storage Server 的枢纽。因为相关信息存储在内存中,所以Tracker Server性能非常高,一个较大的集群(上百个group/卷)中3台就够了。
StorageServer :存储服务器,文件和文件属性信息(meta数据)都存储在服务器的磁盘上。
FastDFS的集群搭建
一、对安装资源的下载
进入 https://github.com/happyfish100 网站下载FastDFS相关资源。
二、因为FastDFS是用C写的所以安装前需要先安装C的环境
yum install -y gcc-c++
三、将下载下来的https://github.com/happyfish100/libfastcommon/archive/V1.0.35.tar.gz资源上传到Linux ,并解压后编译
[root@CentOSX ~]# tar -zxf libfastcommon-1.0.35.tar.gz
[root@CentOSX ~]# cd libfastcommon-1.0.35
[root@CentOSX libfastcommon-1.0.35]# ./make.sh
[root@CentOSX libfastcommon-1.0.35]# ./make.sh install
四、将下载下来的https://github.com/happyfish100/fastdfs/archive/V5.11.tar.gz资源上传到Linux ,并解压后编译
[root@CentOSX ~]# yum install -y perl-devel
[root@CentOSX ~]# tar -zxf fastdfs-5.11.tar.gz
[root@CentOSX ~]# cd fastdfs-5.11
[root@CentOSX fastdfs-5.11]# ./make.sh
[root@CentOSX fastdfs-5.11]# ./make.sh install
提示:当软件安装结束后,默认FastDFS启动所需的配置文件放置在/etc/fdfs目录下。
五、配置服务 每个节点都要执行
.创建fdfs运行所需的数据目录
root@CentOSX ~]# mkdir -p /data/fdfs/{tracker,storage/store01,storage/store02}
[root@CentOSX ~]# tree /data/
/data/
└── fdfs
    ├── storage
    │   └── store01
    |   └── store02
    └── tracker
创建启动所需的配置文件
[root@CentOSX ~]# cp /etc/fdfs/tracker.conf.sample /etc/fdfs/tracker.conf
[root@CentOSX ~]# cp /etc/fdfs/storage.conf.sample /etc/fdfs/storage.conf
[root@CentOSX ~]# cp /etc/fdfs/client.conf.sample /etc/fdfs/client.conf
提醒: 因为配置文件大多大同小异,一个节点配置好了后可以使用scp 本地文件路径 远程主机名:远程文件路径的方式复制到另外节点,有同名会直接覆盖
配置Tracker Server
[root@CentOSX ~]# vi /etc/fdfs/tracker.conf
base_path=/data/fdfs/tracker
配置Storage Server
注意如果是双网卡可能会导致启动不起来最好保持网段与动态一致
[root@CentOSX ~]# vi /etc/fdfs/storage.conf 找到改成如下
base_path=/data/fdfs/storage
store_path_count=2
store_path0=/data/fdfs/storage/store01
store_path1=/data/fdfs/storage/store02        # 前面有注释符号记得删去
tracker_server=CentOSA:22122                 # 找到  tracker_server=XXX 删除将这三句复制过去就行记得节点主机名写对
tracker_server=CentOSB:22122
tracker_server=CentOSC:22122
修改Client端
[root@CentOSX ~]# vi /etc/fdfs/client.conf
base_path=/tmp
tracker_server=CentOSA:22122
tracker_server=CentOSB:22122
tracker_server=CentOSC:22122
六、启动服务器
[root@CentOSX ~]# /etc/init.d/fdfs_trackerd start
Starting FastDFS tracker server:
[root@CentOSX ~]# /etc/init.d/fdfs_storaged start
Starting FastDFS storage server:
[root@CentOSX ~]# ps -aux | grep fdfs
Warning: bad syntax, perhaps a bogus ‘-’? See /usr/share/doc/procps-3.2.8/FAQ
root 78950 0.0 0.1 144784 2040 ? Sl 21:06 0:00 /usr/bin/fdfs_trackerd /etc/fdfs/tracker.conf
root 79000 13.0 3.2 83520 67144 ? Sl 21:06 0:06 /usr/bin/fdfs_storaged /etc/fdfs/storage.conf
root 79324 0.0 0.0 103320 884 pts/0 S+ 21:07 0:00 grep fdfs
[root@CentOSX ~]#
FastDFS操作
上传
[root@CentOSX ~]# fdfs_upload_file /etc/fdfs/client.conf install.log
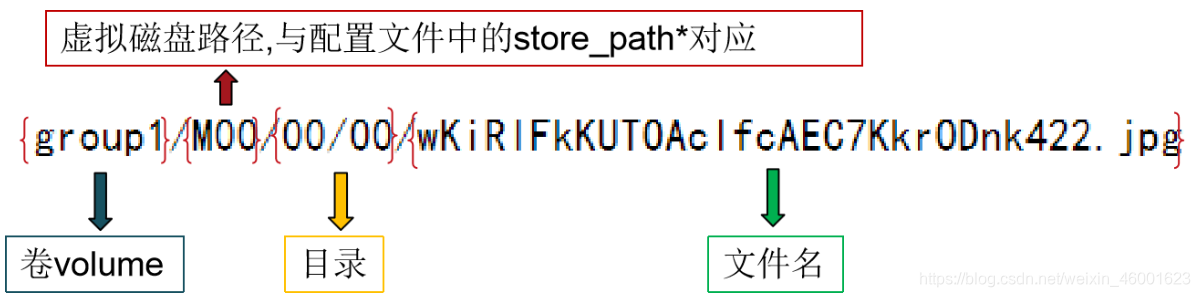
group1/M00/00/01/wKikgV0YtQ2AfmozAAAixZ60QfI792.log 返回的File_ID
提示:File_ID是由Storage Server生成并返回给Client端。File_ID包含了组/卷和文件路径。Storage Server可以直接根据该文件名定位到该文件。
下载 可在任意节点执行
[root@CentOSX ~]# fdfs_download_file /etc/fdfs/client.conf group1/M00/00/01/wKikgV0YtQ2AfmozAAAixZ60QfI792.log
提醒:你在哪个节点哪个文件里执行的这个脚本便会将其下载到那里
删除
[root@CentOSX ~]# fdfs_delete_file /etc/fdfs/client.conf group1/M00/00/01/wKikgV0YtQ2AfmozAAAixZ60QfI792.log
等等等~~ 可使用脚本 fdfs_ (Tab键来看都有什么)
Nginx集成FastDFS
配置安装
这些步骤在每个Nginx节点上都要执行,
一、下载fastdfs-nginx-module(不建议使用github上,因为编译可能会有问题)
[root@CentOSX ~]# tar -zxf fastdfs-nginx-module.tar.gz
[root@CentOSX ~]# yum install -y pcre-devel
[root@CentOSX ~]# yum install -y openssl-devel
[root@CentOSX ~]# wget http://nginx.org/download/nginx-1.11.1.tar.gz
[root@CentOSX ~]# tar -zxf nginx-1.11.1.tar.gz
[root@CentOSX nginx-1.11.1]# ./configure --prefix=/usr/local/nginx-1.11.1/ --add-module=/root/fastdfs-nginx-module/src
[root@CentOSX nginx-1.11.1]# make
[root@CentOSX nginx-1.11.1]# make install
二、拷贝配置
[root@CentOSX ~]# cp fastdfs-nginx-module/src/mod_fastdfs.conf /etc/fdfs/
[root@CentOSX ~]# cd fastdfs-5.11/conf/
[root@CentOSX conf]# cp http.conf mime.types anti-steal.jpg /etc/fdfs/
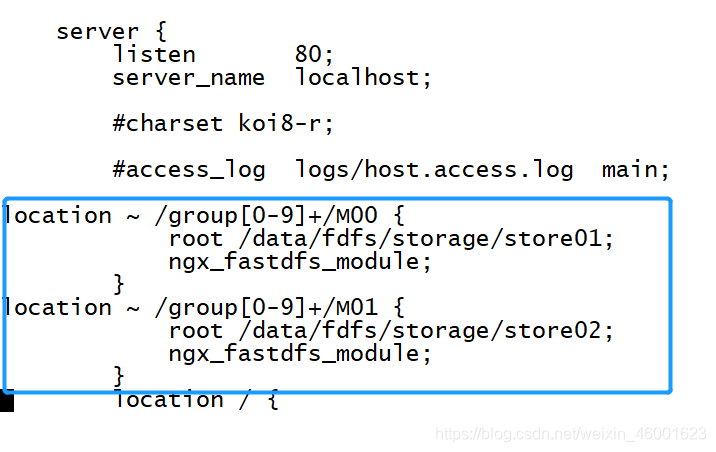
三、配置nginx.conf
vi /usr/local/nginx-1.11.1/conf/nginx.conf
location ~ /group[0-9]+/M00 {
            root /data/fdfs/storage/store01;
            ngx_fastdfs_module;
        }
location ~ /group[0-9]+/M01 {
            root /data/fdfs/storage/store02;
            ngx_fastdfs_module;
        }
将上面这段粘到如下图位置
四、修改mod_fastdfs.conf
[root@CentOSX ~]# vi /etc/fdfs/mod_fastdfs.conf
tracker_server=CentOSA:22122
tracker_server=CentOSB:22122
tracker_server=CentOSC:22122

url_have_group_name = true
group_name=group[1,2,3]
store_path_count=2

store_path0=/data/fdfs/storage/store01
store_path1=/data/fdfs/storage/store02
五、启动nginx
[root@CentOSX ~]# cd /usr/local/nginx-1.11.1/
[root@CentOSX nginx-1.11.1]# ./sbin/nginx -t        //这是检测配置是否正确
ngx_http_fastdfs_set pid=116305
ngx_http_fastdfs_set pid=116305
nginx: the configuration file /usr/local/nginx-1.11.1//conf/nginx.conf syntax is ok
nginx: configuration file /usr/local/nginx-1.11.1//conf/nginx.conf test is successful
[root@CentOSX nginx-1.11.1]# ./sbin/nginx            //正式启动
六、测试下载
先上传了一个图片文件
[root@CentOSA ~]# fdfs_upload_file /etc/fdfs/client.conf install.log
group2/M01/00/00/wKikgl0p_4-AIqGJAAAixZ60QfI693.log
随便访问⼀个nginx服务查看效果
http://CentOS[A|B|C]/group2/M01/00/00/wKikgl0p_4-AIqGJAAAixZ60QfI693.log?
filename=install.log
提示:⽤户在请求的时候,可以选择性添加⽂件名(filename=install.log),⽤于修改下载的⽂件名
FastDHT去重
FastDFS除了提供了与nginx的集成,已提供了去重的⽂件解决⽅案。该解决⽅案FastDFS的作者余庆也在github上以FastDHT分⽀贡献出来了。

安装
一、安装BerkeleyDB 将下载的db-4.7.25.tar.gz 上传到Linux 并解压
[root@CentOSX ~]# tar -zxf db-4.7.25.tar.gz
[root@CentOSX ~]# cd db-4.7.25
[root@CentOSX db-4.7.25]# cd build_unix/
[root@CentOSX build_unix]# ./../dist/configure
[root@CentOSX build_unix]# make
[root@CentOSX build_unix]# make install
二、安装FastDHT 将下载的FastDHT_v2.01.tar.gz 上传到Linux 并解压*
[root@CentOSX ~]# tar zxf FastDHT_v2.01.tar.gz
[root@CentOSX ~]# cd FastDHT
[root@CentOSX FastDHT]# ./make.sh
[root@CentOSX FastDHT]# ./make.sh install
提醒:安装结束后会在/etc⽬录下产⽣fdht⽂件夹
[root@CentOSX FastDHT]# tree /etc/fdht/
/etc/fdht/
!"" fdht_client.conf
!"" fdhtd.conf
#"" fdht_servers.conf
三、修改fdhtd.conf
[root@CentOSX ~]# mkdir /data/fastdht
[root@CentOSX ~]# vi /etc/fdht/fdhtd.conf
base_path=/data/fastdht
四、修改fdht_servers.conf
[root@CentOSX ~]# vi /etc/fdht/fdht_servers.conf
group_count = 3
group0 = CentOSA:11411
group1 = CentOSB:11411
group2 = CentOSC:11411
五、修改fdht_client.conf配置⽂件
[root@CentOSX ~]# vi /etc/fdht/fdht_client.conf
base_path=/tmp/
六、启动FDHT服务
[root@CentOSX ~]# fdhtd /etc/fdht/fdhtd.conf start|stop|restart
[root@CentOSX ~]# ps -axu| grep fd
Warning: bad syntax, perhaps a bogus '-'? See /usr/share/doc/procps-3.2.8/FAQ
root 29127 0.0 0.8 195200 17504 ? Sl 00:38 0:00 fdhtd
/etc/fdht/fdhtd.conf start
root 29193 0.0 0.0 103320 884 pts/0 S+ 00:39 0:00 grep fd
root 128672 0.2 0.1 275856 2204 ? Sl 00:14 0:03
/usr/bin/fdfs_trackerd /etc/fdfs/tracker.conf
root 128710 1.8 3.2 85584 67188 ? Sl 00:14 0:27
/usr/bin/fdfs_storaged /etc/fdfs/storage.conf
操作FastDHT服务
设置值
[root@CentOSX ~]# fdht_set /etc/fdht/fdht_client.conf jiangzz:user001
name='jiangzz',age=18;
This is FastDHT client test program v2.01
Copyright (C) 2008, Happy Fish / YuQing
FastDHT may be copied only under the terms of the GNU General
Public License V3, which may be found in the FastDHT source kit.
Please visit the FastDHT Home Page http://www.csource.org/
for more detail.
success set key count: 2, fail count: 0
读取值
[root@CentOSX ~]# fdht_get /etc/fdht/fdht_client.conf jiangzz:user001 name,age
This is FastDHT client test program v2.01
Copyright (C) 2008, Happy Fish / YuQing
FastDHT may be copied only under the terms of the GNU General
Public License V3, which may be found in the FastDHT source kit.
Please visit the FastDHT Home Page http://www.csource.org/
for more detail.
name=jiangzz
age=18
success get key count: 2, fail count: 0
删除值
[root@CentOSX ~]# fdht_delete /etc/fdht/fdht_client.conf jiangzz:user001 name;
This is FastDHT client test program v2.01
Copyright (C) 2008, Happy Fish / YuQing
FastDHT may be copied only under the terms of the GNU General
Public License V3, which may be found in the FastDHT source kit.
Please visit the FastDHT Home Page http://www.csource.org/
for more detail.
success delete keys: name
success delete key count: 1, fail count: 0
集成FastDHT
一、.修改etc/fdfs/storage.conf配置⽂件
[root@CentOSX ~]# vi /etc/fdfs/storage.conf
check_file_duplicate=1
keep_alive=1
#include /etc/fdht/fdht_servers.conf   原文有两个# ,前一个是注解删除掉,后面的#表示导包
二、分别启动fdhtd服务、fastfs
[root@CentOSX usr]# /usr/local/bin/fdhtd /etc/fdht/fdhtd.conf restart
[root@CentOSX usr]# /etc/init.d/fdfs_trackerd restart
[root@CentOSX usr]# /etc/init.d/fdfs_storaged restart
上传⽂件测试
[root@CentOSA ~]# fdfs_upload_file /etc/fdfs/client.conf install.log
group2/M00/00/00/wKikgl0qC4KAErBTAAAixXWAIyY133.log
[root@CentOSA ~]# fdfs_upload_file /etc/fdfs/client.conf install.log
group2/M00/00/00/wKikgl0qDAqAa0XwAAAixWB5m1c851.log
[root@CentOSB ~]# ls -l /data/fdfs/storage/store01/data/00/00/
total 20
lrwxrwxrwx. 1 root root 72 Jul 14 00:49 wKikgl0qC4KAErBTAAAixXWAIyY133.log ->
/data/fdfs/storage/store01/data/00/00/wKikgl0qC4KARrYBAAAixZ60QfI755.log
-rw-r--r--. 1 root root 8901 Jul 14 00:49 wKikgl0qC4KARrYBAAAixZ60QfI755.log
lrwxrwxrwx. 1 root root 72 Jul 14 00:51 wKikgl0qDAqAa0XwAAAixWB5m1c851.log ->
/data/fdfs/storage/store01/data/00/00/wKikgl0qC4KARrYBAAAixZ60QfI755.log
可以看出系统产⽣了wKikgl0qC4KAErBTAAAixXWAIyY133.log的两个链接
提示:去重是扫描文件内容获取MD5值,上传的文件内容相同产生的File_ID,是一个软连接(有点类似于桌面上的快捷方式,通过它可以找到文件的真正位置),删除软连接只要文件还有一个软连接连着文件就不会被删除,如果没有,那么文件便会被清楚掉!
SpringBoot集成FastDFS
首先还是依赖
<dependency>
 <groupId>com.github.tobato</groupId>
 <artifactId>fastdfs-client</artifactId>
 <version>1.26.6</version>
</dependency>
然后是配置文件 application.properties
fdfs.tracker-list=CentOSA:22122,CentOSB:22122,CentOSC:22122
# 配置默认缩略图
fdfs.thumb-image.height=80
fdfs.thumb-image.width=80
文件上传
注意别忘了
@Autowired
private FastFileStorageClient fastFileStorageClient;
public User registerUser(User user,
                             @RequestParam(value = "multipartFile",required = false) MultipartFile multipartFile) throws IOException{
     //上传照片
        //获取文件原始名带后缀
        String originalFilename = multipartFile.getOriginalFilename();
        //获取后缀名
        String substring = originalFilename.substring(originalFilename.lastIndexOf("."));
        /**
         * SpringBoot 集成 FastDFS
         *
         * */
        try {
        InputStream inputStream = multipartFile.getInputStream();//获取文件的输入流
            //                                          文件的输入流   流中上传文件的大小        后缀名    元数据(有就往HashSet存值,空的HashSet)
        FastImageFile fastImageFile = new FastImageFile(inputStream, inputStream.available(), substring, new HashSet<MetaData>());
        StorePath storePath = fastFileStorageClient.uploadFile(fastImageFile);
       //storePath.getFullPath() 会返回File_ID  将他存到数据库里
        user.setPhoto(storePath.getFullPath());
        service.saveUser(user);
           //注册成功返回登陆页登录
           return user;
       }catch (Exception e){
           //注册失败从新注册
           return user;
       }
附图片上传,可以有缩略图
FileInputStream inputStream = new FileInputStream("G:/素材资料/61850.png");
FastImageFile fastImageFile=new
FastImageFile(inputStream,inputStream.available(),"png",new HashSet<MetaData>(),new
ThumbImage(150,150));
StorePath storePath = fastFileStorageClient.uploadImage(fastImageFile);
System.out.println(storePath.getFullPath());
缩略图网页查看是 主机名/在正常图片的File_ID .后缀名前加
_150x150
注意缩略图是没有去重的!
删除文件
fastFileStorageClient.deleteFile(“group3”,“M00/00/00/wKjvgl0prl6AX6ygAL26hh1kYdE312_80
x80.png”);
⽂件下载(⽤不到因为有Nginx可以直接网页访问下载)
但也补充在这里
ByteArrayOutputStream baos = fastFileStorageClient.downloadFile("group3",
"M00/00/00/wKjvgl0prTSAMjeTAL26hhzQmiQ959.png", new
DownloadCallback<ByteArrayOutputStream>() {
 @Override
 public ByteArrayOutputStream recv(InputStream ins) throws IOException {
 ByteArrayOutputStream baos = new ByteArrayOutputStream();
 IOUtils.copy(ins, baos);
 return baos;
 }
 });
IOUtils.copy(new ByteArrayInputStream(baos.toByteArray()),new FileOutputStream("G:/素材
资料/baby.png"));
