要在小程序中实现图片放大缩小是着实不容易呀,还要把用户选择的指定区域生成图片,简直令人发指。
不多说,上烧鸡(代码)
首先还是先来看看要实现的效果
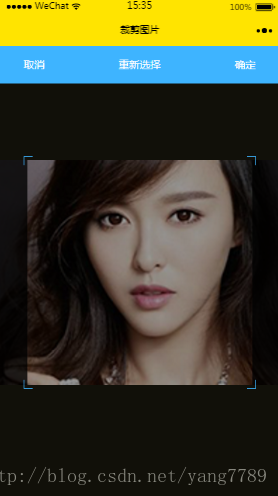
用户可以在指定的区域中滑动,放大,缩小自己的图片,点击确定之后,把方框中的区域生成图片。这个和上传头像功能差不多。
首页我们要做的就是怎么才能让照片完美的显示在页面。图片一般分为横版和竖版图片,这两种情况要分开显示。
wx.chooseImage({
      count: 1,
      sizeType: ['original'],
success: function (res) { wx.getImageInfo({ src: res.tempFilePaths[0], success: function (res) { //console.log(res.width); //console.log(res.height); var str = res.width / res.height; if(str > 1){//横版图片 }else{//竖版图片 } } }) } })- 1
- 2
- 3
- 4
- 5
- 6
- 7
- 8
- 9
- 10
- 11
- 12
- 13
- 14
- 15
- 16
- 17
- 18
- 19
调用wx.getImageInfo方法,拿到用户选择的图片的宽高,用宽除以高就可以判断图片的类型了。
接下来就是处理图片的宽高了,假设方框的大小是400*400,那么:
wx.chooseImage({
      count: 1,
      sizeType: ['original'],
success: function (res) { wx.getImageInfo({ src: res.tempFilePaths[0], success: function (res) { //console.log(res.width); //console.log(res.height); var str = res.width / res.height;//图片的宽高比 if(str > 1){//横版图片 _this.data.height = 400;//图片的显示高度为400 _this.data.width = str * _this.data.height; //图片的宽度 = 宽高比 * 图片的显示高度 }else{//竖版图片 _this.data.width = 400;//图片的显示宽度为400 _this.data.height = str * _this.data.width; //图片的高度 = 宽高比 * 图片的显示宽度 } } }) } })- 1
- 2
- 3
- 4
- 5
- 6
- 7
- 8
- 9
- 10
- 11
- 12
- 13
- 14
- 15
- 16
- 17
- 18
- 19
- 20
- 21
- 22
这样,当是横版图片的时候,用户能左右滑动自己的图片,上下不让他滑动,竖版同理。
关于怎么让图片和方框居中显示,我是用的padding填充,不是啥难事,这个就自己去摸索吧。
完成了图片的显示之后,接下来就是进入正题了,首先我们先完成图片的放大缩小功能。
在小程序中提供了touchstart,touchmove,touchend这三个方法,分别是手指触摸动作开始,手指触摸后移动,手指触摸动作结束,我们要用到这三个方法来完成图片的放大缩小功能。
wxml:
<scroll-view scroll-y="true" scroll-x="true" class = "FilePath" bindtouchmove="scroll" bindtouchstart='scroll' bindtouchend='endTou'> <image src='{{src}}' style="width: {{width}}px;height: {{height}}px;" bindtouchmove="touch"></image> </scroll-view>- 1
- 2
- 3
监听手指触摸的方法:
olddistance,//上一次两个手指的距离
newdistance:"",//本次两手指之间的距离,两个一减咱们就知道了滑动了多少,以及放大还是缩小(正负嘛)
diffdistance:'', //这个是新的比例,新的比例一定是建立在旧的比例上面的,给人一种连续的假象 Scale: 1,//图片放大的比例, baseHeight:'', //原始高 baseWidth:'', //原始宽 //手指在屏幕上移动 scroll: function (e) { var _this = this; //当e.touches.length等于1的时候,表示是单指触摸,我们要的是双指 if (e.touches.length == 2) {//两个手指滑动的时候 var xMove = e.touches[1].clientX - e.touches[0].clientX;//手指在x轴移动距离 var yMove = e.touches[1].clientY - e.touches[0].clientY;//手指在y轴移动距离 var distance = Math.sqrt(xMove * xMove + yMove * yMove);//根据勾股定理算出两手指之间的距离 if (_this.data.olddistance == 0) { _this.data.olddistance = distance; //要是第一次就给他弄上值,什么都不操作 // console.log("第一次"); }else { _this.data.newdistance = distance; //第二次就可以计算它们的差值了 _this.data.diffdistance = _this.data.newdistance - _this.data.olddistance;//两次差值 _this.data.olddistance = _this.data.newdistance; //计算之后更新比例 _this.data.Scale = _this.data.oldscaleA + 0.005 * _this.data.diffdistance;//这条公式是我查阅资料后找到的,按照这条公式计算出来的比例来处理图片,能给用户比较好的体验 if (_this.data.Scale > 2.5){//放大的最大倍数 return; } else if (_this.data.Scale < 1) {//缩小不能小于当前 return; } //刷新.wxml ,每次相乘,都是乘以图片的显示宽高 _this.setData({ height: _this.data.baseHeight * _this.data.Scale, width: _this.data.baseWidth * _this.data.Scale }) _this.data.oldscaleA = _this.data.Scale;//更新比例 } } }, //手指离开屏幕 endTou: function (e) { this.data.olddistance = 0;//重置 this.getRect(); }- 1
- 2
- 3
- 4
- 5
- 6
- 7
- 8
- 9
- 10
- 11
- 12
- 13
- 14
- 15
- 16
- 17
- 18
- 19
- 20
- 21
- 22
- 23
- 24
- 25
- 26
- 27
- 28
- 29
- 30
- 31
- 32
- 33
- 34
- 35
- 36
- 37
- 38
- 39
- 40
- 41
- 42
- 43
- 44
getRect()是我用来获取节点信息的方法,用于得到wx.canvasToTempFilePath方法的坐标点。(不懂得朋友可以点进去看看)
getRect: function () {
var _this = this; wx.createSelectorQuery().select('.FilePath').boundingClientRect(function (rect) { _this.data.x = Math.abs(rect.left);//x坐标 _this.data.y = Math.abs(rect.top);//y坐标 }).exec() }- 1
- 2
- 3
- 4
- 5
- 6
- 7
wx.createSelectorQuery()可以获取到节点的信息。
估计看到这里有人就蒙了,其实rect.left和rect.top分别是节点的左边界坐标和节点的上边界坐标,这个坐标可以视为偏移量,就是说’.FilePath’这个节点也就是我放图片的标签往左边和上边偏移了多少,再取他们的绝对值,就得到了我们需要的坐标点了。
接下来就是最后一步了,我们要来截取图片,
wxml:
<canvas canvas-id="myCanvas_A" style="width: {{width}}px;height: {{height}}px;"/>- 1
js:
generate: function () {
var _this = this; const ctx_A = wx.createCanvasContext('myCanvas_A'); var baseWidth = _this.data.baseWidth * _this.data.Scale;//图片放大之后的宽 var baseHeight = _this.data.baseHeight * _this.data.Scale;//图片放大之后的高 ctx_A.drawImage(_this.data.src, 0, 0, baseWidth, baseHeight);//我们要在canvas中画一张和放大之后的图片宽高一样的图片 ctx_A.draw(); wx.showToast({ title: '截取中...', icon: 'loading', duration: 10000 });// setTimeout(function(){//给延时是因为canvas画图需要时间 wx.canvasToTempFilePath({//调用方法,开始截取 x: _this.data.x, y: _this.data.y, width: 400, height: 400, destWidth: 400, destHeight: 400, canvasId: 'myCanvas_A', success: function (res) { console.log(res.tempFilePath); } }) }, 2000) },- 1
- 2
- 3
- 4
- 5
- 6
- 7
- 8
- 9
- 10
- 11
- 12
- 13
- 14
- 15
- 16
- 17
- 18
- 19
- 20
- 21
- 22
- 23
- 24
- 25
- 26
- 27
- 28
终于,世界都安静了,完成!!!!!!!!!!
我该开始接到这个任务的时候,我的内心其实是挺崩溃的,后来静下心来,一个功能一个功能的慢慢来,最终,还是弄出来了,挺开心的。
弄出来之后,发现其实也不难,只要处理好了图片的缩放,其他的都不是啥难事,就是调试的时候特别坑爹,只能在手机上调试,在控制台打了很多输出,慢慢看着来弄的。
总结:
图片的缩放就是监听用户双指滑动的距离,在通过公式得到比例,然后拿这个比例和图片的基本宽高相乘就可以了。截取图片这个就很简单了,就是wx.canvasToTempFilePath的开始坐标这个我是废了一番脑子才想到方法取得的。世上无难事,只怕有心人啊。
再废话一句,这个页面的功能的实现,可页面的样式也是有关的哟。照片的宽高,照片父节点的宽高。。。
from https://blog.csdn.net/yang7789/article/details/78933734